Jenkins is a continuous integration server that is in charge of automating our pipeline. Before integrating with our Git repository to build our application automatically, let's review the key concepts behind the CI server:
- Pipeline: A pipeline consist of a set of sequential steps that will occur in the order in which they are arranged. The pipeline is also where we can parallelize tasks.
- Job: This is a small unit of work, such as run test or pull our code.
- Queue: This represents all queuing jobs that the CI server will run when there is the capacity to do so.
- Plugin: These are the features that we can add to our CI server. For example, we can use one plugin to connect to our Git repository.
- Master/slave: The master is the host that can delegate work to a slave client machine to scale our CI.
Jenkins has different methods of distribution. We can see more details about this project at https://jenkins.io/download/. For our example, we are going to use a Docker image that is ready to use.
As we already have Docker installed, we can pull the Jenkins image in the command line by running the following:
$ docker pull jenkins/jenkins
Now we can see our image by running the following:
$ docker images
Now we are going to run our Jenkins master from our container by running the following in the command line:
$ docker run -p 8080:8080 -p 50000:50000 -v jenkins_home:/var/jenkins_home jenkins/jenkins:lts
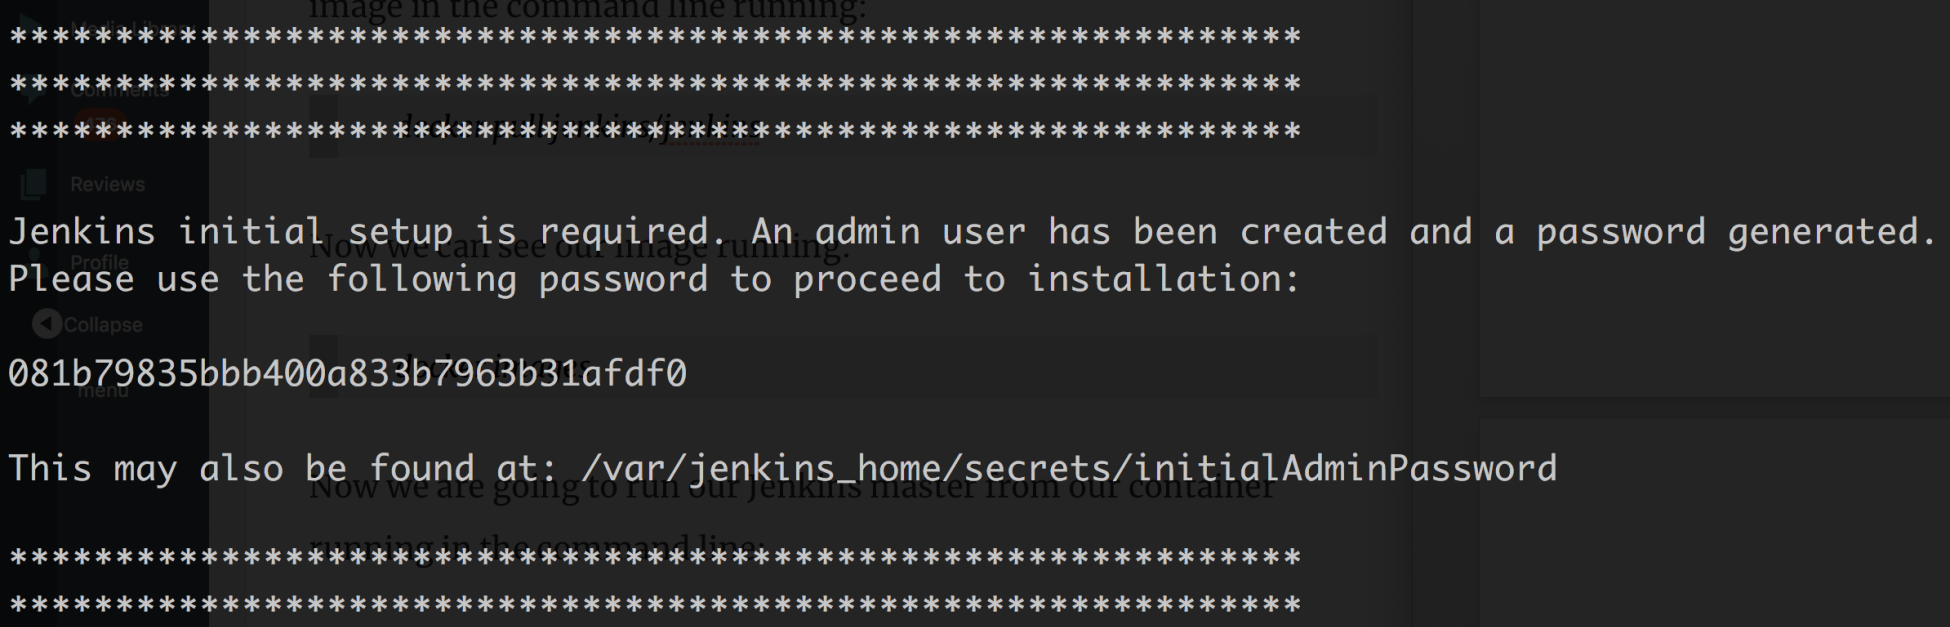
Pay attention to the output of the console with the generated administrator password, as shown in the following screenshot:
We can now see our Jenkins server is running using http://localhost:8080/.
The first step is to paste the administrator password that we have just seen on the console, as shown in the following screenshot:

We are now going to install the suggested plugins, which is going to take a while. Then we will continue the process by creating an admin user and URL.
We are going to enable build triggering, so we are going to configure our Jenkins instance for receiving push notifications from GitHub. To do this, go through the following steps:
- Go to the Jenkins home page (http://localhost:8080) and then click on the New item icon in the left menu.
- Enter the name of the project and select Freestyle project. After doing this, click on the OK button, as shown in the following screenshot:

- Jenkins will show a page where the job steps should be configured. First, enter a description for the project and GitHub URL repository created as shown in the following screenshot:

4. Enter the credentials of your user account for GitHub, as is shown in the following screenshot:

5. Finally, at the end of the page select Gradle as the build tool for the project:

The job created can be configured to be triggered every time we commit code to GitHub. The job will download the code, run tests, and generate the deployable artifact (JAR file) using Gradle. You can add additional steps in this job to build, tag, and push Docker images in Docker Hub and later deploy it automatically on an on-premise or cloud-based server.