CHAPTER 12
Making and Sharing Digital At-Home Manufacturing
Now we will look at the three big power tools of digital at-home manufacturing: the 3D printer, the laser cutter, and the CNC mill. With each of these devices, if you can make one or get access to one, you suddenly have the ability to make millions of products for yourself. The designs for these products can come from databases of millions of open-source ideas. Perhaps more excitingly, the designs can be ones that you have dreamed up and would like to realize in real life. For each of these technologies, there are accessible starting points in the open-source ecosystem, yet they also have evolved enough that you can fabricate very sophisticated tools that can match product fabrication in industry. In the end, each of these tools is really a different type of end effector mounted on a 2D or 3D platform computer-controlled robot. The end effectors do either additive manufacturing (where you add material as you fabricate something) or subtractive manufacturing (where you take material away from a solid block). Once you understand one, you can jump back and forth between additive and subtractive manufacturing to make just about anything!
RepRap 3D Printer
3D printing and additive manufacturing (AM) are actually old technologies. You would never know that, though, because they only gained popular attention when the open sourcing of the technology dropped the costs so that they became accessible to everyone. The recent development of open-source 3D printers makes the scaling of mass-distributed AM of high-value objects technically feasible for everyone from open-source plans (Gershenfeld, 2005; Bradshaw et al., 2010; Pearce et al., 2010; Weinberg, 2010; Cano, 2011). These RepRaps (self-REPlicating RAPid prototypers [www.reprap.org]) were developed in 2005 by Dr. Adrian Bowyer, a professor of mechanical engineering at the University of Bath. Bowyer has a particularly clear view of the implications of what a general-purpose self-replicating manufacturing machine means for humanity and how the project was able to literally evolve under the open-source paradigm (Bowyer, 2004; Sells et al., 2007; Arnot, 2008; Jones et al., 2011; Hodgson, 2013). This is why the major early variants of the RepRap are all named after biologists: Darwin, Mendel, Huxley, and Wallace. The RepRap evolutionary family tree has gotten completely out of control, with hundreds of variants of RepRap 3D printers evolving all over the world (for some examples, see Figure 12.1).
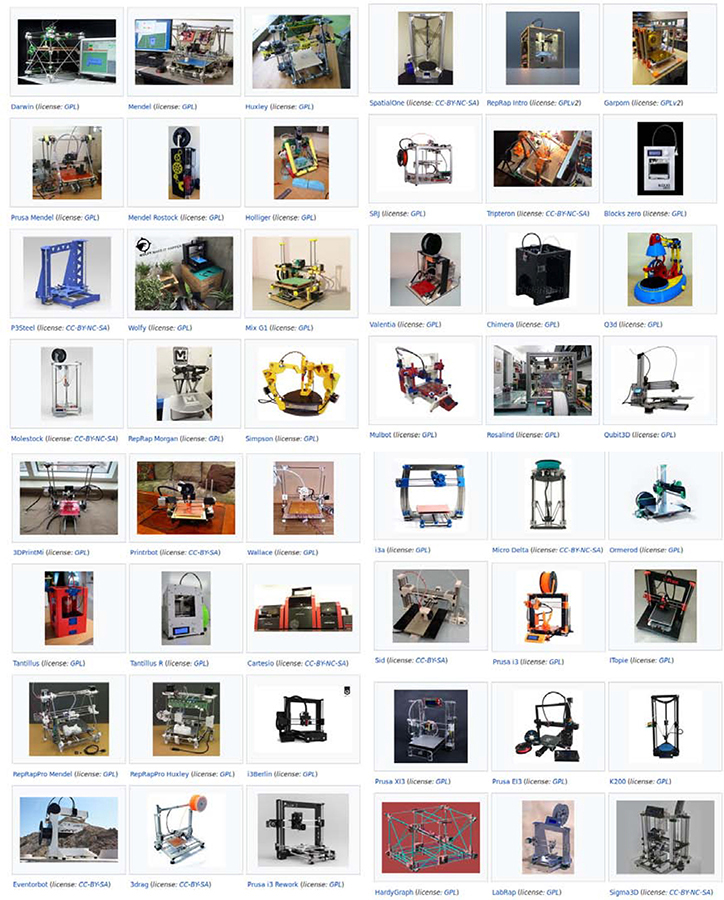
Figure 12.1 Screen capture of a tiny fraction of the major evolutionary paths for the RepRap 3D printer. (GNU FDL-1.3) https://reprap.org/wiki/RepRap_Machines
The RepRap project has created 3D-printing machines that can manufacture approximately half of their own parts from sequential fused deposition of a range of polymers and common hardware. Some versions can do even more of their own parts. They can also make millions of products for you—all developed and licensed for free by others. Likewise, they can bring ideas to life that you have just thought of and that you can share with the global community. The RepRap is made up of a combination of printed mechanical components, stepper motors for 3D motion and extrusion, and a hot end for melting and depositing sequential layers of polymers, all of which are controlled by an open-source microcontroller such as the Arduino (discussed in Chapter 11). The extruder takes in a filament of the working, normally thermoplastic material, melts it using electric heating, and extrudes it through a nozzle. The printer uses a three-coordinate system, where each axis involves a stepper motor that makes the axis move until it reaches a limit switch for homing. The printing process is a sequential layer deposition where the extruder nozzle deposits a 2D layer of the working material, then the Z (vertical) axis will raise, and the extruder will deposit another layer on top of the first, building a 3D object in 2D layers, one at a time.
Because the open-source ethic is so deeply rooted in the 3D-printing community, many of the consumer products you normally buy are already among the millions of free predesigned products. You can download the designs and save a lot of money. My group has shown in studies on a self-built 3D printer (Wittbrodt et al., 2013) and an out-of-the box 3D printer (Petersen and Pearce, 2017) that peer-to-peer sharing “prosumers” (producing consumers) gain an incredible return on investment—more than 100 percent at a minimum and more likely approximately 1,000 percent—by 3D printing products to offset purchases, only using the printer once a week.
Your “investment” in this case is an open-source 3D printer derived from the RepRap. An open-source 3D printer costs less than $200 if you build it yourself, or $1,250 to $2,500 if you buy one preassembled. You can get a decent open-source RepRap partially assembled for $200 to $400 as of this writing.
Downloading a predesigned open-source file and clicking “Print” is pretty easy. Here, I will lay out the steps you need to take to make a product no one has open-sourced yet, which is a bit trickier. In addition, I will show you how to make it for less than the sales tax on an equivalent commercial proprietary product.
My daughter recently started Nordic skate skiing, which means I suddenly needed a ski waxing rack. To get an idea of what this means, see Steve Foreman’s excellent how-to video (www.youtube.com/watch?v=YX-wiE3oItg) on ski waxing. We went to the local outdoor sports store, and the cost of a rack was a whopping $125. It was so expensive that the store had the box locked in a glass display case. All I needed to do, however, was see the basic physical makeup of the product to make a better one using the open-source design method. To demonstrate the method, I will walk you through how I made my daughter a fan art–based Wonder Woman–themed ski waxing rack for less than $5.
Here are five steps you can use to leverage digital manufacturing open-source hardware such as the RepRap to truly obliterate the costs of consumer goods:
1. See if anyone has designed the product you want already. I recommend using Yeggi (yeggi.com), which is a 3D-printable search engine to find premade free designs. I knew that at least one ski waxing rack was available because one of my Michigan Tech students had designed an excellent set of ski waxing vises on Libre3D (libre3d.com). Jerry Trantow and someone named Mosquito4 had made Nordic ski waxing table fittings and a complete ski vise for downhill skiing and posted them on Thingiverse (www.thingiverse.com). I didn’t want a whole table or a vise, but I wanted a system for Nordic cross-country skis. I just wanted to use the kitchen table, so I needed to make something new. Even though these designs were not exactly what I wanted, they provided me with some good ideas on how I could do my design. To make it interesting, I chose to design maximizing the printable components to minimize the cost. This is following the RepRap tradition—minimize all parts that are not 3D printable.
2. Stand on the shoulders of giants and use similar designs for components of what you want. If no one has yet made what you want, then see if they have made any of the parts. In my case, I needed some C- or G-clamps to hold the skis to the kitchen table. It turns out that Johann Joe had made and shared some pretty nice fully printable ones (www.thingiverse.com/thing:1673030). Unfortunately, Johann only shared the STL files. These are the files you need to print with and represent the outer surface of a 3D object. Ideally, Johann would have shared the source code for the design, using an open-source computer-aided design (CAD) package to make the design. But no matter, most CAD packages allow you to edit the STL file as well.
3. Use an open-source CAD package such as OpenSCAD (www.openscad.org) to adapt the design for your needs. I can’t say enough good things about OpenSCAD and the good people who have contributed to the code base and free tutorials. It is a powerful parametric script-based CAD package. What this means is that it allows you to computer code 3D objects. If you know a little bit of coding, you will be right at home with OpenSCAD. I took some measurements of my daughter’s skis to ensure customized designs. All measurements in OpenSCAD are in millimeters. I used the Import command to bring the core part of Johann’s G-clamp into OpenSCAD, and then, because I wanted the result to look nice, I also used a rounded-edge cube library (www.thingiverse.com/thing:470007) created by P. Towalski to build up the parts I wanted. I made three clamps, the middle one that holds the ski by the standard binding and two tilting holders. The middle holder is the only one with any metal. I found the metal wire I needed from a broken clothes hanger from my daughter’s closet. I was careful to make all the parts easy to print from the surface of the print bed while minimizing overhangs. This meant that the middle piece needed to be in two parts. I did this because I wanted to minimize the use of plastic (you can do overhangs even with a single-nozzle 3D printer, but then you waste plastic building up support and have to spend time cleaning up your parts afterward). Here, I had the ugly overhang hidden in the square hole of the middle piece (Figure 12.2).
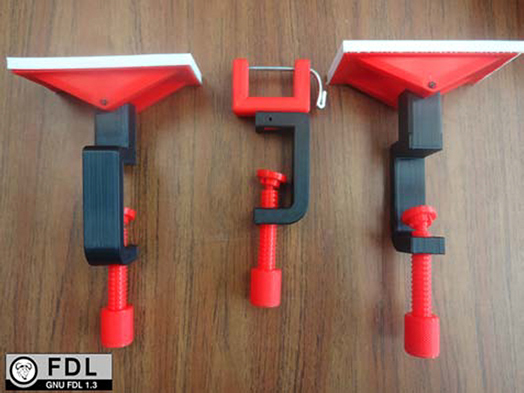
Figure 12.2 The free and open-source ski waxing rack system. (GNU FDL-1.3)
4. Print on an open-source 3D printer. I printed all the parts in polylactic acid (PLA) on an open-source Lulzbot commercial RepRap 3D printer (Figure 12.3). PLA is the most common commercial 3D-printing plastic. It is a biopolymer that is both recyclable and compostable. Buying a prebuilt open-source 3D printer such as a Lulzbot or Prusa is easier for most people, but all the steps would be the same on a RepRap you built yourself from scratch or on a low-cost kit such as the open-source Creality Ender 3.
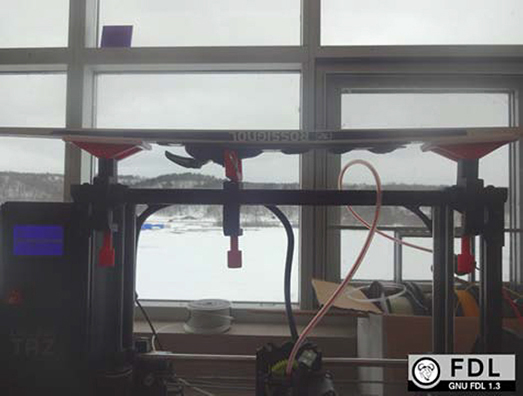
Figure 12.3 The Lulzbot Taz, which was used as a test bed to print the ski waxing rack. (GNU FDL-1.3)
To put the pieces together, I used filament as rivets (Figure 12.4), following a great tutorial (www.youtube.com/watch?v=WqNxYHWpYko) by Jason Welsh, who needed them for his line of open-source 3D-printable action figures. You can use a soldering iron—but if you don’t have one, a clothes iron set to medium works just fine.
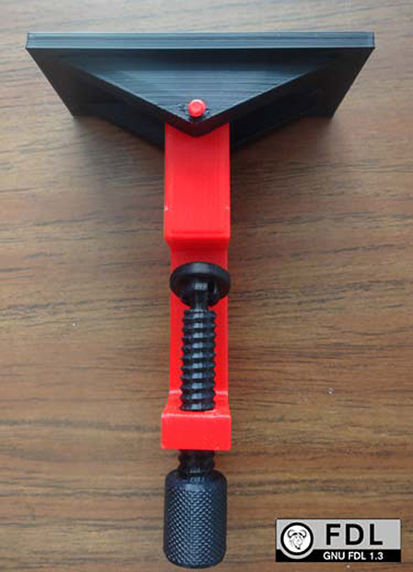
Figure 12.4 Rivet close-up. (GNU FDL-1.3)
I didn’t want the top of the skis to get scratched when in the mount, so I printed some covers with NinjaFlex filament. Later, I found that this was not at all necessary. Finally, to add a super-heroine flourish, I borrowed the Wonder Woman design (Figure 12.5) from a design of a cookie cutter made by g33kgirl.
5. Share! All the ski waxing system files can be downloaded for free from MyMiniFactory (www.myminifactory.com/object/nordic-skate-skiing-waxing-rack-28893).
I was telling a friend on the ski trails about my great success (the economics are in the next section), and she asked if she could have a Thor one for her family (all boys). With the power of the global sharing community, she could do it with about 5 minutes of additional design time. I looked up an OpenSCAD hammer for Thor. As luck would have it, the legendary Vik Oliver (the guy who built the first RepRap child) had SCADed up a pretty nice Thor hammer (www.thingiverse.com/thing:7985) to be used as a pendent. Vik had modeled his version on a design posted on Wikipedia from an artifact in the Swedish Museum of National Antiquities, which someone else had uploaded there in the Creative Commons. Are you starting to understand how awesome the sharing world is? Because my second version should always be better than the first, this time I cut the hammer directly out of the two sides, after mirroring it twice in OpenSCAD, and thus had the design without the added costs and relatively slow printing time of NinjaFlex (Figure 12.6).

Figure 12.5 Wonder Woman NinjaFlex cover. (GNU FDL-1.3)
Maker Economics
Both the Wonder Woman and Thor hammer versions of the ski waxing system worked great, look cooler, and destroyed the cost of a generic commercial mass-manufactured product. By how much?
Commercial PLA filament costs about $0.025/g, and NinjaFlex costs $0.086/g, which means that the Wonder Woman hard parts cost $3.25 and the soft pads cost $1.73. All in all, my completely 3D-printable ski waxing system printed for $4.98 for the Wonder Woman version. This a whopping 96 percent savings from the commercial system. In fact, because the sales tax in Michigan is 6 percent, my design is not only cooler, but the open-source 3D-printable ski waxing system also costs less than the cost of the taxes on the commercially available system. The Thor hammer version is even less expensive because it is made only of PLA and costs $3.33. This is not even as low as I could go because I could have used recycled plastic from a recyclebot (www.appropedia.org/Recyclebot) to push the cost to a few pennies, as you will see in Chapter 15. Equally interesting is the fact that by printing out two sets of ski waxing racks (which could be easily done in a weekend day), I had already justified the cost of an entry-level 3D printer.
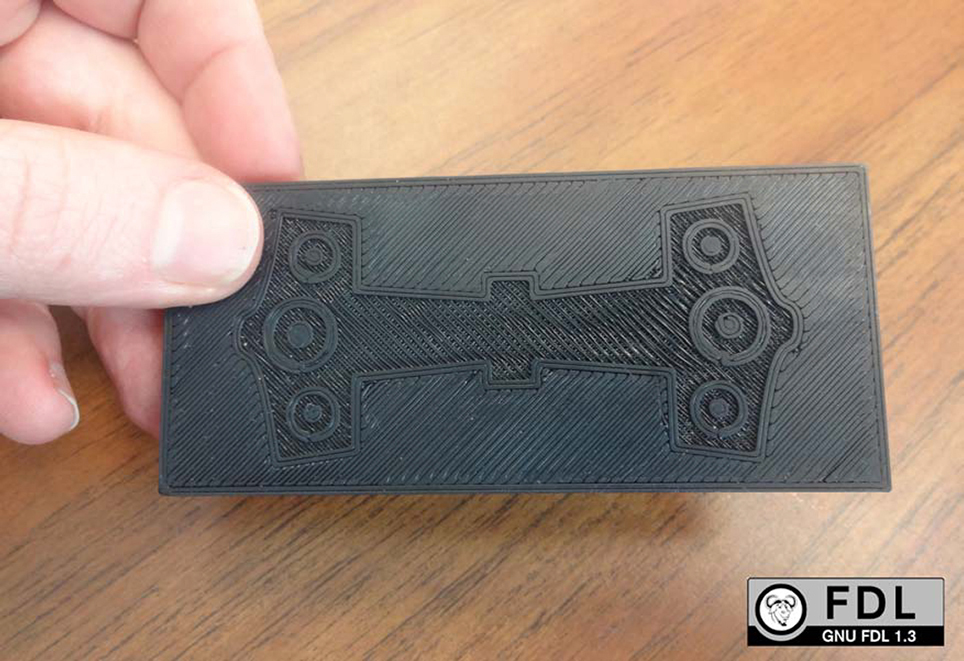
Figure 12.6 Thor’s hammer version of the ski waxing system. (GNU FDL-1.3)
The Bottom Line
If you do not live in a tundra (or in my case, a taiga [snow forest]), you may not have the need for a ski waxing rack, but that is part of the point. Whatever consumer products you need, chances are that most of them already have an open-source 3D-printable version available. For uncommon products such as a Thor-themed ski waxing rack that no one has thought of yet, you can use this method. If you share it, it makes it more likely that others will join the open-source community when they make their less-common creations as well. We all win!
The bottom line is that with a little practice working in OpenSCAD or another open-source CAD package (e.g., FreeCAD [www.freecadweb.org]) and the foundation of designs already available in the free-sharing 3D-printing community, you can save on specialty goods even if no one has gotten around to designing them yet. The open-source approach to distributed manufacturing of consumer goods is real. It saves money—lots of money. It is here now, and you can be a part of it. Although open-source 3D printing has really exploded in popularity, you can use the same open-hardware techniques for subtractive manufacturing as well with both laser cutters and mills.
Open-Source Laser Cutting and Engraving
The easiest way to get started with laser cutting and engraving is to simply swap out the head on your RepRap with a laser. Several of my students have modified the 3D printers they built in my class to do this for the laser cutter or 1-watt laser engraver shown in Figure 12.7. Other RepRappers have moved into lasers, using axRap’s design of an AxCut laser cutter (axrap.blogspot.com), and Jake’s Workshop has also published a method for turning any 3D printer into a 2.5-watt laser engraver, as shown in Figure 12.8. OpenBuilds (openbuilds.com/threads/openbuilds-table-top-50w-co2-laser-cutter-engraver.14364) offers a dedicated 50-watt carbon dioxide (CO2) laser cutter and engraver.
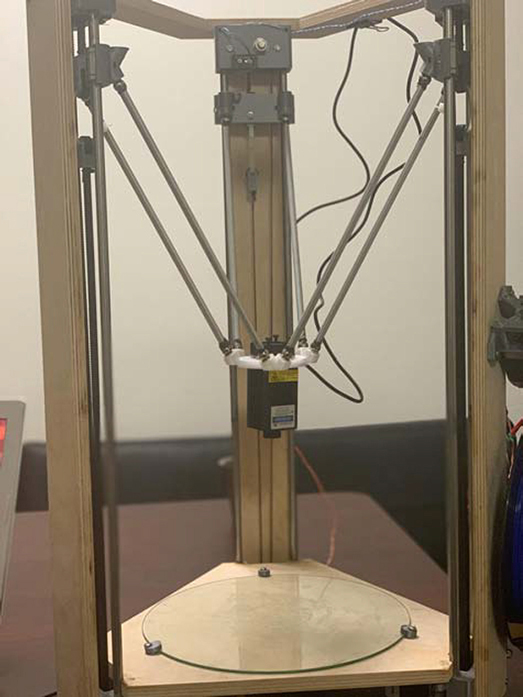
Figure 12.7 A modification of a delta-style RepRap (Athena II) to convert it to a 1-watt laser engraver. (GNU FDL) https://www.appropedia.org/Athena_II_Laser_Engraver_mod
Another approach is to get serious with a large-format laser cutter. There are several options. The mother of open-source laser cutters is the 120-watt Lasersaur (github.com/nortd/lasersaur/wiki), which stands at 1,700 × 1,170 × 360 millimeters and gives you a work area of 2 × 4 feet with a resolution of 0.1 to 0.03 millimeters (240–840 dots per inch [dpi]; Figure 12.9). Laser cutters focus the energy of a laser beam onto a small spot to control the energy density at a given time. The Lasersaur control software does this by running a combination of robotic actuators and sensors, a laser resonator, and an optical-beam delivery subsystem. It has a maximum feed/seek rate of 6,000 millimeters per minute, which makes for fast cutting. It can do all your favorite types of cutting and engraving.
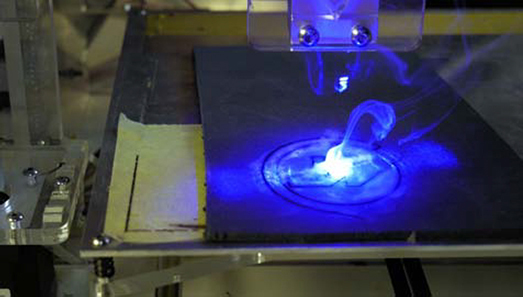
Figure 12.8 Laser engraver/cutter in action on a converted 3D printer. (CC BY-NC-SA) https://www.instructables.com/id/Convert-Any-3D-Printer-to-Laser-Engraver/
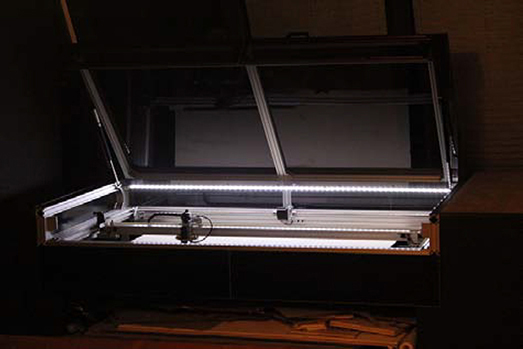
Figure 12.9 The open-source Lasersaur, whose reference design is CC BY-SA, software is GPLv3, and manual is CC BY-SA. https://github.com/nortd/lasersaur/wiki
Another approach is shown in Figure 12.10. A fablab built a LaserDUO (laserduo.com), which integrates two different laser sources (a 130-watt CO2 laser and a 75-watt yttrium-aluminum-garnet (YAG) laser) over its 1,500- ×1,000-millimeter working area (with 500 millimeters in Z-axis) and thus greatly expands its ability to both laser cut and engrave a wide range of materials on large parts with just one machine. The laser can do wood, plexiglass, polyoxymethylene (POM)/Derlin, medium-density fiberboard (MDF), cardboard, and fabrics, including cloth and leather. With the YAG laser, however, you can also cut steels, brass, copper, aluminum, magnesium, and even marble. (You can also transform your laser cutter into a 3D printer with 1 cubic meter of printing volume.)

Figure 12.10 LaserDUO, an open-source dual laser cutter/engraver (inset: products of the fablab). (CC BY-SA-NC) http://www.laserduo.com/
Open-Source Mills
Computer numerical control (CNC) devices are used to fabricate physical objects with a high degree of precision, and if they are mills, they do it with subtractive manufacturing—that is, cutting away what you do not want in your object from a block of material. I talked about the open-source CNC circuit mill and an upside-down delta 3D printer with a mill attachment for making electronic printed circuit boards in Chapter 11. There is a lot more you can do with a CNC mill, however. Most CNC mills feature a gantry-mounted cutting tool (such as a router) that can move in two or more directions. The open-source community has provided a wide range of such tools. For example, if you have access to a laser cutter (or some hand tools and patience), you can follow instructions to make a $700 three-axis CNC mill called DIYLILCNC (diylilcnc.org), as shown in Figure 12.11. If you do not have access to a laser cutter, you can purchase laser-cut panel kits from the company or give the design files to any online laser-cutting service.
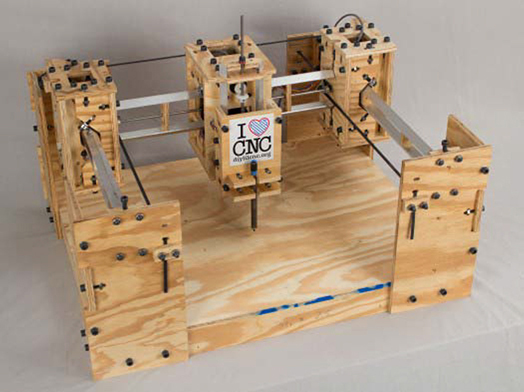
Figure 12.11 The big shoulders of DIYLILCNC. (CC BY-SA) diylilcnc.org
There are many other options for CNC milling. Another example is the OpenBuilds Mini Mill, which is a desktop-sized CNC milling plate, parts maker, and 3D carving machine, as shown in Figure 12.12. The OpenBuilds Mini Mill can be assembled in 2 to 4 hours depending on your skills. It has an accuracy of 0.05 to 0.1 millimeter, a workable material height of 60 millimeters, and a 120- × 180-millimeter work area. Another approach to open-source milling is to make a 3D stage using 3D-printed parts. Some of the simplest designs involve mounting an existing tool such as a Dremel on a 3D stage. The do-it-yourself (DIY) Dremel CNC (www.thingiverse.com/thing:3004773) runs on an Arduino (see Chapter 11) using primarily 3D-printed parts and, of course, a Dremel. If you want to go bigger, there are several machines designed by Ryan Zellars that might be what you are looking for. First is the Mostly Printed CNC (MPCNC) BURLY C-23.5 mm outside diameter (OD) shown in Figure 12.13. The only special tools you need are a hacksaw and a drill, along with any open-source fused filament fabrication (FFF) 3D printer. It can be easily expanded to almost any length, width, and depth depending on the rigidity required. The shorter the lengths and the better the materials, the more rigid and accurate will be your CNC milling. Figure 12.13 shows an MPCNC built using a hardware store electrical metal tubing (EMT) conduit (in the United States, it is sold as ¾-inch inside diameter [ID]). You can upgrade to stainless steel tubing. The MPCNC can mill most woods and plastics, as well as aluminum and even steel (although for metals, you will want to work over a smaller area). As with any 3D motion platform, you can switch the spindle out with a drag knife, a laser, or a 3D printer extruder to make a prototyping multitool. Finally, if you want to use whole sheets, you can use Zellar’s horizontal design (LowRider2 CNC [www.thingiverse.com/thing:3064287]) or the Maslow, which is a $500 large vertical-hanging (4- × 8-foot) CNC cutting machine designed to let you cut big, useful things out of wood and other flat materials (Figure 12.14). The Maslow team has created Maslow Create, an open-source community cloud CAD program for cooperative design (github.com/MaslowCNC/Maslow-Create) and the Maslow Community Garden (maslowcommunitygarden.org). The latter is a sharing website for CNC designs that sports everything from furniture that you might expect (e.g., chairs, coat hangers, beds, and picnic tables) to truly creative wonders, from a Santa sleigh to a full tiny house! With mills such as this, you can scale any 2D image you see on the internet to 4 × 8 feet with Inkscape and make everything in your house a great work of art.

Figure 12.12 OpenBuild’s Mini Mill and printed objects. (Public domain) https://openbuilds.com/builds/openbuilds-minimill.5087/
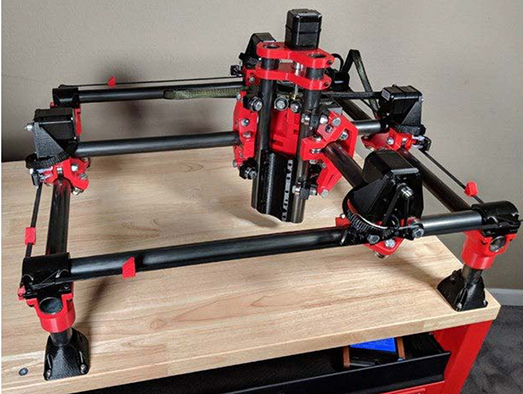
Figure 12.13 Mostly Printed CNC (MPCNC) BURLY C-23.5 mm OD. (CC BY-SA-NC) https://www.thingiverse.com/thing:724999
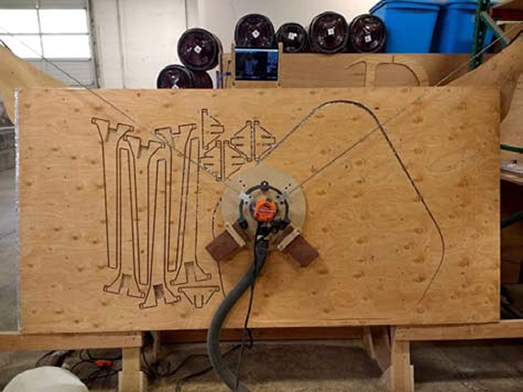
Figure 12.14 Maslow CNC machine. (CC BY-SA) https://www.maslowcnc.com/
Applications
With the three tools discussed in this chapter, you can make just about any physical object or product. 3D printers can be used to make everything from toys for your kids (Peteresen et al., 2017) to adaptive aids for arthritis sufferers (Gallup et al., 2018). 3D-printed toys generally save more than 75 percent of the cost of commercially available true alternative toys and over 90 percent if recyclebot filament is used (Peteresen et al., 2017). For example, for the travel chess set shown in Figure 12.15a, you would save about 90 percent if you printed it yourself compared with purchasing it on Amazon. With the 3D printer, you don’t have to choose one particular chess set, but you could have dozens to pick from based on free online designs, as seen in a single page of results on Yeggi (Figure 12.15b). There are a lot more pages than this even for chess sets. Open-source toy designs can get quite complicated, but they are easy to print and fun to play with, as seen in Figure 12.16. Toys are generally mass produced from plastic and thus super-cheap, yet open-source desktop 3D printers can make custom toys for far less. For other products, such as anything to do with medicine, that have huge markups, the savings are even greater. For example, the adaptive aids savings were even more than 94 percent for a wide range of the products seen in Figure 12.17 (Gallup et al., 2018). There are now millions of open-source 3D-printable designs housed in dozens of repositories (see reprap.org/wiki/Printable_part_sources).

Figure 12.15 (a) Visual comparison of open-source 3D-printed chess set and commercial mass-manufactured equivalents, along with costs and percent savings; (b) screenshot of Yeggi showing free online 3D-printable chess set designs. (CC-BY) https://www.mdpi.com/2227-7080/5/3/45/htm

Figure 12.16 Playing with 3D-printed toys, many articulated (with internal moving parts), printed in place.
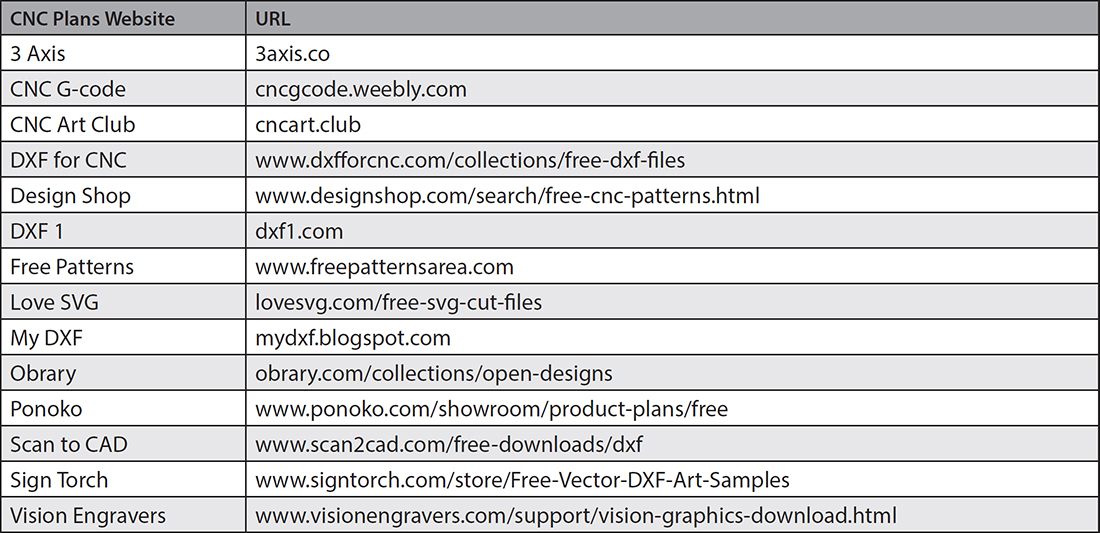
A laser cutter can be used to make everything from intricate wedding invitations (Figure 12.18) to any of thousands of free designs that can be cut from solid materials like those shown in Figure 12.19. Sources for these tens of thousands of designs are summarized in Table 12.1. Have fun digital making in the comfort of your own home!

Figure 12.17 An assortment of 3D-printable open-source adaptive aids.

Figure 12.18 Elegant card with laser-cut gold detail by Freepick. (CC BY) https://www.freepik.com/free-vector/elegant-card-with-laser-cut-gold-detail_1163689.htm
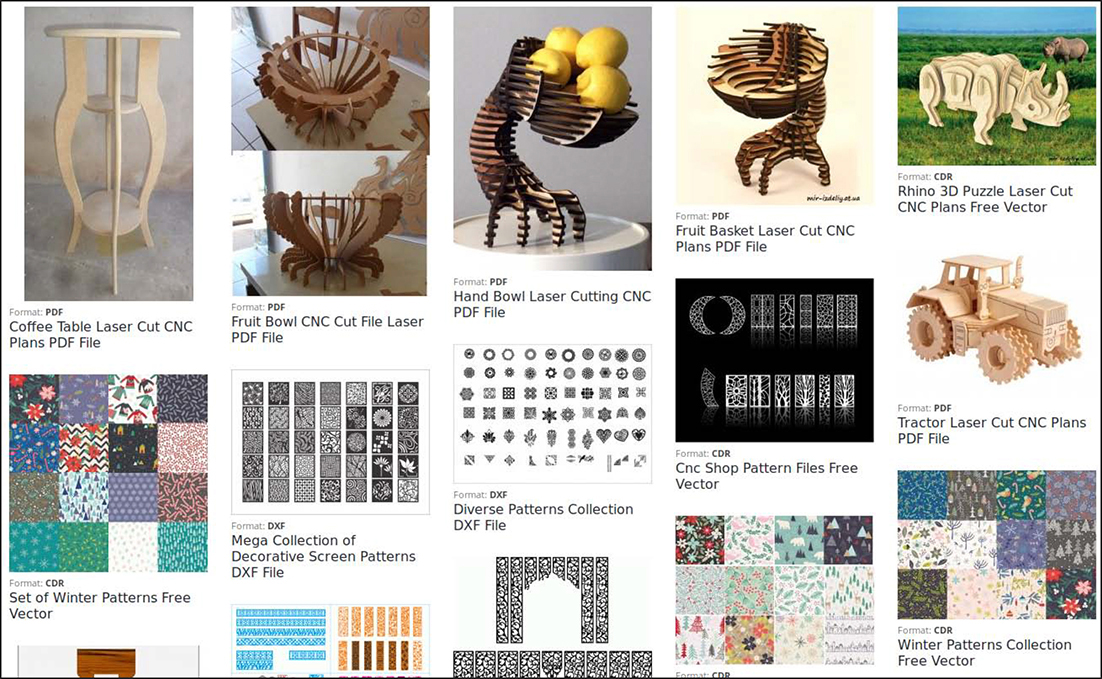
Figure 12.19 Screenshot of a few of the tens of thousands of free design files available on https://3axis.co/
Table 12.1 Free and Open-Source CNC Designs
References
Arnott R. 2008. The RepRap Project: Open Source Meets 3D Printing (Computer and Information Science Seminar Series). University of Otago Library, Dunedin, New Zealand.
Bowyer A. 2004. Wealth without money. RepRap Wiki. http://reprap.org/wiki/Wealth_Without_Money
Bradshaw S, Bowyer A, Haufe P. 2010. The intellectual property implications of low-cost 3D printing. ScriptEd 7(1):1–27. https://doi.org/10.2966/scrip.070110.5
Cano J. 2011. The Cambrian explosion of popular 3D printing. International Journal of Artificial Intelligence and Interactive Multimedia 1(4):30–32.
Gallup N, Bow J, Pearce J. 2018. Economic potential for distributed manufacturing of adaptive aids for arthritis patients in the US. Geriatrics 3(4):89. https://doi.org/10.3390/geriatrics3040089
Gershenfeld N. 2005. Fab: The Coming Revolution on Your Desktop—From Personal Computers to Personal Fabrication. Basic Books, New York.
Hodgson G. 2013. Interview with Adrian Bowyer. RepRap Magazine 1: 8–14.
Jones R, Haufe P, Sells E. 2011. RepRap: the replicating rapid prototype. Robotica 29(1):177–191.
Pearce JM, Blair CM, Laciak KJ, et al. 2010. 3-D printing of open source appropriate technologies for self-directed sustainable development. Journal of Sustainable Development 3(4):17–29.
Petersen E, Kidd R, Pearce J. 2017. Impact of DIY home manufacturing with 3D printing on the toy and game market. Technologies 5(3):45. https://doi.org/10.3390/technologies5030045
Petersen EE, Pearce JM. 2017. Emergence of home manufacturing in the developed world: Return on investment for open-source 3-D printers. Technologies 5(1):7. https://dx.doi.org/10.3390/technologies5010007
Sells E, Bailard S, Smith Z, Bowyer A. 2007. RepRap: The replicating rapid prototype maximizing customizability by breeding the means of production. In Handbook of Research in Mass Customization and Personalization (in 2 Volumes) 2010 (pp. 568–580).
Weinberg M. 2010. It Will Be Awesome If They Don’t Screw It Up. http://nlc1.nlc.state.ne.us/epubs/creativecommons/3DPrintingPaperPublicKnowledge.pdf
Wittbrodt B, Glover A, Laureto J, et al. 2013. Life-cycle economic analysis of distributed manufacturing with open-source 3-D printers. Mechatronics 23(6):713–726.