Once you unpack your new laptop, you may need help getting it set up. Here I cover the basics: installing and charging your laptop battery; turning the computer on and off; mastering the basic use of your mouse, becoming familiar with some basic keystroke shortcuts, and, if you have a touchscreen, finding out how to interact with it.
Next, you can set up the date and time in your computer’s internal clock so they match your time zone and you can apply daylight saving time settings properly. Finally, you get to work with your user accounts. Windows allows you to create multiple user accounts; each account saves certain settings and allows you to control files and folders separately. Child accounts allow you to have some control over what apps and online content a child can access. When each user logs on with a particular user account, it’s like accessing a unique personal computer.
Here, then, are the procedures that you can follow to get going with your laptop.
Install and Charge the Battery
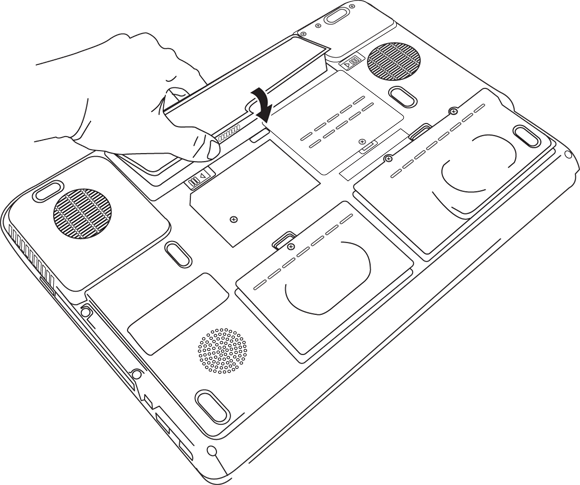
Your laptop comes with a battery that you should insert and charge when you first take the laptop out of the box. The battery is a rectangular affair (similar to the one shown in Figure2-1) that slips into the bottom of your laptop.
Note that tablet models are typically sealed so that your battery is not accessible; if yours is one of those, you don’t have to insert a battery; just plug the tablet in to charge the battery.
It's a good idea to charge your battery completely when you first plug it in, which could take several hours. Follow these instructions to do that:
Locate the plug in your laptop packaging. (It’s usually a two-piece cable; one half of the cable has a large, boxy transformer on one end that plugs in to the other half.)
Plug one end of the cable into a wall outlet and the other into the round power connection port on your laptop. Your user’s manual should indicate where this connection is located (usually on the back or near the back of the right or left side of the laptop).
When you turn your laptop on (see the next task), you’ll find a small icon on the Windows desktop screen in the taskbar (usually called the Battery Meter icon) that looks like a standard battery with a plug next to it. Click this Battery Meter icon to see whether the battery is charged to 100 percent of its capacity. (If you aren't yet sure how to move around the screen and click, see the upcoming task, “Use the Mouse”.)
This icon changes to just a battery (no plug) when the computer isn’t plugged in; this battery icon indicates visually how much charge your battery has left before it drains.
Log on to Windows 10
With your laptop charged up, you’re ready to turn it on. Start by pressing the power button on your laptop to begin the Windows 10 start-up sequence. When you first turn on a new computer, you should choose Express Settings to set it up.
In the resulting Windows 10 Welcome screen, click the screen to reveal the sign-in screen.
Enter your password or PIN, if you've set up one, and then press Enter on your keyboard. (If you haven’t set up the password-protection feature for more than one user, you’re taken directly to the Windows 10 desktop when you turn on your laptop. If you have more than one user you have to choose the one you want to log on as.) Windows 10 verifies your password and displays the Windows 10 desktop, as shown in Figure2-2.
Unlike using a typewriter, which sports only a keyboard to enter text into documents, with a non-touchscreen computer, you use both a keyboard and a mouse to enter text and send commands to the computer. On a laptop, the mouse device is in the form of a touchpad, a flat rectangle beneath the keyboard that you maneuver by tapping or sliding your forefinger.
Though you might have used a keyboard before, a mouse might be new to you, and frankly, it takes a little getting used to. In effect, when you move your finger on the touchpad, a corresponding mouse pointer (a small arrow symbol) moves around your computer screen. You control the actions of that pointer by using the right and left side of the touchpad.
Can’t get the hang of your touchpad? Many users of laptops like to use a wireless mouse instead of the touchpad to provide input to their computers. With a wireless mouse, you move the physical mouse around your desktop with your hand and click the right or left side to perform actions described above. There is typically a scroll wheel in the middle of a wireless mouse you can use to scroll through a document. You can buy a wireless mouse at any office supply store, plug the small transmitter into a USB port of your laptop, and then use the mouse instead of the touchpad. Throughout this book, when I say mouse, you can assume that either your built-in touchpad or a wireless mouse will work with the steps provided.
Here are the main functions of a mouse and how to control them:
Click: When people say “click,” they mean that you should move your mouse pointer over the command or item you want to select or activate and press and release the left side of the touchpad.
Clicking has a variety of uses. You can click while you're in a document to move the insertion point, a little line that indicates where your next action will take place. For example, in a letter you're writing, you might click in front of a word you already typed and then type another word to insert it into the sentence. Clicking is also used in various windows to select check boxes or radio buttons (also called option buttons) to turn features on or off, to choose a command in a menu, or to select an object such as a picture or table in your document.
Right-click: If you click the right side of the touchpad, Windows displays a shortcut menu that's specific to the item you clicked. For example, if you right-click a picture, the menu that appears gives you options for working with the picture. If you right-click the Windows desktop, the menu that appears lets you choose commands that display a different view or change desktop properties.
Click and drag: To click and drag, you move your mouse pointer over an item on the screen, press and continue to hold down the left side of the touchpad and then move your finger to another location (this is the dragging motion). For instance, you can click in a document and drag your finger up, down, right, or left to highlight contents of your document. This highlighted text is selected, meaning that any action you perform, such as pressing the Delete key on your keyboard or clicking a button for bold formatting, is performed on the selected text.
Scroll: Many touchpads allow you to swipe down the right side with your finger to scroll through a document or website on your screen. Just swipe down to move through pages going forward, or swipe up to move backward in your document.
Work with a Touchscreen
Windows 10 was designed to work with a touchscreen computer, though not all computers include a touchscreen feature.
If you do own a touchscreen laptop, placing and moving your finger on the screen replaces the movement of a mouse. You can tap the screen to select something, to activate features with buttons, and to make a field active so you can enter content. Windows 10 also offers an onscreen keyboard that touchscreen users can work with to enter text with the tap of a finger.
You can also use your finger to swipe to the right, left, up, or down to move from one item to another (for example, from one web page to another, one page to another in an e-reader, or from one photo to the next in the Photos app) or to move up or down on a page.
Windows 10 also offers some gestures you can make with your fingers, such as moving your fingers apart and then pinching them together to minimize elements on your screen, or swiping down from the top of the screen to close an app. If you do own a touchscreen and want to learn more, visit Use Touch with Windows in the Get Started app (Start button ⇒ Get Started ⇒ Menu button ⇒ Continuum and Touch ⇒ Use Touch with Windows).
Use Shortcuts
A keyboard shortcut refers to a key or combination of keys that you press and hold to perform an action. Many shortcuts involve the Windows key (the key near the bottom-left corner of your keyboard that sports the Windows logo). For example, you can press and hold the Windows key plus A (Win+A) to display the Action Center.
In Windows 10, keyboard shortcuts can be very helpful to those who don’t have a touchscreen computer. Table 2-1 lists some handy shortcuts to know.
On a laptop computer, you might find that in order to save space, some shortcut functions, such as muting sound or brightening your screen, are accessible by using function keys. Here are the basics of function keys:
Function keys run across the top of your laptop keyboard, labeled F1, F2, and so on.
You'll find a key labeled Fn (for Function) near the bottom of your keyboard.
By pressing and holding down the Function key (Fn) and a numbered function key (F1, for example), you can perform actions such as controlling your built-in speaker’s volume.
The functions assigned to your laptop’s keys vary depending on the model and manufacturer. Check your user’s manual to find out the specific functions assigned to your keyboard.
You'll typically find small icons on your function keys that give you a clue about what the keys do. For example, pressing both the function key that has a little light bulb icon and the up arrow key will probably brighten your screen. Pressing a function key with double, right-pointing arrows (like those you see on a music player) may move you to the next track on an audio DVD.
Set the Date and Time
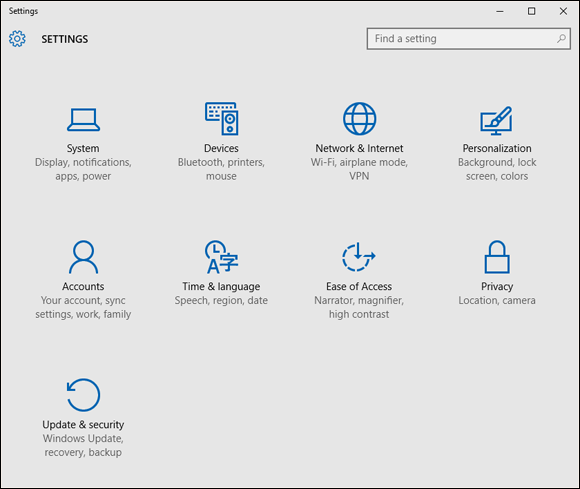
The calendar and clock on your computer keep good time, but if you travel, for example, you might have to provide the correct date and time for your location. Click the Start button and then click Settings.
Click Time & Language in the Settings window that appears, as shown in Figure2-3.
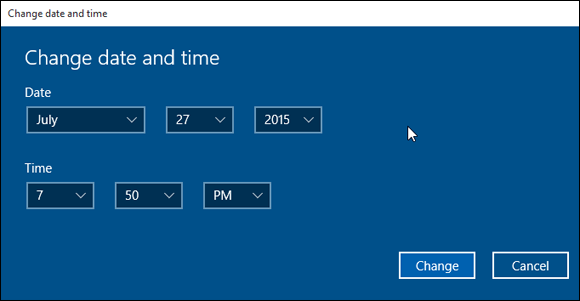
In the Time & Language screen, set the Set Time Automatically toggle to Off, and then click the Change button under Change Date and Time.
In the Change Date and Time dialog box (see Figure2-4), use the various drop-down fields to make different selections. For example, click the year field and choose a different year.
Click Change to save the settings.
To change the time zone you’re in, click the Time Zone drop-down menu and select a different time zone, especially handy when travelling with your laptop.
Click the Close button in the upper-right corner to close the Time & Language Settings window.
Another way to display the Settings from the desktop is to press Win+I.
Create a New User Account
You must have administrator status to create new users. When you initially set up Windows 10, the first user created will automatically be an administrator account. This time, try a keyboard shortcut to get to the Settings window. Press Win+I.
Click Accounts.
In the Accounts screen shown in Figure2-5, click Family & Other Users and then click the Add Someone Else to this PC button (it has a plus sign on it).
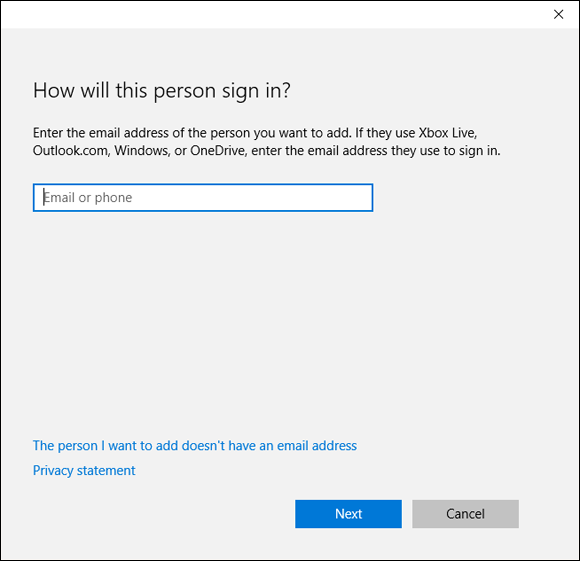
If the new user is a child, click Add a Family Member and then in the Add a Child or Adult window select Add a Child. This turns on Family Safety features and allows you to make safety settings.
In the resulting window, shown in Figure2-6, enter a Microsoft email address. Note that if the person doesn’t have a Microsoft email account, you should create a new account using the The Person I Want to Add Doesn’t Have an Email Address link. Click Next.
After you create an account, when a user with administrative privileges is logged in, he or she can make changes to the user account in the Family and Other Users settings. Click on a user Account, click Change Account Type, and then choose an account type from the drop-down list in the Edit Account dialog box.
For more on adding and changing user passwords, see Chapter 22. After you set up more than one user, before you get to the password screen, you have to click the icon for the user you wish to log on as.
If you prefer, you can log in with a four-digit PIN in place of a traditional password. This makes it quicker to sign in. When you’ve logged in as the user for which you want to set a PIN, go to the Accounts settings shown in Figure 2-5 and click Sign-in Options; then, in the PIN section, click the Add button.
You can set up several user accounts for your computer, which helps you save and access specific user settings and provides privacy for each user’s files with passwords.
Switch User Accounts
To change to another user account after you've logged in, you can press Win+L to go to the Windows lock screen.
Click anywhere to display the sign-in screen.
Click the username you want to log in as, type the password, and press the arrow key to the right of the password field to go to the Windows desktop.
Shut Down Your Laptop
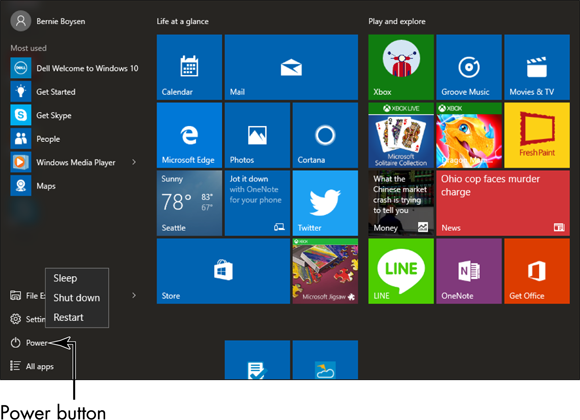
With a Windows 10 laptop, you can simply close the lid to put the computer to sleep, saving power and returning you to where you left off when you open the lid and sign in again. To turn off your laptop completely, you need to initiate a shutdown sequence in your operating system instead of simply turning off the power with the power button on your computer. Click the Start button.
Click the Power button (see Figure2-7). If you prefer to stop your computer running but not turn the power off, click Sleep (or simply close the lid of your laptop). If you want to reboot (turn off and turn back on) your computer, choose Restart. To shut off the power, click Shut Down.
If your laptop freezes up for some reason, you can try resetting it by turning it off and then back on after a minute or so. To shut down a frozen laptop press the power button on your laptop and hold it until the computer powers off.
 Note that tablet models are typically sealed so that your battery is not accessible; if yours is one of those, you don’t have to insert a battery; just plug the tablet in to charge the battery.