Chapter 2
Getting organized with initial audit of the network
Abstract
We take the network from an unknown of unknowns and through a progression of steps, positively and accurately document each and every element of the network so that we obtain a known good basis to build stronger security and performance. We document this an open source network management system which we will later use for differential analysis and detection of unauthorized devices. We also recommend a data object classification system to sort sensitive data later.
Keywords
direct positive identification
NMS management
data object security
NMAP
NFV
password strength
security zones
Understanding that network elements, hosts, server, and wireless devices come in contact with your network is a critical first step in locking down the network. There are definable attributes that most networks staring out before a security and performance optimization exhibits. Most networks are not planned but instead evolve over time to their current state. In many cases, the network has passed ownership from different groups, staff members, or network architects. As a result, many overlapping priorities and generations of equipment exist on the network. The net result of this is that in many cases what is actually on the network, or touches the network via remote access or Wi-Fi, compared to what you think comprises the network can be very different. Even if you have been in control of the network, there may be legacy devices that exist, or place on the network without your knowledge. The impact of this on security can be profound. For example, if there is a “PC in the Lab” or “Private Server” somewhere that is not documented, then there is a high probability that security patches will not get applied, leaving room for such attacks as botnets. Once malware gets a beachhead into your interior network, it can be both extensive in terms of time and money to remove. Another problem of the “unknown of unknowns” of phantom devices is that you will never have positive identification of what belongs on the network and what does not belong on the network. Here, infections can reoccur even after a cleaned network. Furthermore, poorly planned Wi-Fi or virtual private networking (VPN) access may open up the core of the network to an almost unlimited number of “rouge” devices that are unknown, not secure, and will most certainly undercut any security policy we deploy. In addition, we must also point out the perils of virtualization. There is a very high chance that your network now uses hypervisors for their many benefits. The downside to a virtual server is simple that they are so easy to create and remove that you cannot visually inspect them like a physical server in the lab. Virtual servers can be just as dangerous as physical server, and in some cases more, especially if someone on the network is “experimenting” with software or Internet-based cloud services. In the age of BYOD (bring your own device—an organizational policy to allow employees to use their personal equipment on-site), having a well-planned security policy is very crucial. The bottom line is that if someone brings their own device, they may also bring their own malware, viruses, etc. This can have the obvious effect of making a secure network less secure. BYOD has many business benefits, so we are not saying do not allow it, but simply plan well for it and isolate it in the correct zone.
If we drill into the infrastructure, undocumented configurations and lack of limited, positive authority over configuration of those devices can led to disastrous effects. This is especially true when you think of a network device, such as Layer 3 switch, which may have a configuration such as an access control list (ACL). It may be legacy and may not conform to our planned security policy. So the first level effect of misinformation about how network elements are configured is lower security levels, but the secondary effect can be lower network performance. For example, if you have too many unnecessary ACL rules on a core router, you will slow down a majority of traffic on the network. For example, unoptimized or excessive lists may trigger a TCP timeout event. Most networks also employ some form of WAN. These can be in the form of VPN site-to-site IPSec tunnels, which is a predominant standard in creating encrypted tunnels across a public network or dedicated point-to-point service provider links. By not understanding basic information about service levels you may be paying for, or optimized link characteristics. The network may become sluggish, especially for remote users. Furthermore, understanding the basic domains of the network is a critical step in planning since we plan to use a system of zones to minimize threat exposure.
When we think of documenting the network, we seldom consider the data stored and transmitted through the network as an element of security. The truth is without understanding the sensitivity of information in the network, stored on hosts in the network, or transmitted across the network, we open ourselves to some of the worst possible data breaches. Remember that when the bad guys try to steal data, the operative word is “Data.”
Goals and Objectives of this Chapter: Positive Identification of Valid Assets
Now is the time to get organized and begin the process of hardening the network for security and performance. The first step I want you to do is take any network map, spreadsheet, or any other form of existing network documentation and throw it out. The reason why we do this is simple, stuff that is written down, without a chain of custody, even with a chain of custody, will in many cases be wrong or incomplete. It is important in our planning that we positively, personally identify each and every element on the network and not inherit and propagate bad or possibly incorrect information. We will start fresh and detect what is on the network. We will disregard trust, or what other people report, in favor of direct identification.
In the first step, we will identify what host assets are on the network, which included fixed PCs, laptops, tablets, and smartphones. This process will use both automated inspection and quite a bit of manual inspection, followed by more automated differential inspection. By the end of this process, every device used to access the network will be positively documented. We will examine the make and model of the device, specific configuration data points like fixed IP address or Dynamic Host Configuration Protocol (DHCP), the MAC address of each and every device, the operating system and version, installed software (approved and not), what network management tools are installed, and specific device configuration and to whom the device is owned. From this information, we will populate a Network Management System (NMS) database.
In the second step, we will inspect and document server resources. We will specifically inspect server type (bare metal or virtual), server OS and patch level, installed services, open TCP and UDP ports (used by a service on both the client and server side to make a connection), IP and MAC address of each interface. We will also document administrative credentials, physical site location, and where the server plugs into the network. For virtual servers, we will document the hypervisor administrative credentials and the connected vSwitch connecting the server. Furthermore, we need to document the Network Functions Virtualized (NFV) chain connecting each and every virtual server to a physical Network Interconnect (NIC) on the hypervisor, and then where the hypervisor NIC is plugged into the network.
In the third step, we will identify attributes of each and every network device connecting client hosts to server to any edge device. Here, we want to examine the make and model of the device, the administrative credentials, the configuration of the device, such as how many network ports and of what type (such as 1G or 10G ports) and where those ports are connected in respect to other devices. Thus, we will draw a network map based on discovered elements. Within each device, we will need to document the configuration of the device, and assign the configuration a version number, such as version 1.0. This allows us later to make controlled changes so that we understand what is valid and not valid. This step will begin out direct chain of custody of configurations.
In the fourth step, we will identify what zones exist within the network. This tends to flow along the workflow of the company, such as “Engineering” or “Accounting.” We will also document each and every remote site, and treat the WAN as its own zone. Understanding how the network is logically broken up will help us later to identify priorities and severity levels, as well as border areas for security checks.
In the fifth step, we will scan the network for our information and data assets as well as develop a data object sensitivity classification system that is particularly critical to overall network security. This step not only is purely technological, but also involves understanding your specific companies’ terms and sensitivities. The process of scanning the network will involve scanning of individual host storage (like your users’ local hard drive), as well as CIFS network shares, FTP sites, NFS mounts on server, as well as newer technologies such as virtual cloud storage. Furthermore, we will document internal workflow data that resides on databases as well as critical internal records such as product protocol types, or employee records. Last, we must document how information is created, its flow though the network, and storage habits of the users.
Once we have out audit completed, we will discuss ways of storing the information in an NMS. This will allow us to keep an official record of what is permitted and not permitted on the network, and forms a foundation for our security and performance model. Finally, we will discuss how frequently to audit the network. Because we will be using open source software, I need to make a basic declaration about usage. First, I do not own or contribute to any of the software packages mentioned in this book. I am simply showing you how to use and interpret it for the objective of improving security and performance. The ownership of the software, images, and documentation is the exclusive ownership of their respective authors as described by their EULA agreements. Being open source, many packages allow single use for free and require a fee, generally small, if used in an enterprise network. Even though it may be technically possible to not pay, I strongly recommend you do, because it is not only ethical but simply the right thing to do. With all software, please take the time to read the rules about usage.
You may think this step is laborious (possibly taking weeks) or not necessary, but I assure you it is. With this step, you are building the foundations of security in your network. Without a solid foundation, such as not really knowing what makes up the network, what is changing, what is valid or not, you will not be able to mitigate attacks effectively.
Auditing Host Assets
Of any part of the hardening process, this part will be the most manual and labor intensive, especially the initial audit. Remember that we use the principal that pervious audits data is subject to error, and thus we want to positively and personally identify hosts in the network by disregarding that data and starting fresh. This presents an interesting challenge, and demonstrates why this step may not be completely automated but must be a mix of manual inspection and auditing tools. Consider what may be lurking in your network, especially if you inherited it from other organizations. There may be old PCs, people may bring personal devices into the network that are not authorized, there may be rogue file servers, and who knows what is on the hypervisors. In fact, one of the worst kinds of hidden hosts is the old infected PC that is normally off, but when powered up starts to infect the network. The point is you do not know, what you do not know unless you manually look in each and every cube, in every lab and closet. One of the objectives of this step is to separate what is allowed from what is present. Later, we will use Layer 2 authentication to only allow objects we identify in this stage onto the network. So, having established that a physical site audit of every office, local and remote, needs to be done, what do we need to do to prepare for the audit?
Asset Identification and ID
Chances are that you may already have an Asset ID system in place. My recommendation is that you may wish to start over. This may sound like a radical step, but let me explain the reason you may wish to consider for and against this recommendation. If you feel the asset ID tagging has been under your control from the effective beginning, then there is a high probability that you can skip this recommendation. But, like most organizations, IT infrastructures change, morph, and are inherited across generations of IT staff. If a tagging system is old, and you have no clear chain of custody established across the comings and goings of staff, there is a strong probability that what you think you know about your network is not what is actually there. Because we always want positive control, indexing the network allows you to reaffirm the chain of custody and correctness of data.
You will need new asset tags that you will use in the audit. I recommend that the tags clearly identify your organization, is uniquely different from previous tags. In fact, whenever you place a new tag, remove the old one. For example, if the old tags were blue, choose silver tags. The asset tags should have a unique ID expressed as both a printed number and its corresponding barcode. The asset tag should also have an anti-removal security feature. This may include the label splitting or shredding if attempted to be removed. Finally, if your organization has a lot of hosts, you may want to consider a RFID based asset tag, this will significantly speed up regular physical audits.
When we install the new tags, where should they be placed on the device? I have seen many organizations place the tags on the bottom or back of a fixed PC or server. This is not recommended for two reasons. First, it makes future audits more difficult because you have to pull the device out of the rack or crawl behind a tower PC to identify the ID. When placing tags on assets, it is best to place them where the organization asset is rapidly visible. This way, we can quickly identify gear that should not be present. If it does not have a visual tag, it should be immediately removed.
One last point I want to make about the audit tags is chain of custody for the unused tags. You should consider them gold. I recommend that you have exactly one person distribute them to personal for inspection on an as-needed basis, keeping unused tags in a locked safe. Staff installing tags should always be auditing and must give back unused tags at the end of the audit for safe keeping. This demonstrates a key point to network security, that trust is frequently incompatible with security policies. Thus, never trust, always verify. This may seem harsh and incompatible with company culture, but well secured networks have no need for trust. The fact is, any employee can infect or steal data. It happens far more than you expect. For example, 60 percent of employees who are fired have been found to steal data (source: http://www.washingtonpost.com/wp-dyn/content/article/2009/02/26/AR2009022601821.html)
Classes of Hosts to Audit
It is important to understand the different classes of host assets. The first class of interest is the fixed host asset. This class is a nonmobile PC resource, such as a tower computer and can run any variant of new or old operating system. The key thing to monitor for this class of assets is the purpose of the asset, is it running any unauthorized server (HTTP, FTP, NFS, etc.), and if it is Windows-based, is it a member of the corporate Active Directory (AD). This type of PC can easily become an infection source (one good infected memory stick can cause weeks of work and thousands of dollars), especially if there are any back doors into the network via the PC. The other thing to note about this PC is that they can be located in very “creative” places, for example, under a desk, in a lab in the back corner. In an extreme example, I have seen a server literally in the back of a janitorial closet, brooms in front of the server. The point is when you look for this type of PC, be sure to look everywhere. The next class of device is the mobile PC. This class tends to run Windows 7 or Windows 8.x. By their very nature, they are mobile and have a high chance of infection. The third class of device is the mobility device, specifically tablet and smartphone device. They share some of the same risk profiles as a mobile PC, in that they can get infected and are more targeted by the “bad” guys because there are billions of them.
Installing an NMS: SpiceWorks
To inventory and management of the network, I am going to recommend a product called SpiceWorks (http://www.spiceworks.com/). The platform is free, but advertiser supported. The platform is very rich in features and has a well-established community. I feel this is one of the best NMS platforms on the market because the community and availability of modules for the platform are extensive, paid or not, and I strongly recommend it. As previously mentioned, I make no claims of ownership to any code or products on the site, I am simply recommending it to further harden the network for performance and security.
The first step you will need is to set up a dedicated server to host SpiceWorks. I recommend as high end Windows Server 2012+ x64 based server as you can allocate for a couple of reasons. First, a dedicated server is more isolated than a VM, and as such has a slightly better risk factor against a targeted attack and can be placed in an isolated zone. Second, a high end server will grow with you. This will be important later when we deploy remote agents. The server needs to be placed in a very secure zone in your network. Once you have Windows Server installed, be sure to perform a patch update and make sure all drivers are current. You will not want to install any firewall software on this server, and you will need to make sure the built-in Windows firewall is turned off. This is because SpiceWorks will use a variety of protocols to scan the network. In addition, on internal firewalls, you will want to create a point security policy that will allow any traffic sourced from your specific SpiceWorks Server through the network. Now it is time to install the platform.
Go to http://www.spiceworks.com/ and “Join SpiceWorks” by clicking the button:
Now fill out your information and “join.” A verification email will be sent to you, follow the embedded link. You will then be asked to create a profile.
Download the SpiceWorks for Windows application and run the installer as an administrator. Install with defaults. Please note that during the installation, you will be asked for the default TCP listening port, the default is port 80 as well as port 443. You will also be asked if you want to install WinPcap and NMAP, say yes.
Once installed, you will notice that a desktop icon is created. If not already launched, launch SpiceWorks. At the login prompt, you will need to create a local account.
Once logged in, pick “Discover my Device.” You will see:
We are not quite ready for discovery, so in the upper right hand of the screen, click on “Settings”
The most important settings for now are “Active Directory Settings” and “Network Scan.” Click on Active Directory and fill out all relevant information.
We plan on using the Active Directory system to help discover most of our host resources. Be sure to insert the correct AD server and administrator account. In addition, you want AD scanning turned on and scan every 30 minutes. Also, be sure to check “Sync Changes with AD.” If your network used LDAP services, be sure to configure the correct information.
Under Email Setting, configure your email account information (Fig. 2.1):

Figure 2.1 Email Server and Account Settings.
At this point, we have to consider administrator rights in the network. Clearly, you have some administer accounts in the network already, but what is the chain of custody for those accounts? Do too many people have them? Do ex-employees have them? For that reason, I am recommending that all existing administrator accounts be updated with new password that will rotate monthly. In addition, whenever administrator staff changes, that should force a new administrator password globally.
Here are some recommendations on strong passwords according to The GeekStuff.com (source: http://www.thegeekstuff.com/2008/06/the-ultimate-guide-for-creating-strong-passwords/):
Passwords should be
• at least eight characters in length
• combine upper and lower characters
• contain at least one number (0–9)
• contain one special character (ie, !,@,#,$,%,&, etc.)
• no reuse on rotation
Now, we will need to pick a new administrator username and password. This new account should only be given to staff on a need to know basis. In the SpiceWorks GUI, select “Network Scan.”
Under the “Your Networks,” you will need to add the subnets in use in your network in the form first host IP–last octet in subnet. Be sure to add all local and remote subnets, and do not forget remote subnets.
In “Stored Passwords,” we will add our administrator account per access class. Click on each class such as WMI, SSH, SNMP and add the new admin account. For devices such as printers, we will use SNMP. For this case, typically “public” and no passwords are common. We do not want this, because it lowers security. I recommend creating a new strong “SNMP Community String” using similar rules as a password. So the plan is that most host assets will be attached to the Active Directory domain, but exceptions will be processed by accounts we will create in stored passwords.
Performing Fixed Physical Site Audit
Now, the legwork begins in earnest. When you find a host, the task objective is the following:
• physically identify the host
• tag valid hosts with new asset tags
• identify the purpose and owner of the host
• is it a valid host, old equipment, or nonauthorized gear
– if the host is not needed, obsolete, or is not authorized, the equipment must be pulled off the network
• is the PC a Windows-based host and active member of the Active Directory
• yes
– does the local host have any local administrator accounts?
• if yes, we need to change the local admin account to the new admin password
• no
– this host is considered a Windows-host exception
• inspect the local accounts; chances are the main account is an administrator. My recommendation is to demote the local account to the “User Group,” and create a new administrator account with the aforementioned new password
• if the host is a non-Windows host, such as a Mac or Linux host, you will want to create a new administrator level account for management
• in addition, you will need to document the following for the exception host
– owner
– location and switch port connecting it to the network
– user name and password of primary account
– for each network interface, you will need the IP address if static or document if it used DHCP
– MAC address of each NIC
• for non-PC devices, such as printers
• document the following
– name
– type (make and model)
– location
– connected switch port
– web interface credentials
– SNMP
• change the SNMP community string to the new private string and change/add password
You should assign a single staff member to collect and correlate all the data from different people inspecting the network, especially data from branch offices.
Performing Audit of Mobile Assets
By its nature, mobile devices (laptops, tablets, smartphones) are sometimes present on the network and sometimes not. For this reason, we need to perform the same basic inspection as fixed assets, but we need to coordinate with the user population for them to come in and add their devices to the database.
You should ask each user with an assigned mobile device to come in at a specific time to a central location, like a conference room. This may be perceived as inconvenient for users, but it is necessary because a single device may infect the entire network if it is allowed to connect. For laptops, perform the same operations as mentioned in the fixed asset section. For mobile devices, you should document the phone/tablet password and user account, and Wi-Fi and fixed NIC MAC address. Asset tags should also be placed on these devices to identify that they have been inspected. The best place to place the asset tag is on the inside of the battery case.
Once we have an active list of mobile device users, we will use that later with the MDM module for remote management of smartphones and tablets. At this stage, we simply want to identify who has what device.
Performing Audit of Server Assets
Server based audits are similar to host based audit, with some critical exceptions. A server may be a classic bare metal server, or may be virtualized. In any event, we need some more detailed information regarding the server.
Documenting the Basic Server Metadata
A server is a community in its self. It has administrators, content creators, users, policies, and actions. In documenting the server, this needs to be annotated completely. First, we need to understand who are the primary and backup owners of the server, who administrates it, who provides content, and who uses that content. We need to login to each server and identify every account present on the server, especially local accounts such as who has user access and who is a local administrator. We should use the principal that a user should have just enough access right to not impair their work. For example, people who upload content frequently have and rarely need administrator level rights.
Documenting Server Assets
Documenting the specific attributes of each device can help later in performance tuning and identification of infected devices (such as knowing the MAC address of a server). For each server, you should document the following:
• What is the base hardware platform (CPU, RAM, storage)?
• What is the OS and patch level of the server?
• What is the IP and MAC address of each NIC?
• How is the content backed up, including where and schedule?
• What user accounts and ammonization levels are present on the server?
• What services installed?
• What are the open TCP and UDP port numbers on the server?
Virtualized servers need some additional documentation. A virtual server can sit behind a potentially long Network Functions Virtualization (NFV) chain of virtual routers, switches, firewalls, etc. You need to document the classic server metric mention, but you also need to document the VM profile settings, snapshot state, attached datastore, and NFV chain up to and including the physical NIC. In addition, you need to document the administrator accounts on the hypervisor server platform.
To accomplish this, there are a couple of tools we can use. The first tool I will recommend for gathering system information about either server of a PC host is a tool called HWINFO (http://www.hwinfo.com). This tool will give you very deep information about the server hardware platform.
I recommend that you download the “Portable” version, because that version will not install any software, you just extract and run. Please note that the NIC MAC address is available on the Network/<NIC> subpage (Fig. 2.2).
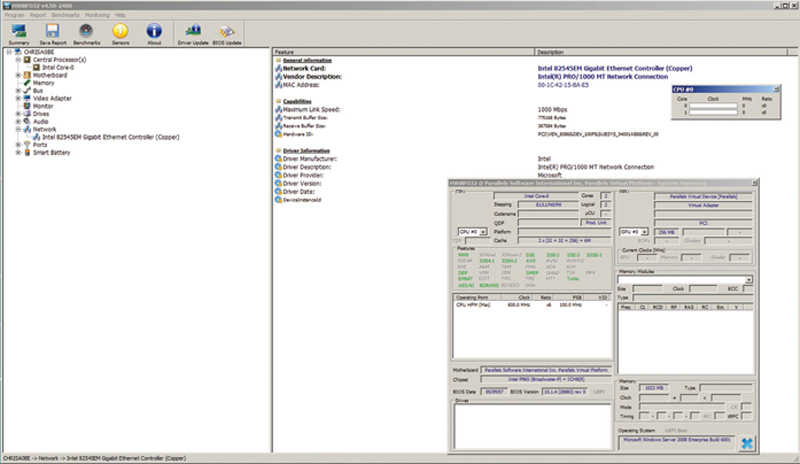
Figure 2.2 Example System Information.
Of course, if the server is Windows, you can also use the excellent built-in tool “systeminfo” from a command prompt to poll the server. I also recommend you use this tool in conjunction with HWINFO because it will also give you necessary information about the server patch levels, server software, etc. This is also convenient because for servers with limited Internet access, the command is present on all Windows server platforms (Fig. 2.3).
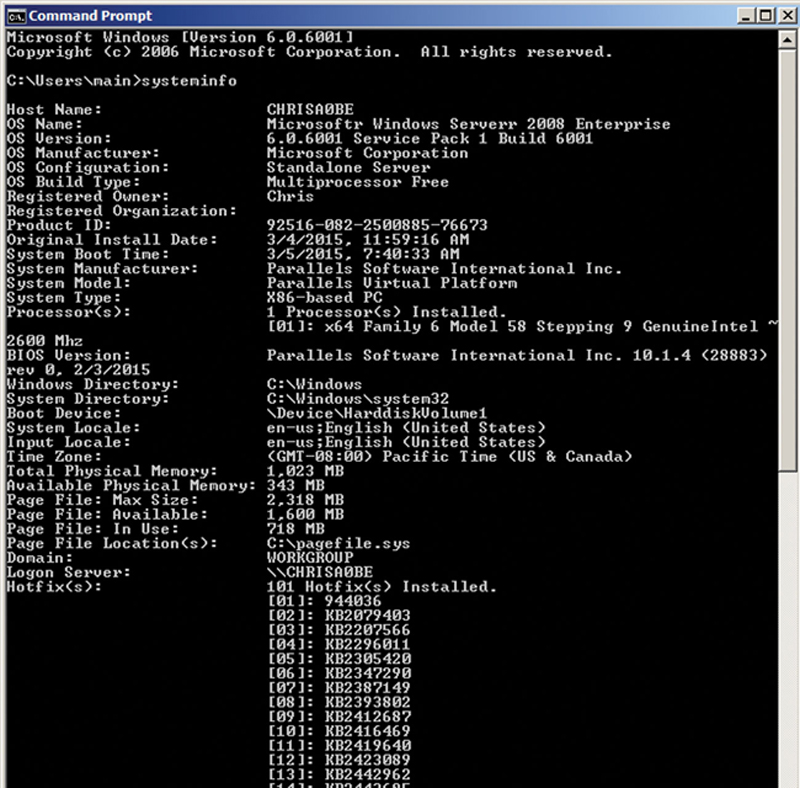
Figure 2.3 Command Line System Information About a Host.
For Linux server, I recommend using the “sudo hwinfo –short” command, which will give you basic hardware information.
For example, issuing the command at the CLI prompt will give you Fig. 2.4.
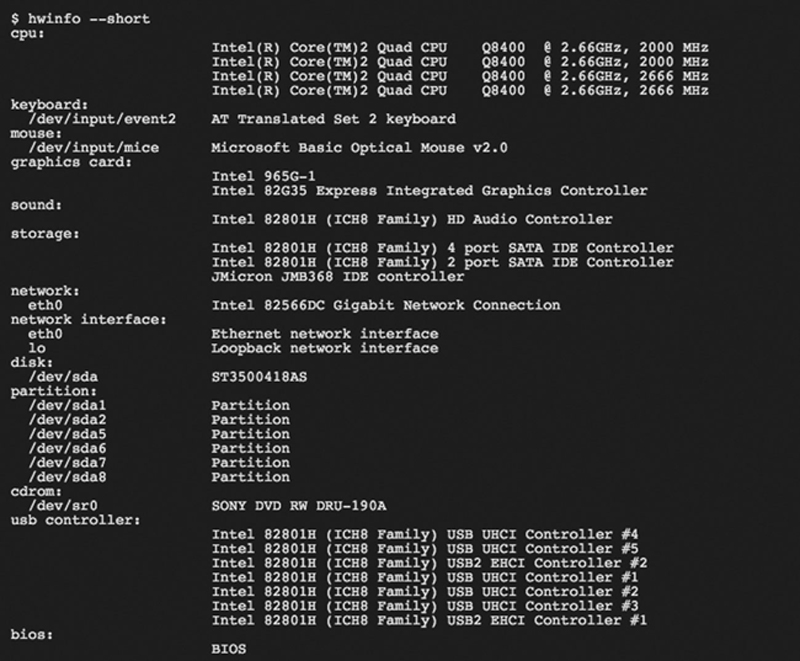
Figure 2.4 Example “hwinfo-short” Summary Information.
In addition, if you use the “ifconfig –a” command, you can poll each interface’s network configuration (Fig. 2.5).
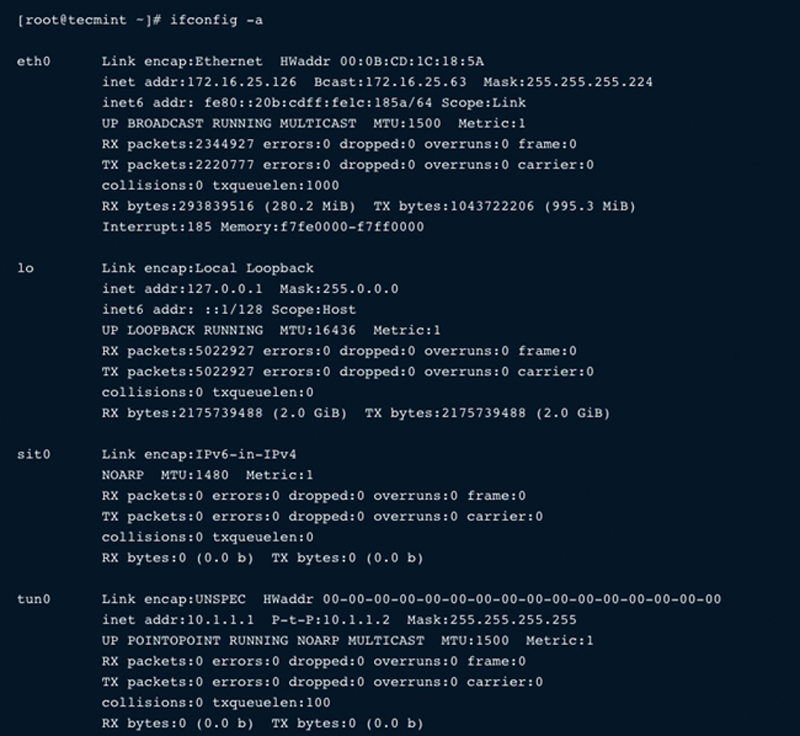
Figure 2.5 Network Interface Configurations.
Tools to Document Virtual Server Assets
In addition to the above-mentioned polling, you will also need to understand hypervisor specific VM profile, where its specific position is in the NFV chain, and the host hypervisor. First, you will need to document admin accounts on hypervisors, when you have this information you will need to log into the hypervisor. Since VMware is the predominant hypervisor vendor, I will use that platform to demonstrate concepts, but you specific hypervisor platform may vary based on vendor.
If you do not already have the ESX vSphere client installed, just web browse to the IP address of the hypervisor. If you do not know the IP address, you can direct console in via keyboard/ monitor to the host, log in with an admin account by pressing <FN>-F2, and typing in your admin credentials. From here, select “Configure Network Management” where you can see how the hypervisor management is configured. One other thing I recommend it changing the administrator’s password to our new hardened password which will rotate periodically, to remove the chance of nonauthorized users access.
Launch the vSphere client and type in the IP of the ESX host, admin user name, and our new password. This will get you to the vSphere main screen, where you can expand the VM list. Right-Click on the server in question, and click “Edit Settings…” (Fig. 2.6).
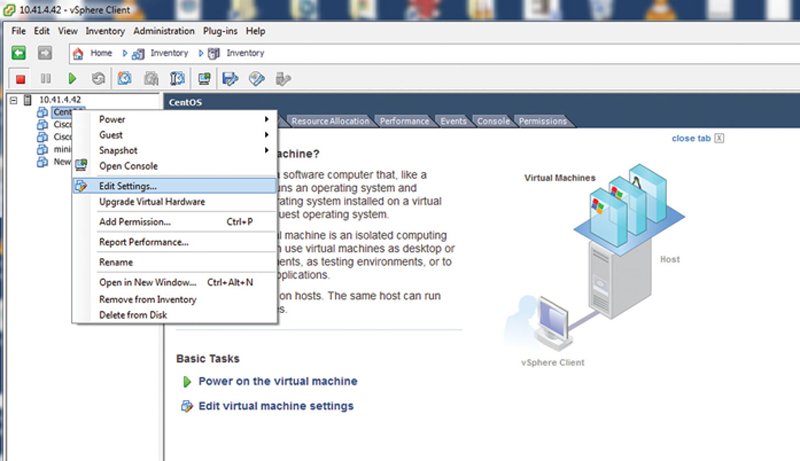
Figure 2.6 Editing a VM in ESX.
This panel will describe the settings of the VM. If you click on the Network Adapter in sequence, you can see the virtual L2 MAC address assigned to each of the VMs (Fig. 2.7).
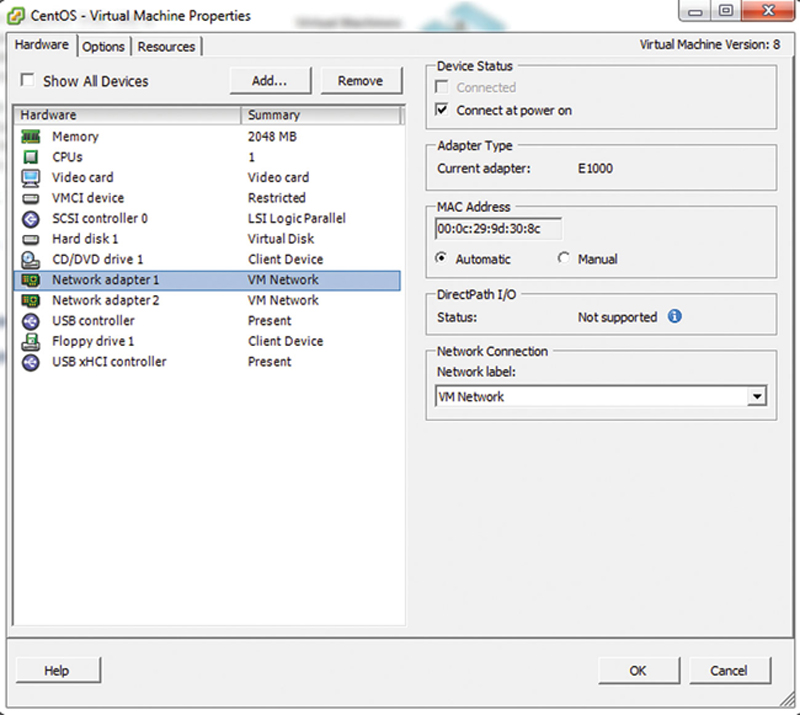
Figure 2.7 VM Network Adapter Settings.
In addition, you will need to see to which vSwitch each and every NIC is connected. From this we will trace the NFV chain back to the egress physical NIC on the hypervisor host. Next, if you click on the ESX host IP in the host tree, then click on Configuration>Networking, you will see the vSwitch mapping. For each NIC, find the vSwitch name and verify your server VM is a member of the vSwitch (Fig. 2.8).
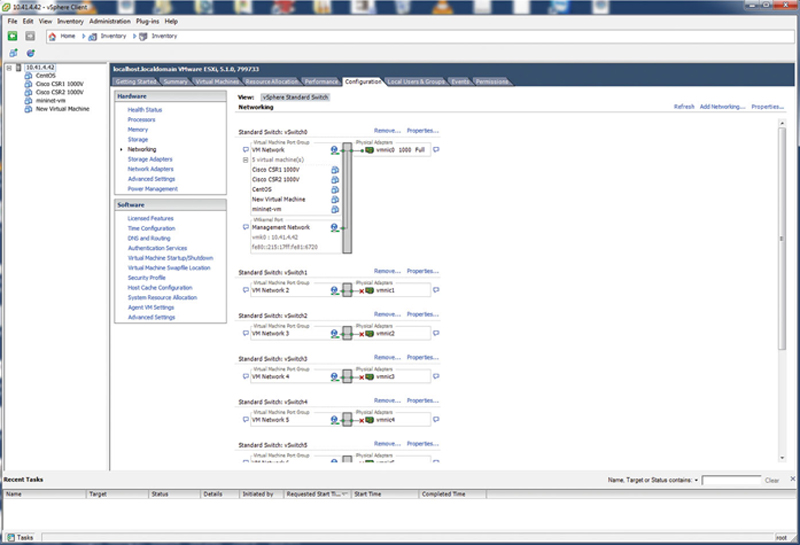
Figure 2.8 Network vSwitch Mappings.
Now, look for other VM and physical NICs, such as “vmnic0.” The vSwitch that contain the server VM and NFV device VMs are candidates for being connected. Log in to the NFV midspan device and check the NIC addressing to see if it and the Server VM nic are in the same local subnet. If so, they are probably connected. Also, when logged into the midspan device, try to trace route the server. Likewise, from the server, trace route the mid span device. You should get a one hop response.
For each virtual NIC on the midspan device, use the same procedure and follow the path until you reach the physical NIC as verified by local addressing. At this point you have identified your NFV chain. Stop when the egress IP route is outside the hypervisor via a physical NIC.
Using NMAP
NMAP is a very powerful tool for verifying elements, open ports, and objects on your network, and we will use it extensively in this book. When you install SpiceWorks, NMAP and WinPcap will install so you can use it from your SpiceWorks server. If you need to install it you can get the Windows or Linux version here (https://nmap.org/download.html). NMAP does have a graphical user interface called Zenmap, but the command line interface is very straightforward to use.
After installing NMAP, be sure NMAP is in your PATH statement of Windows or Linux. To verify this from a command line, simply type “nmap” and return. You will either see a program cannot be found error or NMAP help and example. You can set the PATH to the NMAP executable in Windows by right clicking on Start>Computer and selecting properties. Then click on “Advanced System Settings,” then “Advanced Tab” and click on “Environment Variables.” Next, under “System Variables,” scroll down to the entry “Path.” Edit the string, and add the fully qualified path at the end. Be sure to separate the last entry to the new path with a “;” character.
The first thing we can do to scan our server is to look for open TCP ports. Do this my typing “nmap <IP>.” For our purposes, we will use the IPv4 address, but you can also use a DNS conical name provided the DNS record is available and DNS is properly configured. In addition, if you are scanning the local machine, you can also type “nmap 127.0.0.1” (Fig. 2.9).

Figure 2.9 Example TCP Scan.
Now, you also want to look for active UDP ports, so you can issue “nmap –sU 127.0.0.1” (or correct IP). This will show you what active services are available.
Now for each open TCP and UDP port number, question why the port is open. Is it a default Windows service (a good resource may be found here: https://msdn.microsoft.com/en-us/library/cc875824.aspx) or Linux.
Here is a tip, if in Windows command line you issue a “netstat –noa,” you will get a list of active TCP and UDP ports, indexed by PID (process ID). Now, you can look up which executable is bound to that process ID by issuing a “tasklist | findstr xxx” where xxx is the PID. This will then tell you the executable bound to that socket (Fig. 2.10).
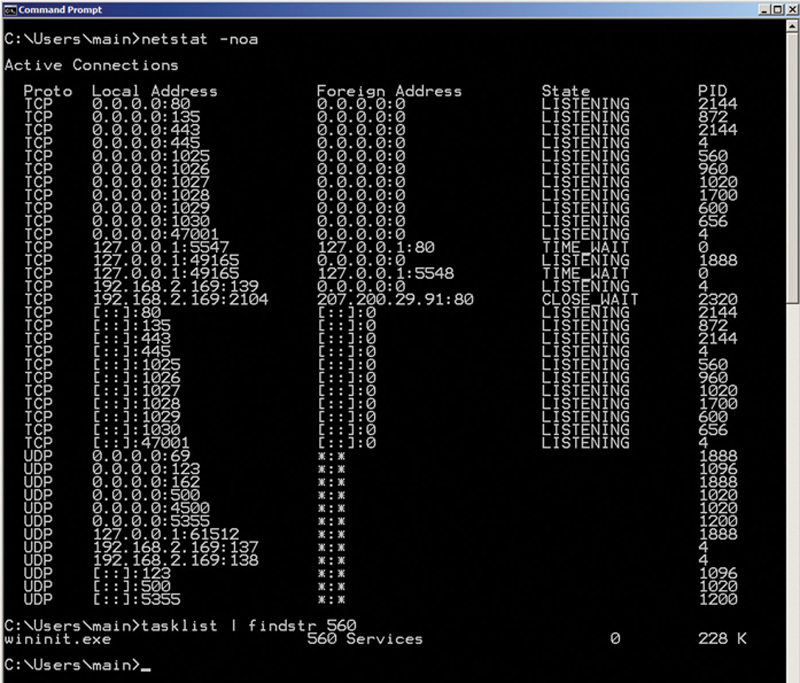
Figure 2.10 Example of “netstat” Open Port TCP and UDP Ports.
So, now that you know what TCP and UDP ports are listening, and what processes are bound to those open sockets, really question if that needs to be open or not.
The best practice is only allow the smallest number of open ports as necessary to perform the functions of the server. NAMP can also scan IP address ranges by using a range like “nmap 10.1.0.1-254” or a wildcard like “nmap 10.1.0.*.” To redirect output, you can also use the –iL and then the file name, this is useful in collection.
Servers as Member of Active Directory or Stand-Alone Servers
For our purposes of management, we will want to make sure that if the server is a Windows-based server it is a member of an active directory. Otherwise, if it is a stand-alone server, we need to document the local user and administrator accounts, with the recommendation of changing the password to our new hardened, rotating password scheme. In Linux, simply issue a “$ cat /etc/passwd” to display local server accounts.
Documenting Network Element Objects
Now that we have the client hosts, mobile devices, and servers documented, we need to document the objects in the network such as routers, switches, PDUs, Firewalls, server load balancers, etc. This will also give us the ability to change local passwords, turn on SNMP, and examine access types. Here are the basic points of documentation we will use per device:
• device manufacture and model number
• device manufacture serial number
• physical interfaces
• code version
• management account
• SNMP state
• local interface addressing including MAC address
With each device, we will limit the number of administrator’s accounts, limited console access, and configure SNMP with our custom community string and password.
Example Device: Capturing Configuration on Cisco Devices
The first step in documenting a Cisco device is to either login via SSH or local console as administrator. What you want to do is show all configured accounts. If the device is a Catalyst switch, issue a “sh run | I user” command. This will list out user accounts on the device. Now, user accounts may either be local or obtained over LDAP. For local account use the “deluser” or “no user….” commands to remove nonessential user accounts. Next, we want to change the administrator password to our new rotating password using the “passed” command for root access change and “passwd-guest” for guest level access. If your device is configured for LDAP, you will need to log in to the LDAP server and delete unauthorized users.
Once logged in, I recommend configuring SNMP. After issuing a “Config t,” you will want to issue a “snmp-server community <string> ro <Access-list-number>” where <string> is our private community string, <Access-List-Number> is a unique ACL number, and “ro” places SNMP into read-only mode. I also recommend locking down what can poll the device using an “access-list <Access-List-Number> permit <IP address of SpiceWorks Server>.” This will only allow the SpiceWorks server to poll this device. Now, you will need to issue an “end” and “copy running-config startup-config” to save changes.
Finally, we will want to capture the active config using a “show version.” By capturing the known good config, we will have a baseline later to compare changes, including potentially malicious changes, to the config.
Documenting Topology Zone Assets
Your network comprises many zones, or domains, and the purpose of this step is to document those domains and asses the risk factor of each zone. One really important concept of security is to no longer treat the interior network as “Trusted” and Internet facing zone as “Untrusted.” Clearly, hosts in the Internet are the most “Untrusted” zone possible. But, that does not mean that internal zones should be considered fully trusted. The differentiation is no longer black and white but shades of gray, which you need to calculate. So what makes a zone more or less risky. First, we need to assess the zones access to the outside, who comprises it, where the zone is located. For example, if you have a zone that contains a lot of users, risk goes up. Higher number of people increase the chance of a Botnet infestation. A zone with isolated server, risk goes down. Zones that allow Wi-Fi and VPN, risk goes up. I like to use a 1–10 scale for risk (1 = isolated zone (low risk), 10 = Internet (high risk).
In addition to a zones risk factor, we must also understand what are valid workflows within and across the zone, and what is the need to use resources. Therefore, you need to document what are the approved applications for that zone, what are the workflows generated for those applications (and what TCP and UDP ports) do they use, and who are authorized users within that zone. As a best practice, users should only have access to services they need and be denied access to all others in the network. This way we can add and document exceptions. A zone also is bordered by network objects such as routers and firewall. You should document what interfaces on these devices are members of the zone.
Documenting Information Assets
Realistically, most organizations have no or poorly enforced rules regarding how information is tagged and where it is stored. In many cases, sensitive information may be stored on a local PC, or even worse a cloud storage service. Sensitive and nonsensitive information tends to be scattered all over the organization without positive tracking. Given that in many cases, information theft is the objective of a security breach, having poorly planned information management makes it easy for the attackers, internal or external. I propose that having an organization-wide data management policy is not only beneficial, but also required for the network to become secure. This type of policy can feel disruptive for users in the network, but necessity of locking down and securing sensitive data is very high and in some jurisdictions a legal requirement. We need a classification system that we can easily assign all data objects an access right and a sensitivity level.
First, we must identify access groups, whereby users are placed in those access groups. This tends to fall under the logical workflow of the organization. For example, engineering may be access group 1, accounting access group 2, etc. Access groups tend also to be aligned with zones in a network or to be an individual. Access groups should also be placed in a tree. The root of the tree has the highest level of classification. To this tree, we must also add the general public as the lowest level of classification. Note, in this system, access groups can have the same classification level as peers, but not necessarily the same access rights.
There are basically three levels of rights: restricted (A), guarded (B), and public (C). Restricted level data objects have a need to know basis only and contain a limited set of access groups. Guarded level is considered internal priority, but generally available to a subset of users at the current position in the tree to the root. Public is considered open to anyone, including the general public. So if we put this together, a document may have a classification of A(1), where 1 is the Human Resources group, and A is restricted data. This means that this data object is only accessible to human resources, and special care and rules are used on how it is accessed and stored. A data object may have a classification of A(50,51,52), which means only access groups 50–52 may work on this document. For example, a press release document may be classified as C(100). “C” refers to the scope of public release and “100” refereeing to general availability. Here, the data object is considered nonsensitive.
As a rule of thumb, each rights level should have a specific policy on how the data is shared and how it is stored. For example, here is a policy example based on rights level:
“A” level
Data at this rights level
• may only be shared with access groups assigned to this level of the data object
• may not be stored on a local PC and must be stored on a secure server, never a cloud service
• may not be accessible from the Internet
“B” level
Data at this level
• must stay within the provided access group or higher clearance
• may be stored on a local PC, but not a cloud service
• may not be accessible from the Internet
“C” level
Data at this level may have
• no restrictions
In general, data should start out as a B level classification, and get either promoted to A level or demoted to C level based on the sensitivity and timing of the data.
Identifying A and B Level Documents
We need to be able to distinguish A and B level documents, and the best way to do that is to identify key phrase searches. Specifically, we want to build an ever-increasing list of phrases that would identify sensitive documents in the network. This step is highly specific to your organization and needs input from key stake holders. Basically, they need an easy way to submit key phrases that would help identify and isolate documents. For example, a document with “health record” or “social security numbers” is probably A level. Now we need to long the data to our NMS system. In addition, your company needs an official internal policy about data security. Every user must understand this policy, and the policy needs to be enforceable. Later, we will periodically scan the network for policy breaches, but before that can happen, users must understand the policy.
Adding the Network to the NMS
In SpiceWorks config section, be sure to add user accounts for Windows and Linux client and server exception hosts that are not members of the Active Directory, and be sure to add SNMP entries for network elements.
Now, we are ready to scan the network. In the dashboard, click on “My Network>Scan.”
At this point, you will need to do some cleanup of the identified objects, specifically add assets that it could not automatically find. To do this, you will need a bulk import script here (http://community.spiceworks.com/how_to/203-import-devices-into-spiceworks-from-a-csv-file). Install the script per the instruction.
Collect all remaining devices that are not in the database and place their information in a single CSV file. Use that file to bulk import into SpiceWorks.
When all the devices are present, we now need to place the devices into groups. In SpiceWorks, under “Setting>Custom groups,” add a custom group per zone which was previously identified.
Click on “My Network>Devices” and edit each device, inserting them in the correct group (Fig. 2.11).
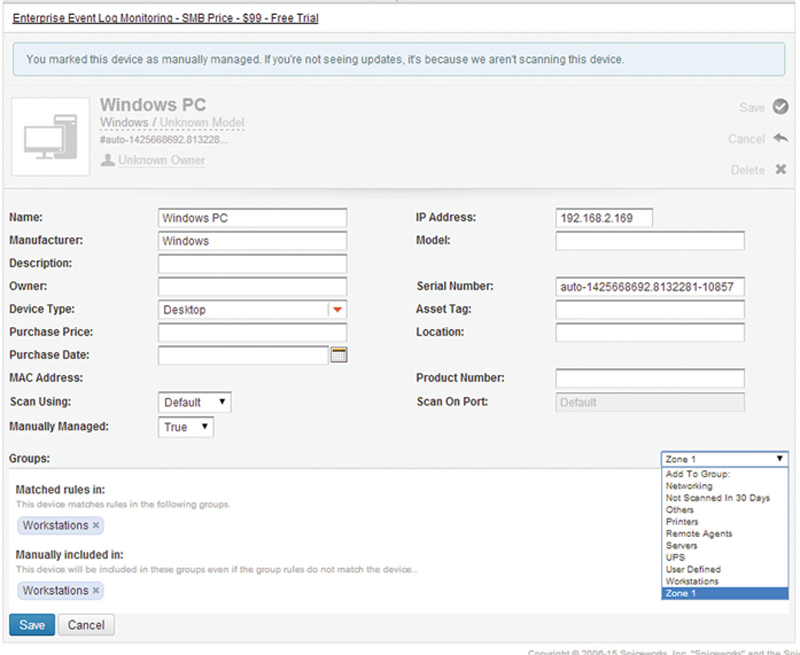
Figure 2.11 Node Object Editor.
Now, you can browse objects by zone:
Finally, I recommend install an SQLite visual query editor (http://sqlitebrowser.org/). This tool will allow you to open the SpiceWorks database and export key fields to CSV. We will need this later to extract key attributes.
Chapter Summary
The purpose of this chapter is to perform an initial deep audit of host and server assets, network objects, mobile devices, hypervisor, virtual server, NFV chains, people, zones, and data on the network. We specifically did not relay on existing databases of inventory, and when possible we deleted old management and access account and changed the password. Finally, we scanned for network objects into SpiceWorks and in a second pass added exceptions. Finally, we sorted object into their zones through the SpiceWorks grouping system. At this point, all network objects should be positively identified and tracking and management may begin.