Chapter 4
Locking down and optimizing the windows client
Abstract
Here, we focus on locking down the Windows client. Focusing on client side advanced configuration to appropriately limit how software and patches may be installed, gains better level of consistency and security for the entire network. Next, we harden key applications like the Web browser and mail.
Keywords
hardening windows client
hardening web browser
hardening mail client
The client computer can be a significant point of attack in the network and thus must be completely optimized for both security and performance. The client computer will most probably be, but not limited to, Windows. Chances are a majority of your clients are using Microsoft Windows, with some additional operating systems such as Linux and MacOS X. When locking down and optimizing the client, we will use the principal of the weakest link. That is, the least secured client has the highest chance of causing breaches of security. In addition to security, we must also optimize the client for performance by adjusting client parameters locally and for network access. Regular optimization and tuning will ensure a good quality of experience in a secure environment.
Keeping Windows Patched
It may sound like an obvious thing, but making sure your clients are regularly patched with updates from Microsoft is actually really important. As with all complex software, there will always be holes and vulnerabilities in the code which may be exploited by malicious entities. Pathing helps close those points of vulnerabilities. It is recommended that you turn on automatic updating in Windows (Fig. 4.1).
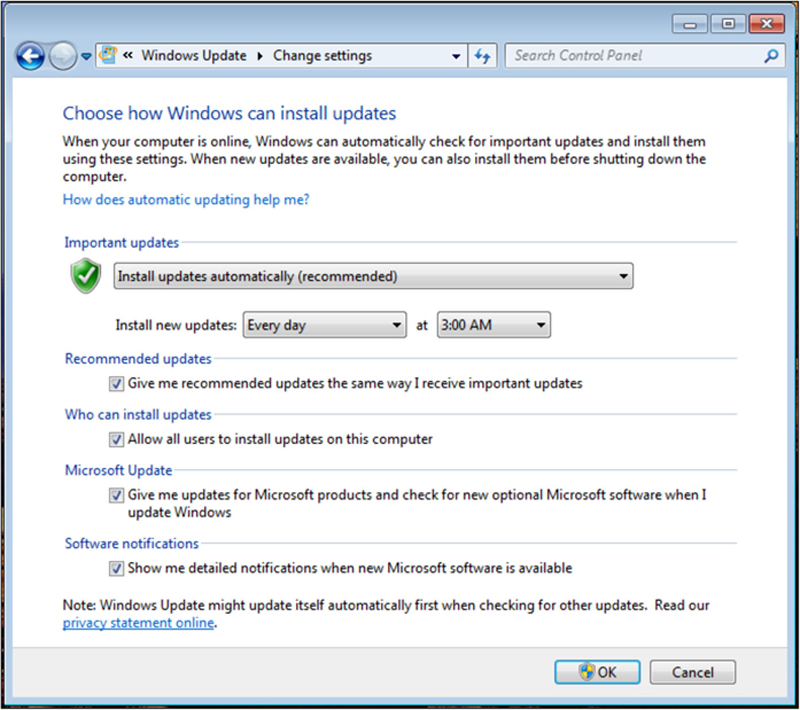
Figure 4.1 Windows Update Options.
There is some discussion if it is available to allow automatic updating of clients. I think it is advisable for a few reasons. First, if you are in a large network, there is a huge logistics problem of attempting to manually update patches if you choose to do it by hand. You can, of course, push patched over Active Directory, but this assumes the user will be connected to the AD domain. For mobile users, this may or may not happen daily. What is true is that if there is a severe enough exploit, you need to get the patch rolled out universally as soon as possible, even if users are not connected to the network.
Patching is required not only for the core operating system, but also for device drivers specific to the manufacture of the device. These driver updates not only improve performance, reduce bugs, but also eliminate potential breach entry points.
Defining Approved Software
Part of keeping the client secure is to move from a model where the user can install any software (which is potentially infected, or is not secure and lowers over all security) to a model where the company provides an approved list of software. By doing this, you can dramatically reduce the chance of unintentional infection by users, keep the pool of software discrete and defined, and focus on keeping approved software well performing and secure.
So what do I mean by software? This can include approved web browser, office application, mail client (if not using Exchange), java, tools, web browser plugins, and extensions (Luckily these are going away). Best practice is to choose software that has direct business use, and deny others.
Setting User Rights Correctly and Locking Down Install Rights
I have seen a lot of instances where the workstation user has “Administrator” or “Power User” rights. Users should always have the user Rights of “User.” In addition, there should be a local administrator account, which is not shared with the user. This will remove their ability to install most software but still gives administrators the ability to locally access the workstation. In addition, we want to use Software Restriction Policies through Group Policies with WMI filtering. With this option, we can restrict that path of approved software and disallow running of software in other locations.
To set this up, on your Active Directory controller, open up Active Directory users and Computers and perform the following:
1. Click on the Organization Unit (like LAN_Users)
2. Right Click and select Properties, Select Group Properties
3. Click new, and name it, Click Edit
4. Under User Configuration, Click on Windows Settings
5. Click on Security Settings > Software Restriction Policies
6. Right Click and select new Software Restriction Policies
7. Right Click on Disallowed, and set as default
a. This will explicitly block any software from running that we do not have explicit rules to allow
8. Click back on Software Restriction Policies
9. Double click on Additional Rules
10. Right-Click, Create a Hash rule
a. Click Browse
b. Using UNC path, browse to a workstation in that group to the default path. Select the .EXE file
c. Set the Security Level to Allowed
d. Repeat Step 10 For each Allowed .EXE on the Client
11. Click on Software Restriction Policies
a. Keep “all software except libraries (such as DLL).” Checked
b. Check policy applies to the following users “all users except local administrators”
12. Current group workstations will have to log out and reauthenticate
We also have to consider the nonconnected windows client. In some circumstances, such as labs, we may not have domain controllers pushing policies. For this class of workstation, do the following:
1. Click Start>type in “gpedit.msc” and return
2. Click on “Computer Configuration”
3. Click on “Administrative Templates”
4. Click on “Windows Components”
5. Click on “Windows Installer”
There are many good lockdown features here, but double click on “Prohibit User Installs” and set to enable (Fig. 4.2).
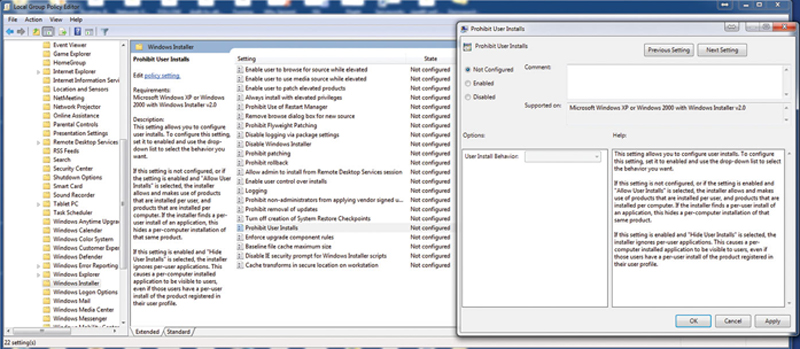
Figure 4.2 Policy Group Editor.
Finally, we must consider the standalone, non-Windows PC. For MacOS X, you will want to create local user account in Apple>System Preferences>Users & Groups with a new account type “Managed with Parental Controls.” Make sure “Allow user to administer this computer” is unchecked (Fig. 4.3).
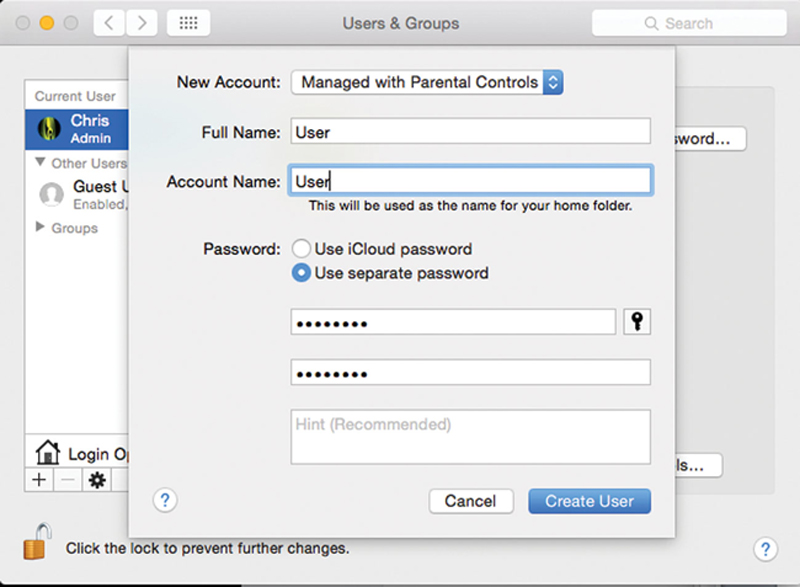
Figure 4.3 User Account.
Now, under Apple>System Preferences>Parental Control, click the lock icon and authenticate with the admin user account, and check that you want to enable parental controls. Click on each non-admin user account and, configure like Fig. 4.4.
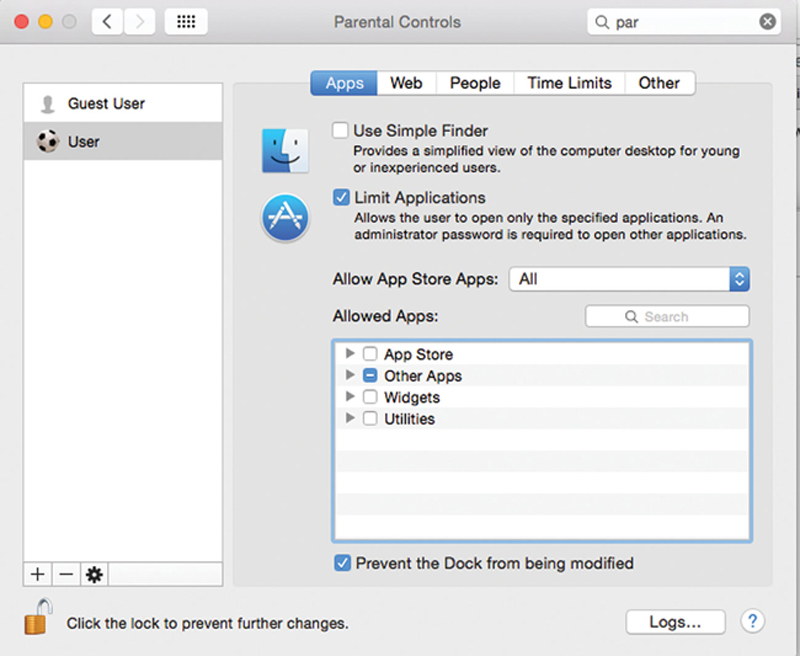
Figure 4.4 Using Parental Controls for Better Security.
Under list of other icons, only check approved apps. Also, be sure to disable AppStore, Widgets, and Utilities. As always, verify there is only one admin account and regularly rotate the password with a strong admin credentials.
For Linux desktops, make sure the user uses a nonadministrator account and the admin account is rotated.
By making sure domain users are set to the “Users” access right, you restrict the ability of the user from installing or running new software. By keeping a local administrator account on the workstation, you give admins flexibility in configuring or adding new software. In the Group Policy, we turn off running all software, and then add in access control policies to specially run approved apps, while giving local administrators full access. By doing this, a major potential source of either infection or breach is closed.
The Importance of Windows UAC
UAC, or User Account Control, is a critical security component that when turned on will ask the user to authorize changes to the computer. This is critical defense from worms and rootkits to embed themselves into the OS. In Windows 7, the user has the option of configuring the UAC level using a slide. My recommendation is fill protection (slider to the full top) after all approved software is installed on the PC. To configure this go to Start>Control Panels. Search for “UAC,” then change user account control settings. Turn on UAC and slide it to full protection (Fig. 4.5).
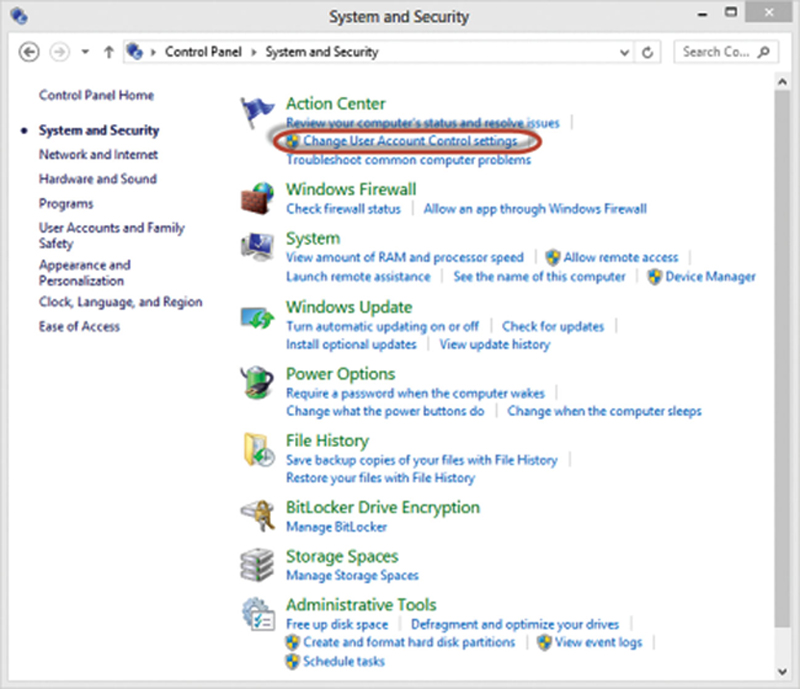
Figure 4.5 Accessing the UAC settings in Windows.
The following require Administrative privileges in Windows:
• Running an application as administrator
• Changes to system-wide settings or to files in the Windows or Program Files folders
• Installing and uninstalling drivers and applications
• Installing ActiveX controls
• Changing settings to the Windows Firewall
• Changing UAC settings
• Configuring Windows Update
• Adding or removing user accounts
• Changing a user’s account type
• Configuring Parental Controls or Family Safety
• Running Task Scheduler
• Restoring backed-up system files
• Viewing or changing another user’s folders and files
• Changing the system date and time
With UAC turned on to full, you add a layer of security for unauthorized installation of software or modification of critical admin elements.
Hardening Windows Networking
Hardening of windows networking is a critical primary step to increasing security. Obviously, poorly locked down windows networking invites attack and exploitation of the computer. As a principal, if we do not need a service, we will disable it. This narrows the windows of exploit. Here are the following steps I recommend to harden Windows networking on the client.
Consider Disabling Ipv6
Chances are you are not using Ipv6. If this is the case, having the service running allows for an unacceptable potential breach point. I strongly recommend disabling Ipv6 totally on the client. To do this, click on Start>Control Panels>Network and Sharing Center. Click on the “Local Area Connection” link. Click Properties (Fig. 4.6).

Figure 4.6 Disabling IPv6 in Windows.
Now, uncheck “Internet Protocol version 6 (TCP/Ipv6),” and click OK.
Consider Disabling IGMP
IGMP is a multicast client service that is rarely used. I recommend disabling it, unless it is specifically needed by a service in your network. For example, if you use broadcast video that may likely use IGMP Multicast. Or, if you plan on deploying VXLAN, which will also use multicast to distribute traffic.
To do this right-click on Start>All programs>Accessories>Command Prompt and “Run as Administrator.” Type in “Netsh interface ipv4 set global mldlevel=none” to disable IGMP (Fig. 4.7).

Figure 4.7 Example of Setting Options with “Netsh.”
Consider Disabling UPnP
UpnP, or Universal Plug and Play, is a service to help make configuration easier for the user. Since the user will not be configuring anything, and since it potentially opens a large service hole, we want to disable it.
To do this, click Start, type in ‘regedit’, and return. Brows to the following key:
HKEY_LOCAL_MACHINE/SOFTWARE/Microsoft/DirectPlayNATHelp/DPNHUPnP
Now, set the (default) key to “2” (Fig. 4.8).
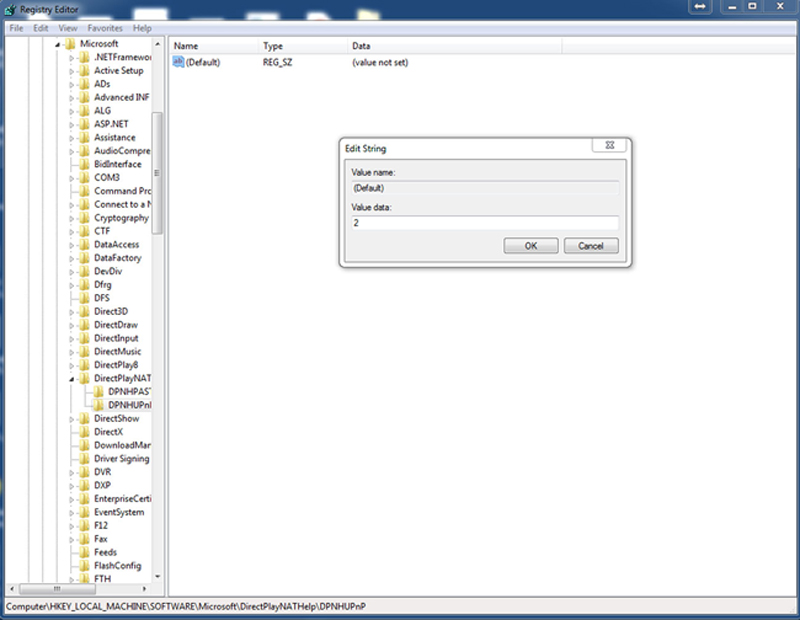
Figure 4.8 Setting a Windows Register Key.
Consider Disabling Listening Ports
Listening ports are openings to services on the computer, bound to some upper layer service. You want to minimize these as much as possible. To view listening ports, in a CLI command prompt, type “netstat –abn.” This will show you open TCP and UDP ports, their port number, their state (LISTENING or ESTABLISHED), foreign attached client and their IP, and the executable (Fig. 4.9).
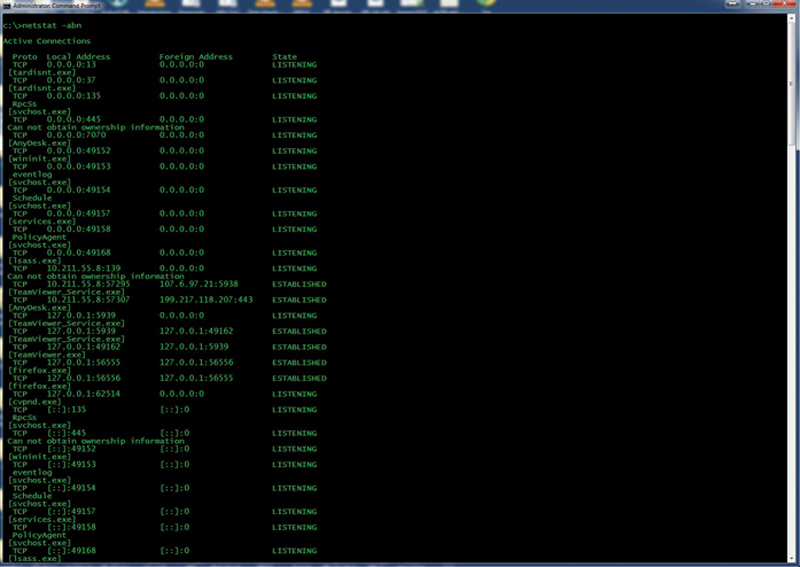
Figure 4.9 Probing for Open TCP Ports.
Windows has some well-known services that you should keep open, namely:
• RPCs (135)
• wininit.exe (49152)
• event log service (49153)
• schedule service (49154)
• services.exe (49155)
• lsass.exe (49156)
Note, port numbers greater than 49152 can change between boots, so validate based on service executable and L4 type. Only sockets of approved services should be open. The following link (https://en.wikipedia.org/wiki/List_of_TCP_and_UDP_port_numbers) is a good reference of port descriptions. If you see a port that is open and you cannot directly identify or link I to a known service, then consider removing the executable associated with service. As a tip, go to the volume root and from the command line shell type “dir <executable name> /s /h /b” to find the path of the executable. Consider either uninstalling that application, placing it in the approved list, or disabling the listening port in the application preferences.
Local Firewalling and Mitigation
Local windows firewalling and mitigation will provide another layer of protection on top of network-based security. In this section, I will describe some best practices to mitigating and defending from attacks that make it to the workstation. First, let us install some antiattack mitigation software on the client.
Consider Using Enhanced Mitigation Experience Toolkit
According to Microsoft (Download http://www.microsoft.com/en-us/download/details.aspx?id=43714), this tool helps defend against a myriad amount of attacks. This tool will help scan Windows services and resources for infections. Therefore, I defiantly recommend installing it.
Do the following (Fig. 4.10):
1. Download EMET at http://www.microsoft.com/en-us/download/details.aspx?id=43714
2. Install with defaults
3. Choose Recommended Settings
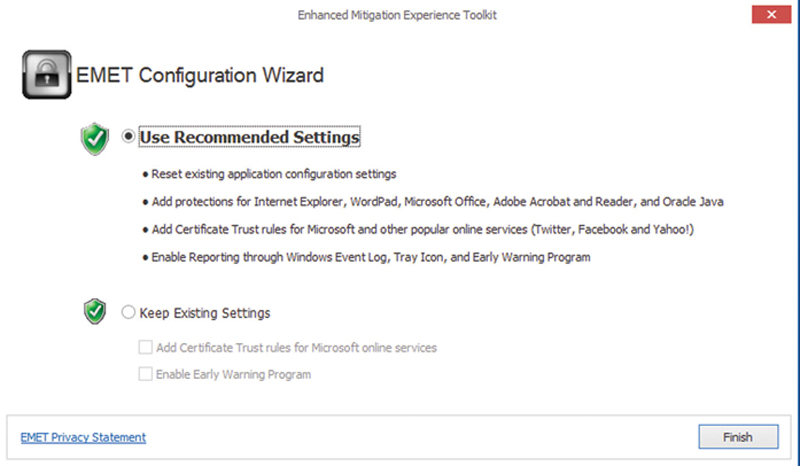
Figure 4.10 Use EMETs Recorded Settings.
Once installed, Click Start>EMET GUI to run the GUI. Change Quick Profile Name to “Maximum Security Settings.” You will need to reboot the workstation (Fig. 4.11).
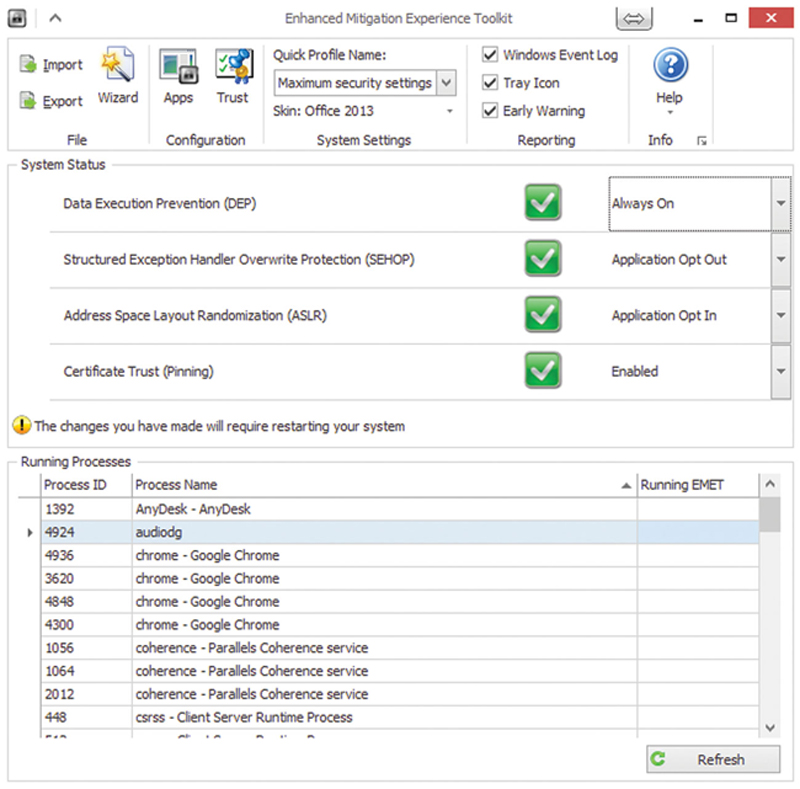
Figure 4.11 Example of Some EMET Advanced Settings.
Consider Using a Local Firewall
Having a local firewall on the workstation is actually pretty important, because it provides a layer of defense if the network based security fails. Windows has a built-in firewall, but my recommendation is a product known as Comodo (https://personalfirewall.comodo.com/). They actually offer two versions of their product, a free firewall and a professional for pay firewall (∼$40, less in high volume). With the professional version, you get a unified firewall and antivirus solution. I will focus on the free version, but I do strongly recommend the professional version for enterprise.
After downloading and installing Comodo firewall.
Now, Click update to sync the database. In the main menu, click on the firewall link to configure the firewall Preferences.
Configure as shown for optimal user experience. Also, you will want to enable password, and use out strong, rotating admin password.
Now, configure Updates tab as follows:
Now, configure Logging. Note that we want to log to the windows log for potential future forensics reasons.
Now, click on security settings>HIPS>HIPS setting and configure the following:
Click on Firewall>Firewall Settings and configure as follows:
Click on Firewall>Rulesets, and configure accordingly:
Click on Firewall>Application Rules, Right click and add a rule. Add each of the executable of the allowed applications.
Be sure to check the rule in Application rules running on this computer.
Disable Unnecessary Windows Client Services
Windows comes with a default of many running services to cater to the widest audience possible; this is good for sales of windows, but not so good for security. It is very important to only have services that you need running, and not more. A great resource for listing windows 7 services and what they do may be located at BlackViper blog (http://www.blackviper.com/windows-default-services/windows-7-default-services/); this site gives a great list of service functions. So now we need to lock down unnecessary services. To do this, click on Start>Control Panel>Administrative Tools>Services. To disable a Service, double click on the service name and click the Stop button (Fig. 4.12).
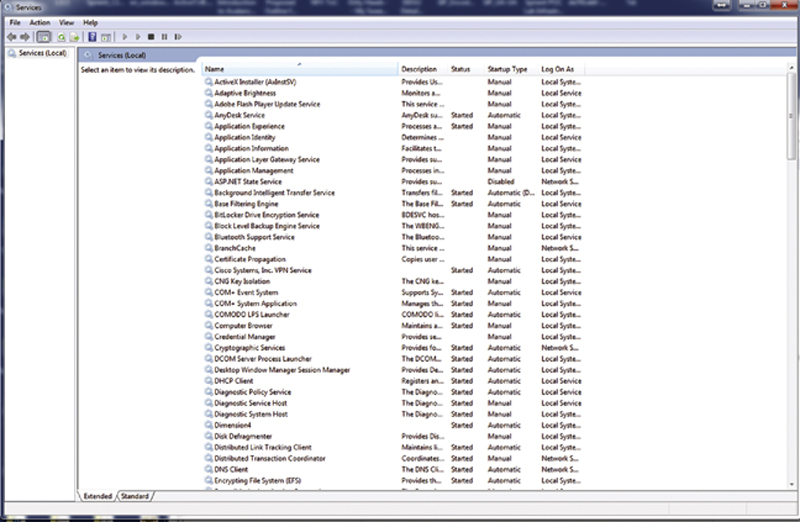
Figure 4.12 Listing Windows Services and Their Start Mode.
Some specific services you may wish to disable include
• IPHelper
• Offline Files
• Parental Controls
• Smartcard
• SmartCard Removal Policy
• Windows Media Center Receiver Service
• Windows Media Center Scheduler Service
• Windows Media Player Network Sharing Service
• FAX
• Home Group Listener
• Hope group Provider
• TabletPC Input Service
• Adaptive Brightness
• Application Experience
• Bluetooth Support Services (When no Bluetooth devices are used)
It is a good idea to look through each service and determine if it is really needed for your specific environment. To determine this, after a fresh install of Windows, launch task manager, and click on Processes. Note the active services, these are the core services. After you install packages, notice the process name and path. By the time you have finished installing all the standard software, you know you have a list of known good processes. Anything other than this should be questioned.
Miscellaneous Configuration Changes to Improve Security
Here is a list of additional configuration changes you can make to improve Security on the windows workstation:
• Turn Off Auto Run
• Download this patch (http://go.microsoft.com/?linkid=9741395) and run the FixIt, this will disable auto run
• Disable the Dump File
• Passwords and confidential material may be written to the logs, so disable it. Go to Start>Computer>Properties>Advanced System Settings>Startup and Recovery Settings. Set Write Debugging Info to None.
• Turn off Gadgets
• Download this patch (http://go.microsoft.com/?linkid=9813057) to turn off gadgets
• Turn off Remote Assistance
• This session can be easily hijacked. Go to Computer>Properties>Advanced System Setting>Remote tab, uncheck “Allow Remote Assistance” as the default behavior, you can always selectively turn it on if the user needs support later.
• Restore Point Configuration Larger Cache
• Go to Computer>Properties>Advanced Systems Settings>System Protection tab. Click Configure and double the cache.
• Configure Screensaver Password
• Right-click on the desktop, click on personalize Screensaver. Turn on screen saver to 30 minutes, and check require password option.
• Turn off Unnecessary Platforms
• Go to Start>Control Panels>Program and Features
- Disable Tablet PC Component
- Disable Windows Gadget platform
Hardening the Browser
The web browser is most likely the most important application on the client PC. It is also one of the most risky because by definition it regularly touches the outside world, and if not configured properly, can be an easy in for attacking agents. In this section, we will lock down and secure each of the three major browsers, as well as give tips on best practices.
Some Basic Points
Since in our model, we disallow the user from installing software, we should not have the problems of the user going on the Internet and downloading an installer and installing. This is critical because a well-known way to attack a network is to pose an infected installer as legitimate. Furthermore, this also eliminates the problem of toolbars being installed outside of an approved software. There are a couple of basic points I recommend. First, stick with one browser organization wide. By doing this, you can push out fixes and patches faster, and reduce overall administration. Another thing to consider is that the general trend is to remove the plugin engine in the browser in favor of standards based technology like HTML5. I strongly recommend you consider a browser, such as Google Chrome, that has removed plugin support. Plugins, such as Adobe Flash, have traditionally been a source of security problems. Furthermore, from a security standpoint, a plugin takes some piece of processing of crucial information, places it in a black box that you cannot see, and potentially shares that information outside of your network, all lowering the overall security level. The other point I wanted to make is to turn on automatic updates and always use the current patch level of the browser. This simple act is critical. As bugs and security holes are identified, patches are developed and pushed to users. Since in security time is extremely critical, having patches pushed to all your users is the best way of maintaining browser security.
Hardening Internet Explorer
Here is a list of recommendations for hardening Internet Explorer:
• Verify Internet Options Security
Click on Start>Control Panels>Internet Options>Security. Click on “Internet” Security Zone, and verify that the setting is “High.” This will give you maximum protection against attacks inline in the page (like a cross site scripting attack), also make “Protected Mode” is checked. This feature basically sandboxes Internet Explorer (Fig. 4.13).
• Turn on SmartScreen
With SmartScreen, when the user browses to a malicious site, the user will be asked by the browser if they want to continue. In IE, press the Alt key and click on Tools>SmartScreen Filter>Turn on SmartScreen Filter (Figs. 4.14–4.16).
• Turn On ActiveX Filtering
ActiveX controls are sometimes required, but can also be malicious. It is recommended that you turn on ActiveX filtering. To do this, click on Gear Icon>Safety>ActiveX Filtering (Fig. 4.17)
• Turn on Tracking Protection
Tracking protection helps hide the user identity. To turn on this feature, click on Gear Icon>Safety>Tracking Protection. Under Tracking protection, right click and enable protection (Fig. 4.18)
• Disable Add-ons
You may also wish to Disable Add-ons. Do this by clicking on the Internet Options>Advanced>Browsing and unchecking “Enable third-party browser Extensions” (Fig. 4.19)
• Verify Internet Programs on Programs Tab
In Internet options>Programs, verify that the approved helper applications are selected as per your security policy.
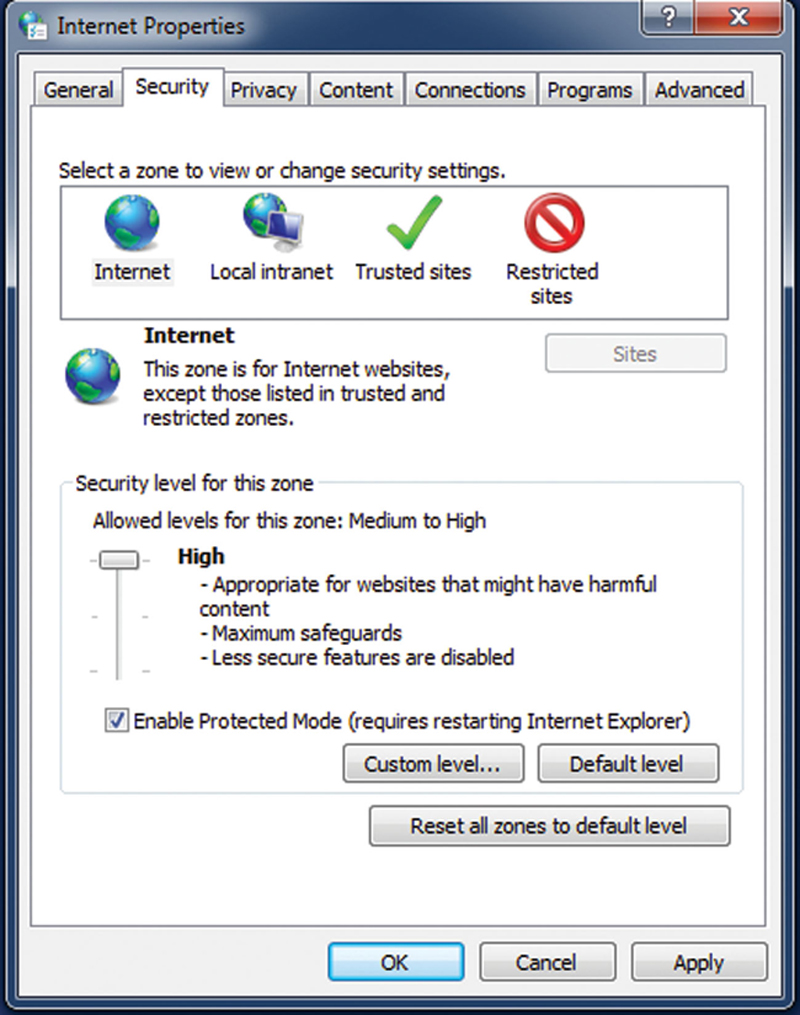
Figure 4.13 Set Windows Verity Level to High for Internet Zone.

Figure 4.14 Turn on SmartScreen Feature.
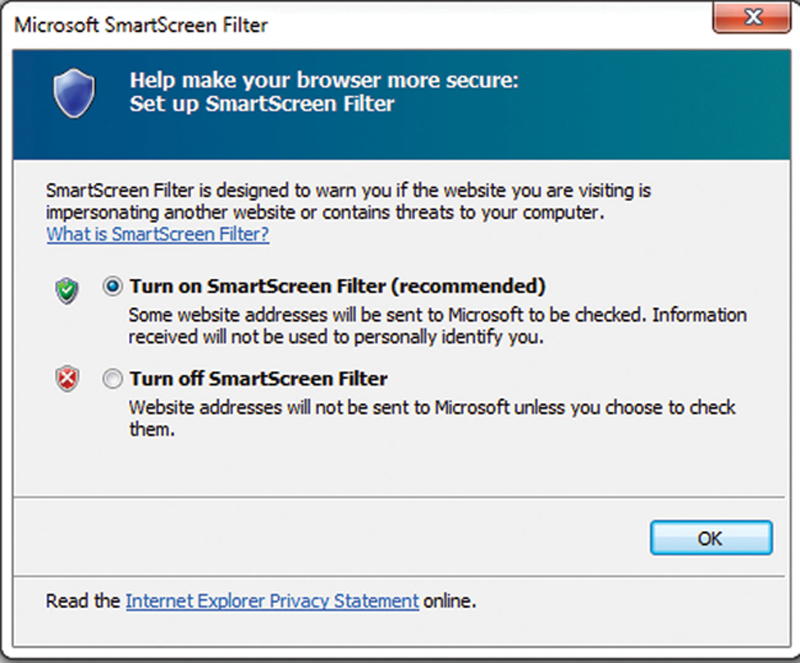
Figure 4.15 Configure with Recommended Settings.
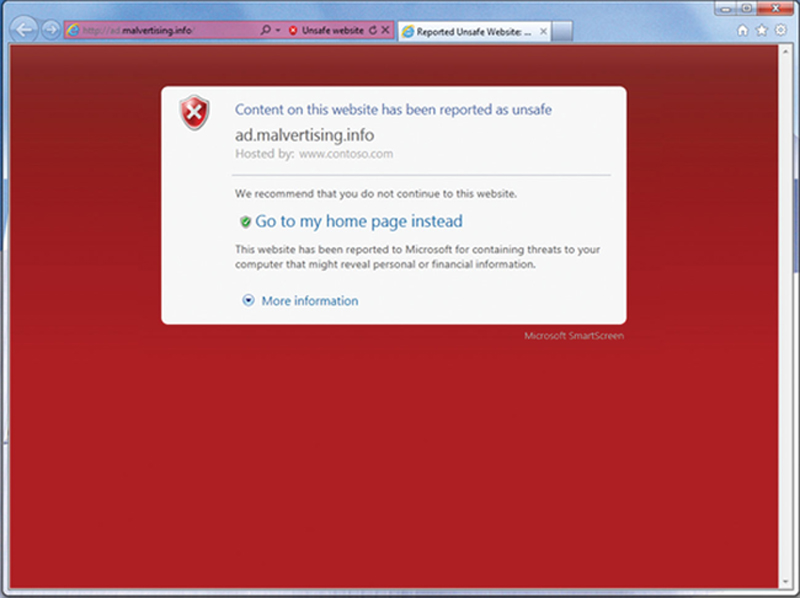
Figure 4.16 Example When SmartScreen Detects Unsafe Pages.
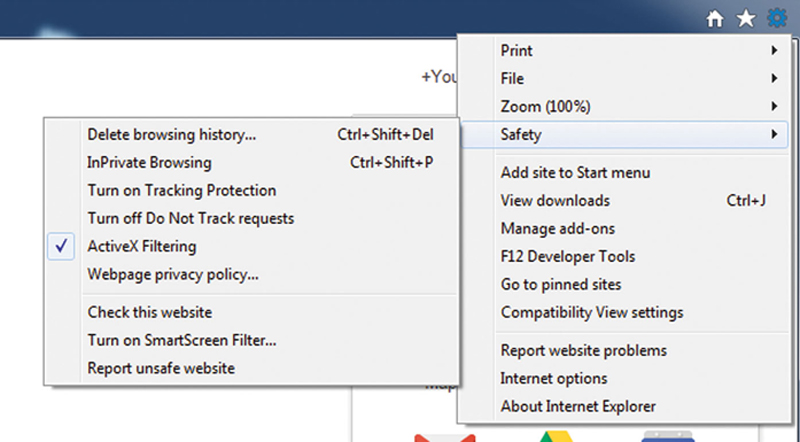
Figure 4.17 Turn on ActiveX Filtering.
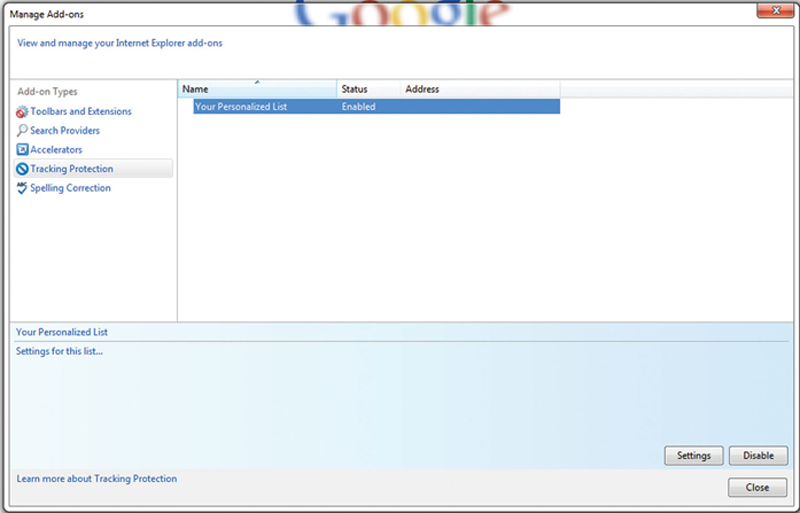
Figure 4.18 Configure Tracing Protection.
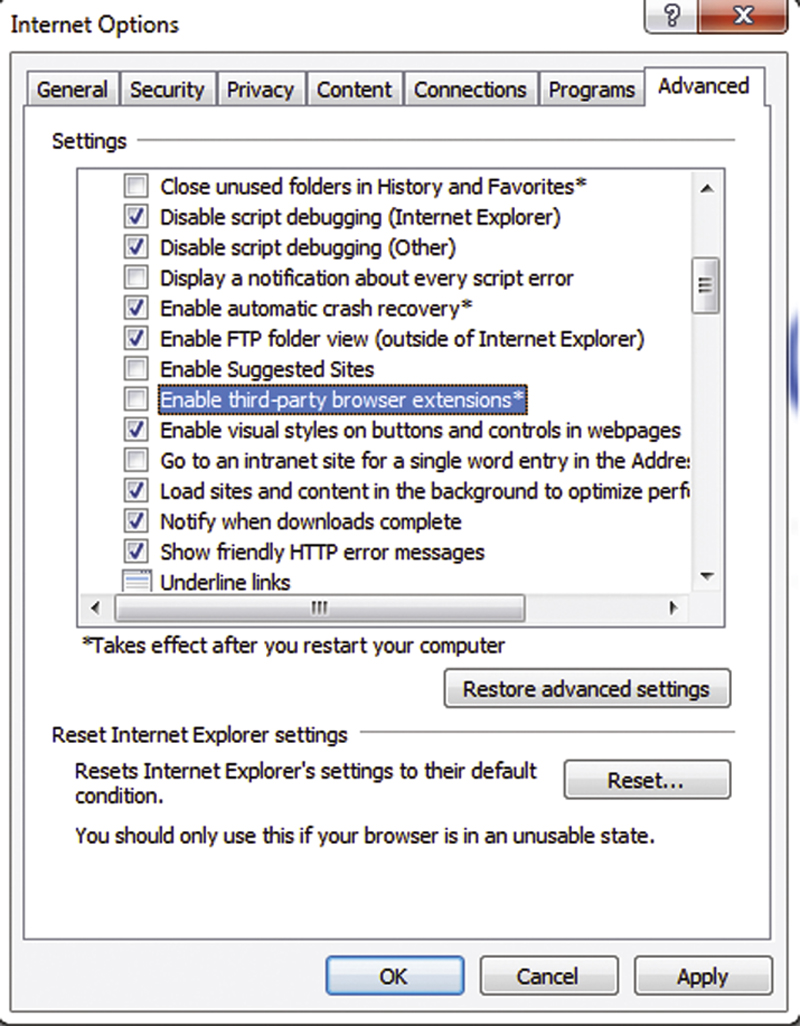
Figure 4.19 Turn off Third-Party Extensions.
Hardening Google Chrome
Recently, Google removed support for the old, and very insecure, NPAPI plugin system. This has dramatically improved the security footprint of Chrome, and as a result is now, in my opinion, the best web browser to make standardized for your organization. Here are some additional tips to further lockdown chrome.
Setting Chrome Privacy features
Click on the Chrome>Settings>Show Advanced Settings. Click on the Content settings button, and check the following (Fig. 4.20):
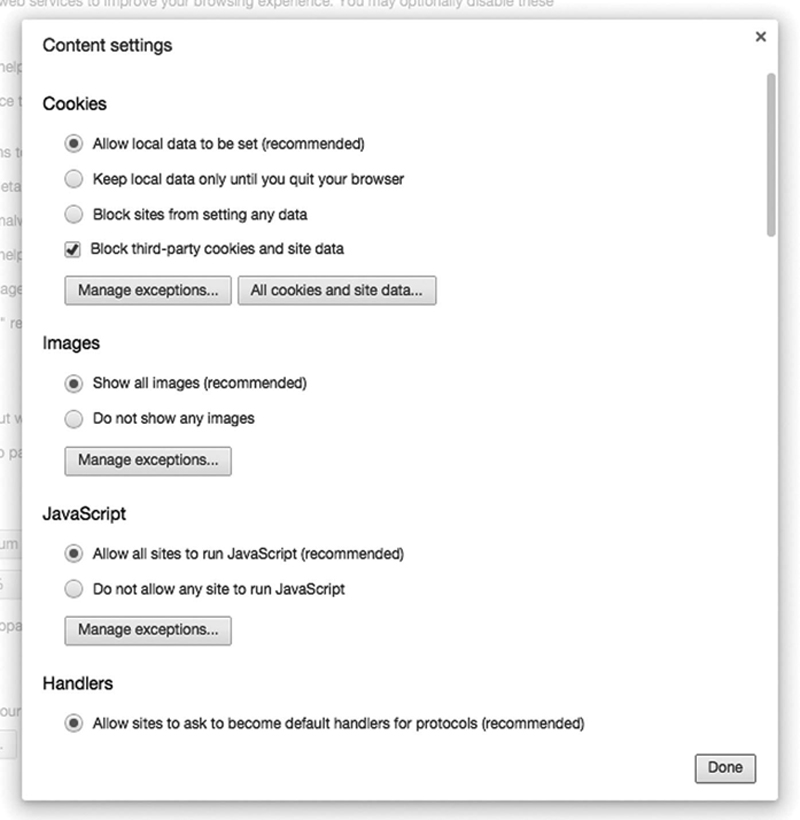
Figure 4.20 Configure FireFox Basic Settings.
The main thing is that you do not want third party extensions from setting cookie and site data. Next, in the Privacy setting section make sure phishing and malware protection is set, and “Do Not Track” option is set. Even though convenient, I do not recommend allowing the user to save passwords. Saving passwords is a convenience, but also presents a much larger security risk. If the resource is accessed by a third party, and the username or password is automatically filled in, a line of defense is defeated (Fig. 4.21).
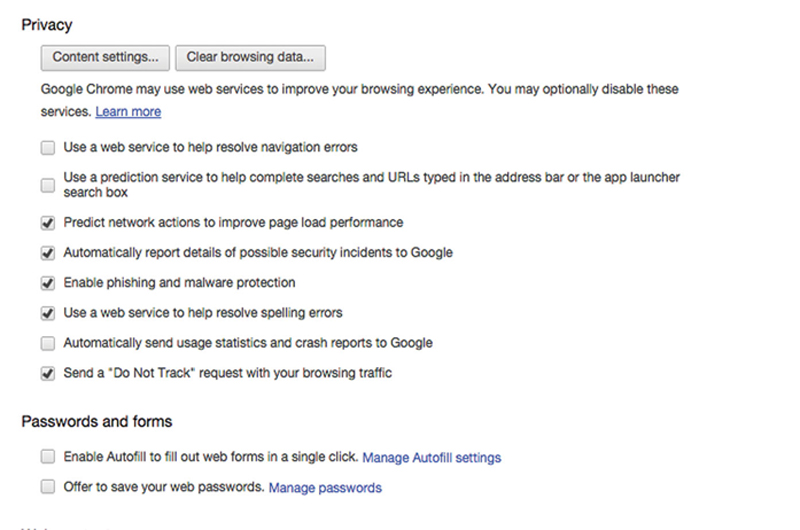
Figure 4.21 Configure Privacy Settings in FireFox.
Securing Firefox
Firefox is a third potential Web Browser you may choose for your enterprise. It has the advantage of having very strong Selenium support for those that need web automation. If you click on Firefox>Preference>Privacy, set the following (Fig. 4.22):
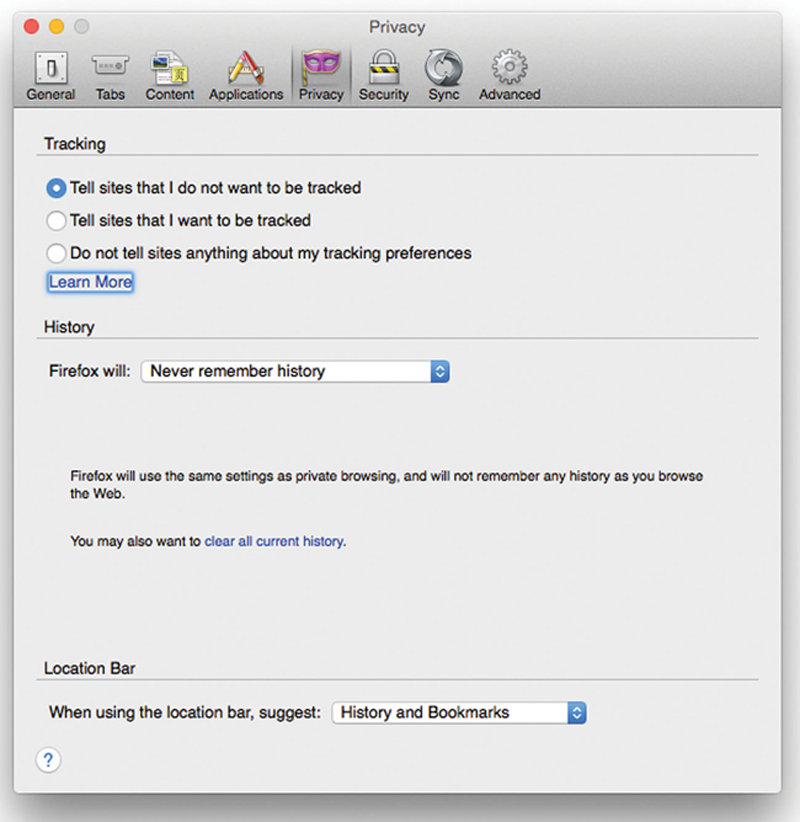
Figure 4.22 Turn Off Tracking and Never Remember History Settings.
Now, in preferences, click on Security, make sure that you have Firefox warn you when a site tries to install add-ons, and block attack and forgery sites. I also recommend setting a master password for user cannot change settings (Fig. 4.23).
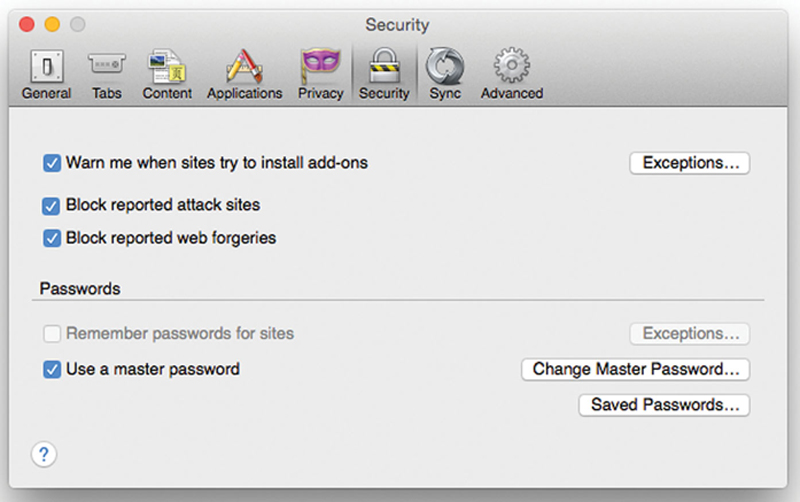
Figure 4.23 Firefox Security Settings
Last, there are a couple of add-ons that will improve FireFox Security.
NoScript: It allows you to filter what sites can, and cannot, use scripting like JavaScript, Silverlight, Flash, etc. Site scripting can be a major source of infection in a network.
Xpand.it!—when you hover over a link, it can help tell you if the link is legitimate, or hijacked.
Adblock Plus—block annoying popups and help user not link to malware sites
HTTPS Finder—helps enforce HTTPS over HTTP, when available.
Mozilla Plugin Checker—helps keep plugin modern and up to date.
Securing Java
Java is a wonderful piece of code that many applications use directly or as a framework infrastructure; it can though be a major security target. Proper security management on a periodic basis is critical.
First, make sure your Java is up to date from java.com. One attack technique is sites will attempt to lure people to install a version of Java that is infected with malware. Only get Java from java.com, and use java.com to test the install to make sure it is installed correctly and is legitimate. Next, only have the latest version of Java installed. Java, like any piece of software, is versioned and one way Oracle reduces security flaws is to update the software. By having older versions installed, you risk a larger security footprint for targeting. In the Java control panel, under security, be sure security level is set to high. In the exceptions list, only put internal sites or applications that need access (Fig. 4.24).
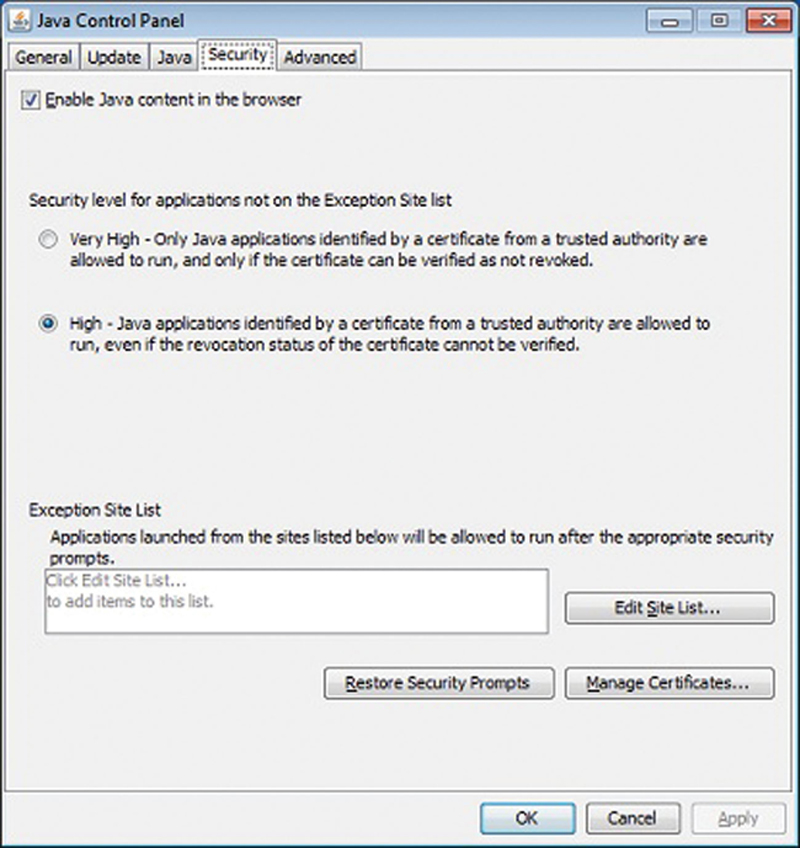
Figure 4.24 Setting Java Security to “High”.
Be sure to enable automatic Java Updates for rapid deployment of security patches. Be sure to clear the Java cache to improve performance and finally do not allow applications from unknown publishers to run. To do this in the Java Control Panel, under security, add a URL by
1. Click on the Edit Site List button.
2. Click the Add in the Exception Site List window.
3. Click in the empty field under Location field to enter the URL. URL should begin with http://or https://, for example, http://myexample.com or https://myexample.com
4. Click OK to save the URL that you entered. If you click Cancel, the URLs are not saved.
5. Click Continue on the Security Warning dialog.
URL Format
1. A protocol and domain are required. Supported protocols are FILE, HTTP, and HTTPS. HTTPS is recommended. If the protocol is not HTTPS, a warning is shown.
2. A port number is required only if the default port is not used.
3. A path is optional.
4. Wildcards are not supported.
5. If only a domain is provided, any RIA from that domain is allowed to run. A domain can have multiple entries, for example, https://www.example.com and http://www.example.com.
6. If the path ends with a slash (/), for example, https://www.example.com/apps/, RIAs in that directory and any subdirectory are allowed to run. If the path does not end with a slash, for example, http://www.example.com/test/applet.html, only that specific RIA is allowed to run.
Do you need and even more secure Browser and Instant Messenger Chat (IM) service? Consider using TOR (https://www.torproject.org/) and a TOR web Browser (https://www.torproject.org/download/download-easy.html.en). TOR will obfuscate your addressing very well. Combined with SSL using a meaningful minimum crypto level of Elliptical Curve DH, gives you very good anonymity. For very secure IM messaging, consider using “Signal” (https://whispersystems.org/).
Protecting Mail: Anti-SPAN and Anti-Phishing Protection
Mail is probably the killer application for most organizations. Simply put, try to run a company without email. That being said, it can be a big problem area for security. Modern email messages are almost becoming min apps with the ability to embed HTML, scripts, video, and attachments. Because the footprint of email users is so large, effective mail security strategy must be deployed. I recommend a multistage, multivendor strategy including the server and client sides. On the client side, I recommend an outlook plugin called mailshell (http://www.mailshell.com/mail/client/oem2.html/step/client).
The plugin works by seamlessly integrating inside of Outlook. The plugin will then securely sync with their “Mailshell SpamLab” service and download new span definitions. I think this is really important because the tool is not just algorithmic based, but based on well-known, new, and critical spam attacks built by a dedicated team. This also means that as a new class of malware or phishing attack is found, all your clients in the network get simultaneously upgraded, even client not directly connected to the Active Directory. This gives a much better security profile for a potentially very dangerous source of attacks on the network.
Another benefit of Mailshell is that they are deeply partnered with key industry players and are a member of “Anti-Phishing Working Group” (APWG). According to the APWG website, “APWG is the global industry, law enforcement, and government coalition focused on unifying the global response to cyber crime through development of data resources, data standards and model response systems and protocols for private and public sectors.” With all of this, mailshell has an effective catch rate of 99+%, which is very impressive in the industry and worth the investment for your organization.
Optimizing Windows Client Performance
In this section, I will discuss how you can optimize the performance of the Windows client. I assume Windows 7 professional, which should represent the largest percentage of business users, but the same techniques should work for other variations of windows such as Windows 8 and Windows 10. I also assume x64 version of windows.
Hardware Selection
Windows is always capped by the underlay hardware, so when choosing hardware, there are some simple considerations to consider. First, most people think the CPU core speed is the most important attribute to performance. Although, yes, it is a factor (At thin point you should be using at least quad core 2.4 GHz Intel based CPUs for clients), it is only a cofactor in overall performance. In fact, the storage subsystem is considerably more impactful, followed by RAM, the Core performance. When choosing a storage, at this point, SSD storage is really where you should go. SSD, especially in the 256-500 Gb range, are pretty price competitive and substantially improve the performance of client. When choosing SSD, it is vital that you select a drive that supports TRIM (TRIM allows the client to “load balance” storage within the drive to extend the life of the drive). In Windows 7, TRIM is on by default. If you suspect TRIM is disabled (or you just want to check), do the following:
1. Start>Search>CMD.exe
2. Right-click and “Run as Administrator”
3. Type “fsutil behavior set disabledeletenotify 0”
4. To verify TRIM is working, type “fsutil behavior query disabledeletenotify”
5. If you see “DisableDeleteNotify = 1,” TRIM is enabled
In addition, if your motherboard supports AHCI (Advanced Host Controller Interface), an Intel standard that can speed up hard drive operations and enable more efficient multitasking, you should enable support in Windows 7:
1. Quit all Open Apps
2. Start>Search>regedit
3. Locate and then click the following registry subkey: HKEY_LOCAL_MACHINESystemCurrentControlSetServicesMsahci
4. Right-click Start in the Name column, and then click Modify.
5. In the Value data box, type 0, and then click OK.
6. Exit Regedit
7. Restart your PC
8. At the BIOS prompt, Enter the BIOS menu (Usually “F8” on startup)
9. Enable AHCI
10. When Windows boots, the AHCI driver will load.
11. Reboot Windows one more time
It is important that you disable defragmentation and hibernation in Windows with SSD. In addition, the drive manufacture may also have additional optimization utilities. If so, it is worth it to enable the utility for peek drive performance.
RAM for the client is the next thing you can optimize. The modern client should have at least 8 GB (16 GB Optimal) of RAM using DDR3. The frequency you should use should be a minimum of DDR 1333 CAS 9. You can get faster ram with lower latency, but the benefit for most business applications is minimal.
Now, let us address BIOS optimization. Some of the recommendations later may or may not be available for your specific BIOS. Performance modifications are independent, so any available modification should help.
First, make sure your BIOS is up to date. Many existing PCs are running with out of date BIOS. Run though the update procedure per your motherboard or PC manufacture. Once updates, power on your PC and enter BIOS.
Optimize the following Settings:
1. Disable Boot up Floppy Seek option
a. This may or may not be present in your BIOS, but if it is, disable it. It is considered a legacy setting
2. BIOS Anti-Virus
a. Set this option to “Virus Warn.” This is useful enough to keep on if a root-kit attempts to rewrite the boot sector, but not worth extensive scan at every power up.
3. Cache Memory Optimization
a. CPU internal Cache and CPU External Cache can be very beneficial to speed up the client. Try setting different enable/disable combinations and test to see the best impact for your applications.
4. Enable Quick Power On Self test
a. Saves time in booting the PC
5. Enable CPU to PCI Posting Option
6. Enable PCI Burst Option
7. Enable PCI to CPU Posting Option
8. Boot Sequence
a. Just be sure to boot from the SSD first
9. Enable CPU Turbo Boost and Hyper threading
10. Enable Power DBS (Demand Based Scaling)
Preparing Existing Installs
Generally when you optimize an existing install of windows, there will be a random assortment of valid and unauthorized applications, spamware, possibly viruses (Malware, Keyloggers, Rootkits, etc.). Or objective with preparing an existing install is to get it in a uniform install state as new install. I will also preface this section by saying that if the install of windows is too corrupted or too involved to recover, backing up data file and wiping the PC is always a valid option.
We should go into a PC assuming it is infected. On your PC, create a flash drive with critical utilities such as your antivirus, optimization, and testing tools. Once you insert this flash drive into the target PC, never remove it and insert into a known good PC; we will have to reformat the flash drive to prevent cross contamination.
The first step is to install your antivirus software and update the database via the Internet. Set the antivirus software to automatically clean infections, inspect the boot sector, and scan for all types of infections. Then do the deepest possible level of scan for the entire hard drive and system. This may take a while but it is absolutely necessary as a first step.
After the scan is complete, insert a second flash drive into the PC. We will use this to back up key files. Perform a backup of key files including
1. Office Documents
a. Probably stored in the local Documents subfolder, but also do a system wide search for .docx, .xlsx, pptx, etc. files
2. Backup Local Outlook database
a. Launch Outlook
b. Goto File>Import and Export….
c. Choose Export to a file
d. Choose Personal Folder File (.PST)
e. Click on Personal Folders and check “Include Sub-Folders”
f. Choose the Storage Flash drive as an output location and name the file the username. Make sure “Replace duplicates with items Exported” is selected.
3. Interview the User
a. Ask the user if they have any file that “Should be Backed Up” that “Should not be Lost,” in general, documents such as Word, Excel, PowerPoint as well as any other user-created files. In addition, in outlook, it is a good idea to export their local email and calendar database to a .PST file, and back it up.
At this point, you need to make a choice to wipe the PC and reinstall the standard image or try to recover the PC. The safest, and most reliable, way to get the PC into a known, uniform state is to wipe the PC, and reinstall with the standard image and then restore the user files. This is my recommendation.
A Side Note on Flash and SSD Storage Security
I get paranoid about storage, because it is hard to delete and frequently overlooked way for a malicious entity to slip a trojan into the network. Here are some steps to mitigate this threat.
1. Assume the SSD firmware is infected
When I get a new SSD drive, I will always download and reflash the SSD firmware, especially since I have no positive control over the drive when it is new. I will reflash this even if it is the same version. I figure when I download a firmware image directly from the manufacture as well as the flashing tool, if there is infected firmware it will be overwritten. This is not perfect, but is reasonable. Optimally, this should be done for every drive in the organization.
2. I always low lever format the Drive.
A high level format will not necessarily remove infection. I use a tool called HDDGURU (http://hddguru.com/) to accomplish this task. If there is any trojans lurking in the boot sector, this is a good way of removing them with some degree of assurance. I will of course make the warning that any and all data on the drive will be irrevocably removed and erased, always be sure to back up important data first.
3. When do I do these steps
Whenever I get a new SSD or flash drive
Whenever I transition a PC from an unknown state to a known state.
Installing Windows and Component Software
In our model, we will install and optimize windows on a single PC and then image the drive to use to deploy to the field. Once you have the client PC ready, boot Windows 7 Pro x64 and perform an install. Once the install is finished, run through Windows Update and make sure all OS patches are applied. In addition, your PC vendor may have a utility that will scan for correct drivers for PC-specific elements. Run through that and update all drivers.
When creating account, you will want to create a local administrator account, which is exclusively for system administrators. This account should be given a privilege level of Administrator. The main user account should be set as a “Users” privilege level.
Now, we need to turn off unneeded services. Press Windows Key + R, and run services.msc (Fig. 4.25).
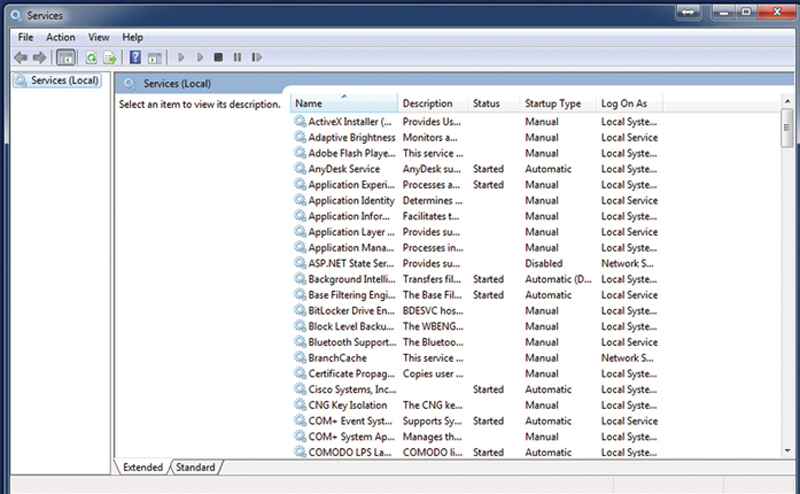
Figure 4.25 Turn Off Unnecessary Services.
This will allow you to toggle the running mode from automatic to manual to disabled. A good resource that describes what each service does is BlackViper (http://www.blackviper.com/category/guides/service-configurations/). Here, you can see if a service is really needed to be on for your network.
In addition, there is a very useful tool for tweaking Windows 7 called SMART (Service Management and RealEasy Tweaking), located here (http://www.thewindowsclub.com/downloading-smart). This service will help you identify automatically loading services which may reduce PC performance (Fig. 4.26).
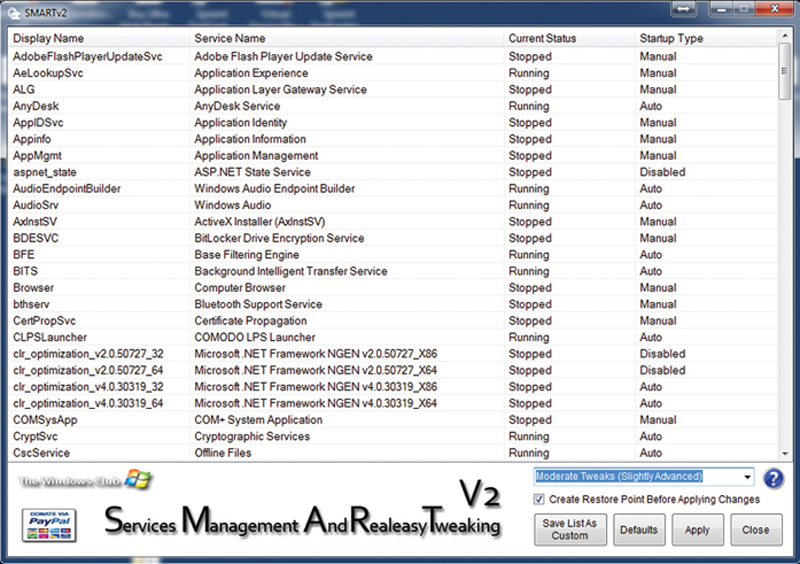
Figure 4.26 The SMART Utility Main Window.
When selecting an optimization level, I recommend using the “Moderate Tweaks” pull-down option and checking “Create Restore Point Before Applying Change.”
You will also need to reboot after you make the changes.
Optimizing Windows 7 Client TCP/IP Stack
Having a well-tuned TCP/IP stack is very important for the user experience of the user. In this section, I will describe some optimizations you can do to improve network performance. You may wish to perform some, all, or none of these recommendations based on your network and administration needs.
Enable Jumbo Frames (9K Frames)
If you look at network traffic on a client as a function of bandwidth, you will notice that file transfers and large object transfers represent a large percentage of traffic. The classic, largest frame size is 1518 bytes (inclusive of CRC). This means that there is a relative large amount of Ethernet overhead when transferring these kinds of objects. To improve this, we should enable Jumbo Frames. Note, if you need to do this, you need to enable support at every point on your intranet (Hosts, Servers, Switches, Routers, Firewalls, etc.). If you do not, you will end up fragmenting IP, which will be very counterproductive to performance. Thus, Jumbo frame support is a network level, all-or-nothing proposition. Assuming you have enabled 9K packet MTU everywhere else, on the Windows client, do the following:
1. Open Network and Sharing Center
2. Click on change adapter settings
3. Right-Click on the NIC facing the LAN, click Properties (Fig. 4.27)
4. Under the Networking tab, click the configure button for the NIC
5. Click Advanced
6. Find “Jumbo Frame” and Click, Select “9KB MTU”
7. Click OK
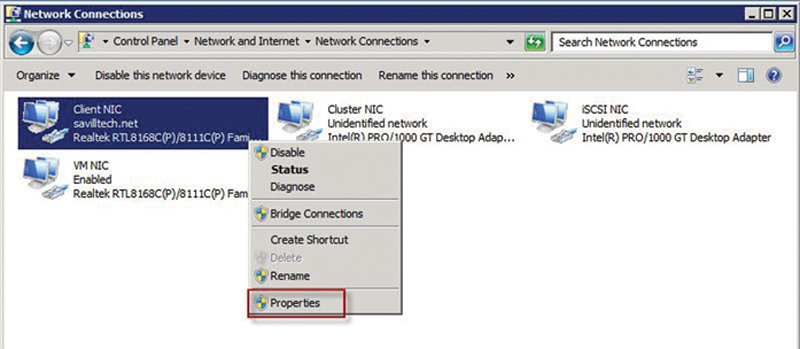
Figure 4.27 NIC Properties.
Enable Chimney Offload State
This setting, if available on your NIC, offloads network processing to the NIC from the CPU. This option is not universally supported, but when it is, this “Coprocessor” model can help a lot.
To Enable launch a Command Prompt (Run as Administrator), type:
netsh int tcp set global chimney=enabled
If you experience problems, you can turn it off by typing
netsh int tcp set global chimney=disabled
Enable Direct Cache Access
This option allows the NIC to directly transfer information to the CPU cache. Again, your specific PC may or may not support this feature.
Type:
netsh int tcp set global dca=enabled
Enable NetDMA
NetDMA allows your NIC to directly work with Apps, bypassing the CPU for a move operation of a packet, thus improving performance.
Type,
netsh int tcp set global netdma=enabled
TCP RWIN Auto-Tuning Level
The RWIN is the window size of data your TCP stack can receive before sending an ACK. Bigger is better generally. Auto-Tuning has four states. Start with the most aggressive (Listed first) and test to see if you see problems. If not, keep the setting, else downshift to the next lower setting and repeat testing. Worst case, simply turn it off.
RWIN Auto tuning levels (From Aggressive to Off):
netsh int tcp set global autotuninglevel=enabled
netsh int tcp set global autotuninglevel=restricted
netsh int tcp set global autotuninglevel=highlyrestricted
netsh int tcp set global autotuninglevel=disabled
Note, if in the hops between your servers and this client, you have a TCP proxy, and the RWIN on the Proxy is lower than the client, you will not see performance improvement. If it is an option, set the RWIN to the largest possible value as not to impair performance end-to-end.
Improve TCP Congestion Control
TCP will slow start and ramp up to the natural goodput rate in end-to-end. The default algorithm is relatively slow (from a historical period where network layer was not really reliable). In general, it is better to be more aggressive.
Type
netsh int tcp set global congestionprovider=ctcp
or to disable, type
netsh int tcp set global congestionprovider=none
Additional TCP Stack Optimizations
There are additional optimizations available for Windows. The easiest way to get to them is though some open source utilities such as SG TCP optimizer (http://www.speedguide.net/downloads.php). This utility will tune the additional setting based on a profile (Fig. 4.28).
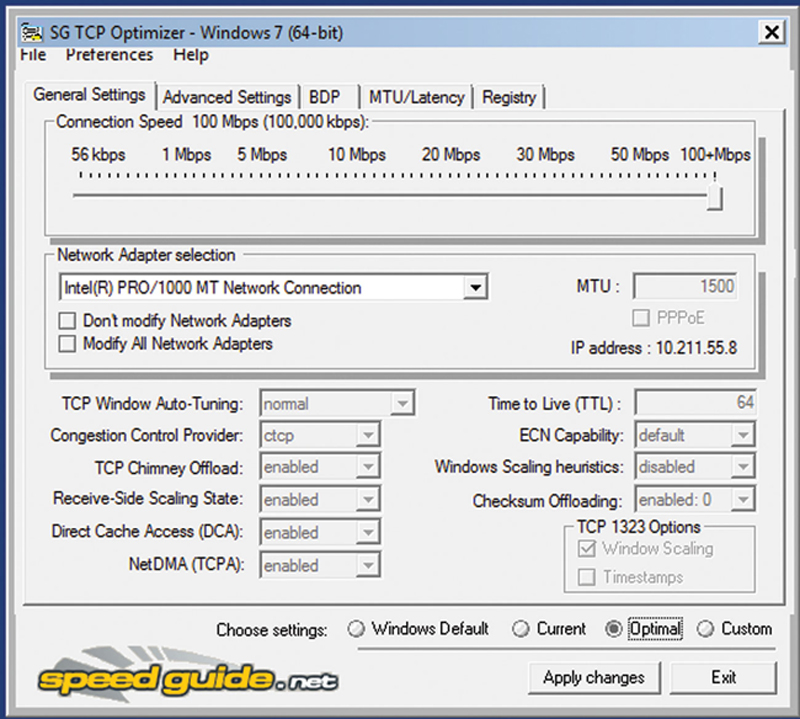
Figure 4.28 Optimizing TCP Stack for Performance.
Pick the NIC facing the LAN, move the slider to 100 Mbps+ and check the “Optimal” radio button, than hit “Apply Changes.” Note, this is also a great way to just resetting everything back to factory default by choosing “Windows Default” if things do not work.
When making any of these changes, it is highly recommended to make one change and test. This allows you to back out of the change if you need to. So what is the best way of testing to see if the change improves performance. First, I place an FTP server at the far end of the network in the trusted server pool. On that server, I place a large file (like a DVD RIP). I also make sure the server has the optimal TCP setting set and applied, and the server is properly patched. FTP is a TCP-based application, so this will allow us to test through Layer 4. Before I make any modifications, I will open up a monitor by right-clicking on the task bar, run Task manager, and click on Performance>Networking. I will then start an FTP transfer and monitor the Network utilization once things have stabilized. I then make my change, reboot my PC, and repeat this task, comparing what I originally observer to the new settings (Fig. 4.29).

Figure 4.29 Examining Live Network Bandwidth.
This way I know if I want to commit or discard the change.
Disable USB Storage
This option should be considered for security reasons, because USB flash drives are a defiantly vector of malicious code. In this section, I will show you how you can disable USB storage on Windows 7.
Steps:
1. Start>Run>Explorer
2. Type %windir%\inf and Enter in the explorer address bar
3. Find the following Files:
a. Usbstor.inf
b. Usbstor.pnf
4. Now we need to change their permission, so on each file, right-click and select Properties>Security.
5. Click the “Users” group
6. Check all permission for Users to “Deny.” Hit OK
7. Reboot
If USB Storage is already configured (ie, you have inserted an USB stick and successfully transferred files), then
Steps:
1. Goto Start>Run>, then type regedit, press enter
2. In Regedit, navigate to the following branch:
a. HKEY_LOCAL_MACHINE\SYSTEM\CurrentControlSet\Services\UsbStor
3. In the Right-Side Pane, change “Start” to “4”
a. Note: Changing the value to “3” will restore access
4. Reboot.
Finishing Install
At this point, you are ready to install productivity software, which will most likely include Microsoft Office, a company standard web browser, and security tools. Different groups within your organization may have different sets of tools. For example, an engineering group may have development tools, whereas the accounting group may have another set of tools. It is best to create a common base, then create and image variants for each group.
Some notes on specific tools. It is probably a good idea to install a PDF reader, that is, Adobe PDF Reeder (This is an open target of exploitation, but is in general a managed risk because of the business necessity of the tool). I caution against installing media infrastructure middleware like Flash or Silverlight. Besides the fact that most modern websites and applications are moving away from these technologies, the core reason is security. These middleware API are definite targets for hackers, so be warned. Last, when choosing services for your network, like a CRM system, a key criteria is that they use well-established open standards such as HTML5, JSON, and JavaScript, as opposed to reliance upon outdated technologies. Given the recommendation in pervious chapters about locking down the PC so “users” group members cannot install software or web extensions, you have positive direct control of software to limit the vector of entry for attacks. Last, be sure to do one finally update check for patches and sync the antivirus/malware database.
Security Consideration for Mobile PCs
By definition, a mobile resource like a laptop that travels outside of the network and is either brought back into the network physically or via VPN, should be of special concern for infection and data theft. First, we need to talk about what is the best VPN technology to use. Remember on the first hop into the network, we always assume the traffic from the remote client is infected, and on the gateway side, always pass VPN traffic through a deep packet inspection firewall. Now, what kind of VPN technology should we use? It basically comes down to IPSec or SSL-VPN. My preference is IPSec, for a couple of reasons. First, SSL-VPN is far newer than IPSec. There is nothing like actual time in the field to prove or disprove that a technology is not only stable, but actually works. Here, IPSec wins hands down. Next, IPSec is more interoperable than SSL-VPN. In general, you are locked in to a specific vendor’s SSL-VPN client and gateway, which I really do not like. Last, I feel that SSL-VPN is not as secure as IPSec (as demonstrated by the “Heartbleed” vulnerability). Next, what cypher level should you use? As previously mentioned, AES-256 SHA1 should be considered a “minimum” level. More specific, never use 3DES, it is simply no longer secure. In addition, you should use your self-signed certificates another layer of authentication.
Now, mobile PCs will get lost and stolen. Generally, the cost of the PC is trivial compared to the data on the drive. Therefore, I recommend that all mobile PCs turn on Bit Locker (Hard Drive Encryption) by default. Think about this scenario, a user’s laptop is stolen, the drive is extracted and mined for data. Because Bit Locker was enabled, the data becomes unavailable. Bit Locker is not perfect and would never hold up to malicious entities that had serious decryption hardware, but using the “Onion Skin” principal, our job is to make it as hard as possible for them to get the data.
The last point about securing mobile PCs, especially user with very sensitive data access needs, is to use a two-stage system. In this system, you set up a virtual machine that acts as their primary “PC.” This VM securely sits in your datacenter. Next, you install a minimal install of Windows on the mobile laptop (with security enhancements). This PC, if lost, is considered expendable because no sensitive data ever is stored locally on this PC. The user then opens an IPSec Remote Access tunnel back to your LAN, then remote desktops to their VM. On the throw away PC, you specifically make the local HDD read-only (no transferring information from the VM to the laptop allowed). This technique has three gates of protection: the username and password to login and decrypt the user session, the IPSec credentials, and the remote desktop credentials.
When a security event like a lost or stolen laptop happens, the system administrator then deactivates accounts by first suspending the IPSec remote access account, adding the exciting certificate to the revocation list at the IPSec gateway, and then changing the username and password of the VM. Or, in an extreme case, remove the VMs from any local vSwitch this “Boxing” the VM (if you think the VM is infected).
There is another advantage to this technique when associated with users who have access to sensitive data. By only allowing them to keep the data on the VM, there is less chance of it “getting out.” In addition, when an employee is discerned or the employee is about to be fired, it is assumed that they will attempt to collect as many “proprietary” documents and effectively steel them for who knows what future reason (sell to your competition, possibly). This technique makes it harder, but not impossible, to do that. In addition, if you need to terminate their access to sensitive data, this allows you to do it instantly. If they have a laptop, giving them time between a termination event and turning it in is dangerous to security.
Imaging and Building Client PCs
Now that you have your known good base PC config built, we will now image it and use that to build new PCs or migrate existing PCs to the new known good config. For this task, I am going to recommend a package called Acronis True Image Source: http://www.acronis.com/en-us/personal/pc-backup/). I find this package to be reasonably priced (∼$60 per seat) and very robust with features, such as flexibility and backup/restore from the cloud.
After installing and licensing to tool, run it and choose Source “Entire PC.” Click on the Destination and choose either a Locally connected USB storage device, and FTP server, or the Acronis Cloud.
The purpose of this setup is to back up what you have done as a first snapshot. Now, we are going to clone the drive. The first step is to figure out the size of the drive. Click on Start>Run and type “diskmgmt.msc” and Enter. You will see the size of the partitions, for example Fig. 4.30.
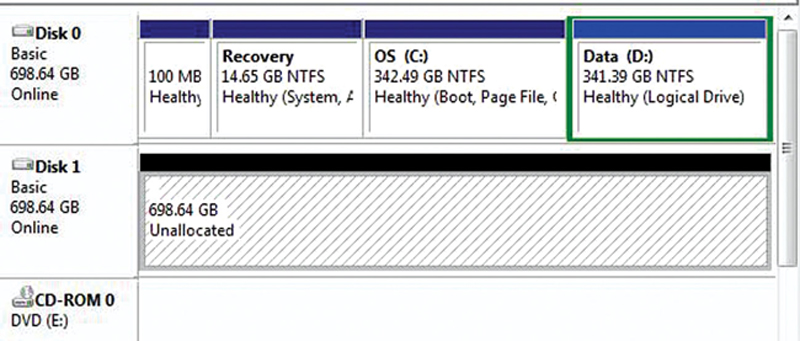
Figure 4.30 Disk Partition Map.
Sum up the size and make sure your external USD drive is greater in capacity.
Now, open True Image and click on Tools>Clone Drive, this will run the close wizard. Choose Automatic mode, and hits Next (Fig. 4.31).
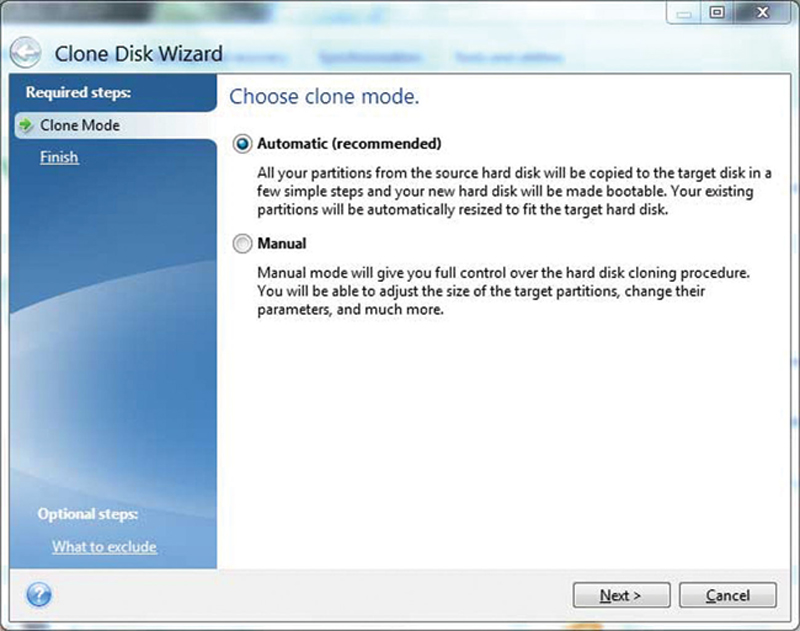
Figure 4.31 Setting Disk-Cloning Options
Now Select a Target (USB drive) and click on “Proceed.” Our Drive will now be cloned.
Your computer will have to restart. Note that this technique will only work if the PC target is the same hardware specs. This is pretty typical though in enterprise that there is a common reference PC. Just be aware that will have to create a separate image if you upgrade your hardware. This is one reason why we created a backup, because you selectively restore your settings on the new hardware, saving you time.
In summary, optimizing the windows client for performance and security will help your network stay stable and help increase the perceptions of end users’ overall quality of service. As you have seen, out of the box windows is not very optimized, so taking the recommended steps to tune windows has high dividends. By starting at the EFI/BIOS levels and working our way through the kernel, driver, General OS, TCP stack, and other optimizations, you are able to more efficiently and more securely use the resources in an optimized fashion. Finally, by addressing potential security holes at the very edge of the network, we close down points of entry for attacks.