PARLOR TRICK THREE:
MINI MADE FABRIC

Miniature Play
At the beginning of all my Fifteen Minutes of Play classes, I talk about process and play, and then I show the many samples of how play can manifest itself in one’s work. At the very end of the class, I show three mini quilts using the mini made-fabric technique. Gasps, oohs, and aahs fill the room, and I share with my students that they already know how to do this. Many are skeptical and can’t figure out how to sew all those tiny pieces together.
I say, “I call this my parlor trick. You learn this little technique, go home, make a quilt, and impress all your friends who know nothing about quiltmaking. They will be throwing compliments at you left and right about your fabulous skills!” This is where I remind them to just say, “Why, thank you so much!” The options are limitless for these little cuties!
Using up scraps is very satisfying. Generally I use solids because they show off the pieces better than prints (and are downright adorable). Just make a few each day, throw them into a mason jar, and watch the jar fill up.
Go ahead; I dare you. ... Give it a try!
You won’t be able to stop at one. (Just like potato chips!) Before you know it, you’ll have made ten. And please don’t forget ... when you finish your king-size quilt, send pictures!
MATERIALS
I save my smaller solid scraps and put them in a plastic bag to use for my minis—not itty-bitty pieces, but manageable pieces approximately 2″ × 3″.
CONSTRUCTION
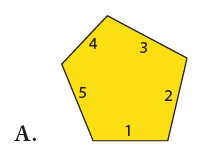
1. Begin with an approximate 1″ × 1″ wonky, 5-sided, and house-shaped solid scrap. This is the smallest piece I use. Fig. A
2. Place another solid scrap, right sides together, over the bottom edge of the house shape, overlapping on both sides. Sew together with a seam allowance larger than ¼″. By doing so, your “house” will get smaller and smaller as you work around the shape. Trim the seam allowance to ⅛″. Fig. B

3. Flip the seam open; press it toward the outside. Working counterclockwise (or clockwise—it doesn’t matter the direction as long as the pieces are added in a continuous order), trim to form a straight edge for the next seam. Use the right side of your house shape as a guide. Fig. C

NOTE> The trick is sewing with a wide seam allowance. This makes your shapes get smaller and smaller to fit in your 1½″ template.
4. Place a longer solid scrap right sides together over this edge, overlapping on both sides. Sew across (always with a wide seam allowance), trim the seam allowance to ⅛″, and press as in Step 3. Fig. D

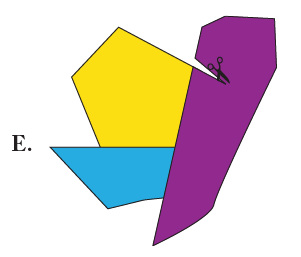
5. Trim to form a straight edge for the next seam. Fig. E
6. Repeat Steps 2–5 for the remaining 3 sides.
7. Place your 1½″ template (or acrylic ruler) over the piece as desired and trim. Fig. F

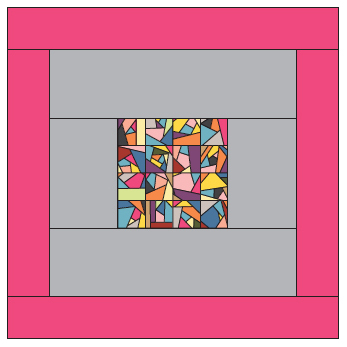
CLASS PROJECT: MINI QUILT 1

By Victoria Findlay Wolfe, 2013, 12″ × 12″
MATERIALS
16 made-fabric 1½″ × 1½″ squares from Miniature Play
Inner border: 1 fat quarter
Outer border: 1 fat quarter
Backing: 14″ × 14″
Batting: 14″ × 14″
Binding: ¼ yard (2 strips 2½″ × width of fabric)
CUTTING
Inner border
• Cut 2 rectangles 3″ × 4½″.
• Cut 2 rectangles 3″ × 9½″.
Outer border
• Cut 2 rectangles 2″ × 9½″.
• Cut 2 rectangles 2″ × 12½″.
Construction
1. Make 16 made-fabric minis following Parlor Trick Three: Mini Made Fabric.
2. Sew together in rows of 4. Press the seam allowances open. Pin at each intersection and sew the rows together, forming a sixteen-patch. Press the seam allowances open.
3. Sew the 3″ × 4½″ rectangles onto opposite sides of the sixteen-patch, along the 4½″ sides. Press the seam allowances outward. Sew the inner border 3″ × 9½″ rectangles onto the other 2 sides, pressing the seam allowances outward.
4. Sew the outer border 2″ × 9½″ rectangles to opposite sides; then sew the 2″ × 12½″ rectangles onto the other 2 sides, pressing the seam allowances outward.
Finishing
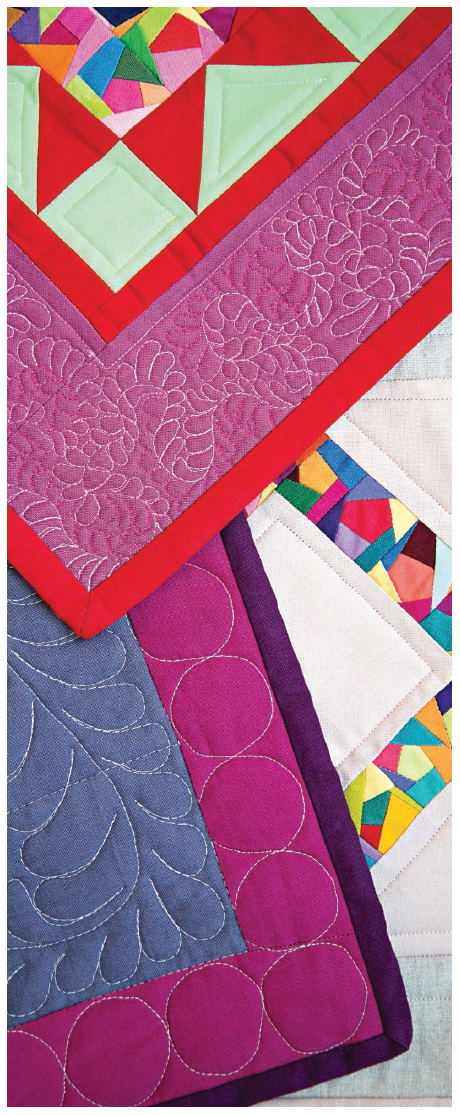
1. Lightly press the quilt top, being careful not to stretch the fabrics.
2. Layer, quilt, and bind.
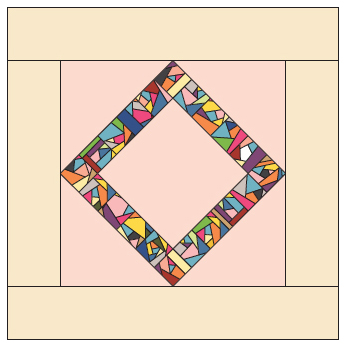
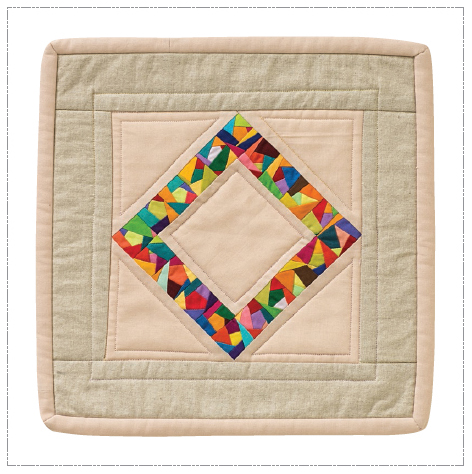
CLASS PROJECT: MINI QUILT 2

By Victoria Findlay Wolfe, 2013, 12″ × 12″
MATERIALS
9 made-fabric 1½″ × 1½″ squares from Miniature Play
Star points and inner border: 1 fat quarter
Star setting: 1 fat quarter
Outer border: 1 fat quarter
Backing: 14″ × 14″
Batting: 14″ × 14″
Binding: ¼ yard or 2 strips 2½″ × width of fabric
CUTTING
Star points
• Cut 8 squares 2″ × 2″.
Star setting
• Cut 4 rectangles 2″ × 3½″.
• Cut 4 squares 2″ × 2″.
Inner border
• Cut 2 rectangles 1″ × 6½″.
• Cut 2 rectangles 1″ × 7½″.
Outer border
• Cut 2 rectangles 3″ × 7½″.
• Cut 2 rectangles 3″ × 12½″.
Construction
1. Make 9 made-fabric minis, following Parlor Trick Three: Mini Made Fabric.
2. Sew together in rows of 3. Press the seam allowances open. Pin at each intersection and sew the rows together, forming a nine-patch. Press the seam allowances open.
3. Draw a diagonal line on the back of the 8 squares 2″ × 2″. Place 1 right sides together on the end of a star setting 2″ × 3½″ rectangle. Sew on the diagonal line. Trim ¼″ outside the line, cutting off the small triangles. Press the seam allowances to the darker fabric.
4. Repeat with another 2″ square on the other end of the rectangle, with the diagonal line pointing in the opposite direction.
5. Make 4 star point units following Steps 3 and 4. Sew 2 of these units to opposite sides of the mini nine-patch. Press the seam allowances outward.
6. Sew a star setting 2″ square to both ends of the remaining star point units. Press the seam allowances away from the squares. Sew these units to the remaining sides of the nine-patch, pinning to match the seams.
7. Sew the shorter inner borders onto opposite sides of the star. Press the seam allowances outward. Then sew the longer inner borders onto the other 2 sides, pressing the seam allowances outward.
8. Repeat Step 7 with the outer borders.

Finishing
1. Lightly press the quilt top, being careful not to stretch the fabrics.
2. Layer, quilt, and bind.

CLASS PROJECT: MINI QUILT 3
By Victoria Findlay Wolfe, 2013, 12″ × 12″
MATERIALS
20 made-fabric 1½″ × 1½″ squares from Miniature Play
Center and setting triangles: 1 fat quarter
Border: 1 fat quarter
Backing: 14″ × 14″
Batting: 14″ × 14″
Binding: ¼ yard or 2 strips 2½″ × width of fabric
CUTTING
Center
• Cut 1 square 4½″ × 4½″.
Setting triangles
• Cut 2 squares 5⅛″ × 5⅛″; subcut in half diagonally to make 4 triangles.
Border
• Cut 2 rectangles 2¼″ × 9″.
• Cut 2 rectangles 2¼″ × 12½″.

Construction
1. Make 20 made-fabric minis, following Parlor Trick Three: Mini Made Fabric.
2. Sew together in 2 rows of 4. Press the seam allowances open. Sew the rows onto opposite sides of the center square. Press the seam allowances toward the center.
3. Sew the remaining minis in 2 rows of 6. Press the seam allowances open. Sew the rows onto the remaining sides of the center square. Press the seam allowances toward the center.
4. Sew the long edge of a setting triangle to opposite sides of the square. Press the seam allowances outward. Then sew the 2 remaining triangles to the other sides of the square.
5. Sew the shorter border rectangles to opposite sides; then sew the longer border rectangles onto the other 2 sides. Press the seam allowances outward.
Finishing
1. Lightly press the quilt top, being careful not to stretch the fabrics.
2. Layer, quilt, and bind.