part 1
THINGS OF FAIRY TALE
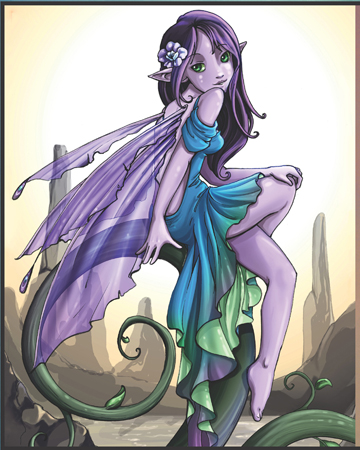
THE FAIRY KINGDOM IS A LARGE PART OF MODERN FANTASY AS WE KNOW IT TODAY. FAIRY TALES AND FOLKLORE INFLUENCE OUR LITERATURE, MOVIES AND GAMES. IT'S EASY TO BE INFLUENCED BY THESE RICH TRADITIONS. SINCE FAIRIES ARE CLOSELY TIED WITH NATURE, IT'S ALWAYS FUN TO DRAW THEM IN EXPANSIVE NATURAL ENVIRONMENTS. BUT REMEMBER — THIS IS FANTASY! ANYTHING'S POSSIBLE IF YOU CAN IMAGINE IT. MAYBE YOUR CREATURES LIVE IN AN URBAN SETTING, UNSEEN BY THE HUMANS LIVING SO CLOSE. ARE THERE GOBLINS HIDING IN THE ALLEYWAYS? THERE ARE SO MANY POSSIBILITIES. ARE YOU READY? LET'S DRAW!
Fairy
Fairies have always been an important part in European mythology and fairy tales. The fairies of myth and legend were both mischievous and benevolent. The fairies that we draw today may be the same, tricky creatures or a reflection of our world today. Urban fairies, anyone?
›1‹
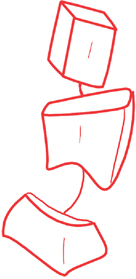
Draw 3-D box shapes for the head, chest and hips to get a feel for your fairy's pose without a huge time commitment. If you don't like it, just erase and start over.
›2‹
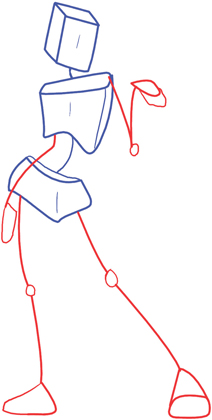
Use lines and connecting circles to represent the limbs. You can already see how this fairy will be positioned; and boy, does she have some attitude!
‹3‹
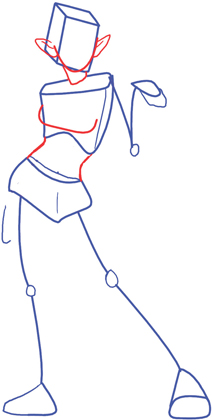
Begin filling out your fairy's head.
Connect the chest and hip boxes, creating a single, continuous shape for the body.
›4‹
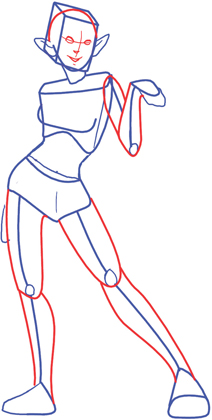
Give form to the stick arms and legs. The upper leg will be significantly thicker than the lower leg. The upper arm will only be a tiny bit thinner than the lower arm.
›5‹
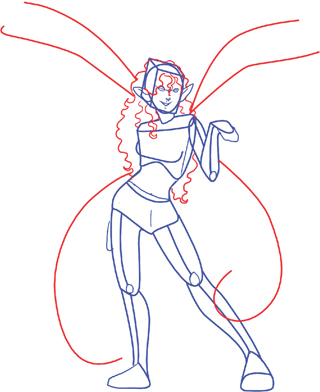
Add lines to indicate hair that matches the character and attitude of your fairy. Begin wings with simple lines indicating the top of each.
›6‹
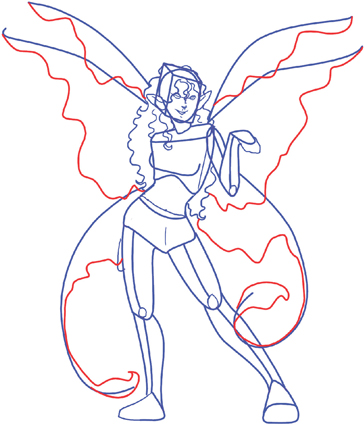
Build off of the basic wing lines to draw ripply, curvy lines that loop down, then join back up. It looks totally fancy, but it's a piece of cake!
›7‹
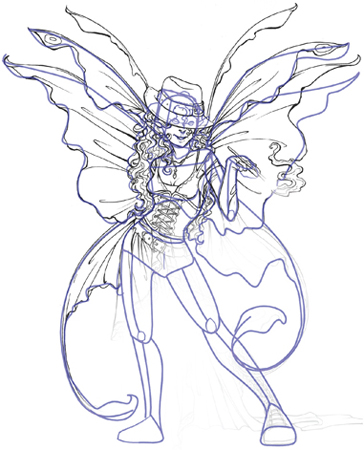
Begin adding costuming to your figure. Garments that are pulled tightly across the body will conform to its shape. Cloth that is unbound will hang loose and be pulled mainly by gravity. The costuming possibilities are limitless. You could have a warrior fairy, a pirate fairy, a river fairy, a vine-covered fairy, a noble fairy… anything! Plan out what you would like to do beforehand so you have a good strategy.
›8‹
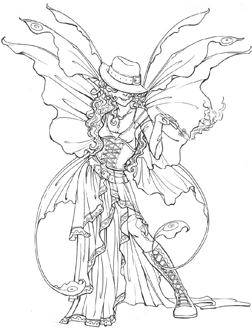
Erase any stray construction lines, and give it a good look over. Is she totally ready for color? Of course she is!
›9‹
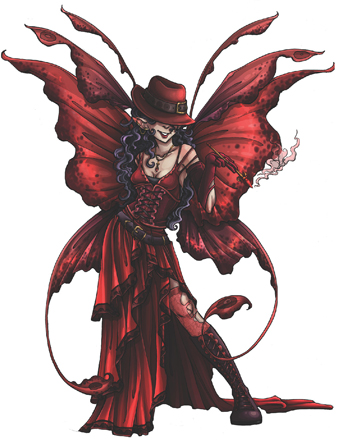
Choose colors that go with your fairy's personality. Got a mysterious fairy? Blacks and purples might be right up your alley. Sweet and innocent? Maybe some soft blues or pinks. This fairy is all about attitude, so I chose a nice bright scarlet.
›10‹
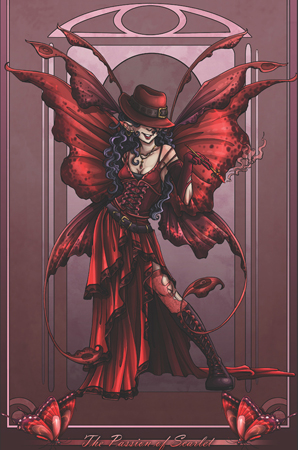
Finish off your fairy with an environment or decorative background. Tah-dah! Instant awesome! (Okay, it's not instant, but “instant awesome” sounds way cooler than “well-thought-out-art-piece awesome.”)
FAIRY WINGS
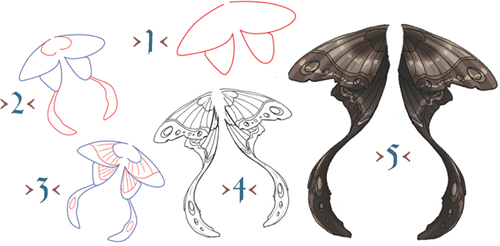
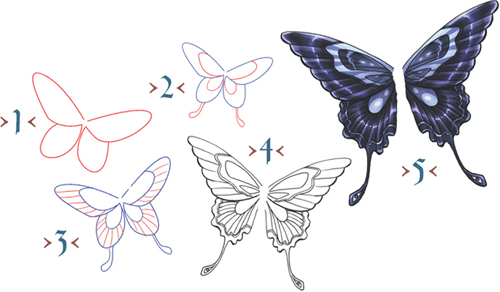
Fairies and sprites are often held aloft by delicate insect wings. Their construction is fairly simple, but plan out the type of wing first. Butterfly, moth, dragonfly or leafy wings — each type begins with different shapes.
MOTH WINGS
Moth wings are rounder and droopier. As with butterfly wings, the upper portion overlaps the lower. Add large tails to the end of each wing. You can create the false-eye patterns seen in nature or go with a more subtle, striped effect.
BUTTERFLY WINGS
Butterfly wings have an upper and lower wing. When viewed from above, the upper wing will be on top of the lower. Make sure both sides of the wings are of equal size by drawing ovals to get the correct proportions. The upper ovals will be larger then the lower and face out diagonally. The lower ovals will face downward. Once that's done, it's all decorative work. Create a pattern that you can use as a basis for color.
RUFFLES AND RIBBONS
The ribbon itself is a simple, flat thing. But, when it's twisted, it can create some really funky shapes. Start your ribbon with any continuous line of motion. The second set of lines that fall above and below the line of motion creates the flat, twisting shape.
THE BOW
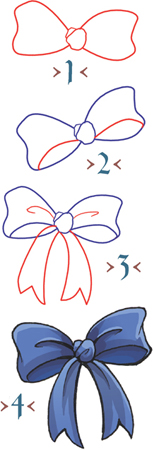
start your bow off simple, with triangular shapes. Add lines to suggest tightness at the knot. Create flowing ribbon that sticks out below the knot to add to the frilly effect.
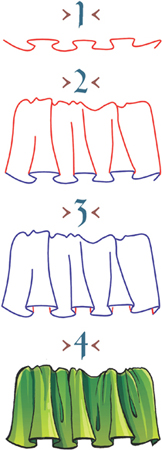
THE RUFFLE
Create the bottom edges of the ruffle with a continuous line. Add vertical lines to connect each bend in this line to the top edge. Draw a second line going up behind each of the vertical lines on the overlapping bend to show the material as it bends behind itself.
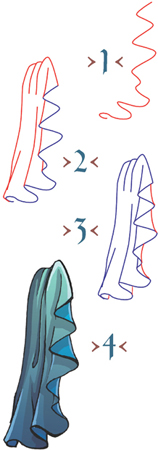
THE OVERLAPPING FOLD
Folds that overlap themselves look tricky at first, but they really are just a series of vertical lines that branch off each corner of your line of motion. Draw vertical lines going up from each turning point on the left side. This will form the basic shape of the material. Draw a vertical line going up from each right turning point to show what the back of the material is doing.
POINTY EARS
Many fantasy creatures have ears that come to a point. Start off with a standard human ear. This will give you the size and shape you'll need when you connect the ear to the head.
›1‹
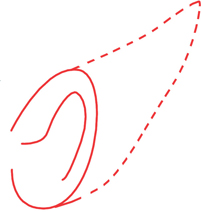
Add a tip to the human ear shape. It can be as long as you like.
›2‹
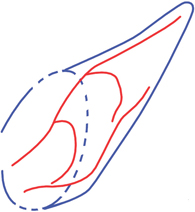
Draw a line following the curve of the ear to make a rim. Draw sideways U-shapes to make the hollows.
›3‹
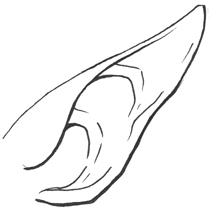
Place your final linework. Since the little shapes within the ear are subtle, you may have some broken lines.
›4‹
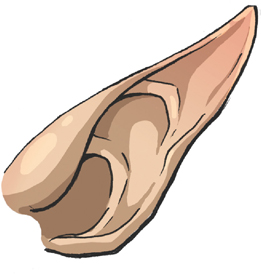
Shade the hollow closest to the head darkest to create a concave look. Make the little ridges lighter than the surrounding area because they are popping out and are closer to the light.
›5‹
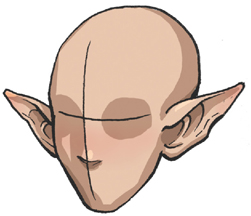
Consider how you'd like your ears to sit. Ears that tilt up will only stick out from the head a little bit, and are best seen from a three-quarter view.
Sprite
Sprites and spirits are another exciting and visually awesome part of the fairy kingdom. Sprites, like many fairy tale creatures, are mischievous and playful. You may catch a glimpse of one in the water, or hiding behind a leaf, but when you move in for a closer look, you find it's mysteriously disappeared!
›1‹
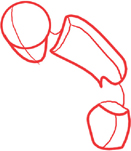
Begin with lanky, stretched-out boxes to indicate the head, chest and hips.
›2‹
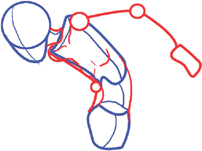
Draw dimensional lines to connect the chest and hips. Using simple line-and-circle construction, sketch in your sprite's arms.
›3‹
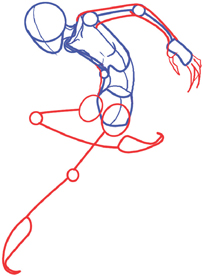
Sketch in few sticks for the basic placement of the legs. Give the arms some form, following the guides in step 2. Add some creepy, elongated hands.
›4‹
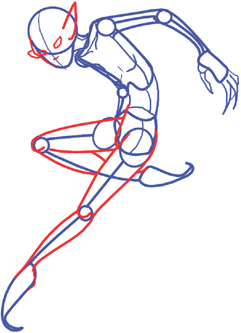
Build form around the leg sticks.
›5‹
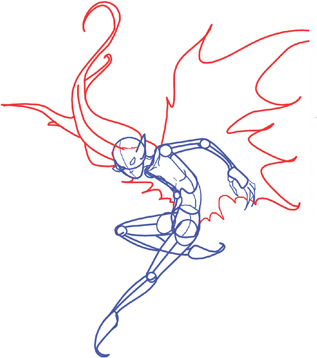
Since the sprite is flying around, add hair that trails behind it. Draw in wings with lots of long, connecting U-shapes.
›6‹
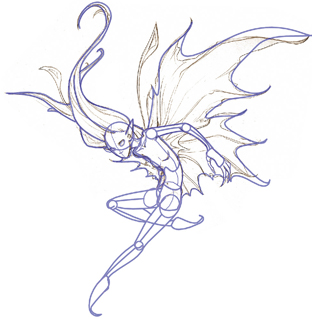
Carefully add details, such as ripples in the wings, individual claws and chunks of hair. Have fun with it!
›7‹
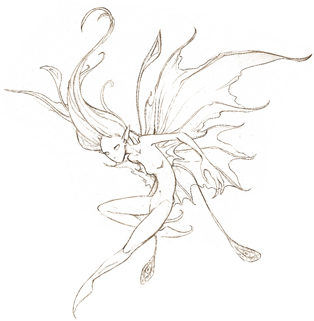
Erase any construction lines that you no longer need.
›8‹
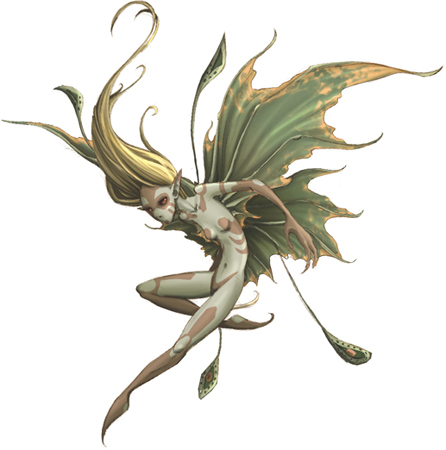
To go camo, like this sprite, color the wings to resemble leaves, and adorn the sprite's body with earth-toned tattoos.
›9‹
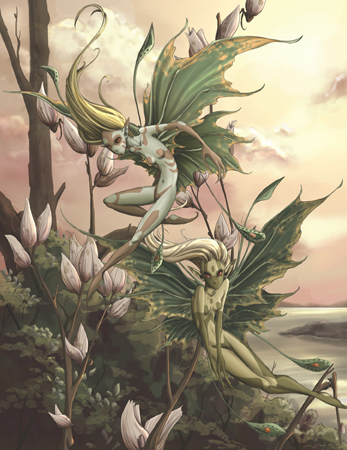
Now all your sprite needs is a place where she can show off all her stuff, so give her a home to call her own. Everyone will “ooh” and “ah” over your amazing, completed image, so put in that extra time to finish it off. In this image I used lots of foliage in greens, pinks and browns to complement the natural look of the sprites and give them some camouflage.
Elf
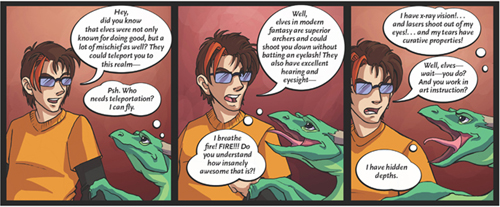
Elves have appeared in European literature for centuries, though this is probably not how you came to know them. Today, elves are mentioned less when referring to fairy tales, and more when referring to Santa, cookie bakers and rangers. The elves shown on these pages are the kind more commonly associated with modern fantasy. As such, they resemble tall, elegant people with pointed ears.
›1‹
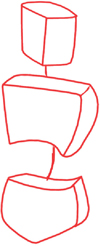
Place the boxes that represent the head, chest and hips. These will give you an idea of how the figure is standing and which direction each area of the body is facing.
›2‹
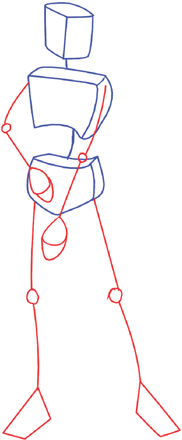
Use sticks and circles to indicate the length and joints of the limbs and to position the arms and legs. Keep it simple!
›3‹
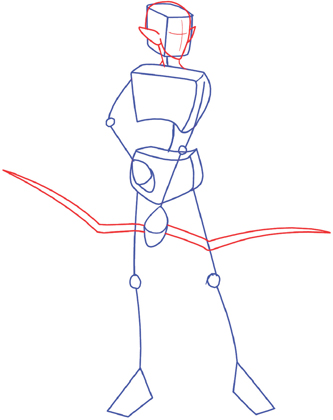
A simple oval will not do for an elf's head. Make it more pointed like the ears.
Draw in the basic shape of the bow.
›4‹
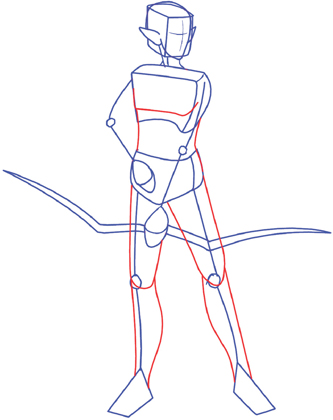
Connect the boxes to give the body form.
Follow the sticks you used to plot out the leg positions to add thighs and calves.
›5‹
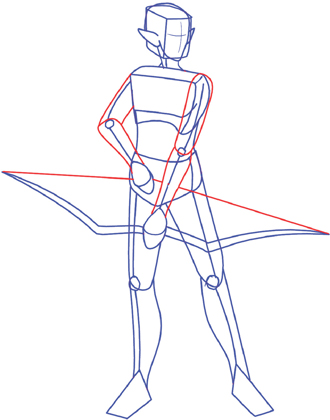
Repeat the process you used for the legs on the arms. This elf is drawing back on a bow. Add a bowstring.
›6‹
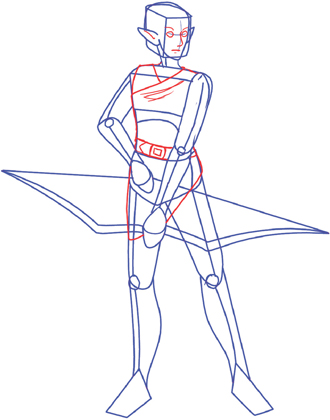
Draw in the basic facial structures. Begin to add clothing. This elf is wearing a tunic. The material bunches in around the belt.
›7‹
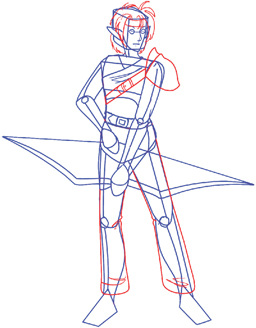
Add hair in simple chunks.
Continue adding clothing details such as this archer's loose pants, tunic and large leather shoulder guard.
›8‹
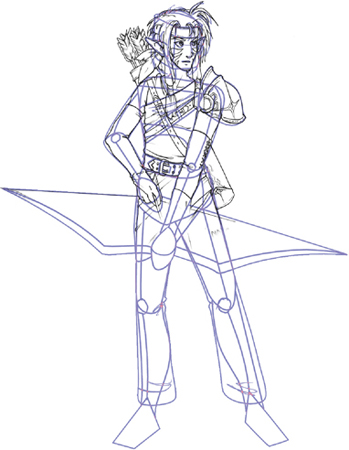
Finish the details. Add individual ripples in the fabric, stitching and tattoos. Use small diagonal lines to define the arrow fletching and crisscrossed leather ties on the arm pieces.
›9‹
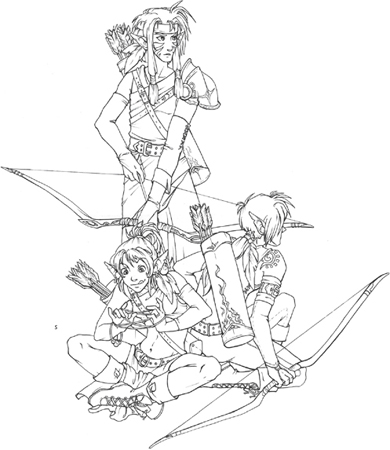
Erase any stray construction lines. In my drawing, I erased the feet of my elf and gave him some companions so that he is not hunting alone.
›10‹
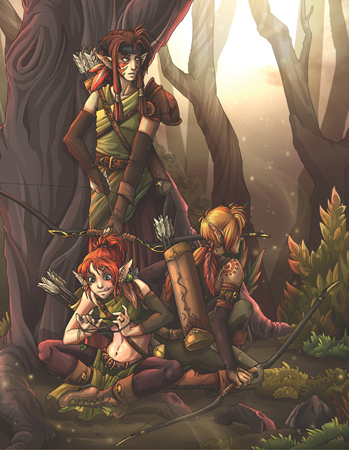
Setting your characters at a specific time of day will bring your drawing to life. This image looks very dark, but you can see that in the distance sunlight filters through. In a heavily forested area, large trees can create patches of dark shadow even in daylight hours. This picture would look very different if it was set at twilight or nighttime.
Goblin
Goblins are mischievous, sometimes wicked little fairies that enjoy playing tricks on unsuspecting people. Once you draw a goblin, watch your desk carefully. If your art supplies go missing, you'll know who to blame.
›1‹
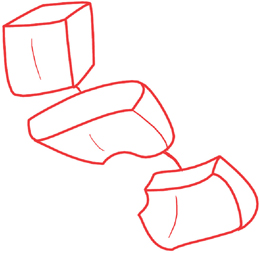
Draw the simple box shapes of your goblin.
›2‹
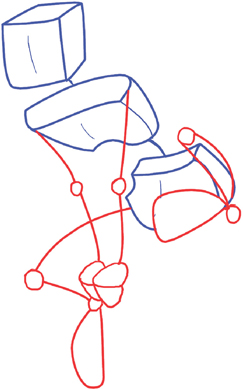
Get the positions of the arms and legs down with simple lines and circles. This little goblin is perched and ready to go!
›3‹
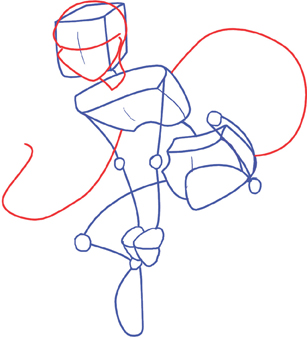
This is not a human being. I went with a triangular-shaped face.
Pop a line in there for the tail. Long swishy tails are great fun, so make good use of them.
›4‹
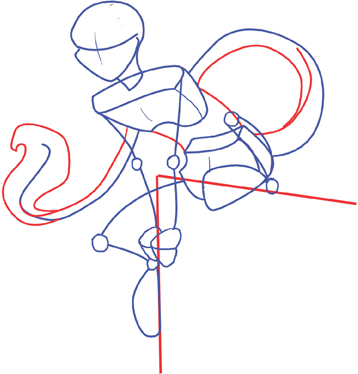
Give him a tail that starts off thin and gets bushy at the end.
Connect the chest and hips into one continuous body shape. Follow the line down into his tail.
›5‹
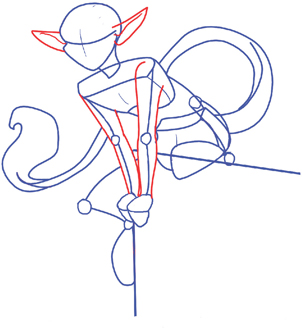
Give his stick-thin arms some form.
Big ears are a must for goblins. Add some pointy ones on the sides of his head (see page 40).
›6‹
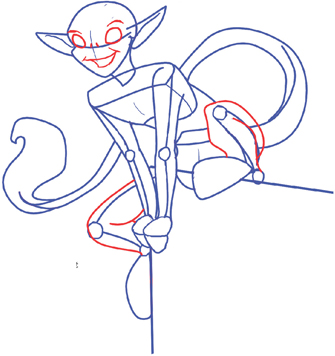
Down all the facial features, with large eyes and a nose so itty bitty it's just nostrils.
Give the legs some dimension, following the construction lines you put down in step 2. Here the legs are folded, and one overlaps itself. Draw the parts of the legs that are closest to you first.
›7‹
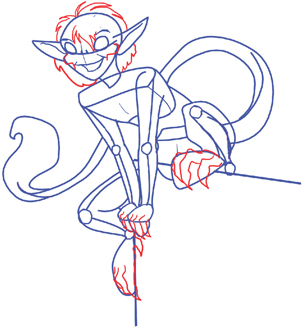
Elongated, claw-like fingers will make him stand out. Draw in a wild mane of hair, and the basics of your tricky little goblin are complete.
›8‹
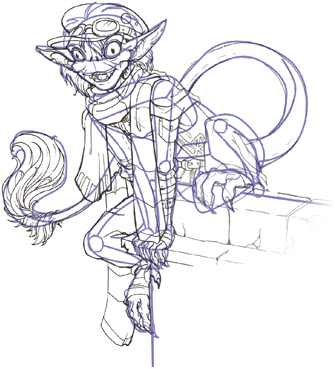
With the construction lines of your goblin down, you'll have a very good idea of what he looks like, so when you get to details like ripples in the clothing, you're good to go!
›9‹
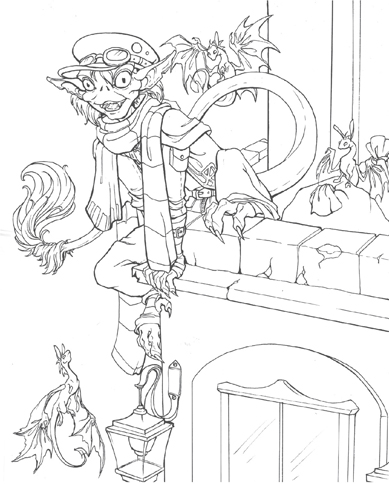
Once you've got all your details down, erase any extra construction lines. Move onto some scenery. With this drawing, the scenery is particularly important, since the goblin is perching on a corner of some sort. Sketch in the corner of a building that has seen better days.
›10‹
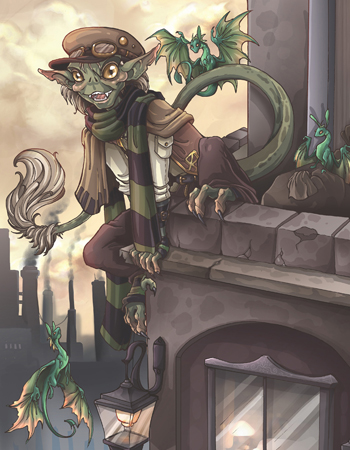
Color your goblin any color of the rainbow. He can be as bright or as muted as you want. Maybe he's colored like his environment. This goblin is perched in a murky city, so he has muted, murky colors.
Dwarf
Dwarves have origins in Norse mythology. Most dwarves are described as being short and stocky with the males (and sometimes the females) sporting long, full beards. Dwarves are fierce, if inelegant warriors. The stereotypical dwarf is a gruff, grumpy sort who's very set in his ways. Your dwarven character can stick to this cliché, or perhaps yours is just a big softie.
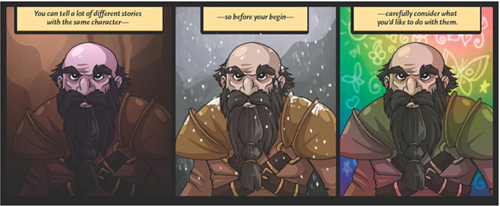
›1‹
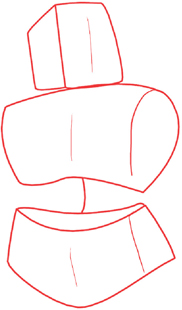
Lay down the chest, hips and head. Since dwarves are short, stocky creatures, squish everything vertically and stretch it horizontally.
›2‹
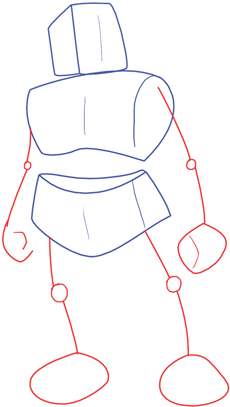
Draw in some quick sticks to indicate the arms and legs. Erase and reposition as needed until you find something you like.
›3‹
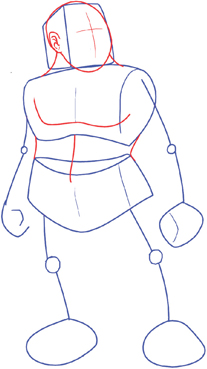
Draw the skull and face shape. Connect the head to the body with a very thick neck.
Connect the chest and hips with a line on either side, making one continuous shape.
›4‹
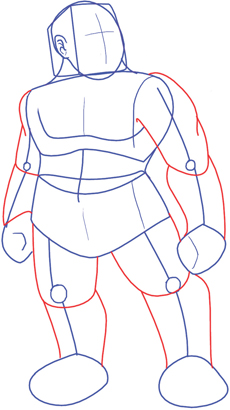
Add substance to those stick arms and legs. Remember, your dwarf's limbs will be short, but very thick.
›5‹

Put axes in his hands. Begin with the handles, drawing cylinders or long rectangles going back in space. Draw the blades perpendicular to the handles.
Draw in the basic facial features. Don't worry about beards yet.
›6‹
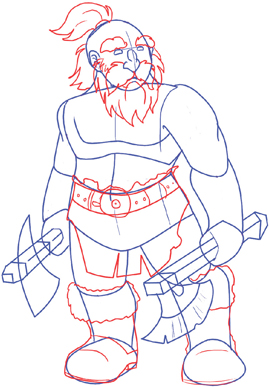
Give your dwarf a beard on and around the facial features (see page 56).
Draw in a kilt, belt and boots.
›7‹
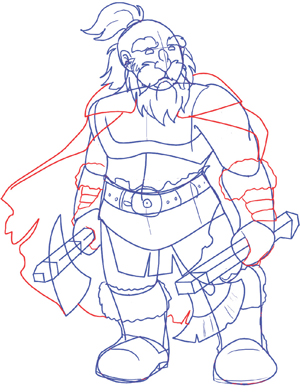
A cape, gloves and shoulder guards finish off the adventurer's look.
As an added touch, line the gloves and boots with fur.
›8‹
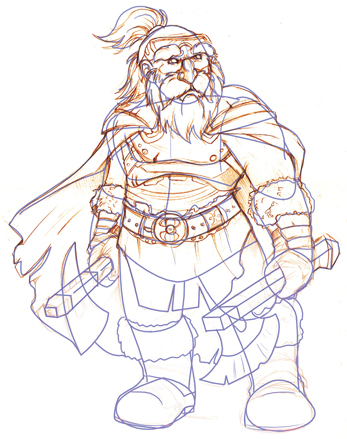
If you like everything you see, begin polishing. Customize belt buckles, goggles and cracks in the armor. Use your pencil in different ways to get different textures. For soft fur, try short rounded marks within and irregular edges. Use hard, perfectly smooth lines for the metallic pieces and watch the magic as the line treatments contrast.
›9‹
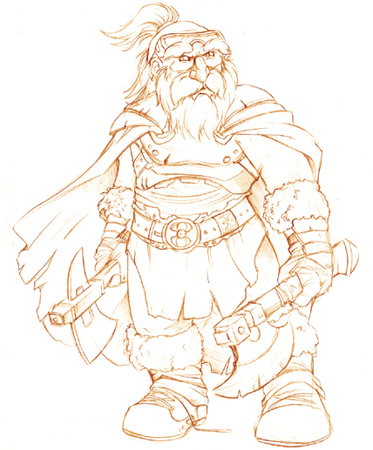
Erase any stray construction lines and give yourself a big pat on the back. Oh wait! It's time to color!
›10‹
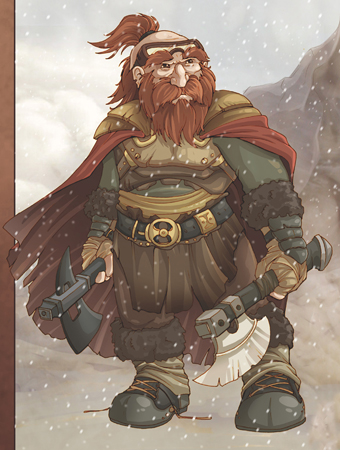
Typically these gruff warriors won't be prancing around in bright rainbow colors. Their armor may be beautifully constructed, but will probably favor practicality over looks. Your dwarf's beard may be Burnt Sienna, a bright cheery red, a deep black or even an icy blonde in color. Use highlights to add texture. Differentiating the coarseness of the beard, the smoothness of metal, and the fuzziness of fur lining will really make your picture come alive.
BEARDS
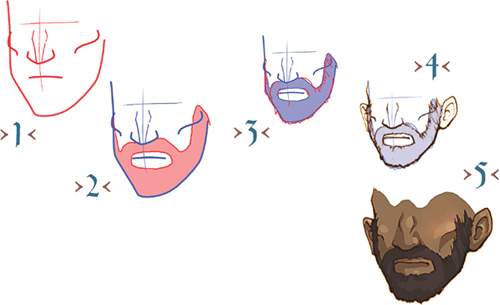
Beards suggest a character's personality. A close trimmed, well-cared-for beard indicates a character that is meticulous and thoughtful. Scraggly stubble shows a gruff character with little interest in grooming. Here are a few basic approaches to drawing a beard.
SHORT BEARD
First, map out the places covered by hair; typically underneath the nose, around the lower jaw, and sometimes up into the hairline for thick sideburns. Shorter beards generally won't extend much past these areas, so just add texture within them.
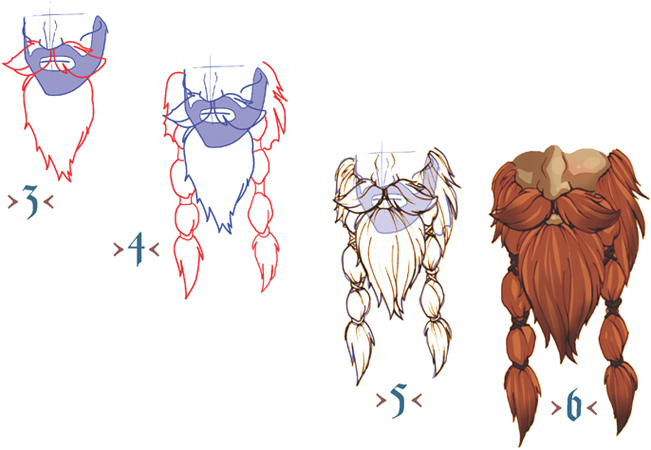
LONGER, INTRICATE BEARD
Start the same way as for a shorter beard. Use large, fluffy, intricate shapes with scraggly edges to fill out the mustache and basic beard. You can stop here or you can add braids or beads for extra interest. A simple bit of hair pulled together with a series of ties is fairly easy to achieve. Be sure to include darker shadows where the beard is tied off and pulled in tightly. And remember to include highlights in between the strips where it bulges out.
TUSKS
Tusks and fangs that grow over the lips of your character will create a feral, untamed look. These tusks are really nothing more than large teeth. They can curve up around the upper lip from the lower jaw. Or they could curve down around the lower lip from the upper jaw. For a particularly wild beastie, try tusks that don't point up or down, and instead point out.
SIMPLE TUSK
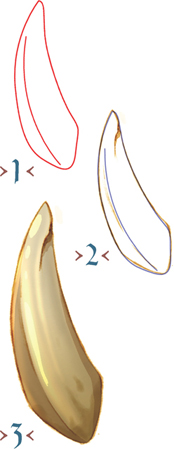
A tusk is simple cone shape, basically an overgrown canine. Easy enough.
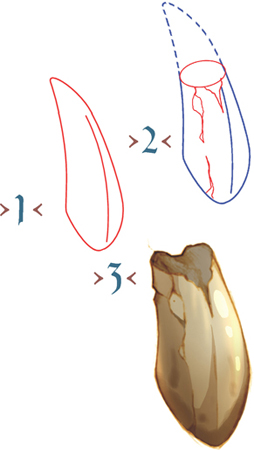
BROKEN TUSK
If your orc, goblin or other tusked beastie has been around awhile, it may have a broken tusk. Since tusks are on the outside of the mouth, they see a little more damage than the teeth on the inside.

SETTING TUSKS IN THE MOUTH
Setting the tusk in the mouth can be tricky. Put them where you would normally place regular-sized canines. Since they are much larger, you'll need to bend the lips out and around them. These tusks are simply too big to be inside the mouth when it closes. They will come around the upper lip when the mouth is closed.
Orc
The orc was a creature originally developed by J.R.R. Tolkien. Today, orcs have become a very common, but very important part of modern fantasy. You'll see orcs in modern fantasy novels, role-playing games and video games. They're often described as brutish, with large tusks, brows and chests. They're dirty more often than not, and come in earthy colors ranging from gray to brown to green.
›1‹
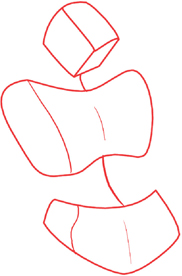
Start off with the boxes for the head, chest and hips.
›2‹
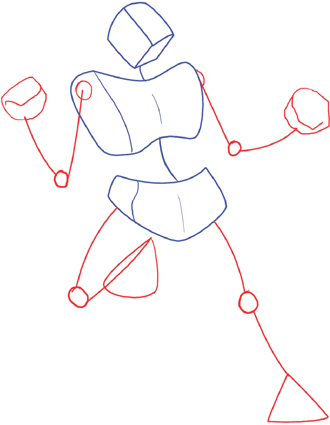
Place your orc's arms and legs. This beast is holding his arms out with one leg propped up on a stone.
Even though the thigh will overlap the lower leg on the bent leg, use guidelines to make sure that you've got the placement how you want it.
›3‹
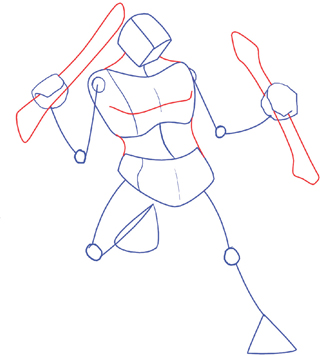
This orc wields two weapons, so draw in loose, general shapes to detail later.
Draw lines connecting the boxes that represent the hips and the chest.
Draw a thick, muscled neck that connects the orc's head to his shoulders.
›4‹
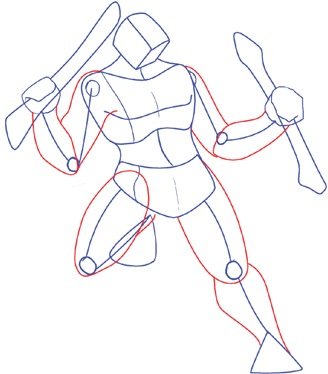
In this pose, the orc's right leg (on our left) will almost completely overlap and obscure the lower leg since the thigh is closer to us and the lower leg goes back into space.
Add thick arms and legs. In general, the upper arms and legs will be thicker than the lower arms and legs.
›5‹
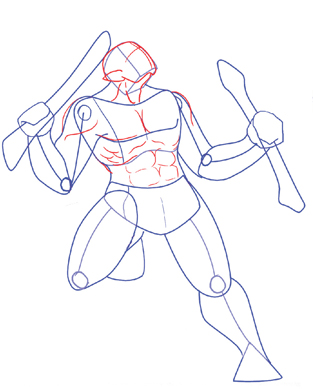
Add a pronounced bicep on each shoulder.
Giving your orc defined muscles will go a long way toward making the drawing engaging.
Give him a 6-pack and some pectoral definition.
›6‹
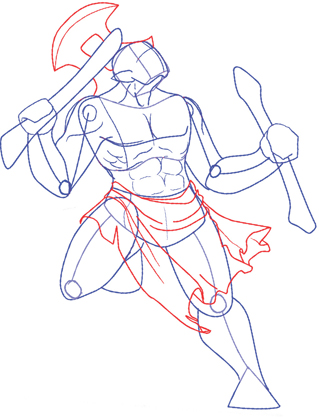
Orcs can wear anything from barbaric animal hides to heavy plate armor. Look for tips on page 39 as you add this orc's kilt.
›7‹
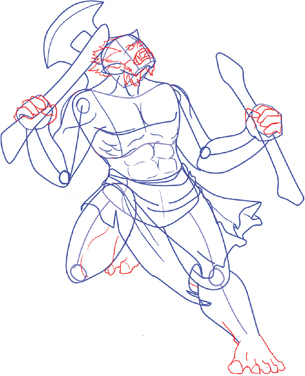
Define the hands and feet (see pages 28–31). Begin to add details to the orc's face. A small nose, located close to the eyes, and tusks give your orc a vicious look.
›8‹
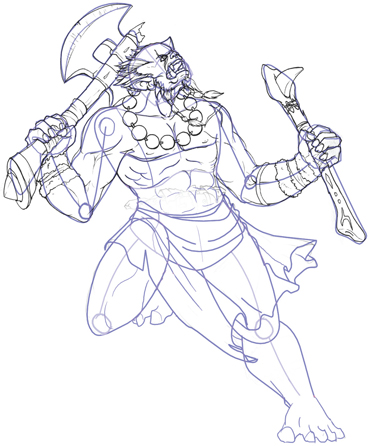
Go over your construction lines and really nail out the details. Add scars, ripped cloth and hair texture. Make sure any scars follow the orc's form. The scar over this guy's eye is straight along the forehead, but because his eyes are sunken into sockets, it pulls in and back out, finally curving over his cheek. Any scars you place on your characters should curve around the muscles and shapes they rest on.
›9‹
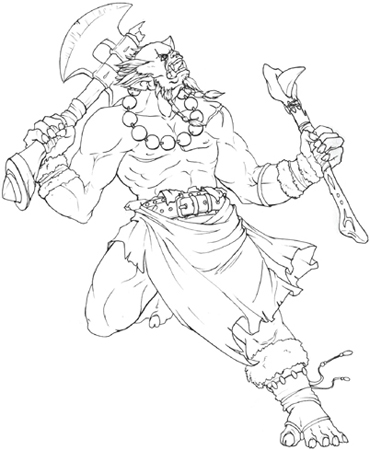
Erase any stray construction lines and give your drawing a final look over. Is the linework on the metallic parts crisp and smooth? Do the edges of the arms and legs have muscles that overlap each other?
›10‹
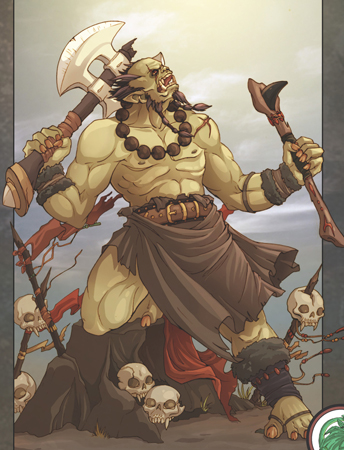
To tie together this scene, use the same sorts of beads around the orc's ankle to adorn the skulls on the pikes, and made sure all the material in the background blew to the right, the same as the orc. Closely tying in your character with the setting is very effective. However, rules are meant to be broken. If your character is a rampaging orc in the middle of a business meeting in an office building, the contrast will be very striking (not to mention humorous).