
A fleet at peace. This is Taranto in the 1930s. The ships are moored stern to the quayside, an arrangement known as ‘Mediterranean mooring’. However, at the time of the attack most ships were anchored in the harbour, making them easier targets. (Source unknown)

The year is 1933 and the new German Panzerschiff or ‘armoured ship’, Deutschland, known to the British and American media as a pocket battleship, passes through Kiel Bay. The smaller ship to starboard is a training vessel. The ship’s name was changed to Lutzow as someone foresaw the potential effect on morale of Deutschland being sunk! (German Federal Archives)

A pre-war shot of the cruiser HMS Cornwall and the aircraft carrier HMS Hermes on the China Station. The Royal Navy was the most widely scattered of any of the navies of the belligerent powers in the Second World War. (US Naval Historical Records Centre)

British heavy cruiser Dorsetshire on a visit to Australia in 1938, with Sydney Harbour Bridge in the background. These ships were classed as heavy cruisers under the terms of the Washington Naval Treaty of 1922, which stipulated that heavy cruisers had 8in guns and light cruisers 6in; tonnage had nothing to do with their classification. (Imperial War Museum)

Another Panzerschiff was the Admiral Graf Spee, the first of the trio of ships to be lost when attacked by three British cruisers in December 1939. After putting most of her crew ashore in Montevideo, the capital of neutral Uruguay, her commanding officer scuttled her, believing that stronger British forces were waiting for his ship. (German Federal Archives)

Two of the three ships that accounted for the Graf Spee: HMS Achilles is seen from the deck of her sister ship, Ajax. HMS Achilles had earlier been transferred to the Royal New Zealand Navy. (Source unknown)

In an attempt to obtain the surrender of the French fleet at Mers-el-Ke´bir and Oran, repeated attempts were made to open communications but the French resolutely refused to surrender their ships or put them beyond use. Captain Holland, commandin g officer of Ark Royal, was sent by seaplane to negotiate, and on his way back the problem was how to return to his own command quickly. The first of these three images shows the Swordfish seaplane approaching the carrier, with the arrester wires removed from the flight deck. (Author’s collection)

Touchdown! To reduce her top weight and also ensure that she remained within her specified tonnage, Ark Royal had a very thin flight deck, so the danger of damage was very real. (Author’s collection)

Safely down! Deck crew rush out with wheels in order to manoeuvre the Swordfish. (Author’s collection)

Although a battle-cruiser, HMS Hood was the Royal Navy’s largest warship for many years. She was meant to be one of a class of four ships, but design defects meant that the rest of the class was cancelled. She was due to be refitted and partially rebuilt in the early 1940s; however, she blew up in the famous encounter with the Bismarck and Prinz Eugen before that could be done. (US National Archives)

The sleek lines of the pride of the German Navy, the battleship Bismarck, possibly passing through the Kiel Canal as the water appears calm and tugs are in attendance. She was not to survive for much longer than the Hood. (German Federal Archive)

The Royal Navy tracked down and sank Bismarck, with the campaign aided considerably by the use of carrier-borne aircraft that crippled the ship. Here are Fairey Swordfish aboard HMS Victorious before taking off on a strike against the German battleship. (Imperial War Museum)

Survivors from the Bismarck desperately attempt to board the British cruiser Dorsetshire, but after one of them told the cruiser’s crew that a submarine was coming the rescue had to be abandoned, meaning that most of the German sailors died. (Imperial War Museum)

In wartime many ships are, in naval terms, ‘taken up from trade’ for a variety of tasks. At the top end of the scale were the armed cruisers, although these were overwhelmed when facing major warships. Much further down the scale were the converted trawlers, used for minesweeping and convoy escorts: this is His Majesty’s Trawler, HMT Acacia. (Imperial War Museum)

The Germans also used armed trawlers and this is the Kapitan Stemmer, armed and with much communications equipment that she would not have needed in her peacetime role. (German Federal Archive)

HMS Exeter was the third of the trio of cruisers that fought in the Battle of the River Plate with the Graf Spee. A heavy cruiser, she had the heaviest armament of any of the three vessels but her 8in guns should not have been a match for the 11in guns of the German ship. She is seen here off Sumatra in 1942, not long before her own demise. (Australian War Memorial)

A Japanese photograph showing HMS Exeter sinking in the Battle of the Java Sea. The odds were heavily stacked against her and the other ships due to the lack of carrier-borne aircraft to defend them. (US National Archives)

Another Japanese photograph showing heavy cruisers HMS Dorsetshire and Cornwall sinking off Malaya after being attacked by Japanese aircraft. The pattern left by the wake of the two ships as they tried to evade Japanese attack can be seen clearly. (US National Archives)

Undoubtedly the most successful of the many different conversions of merchant ships during the Second World War were the MAC ships, or merchant aircraft carriers, which were tankers and grain carriers fitted with a wooden flight deck. None of these were lost to enemy action, but they saved many merchant ships and seamen in the convoys they escorted. The puff of steam is from a valve that leaked steam to show the wind direction. (Author’s collection)

It is difficult to say whether taking off or landing was more dangerous on the short and narrow flight deck, but the Fairey Swordfish and their pilots were always up to the challenge. The position of the other ships in the convoy shows that the Adula had to change course to head into the wind. These ships were still manned by the Merchant Navy and operated by ship-owners but of course the air-crew, the maintainers and the ‘batsman’ were all Royal Navy personnel. (Author’s collection)

Supposedly intended as a replacement for the Swordfish, the Fairey Albacore brought the luxury of an enclosed cockpit but engine problems meant that it never really displaced the Swordfish. Towards the end of the war there were plans to build a batch of Swordfish with cockpit canopies for the Royal Canadian Navy. (Author’s collection)

Intended to do the same job as the Swordfish was the Fairey Albacore. One of the roles for this aircraft was supposed to be dive-bombing; however, it was notorious for not always pulling out of a dive. Divebombing was meant to ensure accuracy, but judging when to pull out was difficult as altimeters could not unwind fast enough to show the true height above the target. (Author’s collection)

The last aircraft carrier to join the Royal Navy before the outbreak of war was HMS Ark Royal, only the second British carrier to have been laid down as such. Her high freeboard is due to a combination of two hangar decks and a full-length flight deck. (Author’s collection)

Another image of Ark Royal showing her three aircraft lifts, which had to be relatively narrow to avoid weakening her thin flight deck even further. Everyone expected her to be at the mercy of aerial attack, but ironically she would be lost to a single torpedo fired by a U-boat off Gibraltar that disabled her machinery. (Author’s collection)

The shortage of flight decks was eventually solved by the escort carrier, known to the Royal Navy as auxiliary carriers, which was a better term as they did more than just escort convoys: ferrying aircraft, acting as maintenance carriers, supporting aircraft providing air cover for ground forces during the Mediterranean invasions and also as US forces island-hopped across the Pacific towards Japan. This is HMS Ameer (an alternative spelling of ‘Emir’) refuelling a Canadian destroyer. (Imperial War Museum

A broadside view of HMS Achates, a British destroyer commissioned in 1930 and one of a class of nine vessels. Despite severe economic depression for most of the period between the two world wars, the Royal Navy received around eight new destroyers almost every year. (Imperial War Museum)

The Arctic convoys saw those involved battling with the weather as much as with the Germans. This is the light cruiser HMS Scylla, with her crew attempting to clear the forecastle of ice, which even covered the armament. Ships could even become top-heavy with ice and roll over. (IWM A15365)

The Swordfish was invaluable as an antisubmarine aircraft and was also used for reconnaissance. However, despite being a single-engined biplane and frequently seen over and around convoys, they were often mistaken for German Junkers Ju 88s by antiaircraft gunners aboard convoy ships, despite the Ju 88 being a sleek twin-engined monoplane. One Swordfish pilot devised this Valentine card in an attempt to stop a convoy’s AA fire being aimed at his aircraft. (Author’s collection)

The Illustrious-class aircraft carriers were the most successful of the Second World War, having strong armoured protection and speed, with the latter attribute not only making flying operations easier but also making them a more difficult target for submarines. This is the third ship of the class, HMS Victorious, seen here in Icelandic waters. (Author’s collection)

Contrast the clean lines of Victorious with those of HMS Glorious, a converted ‘light’ battle-cruiser. Her design incorporated a separate takeoff deck as well as a main flight deck that could be used for both landing and taking off but which was, of course, far too short as aircraft sizes and weights increased. This is one of the last photographs to be taken of her, off Norway, and seen here with the RAF Hawker Hurricanes ranged aft on her flight deck. (Source unknown)

The new generation of more capable aircraft carriers allowed higher-performance aircraft to be operated, one of which was the Vought Corsair supplied from the United States after the USN initially believed that the aircraft was too large and heavy to be flown from carriers. Some believe that it was the best carrier fighter of the war. (Author’s collection)

One of the most modern battleships was HMS Prince of Wales, but she was hampered by having 14in guns rather than 16in as originally planned in order to comply with new but short-lived international agreements. The low bows of this class were intended to allow her ‘A’ turret to fire forward but adversely affected sea-keeping. She was sunk by the Japanese on 10 December 1941. (Imperial War Museum)

Another casualty was HMS Eagle, torpedoed while escorting Operation PEDESTAL, the Malta convoy of August 1942. She was meant to be retired once the first of the new fast armoured carriers arrived but as war loomed, not only was she and the other three older carriers retained but an additional three carriers were ordered, one of which was a maintenance ship. (Imperial War Museum)

HMS Safari, one of the larger submarines used by the Royal Navy. These suffered heavy losses, especially in the Mediterranean where larger submarines were at a disadvantage, even though their size also meant that they were useful in helping to keep the island supplied. (Imperial War Museum)

An aerial view of HMS Triumph, famous for being the only British submarine to survive striking a mine. The crew were having lunch at the time, which was served around midnight on submarines, as she was on the surface in bad weather recharging her batteries. Eyewitness accounts tell of an explosive pulse travelling through the boat with some soup being spilled, but fortunately the torpedoes loaded in her forward tubes did not explode and she was able to limp into Chatham for repairs. (Author’s collection)

Malta spent all of 1942 and much of the following year on the verge of collapse. Food supplies were very short and fuel was scarce, crucial for Malta’s survival. Relief finally came with the convoy of August 1942, code-named Operation PEDESTAL. This is the crippled tanker Ohio, being helped into Grand Harbour with her vital cargo of fuel. She settled on the harbour bottom after unloading and, once refloated, broke her back.

Experience earlier in the war had shown that reconnaissance was essential for successful landings and that the landing fleet and bombardment ships needed guidance to the right positions. Off Normandy, this was done by X-craft, midget submarines with a four-man crew, which were skilfully navigated so that they could show lights to seaward. Other uses included an attack on the German battleship Tirpitz in a Norwegian fjord. This is a preserved X-craft, X-24, at the Submarine Museum in Gosport, Hampshire. (RN Submarine Museum)

The Germans expected attacks on Tirpitz from the air, and together the Royal Air Force and the Fleet Air Arm ensured that they weren’t disappointed. The efforts made to hide the ship, or at least break up her outline, can be seen here. (German Federal Archive)

This is what the ship normally looked like: a sister of the ill-fated Bismarck, but in the end also to be sunk when the RAF used 12,000lb ‘Tallboy’ bombs that capsized her. (German Federal Archive)

Good images of Tirpitz were hard to come by, so the United States Navy prepared this drawing so that naval officers who encountered the ship would be quick to recognize her. The fact that the drawing shows her from above indicates that the main audience for the image would be the crew of reconnaissance or attacking aircraft. (US National Archives)

Convoy speeds were so low that destroyers were wasted as escorts and in any case were not sturdy enough for prolonged exposure to heavy seas, so the corvette was developed from a design for a commercial whaling ship. This is HMS Dianthus, with members of her crew reloading a depth-charge launcher. (Imperial War Museum)

The corvette was a highly successful development, so much so that under what was known unofficially as ‘reverse lend-lease’ a number of ships were transferred to the United States Navy, giving them access to British sonar technology. This is the former HMS Milfoil in her new role as USS Intensity. (US National Archives)

A convoy of landing craft crosses the English Channel bound for Normandy with barrage balloons to provide extra protection from attack by German aircraft. In fact, there was no German aerial intervention and the landings largely caught the Germans by surprise, partly because of doubts over the landing site and partly because of bad weather. (Imperial War Museum)

The battleship HMS Nelson on gunnery trials. She had nine 16in guns in three turrets, all of which were mounted forward. Not only could a 16in shell pack a heavier punch than a 15 or 14in shell, it also had longer range. After the landings, the Germans found moving troops and tanks difficult for more than 20 miles from the coast because of the naval bombardment. (Imperial War Museum)
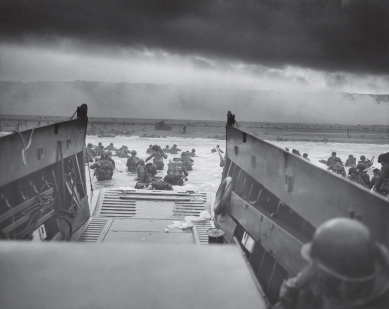
Into the ‘Jaws of Death’ was the original caption for this official US photograph of troops aboard to charge ashore at what became known as ‘Bloody Omaha’. The Germans were not only well-positioned and wellgarrisoned at this point, but the pre-landing bombing and naval bombardment had largely left the defences unscathed. (US Coast Guard Service)

Two prefabricated harbours, known as Mulberry Harbours, had to be towed into position and assembled after the landings as landing ships were severely limited in the volume of cargo they could carry, and which had of necessity to be self-propelled. The harbours meant that supplies could be shipped directly from the United States. A severe storm damaged both harbours and rendered that in the US sector unusable. (US National Archives)

The vast thirst of the combined Allied aircraft, tanks and supply vehicles meant that an oil pipeline was needed, known as PLUTO for ‘pipeline under the ocean’. PLUTO ran from Shanklin on the east coast of the Isle of Wight. (Source unknown)

Even as the Germans began to withdraw from Greece and the Balkans, harried by Allied air and naval forces, there was an attempted Communist coup in Greece. Here is Winston Churchill disembarking from the cruiser HMS Ajax for a meeting ashore in Athens. (Imperial War Museum)