CHAPTER 5
How Long Has It Been Since We Last Met?
Time present and time past are both perhaps present in time future. And time future is contained in time past.
—T. S. ELIOT
In chapter 3, we learned how to use all of our senses to fully “see” what was already before us. Chapter 4 taught us how to differentiate between different types of visual signs and how to tell the difference between a natural occurrence and an actual sign left by our Chase. Identifying a sign is great, but identification alone cannot tell us much about the Chase’s current location. Can you judge the sign’s age? Can you tell how long it’s been there and how long ago the Chase passed this way?
One of the most difficult things a Tracker must learn is to determine how much time has elapsed since a sign was made. This is perhaps the most mysterious element to those who are unschooled in tracking, the one element that elicits the greatest awe from the non-Tracker. But, like the sights, sounds, and smells spoken of earlier, one must simply learn to read and interpret what is already there.
Even a novice Tracker should be able to make a reasonable assumption about the age of any sign. And as with anything else, practice will give you the edge you need when it really counts.
HUMAN AND ANIMAL EXCREMENT
In chapter 3, we discussed various odors, including that of human and animal urine and feces. Let’s take that a step further and use that excrement to help us determine the passage of time. Chapter 1 included an excerpt in which a Native American Tracker examined horse droppings and determined not only the specific grasslands where the animal had grazed but also how much time had gone by since the droppings had been left. While not an exact science, determining time passage can be accomplished with a few clues.
Take a close look at the excrement, either urine or feces. The moister and more fly-congested it is, with a high concentration of smell, the less time has passed since it was left. Conversely, the more dehydrated and less fly-congested it is, with less concentration of smell, the longer it has been since the excretion. To obtain a more exact knowledge of the range of details, time it and analyze it in your laboratory (later in this chapter). In cold to freezing conditions, cut in half or open the feces. The inner moisture and heat will tell you its freshness. (Yes, it’s a dirty job, but just remember: If it smells like it and looks like it, you surely do not have to taste it!)
LIVING CREATURES AND PLANT LIFE
Here, again, knowledge of the flora (plant life), fauna (wildlife), and insects of your immediate surroundings is paramount to success. In your climatic and geographic region of the world, knowing when certain species of animals come out to feed and at what time insects are the most active will certainly provide a clue as to the time a Chase traveled through the area.
For instance, most deer travel to water to drink during the late evening. If, during the dead of night or the crack of dawn, you notice a fresh deer’s hoofprint in the middle of your Chase’s shoe print, you can conclude with fair accuracy that the deer arrived after the Chase. If, however, your Chase’s shoe print is superimposed on a deer’s hoofprint, you can almost conclusively determine that the Chase was there after the deer. If the deer of the area normally go to the water source between approximately 8:00 p.m. and 9:00 p.m., and your team notices a fresh human footprint over the deer print at 11:30 p.m., the team can pretty safely assume that the Chase is a mere 2.5 to 3.5 hours ahead—or less.
Another example is a spider, which constructs a web during the late evening to capture late-flying insects (see figure 5.1). These webs are often strung along narrow trails that are wide enough to capture flying insects yet close enough from one side to the other to make the web construction quick and easy. If the Chase’s prints are discovered in the early morning below a newly created spiderweb, the Tracker can assume that the Chase had passed through the area prior to the late evening of the day before.
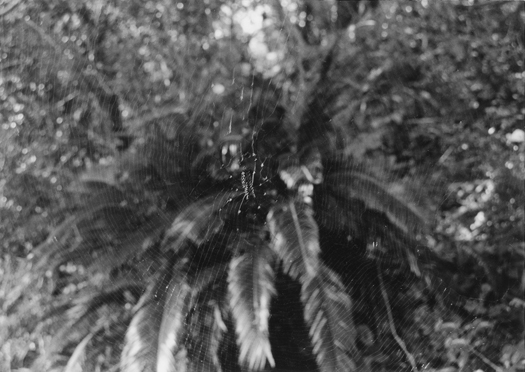
Figure 5.1 Spiderweb.
Earthworm cast is another clear indicator of recent travel. Now, I am by no means a worm expert. I could dazzle you with Latin names such as Oligochaeta, Lumbricus terrestris, and Lumbriculida, all part of the worm population known as “segmented worms,” but unless you are a pathologist or biologist, all you need to know is that worms are slimy and soft. Some earthworms are short, some are long, some are skinny, and some are fat. I have yet to see a pretty one.
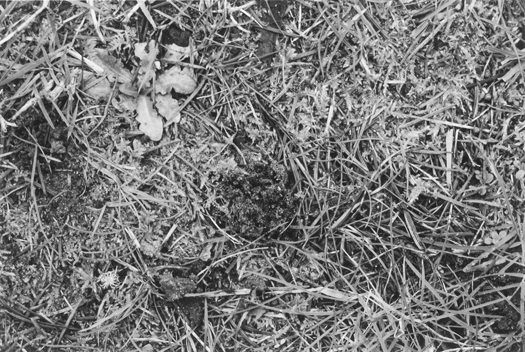
Figure 5.2A Mound of worm cast—undisturbed.

Figure 5.2B Same worm cast—crushed by boot.
A fact well known to many anglers, worms appear on the surface of the ground after rainfall or at predawn for air. As they travel, they simultaneously leave a mound or trail of moist mud pellets, called “worm cast.” In tropical or subtropical regions of Southeast Asia, worm cast takes place between one and six o’clock in the morning, climate determining the exact hours it appears. Earthworms are not too fond of sunlight; therefore, before dawn, they return to their sweet, cool mother earth. A trail of worm cast that has been crushed by a human boot was most likely disturbed after those hours, indicating a more recent passage (see figures 5.2A and B). Conversely, footprints covered by a trail or mound of worm cast most likely occurred before 1:00 a.m. (see figures 5.3A, B, and C). For more information about these creatures, ask your local hard-core fishers. They will be able to tell you most anything you care to know—and some information you would rather not—about earthworms in your neck of the woods.
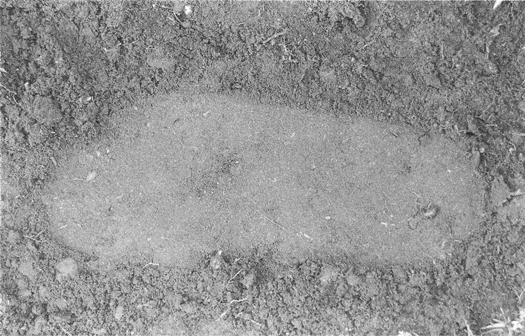
Figure 5.3A Worm cast—beginning traces.
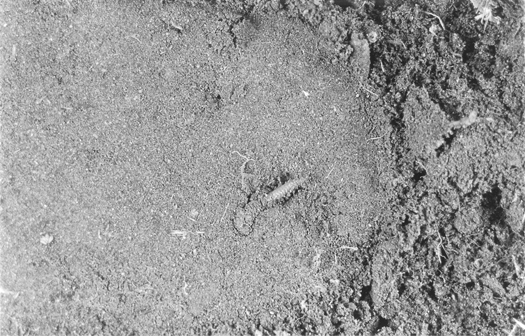
Figures 5.3B Worm cast—closer view.

Figure 5.3C Worm cast—full night’s work.
In the Pacific Northwest there are particular species of belly-crawlers known as slugs. They are similar to snails except that they have no shell and are extremely slimy. During the night and predawn hours, they come out to feed on new, tender plants, much to the dismay of area gardeners and florists. Slugs leave a very distinct trail of gelatinous ooze that dries and hardens with the sun. When disturbed, the appearance of the trail will tell you if it was smeared (while still moist) or broken (after it dried). This clue, of course, will give you a good indication of when the Chase traveled through the area.
The possibilities of these kinds of examples are nearly endless, limited only by one’s knowledge of the animals, plants, and insects of a geographic area. Because this book is merely an overview, I do not have the luxury of examining the habitat and living habits of every possible living creature. There are other ways, however, to discover for yourself how the passage of time affects objects common to inhabitants of certain regions, while giving you the firsthand observation required of the most experienced Tracker.
One way is to go out with a seasoned Tracker, watching, smelling, touching, and listening as he or she explains the variances of signs according to the amount of time that has passed. Few novice Trackers have that kind of opportunity.
Another way to learn about the passage of time is much more scientific, for those of you who are analytically minded and/or have the patience to watch time unfold before your eyes. This method has greatly aided me in determining the age of various signs and has enabled me to build a detailed and highly accurate Tracker Analysis Database. It consists of an actual controlled laboratory test conducted in the outdoors over a predetermined period of time, during which you can actually watch, observe, and note the changes that affect both natural and objects.
CONTROLLED LABORATORY TEST
A controlled test is a systematic or logical procedure for judging the age of a sign. It will allow you to see firsthand how common objects and natural signs age and change over time. The setup is quite simple, and the experiment follows methods normally used in a typical scientific study.
The first and most important requirement is to find a secluded location that will not be disturbed by people or by animals outside the range of the experiment, such as dogs, cows, or other domesticated animals. Select a spot in an area where you would most likely be tracking someone, but protect it in such a manner that it will not be victim to acts of vandalism. If you want to be able to read the signs of the animals natural to the area, however, then avoid high fences or barriers that cannot be jumped or breached by native animal and insect inhabitants. The second requirement is to find a location that has both exposed and covered areas.
Depending on which type of climate you live in, divide the area into sections that equal the number of seasons you experience. If you live in an area that has only a wet and dry season, divide the area into two sections; if you live in a temperate climate with four distinct seasons, divide your laboratory into four sections. Then further divide each section into two compartments. One compartment should be exposed to the elements, to permit the full impact of sun, rain, snow, wind, and other weather phenomena. The other compartment should be under the natural cover of trees, bushes, or other plant life (see figure 5.4).
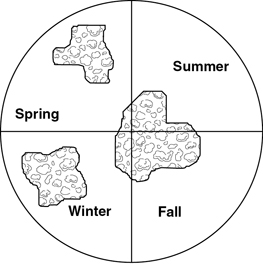
Figure 5.4 Combined test area.
Depending on the abundance or lack of wide-open spaces or natural cover, you may find it easier to cordon off the exposed and covered areas first and then divide those areas into the two or four seasonal compartments (see figure 5.5).
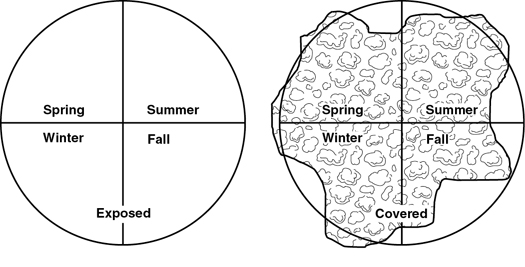
Figure 5.5 Divided test area—sheltered and unsheltered.
The contents of each compartment will hold a wide variety of natural and man-made objects and should cover the spectrum of what you would expect to find during the course of a routine hunt or search and rescue operation. They should contain anything you would like to observe throughout the aging process, including but not limited to: a variety of cut plants abundant for each season; cut and scratched trees of many varieties; broken twigs; a campfire; shoe and/or boot prints made by adults and children, male and female, with a heavy pack and with no load at all; feces and urine; trash, such as newspapers, candy wrappers, food/soda/beer cans, cigarette butts, toilet paper, matchsticks; and food. Every attempt should be made to secure items that could be blown away, either by tacking them or tying them down.
Conduct of the Experiment
For each season, you will be setting up two compartments at a time, one sheltered, the other exposed to the elements, each containing identical items. The sheltered compartment should utilize a natural canopy of trees (building a shelter would defeat the purpose of observing the items in a natural setting). Put together the compartments during the peak of each season. In North America, throughout the majority of the United States, for example, the peak of spring would be May 10; summer would be July 10, and so on. For the tropics of Southeast Asia, the wet season is May to October, while the dry season is November to April. The peaks would be halfway through both seasons.
Build each individual sign in its most natural state, as it would naturally happen. Create a genuine atmosphere for your items, including, as I already mentioned, a natural canopy for your sheltered items. If replicating a Chase at rest, don’t just sit on the ground for one minute and then use this as an actual illustration of a resting person. You would be wasting your time and fooling yourself. Take off a heavy pack, drop it to the ground, plop down beside it, and stretch your feet out, munching on a candy bar or eating a meal for ten to thirty minutes. Or rearrange the pack and use it as a pillow, then lie down and take a nap for an hour or overnight. Crumple the candy wrapper and throw it down. Walk through some tall grass, mud, and sand; run through some trees or brush, breaking, tearing, or scratching bark, leaves, branches, or exposed roots; climb a short rise; splash across some water. Even when urinating, do so as you would naturally, with males standing and women squatting.
Let your imagination, time, and area of availability be your guide. Just remember to do each of these things twice, once for the covered area and once for the exposed area in each seasonal compartment.
I have already mentioned that one of the things that set early American Trackers apart was their ability to tell the race, tribe, or home region of an individual by examining their excrement or their horses’ droppings, as did Poor Elk in chapter 1. This next section will help you recognize characteristics that will let you do the same.
What You Eat Is What You Leave
Animals that live in a particular habitat or migrate from one geographic area to another on a seasonal, instinctual, or survival basis can be identified by their scat. It can also be said that a particular nationality or region of people can be identified by their excrement.
Now that the world is a “smaller place,” imports and exports of food allow an individual to maintain a near exact diet to that of his home country or region, though he may be halfway around the world. In the same way, food from other countries can change the eating habits of domestic people, as will traveling to a foreign country and eating the foods of the local nationals. If you were to travel to Thailand and eat ethnic Thai food, your excrement would be the same as that of native Thai people. If three people from three different countries were to eat the exact same food and beverages in proportion to their capable intake, the excrement of each would be the same, as long as the three had been acclimated to the region in which they were eating. Hence, a human’s excrement is a direct reflection of diet after digestion.
In order to get a good feel for what the excrement of three different diets might look like, I have devised an experiment that you can utilize within the compartments you have already set up. If you conduct the experiment correctly, your own waste products should look very similar to the photos I have included here.
Week One
| Diet: | Primary—Salmon, venison, nuts |
| Fruit—Black/blueberries | |
| Beverage—water | |
| Excrement: | Residue of undigested nuts, berry seeds |
| Color—mid to dark brown | |
| Appearance—moist yet rigid, segmented (see figure 5.6A) |
Week Two
| Diet: | Primary—Trout, sardines, small grain rice |
| Fruit and Vegetables—Tropical fruit, consisting of partially ripe mangoes, ripe papaya, ripe bananas, kiwi; mushrooms | |
| Beverage—Coconut milk with water, tea | |
| Excrement: | Residue of undigested papaya fiber, mango, and mushroom |
| Color—light brown | |
| Appearance—moist and soft (see figure 5.6B) |
Week Three
| Diet: | Primary—Chicken, oil, vinegar |
| Fruit and Vegetables—tomatoes, carrots, celery, cucumbers, lettuce; peaches, oranges, nectarines | |
| Beverage—water, carrot juice | |
| Excrement: | Residue of undigested cucumber seeds |
| Color—dark brown | |
| Appearance—moist, very rigid and segmented (see figure 5.6C) |
This diet should be followed exactly for three straight weeks. To obtain the same results I have shown here, you must eat the exact same foods and drink the same beverages. Start each new diet at dinner/supper time, drinking plenty of water to flush out the last diet’s excrement. Wait until the third result of your excrement or just prior to commencing the next diet, to get the best result of the entire week’s intake. This will allow your body to fully process what you have eaten during the week and will give the best reflection of your diet’s excrement.
Enjoy your meals, and don’t forget to deliver your “product” into your test area(s) to examine the effects of time and weather.
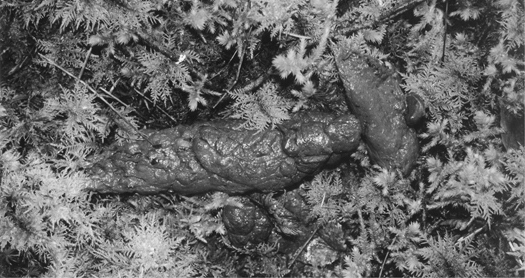
Figure 5.6A Week One (human waste).
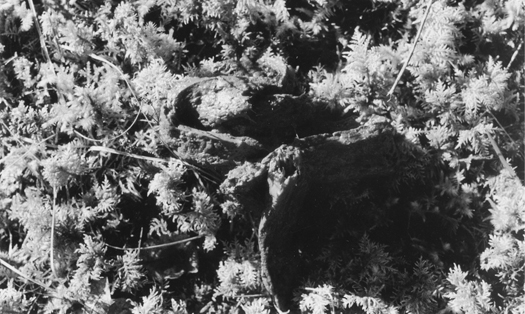
Figure 5.6B Week Two (human waste).
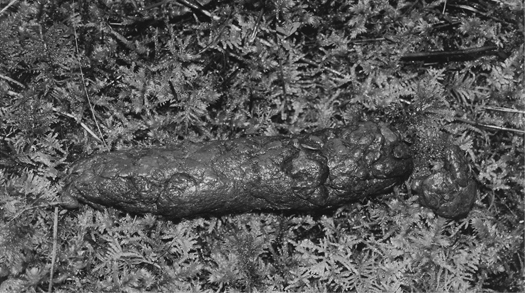
Figure 5.6C Week Three (human waste).
Once you have set up your sites, analyze them over a period of five days, and then weekly thereafter until the peak of the following season. You must make copious notes, take pictures, and/or draw detailed sketches to aid your recall of what you have observed.
Initially, you may want to make note of hourly changes: How soon does the trampled grass stand back up? At what point does the sap of scratched or cut trees start to ooze, stop oozing, and change color? When do the leaves of broken branches start to wither? How soon is a bitten-into apple covered in ants and/or flies? What does a muddy print look like after an hour of sun? At what point do the edges start to dry out and lose their sharpness? Do whatever is necessary to aid your memory.
As your senses are aggressively probing the area, make note of the sticks, twigs, leaves, and grasses that have been bent, broken, crushed, bruised, or cut, thus making nature bleed as a rubber tree does. In the area of impact where nature’s “flesh” has been exposed to the outside elements, discoloration will take place. A good example of this is an apple after it has been bitten into. The exposed area turns brown from oxidation. A bleeding tree is comparable to an individual who has been cut. Assuming the person is not a hemophiliac, his blood begins to coagulate and darken in color, soon becoming a scab. A rubber tree bleeds a white substance called latex. Latex stops leaking within two hours. Eight hours later, it hardens. After an additional twelve hours, the originally white latex changes to a dark brown. Fallen latex leaves (deadfall) will begin to turn brown within three days.
How does understanding the cause and effect of flora breached from its serenity aid you? Let’s take the rubber tree as an example. You have been on a chase for two days. You have noticed that your Chase has set a pattern of using a sharp object to cut trees. On this occasion, you have come across a rubber tree that has been cut; the latex is whitish-beige in color and semi-hard. Based on the above information or experience, you can safely assume that it has been approximately six hours since the cut was made.
Prior knowledge of how flora responds to various human disturbances will be advantageous for comparison, but even without that knowledge, you can make an on-site comparison. If a tree is secreting sap, attempt to make a mirror-type incision on the same type of tree. If the flow of the sap is of equal speed, then you can say that it has not been long since this incision. But if the flow of sap is slower than the newly bruised or cut tree, you can say that the original incision has not been recently made.
Some flowers release an odor when torn or broken. If you encounter a plant that has recently been injured and the affected area has not changed color, go and smell the plant. (Note: It is important that you blow your nose before sampling the smells of various items. You need to obtain the genuine potency of the odor or fragrance.) If there is an odor or pleasant fragrance, attempt to create the same bruise or abrasion on the same type of plant—then smell it. The duller the odor of the original specimen, the older the injury and vice versa.
One example of this is a plant I have often encountered in the Caribbean, Central America, and Southeast Asia. Mimosa pudica is one of 1,700 species of the Leguminosa family. This particular plant can be found in tropical and subtropical environments, and it usually flourishes in open fields. It has shoots with sensitive, bipinated leaves with four secondary stalks and auxiliary tight clusters of flowers (see figure 5.7). The leaflets of this plant close during the night and open at sunrise, much like the morning glory does in the United States. Very sensitive to touch, it closes whenever it comes in contact with human fingers or other foreign objects (see figure 5.8); light rain will not close it. Only the portion that has been affected will actually close. If touched during the coolness of the morning, between the hours of 6:00 and 8:00, it will take up to thirty minutes for the bipinated leaves to open, depending on the heaviness of the dew. Between the hours of 8:00 a.m. and 10:00 a.m., it will take approximately twenty minutes for the leaves to reopen. If touched during the height of day, with the dryness and heat, it will be only three to five minutes before the plant reopens. And as the evening comes to a close with no dew in the coolness of the twilight, it takes ten to twenty minutes to reopen. Those plants growing under a canopy will experience a slight delay in the process of opening.
Figure 5.7 Mimosa pudica, open.
Figure 5.8 Mimosa pudica, closed.
Therefore, knowing such things about the flora in your area will help you become much more competent in estimating the passage of time.
Back at the lab site, watch various activities come to pass as time goes on. Note when the animal life feeds, sleeps, and travels through your sites. Watch and listen for the insects and spiders to make their presence known. Record the times when the dewfall starts and ends. And pay close attention to the weather and its immediate and long-term effects on the objects in your lab. This analysis, carefully studied, will give your senses a full flavor of how time and the elements affect your lab items in a natural setting.
At the peak of the following season, set up the second pair of sites (covered, uncovered). Carefully analyze the first set of sites, and then construct the second. Repeat this process for every successive season until all seasons have been covered and all seasonal sites have been completed.
Most important, once you have set up the sites, do not touch or sanitize them in any way throughout the entire observation period. If you forget to include a certain item, be sure and insert it at the second location during the next season’s setup.
At the earliest stage, it is important that you develop a systematic Tracker analysis report, using the art of observation and comparison. A critical comparison of a specific object must be performed in detail. Carefully observe the changes in individual objects as they change over time; notice the differences between the two sets of signs from one season to the next, noting the similarities and differences between the same objects in the two different sections. What color is the candy wrapper? How much did it deteriorate? Did the apple completely decompose, did it simply dry out, or did animals and/or insects accelerate the decomposition? How badly did the food can rust, if at all? Is there even the smallest indication of a footprint or travel through the site?
What about the cut tree? While some trees simply bruise, other trees “bleed” some kind of sap, latex, or other substance similar to syrup. Note the length of time it takes for the tree to stop bleeding or leaking. How long did it take to coagulate? To darken in color? How much time passed before it scabbed over and hardened?
What does a broken reed look like? Does a cut or broken flower emit an odor or fragrance? How long does it last or remain potent? Does the juice from the stem sting the hand or eyes and for how long? If a skunk has defended its territory with its strong spray, how long does the odor linger, how great a territory does it cover, and which plants hold on to the odor the longest?
Just keep in mind that for each geographical area, you will need to commit a full year to study it thoroughly.
Database
You must now create your database. This information will be such that you will refer back to it time and time again, especially when you are having difficulty judging the age of a particular item. It is imperative that it be as accurate as humanly possible. Remember, however, that the database is only good in the geographic region in which it was created. Don’t expect the data from an arid region to be the same as that from a wet or cold region.
The look of the database can be whatever is the easiest for you to work with. Every time you make an observation of each Aging Stance make a Laboratory Observation Report for your database (see appendix E “Laboratory Observation Report”).
Don’t be shy about coming up with your own scenarios once you have started analyzing your findings. Remember the example of the rubber tree. If it has been cut and secretes latex that is whitish-beige in color, we know that this tree was cut approximately six hours earlier. I have spent a great deal of time in Southeast Asia. If I find fresh worm cast within the confines of a shoe print at 8:00 a.m., I can generally say without reserve that the shoe print was made between the hours of 1:00 a.m. and 6:00 a.m.
Similarly, in North America, you have noted that the majority of wildlife moves at night. If a white-tailed deer’s print is superimposed over a person’s footprint, you can assume that the individual moved through the area some time prior to the previous night.
Better yet, come up with a multifactor scenario, such as the one below.
The hour is 7:30 a.m., you are walking on a trail, and you notice the following signs:
- Spiderwebs at a man’s height have been torn apart; they are yellow in color.
- Fresh flowing sap of a whitish-beige color is oozing from a rubber tree.
- Fresh worm cast has been crushed by a shoe print.
What does this tell you? The torn spiderwebs could indicate that someone passed through the area between late evening and early morning (the yellow color indicates a new web); the flowing sap from the rubber tree indicates that the incision was made within a two-hour period; and the crushed worm cast (laid between 1:00 a.m. and 6:00 a.m.) indicates the shoe print was made after the break of dawn.
All three indicators taken together conclude that the shoe print was made about two hours earlier, at about 5:30 a.m. Better keep your eyes peeled and your rifles loaded if it is a dangerous Chase you are after.
A LESSON IN FORENSIC SCIENCE
There is yet another way to determine the passage of time, but it is not one I recommend that you include in your outdoor laboratory. Here, book studies and/or college classes will have to suffice. This, of course, is the study of forensic pathology, or the study of dead bodies.
Corpses tell us much about the amount of time that has elapsed since death, because each one passes through very distinct stages. The postmortem interval, or PMI, involves a predetermined set of steps that a decaying body experiences from the time of death to complete decomposition. This happens in four phases: rigor mortis, or stiffening of the body; putrefaction, which is the rotting of the body tissue; swelling or bloating of the entire body; and decomposition of the flesh, to the point at which all that remains are primarily bones.
There are three natural processes that occur in the body after death, and the extent of their development are clues to the estimated time of death. Algor mortis refers to the change in body temperature. The body temperature of a corpse will drop, equilibrating with the environment and reaching its peak in approximately ten to twelve hours at normal room temperature (about seventy to seventy-five degrees Fahrenheit). In the outdoors, higher temperatures may slow down cooling, and cold weather may speed it up. Livor mortis, also called “lividity,” is the discoloration of the body that develops after the heart stops and no longer pumps blood through the body. You can see livor mortis approximately one hour after death, but it is often apparent earlier, within twenty to thirty minutes, usually becoming fixed in about eight to ten hours. This is the dark, deoxygenated blood pooling in parts of the body closest to the ground, and it is clearly evident as a purple color in a light-skinned person. On dark-skinned individuals, it will appear darker or may not be visible at all. Loss of blood before death will also lessen the appearance of lividity, while certain causes of death, such as carbon monoxide poisoning, cyanide poisoning, and hypothermia often cause the skin to appear bright red or pink.17
Rigor mortis, as mentioned above, refers to the stiffening of the body that begins shortly after death and sets in approximately one hour after death. The process starts at the head, moves down the body, and finally acts upon the legs and feet last, causing boardlike stiffness. This timeline, however, can be somewhat misleading, according to Dr. Dung Xuan Nguyen. Though it is well accepted that the jaw stiffens within an hour after death, complete rigor mortis could take as long as twelve hours. The process starts to occur within thirty minutes and takes up to twelve hours to reach its full term.18
A more exact PMI timeline of this first stage can be found in Time of Death, Decomposition and Identification by Jay Dix and Michael Graham. Although the exact time of death cannot be determined unless witnessed, there is normally sufficient evidence on the body itself to reach a close estimate, especially within the first twelve hours after death has occurred.
Beyond these initial stages of decomposition, the time interval between each successive stage depends entirely upon the climatic conditions surrounding the corpse. Is it located in an aquatic (water) or terrestrial (land) environment? Is its surface completely exposed, or has it been buried partially or totally? What kind of carnivore, insect, or rodent activity has taken place since death? How large is the body and what type of clothing was worn by the individual?
Decomposition
By far the most influential factor on decomposition is temperature.19 Tropical, subtropical, and/or warm climates expedite the growth of the bacteria that cause decomposition. In the South Pacific and Asia, studies give us a glimpse of decomposition time intervals in the tropics. For example, in Sri Lanka, an island off the coast of India, putrefaction can occur within twenty-four hours; swelling of the whole body can happen within sixty to seventy-two hours. A body exposed to direct sunlight and outdoor heat may decompose within a twenty-four- to forty-eight-hour period, at which time visual identification is nearly impossible.20
Subfreezing areas, on the other hand, preserve bodies for long periods of time. Note recent discoveries of centuries-old mammoths and “ice men.”
Mummification
Ancient Egyptians perfected the science of mummification, giving us the age-old fodder for classic novels and Friday-night thrillers. But mummification can occur naturally, too—arid deserts also preserve bodies in this way. Dix and Graham provide an excellent description of the natural mummification process:
Mummification occurs in hot dry environments where the body is able to dehydrate and bacterial proliferation is minimal. The skin becomes dark, dry and leathery. The internal organs desiccate and shrink. Most mummification occurs in the summer months but may also occur during the winter if the temperature is warm enough. An entire body can mummify in a few days to weeks. As the skin dries and hardens, the soft tissues decompose. After a few weeks, an entire body may appear preserved with some shrinkage due to dehydration. If, however, an incision is made through the skin, soft tissues, fat and internal organs may be virtually absent with the body resembling a “bag of bones.” Once the body is in this state, it may remain preserved for many years unless the skin is torn or broken. Mummification localized to certain parts of the body is relatively common. Mummification of the fingers and toes occurs readily in relatively dry environments regardless of temperature.21
Skeletonization
Complete skeletonization also depends on environmental factors. According to a study conducted by the University of Tennessee, in moderate climates a body will usually decompose down to just skeletal remains within six weeks during the summer and within four months in the winter cold. Of course, this time interval is significantly accelerated “when postmortem animal activity” speeds up the process.22
I have included here two medical examiner’s charts that approximate the time of death according to specific bodily changes (see figures 5.9A and B). This should assist in the time interval identification from rigor mortis to adipocere (a waxy substance that accumulates on the fatty parts of the body; it may protect a corpse from decomposition).
•••
As with other signs noted by experienced Trackers, the study of forensic pathology offers clues regarding the actual passage of time. Aging, whether estimating the time of a person’s death or determining how long ago a footprint was left, is not something that can be learned overnight or after a couple of trips out in the wilderness. The serious tracking student will use all available means to learn about the age of signs, including one-on-one instruction, reading, and hands-on experimentation. As is true with nearly all factors of tracking, this skill, too, relies heavily on experience before an individual can truly become an accomplished Tracker.
|
Freshwater |
Seawater |
||||
|
Stage |
Description |
Time |
N |
Time |
N |
|
Fresh |
Absence of significant discoloration or bloating; rigor mortis and livor mortis may be present |
0–2 days |
38 |
0–3 days |
22 |
|
Early decomposition |
Significant discoloration and early to full bloating |
2 days–1 week |
11 |
2 days–1 week |
4 |
|
Advanced decomposition |
Beginning of adipocere development; sagging and bleaching of soft tissue; erosion of surface tissue |
1 week–1 month |
13 |
? |
2 |
|
Skeletonization |
Exposure of skeletal elements; often significant adipocere development |
1 month or longer |
1 |
? |
1 |
Reprinted with permission from Forensic Taphonomy: The Postmortem Fate of Human Remains, Copyright CRC Press, Boca Raton, Florida.
Figure 5.9A Table 1 Stages of Decay, Criteria for Classification, Duration of Time in the Water and Sample Size for Seawater and Freshwater Cases
|
Time after Death |
Postmortem Changes |
Modifiers |
Category |
Stage |
|
0 minutes |
Circulation and breathing stop Pallor Early lividity Muscular relaxation Sphincters may relax |
Temperature Humidity Outdoor location Indoor location Submerged in water |
Early changes |
|
|
2 hours |
Vascular changes in eye Rigor mortis begins Algor mortis begins Lividity easily seen |
Late changes |
||
|
4–5 hours |
Coagulation of blood Fixation of lividity |
|||
|
24 hours |
Drying of cornea Reliquefication of blood |
Putrid Tissue changes |
I II |
|
|
48 hours |
Rigor disappears Intravascular hemolysis |
III |
||
|
72 hours |
Loss of hair and nails |
|||
|
96 hours |
Skin slippage and bulla formation Bacterial overgrowth |
Insect activity Animal activity |
Bloated |
IV V |
|
Days-months |
Green discoloration Bloating Release of gases Release of liquified internal organs Gradual loss of soft tissues Partial skeletonization Complete skeletonization |
Mummification Adipocere formation |
Destruction Skeleton |
VI VII VIII XI X |
Reprinted with permission from Forensic Taphonomy: The Postmortem Fate of Human Remains, Copyright CRC Press, Boca Raton, Florida.
Figure 5.9B Table 2 Postmortem Changes