
Place the pistol on half-cock. The cylinder should rotate freely.
The best advice for newcomers to blackpowder shooting is to slow down. Loading too quickly will cause inconsistency and mistakes in the load chain, and accuracy will be lost.
Examples of common mistakes caused by working too fast are forgetting to charge a chamber with powder before seating the bullet, and failing to seat the bullet completely in the chamber. Either one will result in valuable time being wasted trying to scrounge up a cleaning rod thin enough to drive out the bullet, or trying to avoid marring the finish on the pistol or slicing off a finger while trying to shave the front off the bullet that didn’t get seated far enough into the chamber to allow it to clear the forcing cone.
Here’s what a correct loading procedure looks like:
Grease, dirt, powder fouling, and other debris can clog the flash channel of a nipple, so the first step in loading any kind of percussion arm is clearing the nipple. Some people recommend firing a percussion cap on an unloaded firearm to blast the flash channel clear. This method will clear most obstructions quite effectively, however, this also deposits corrosive salts and other moisture attractants in the flash channel. If the pistol is going to be stored or carried for an extended time in a loaded condition, this is not the best practice. The salts and dirt will attract moisture, which can ruin the fresh percussion caps, contaminate the powder charge, and create rust in the nipples and chambers. Blackpowder is 75-percent salt, so moisture must be controlled whenever possible. William Butler “Wild Bill” Hickok was reputed to have fired, cleaned, and reloaded his revolvers every morning to ensure that the loads had not been contaminated by moisture overnight. While not everyone can or will follow this practice today, moisture control is an issue that must be addressed to ensure reliable ignition when the hammer falls.
Place the pistol on half-cock. The cylinder should rotate freely.

Clear the flash channel. Any fine wire will work to serve as a nipple pick.

Use a regulated powder measure to throw the charge.

Keeping the flash channel clear is critical for preventing misfires and hang-fires. The best practice for making sure the flash channel is clear is to run a wire nipple pick through each nipple. An alternative is to blow sharply through each nipple. Care must be taken not to place the mouth in contact with the nipple, due to the hazards associated with ingesting lead.
Each firearm is a law unto itself, regarding the combinations of charges and bullets that provide the best performance. Old timers often filled the chambers with as much blackpowder as they would hold and then rammed the balls down on top. The modern percussion revolver shooter should be more concerned with safety. Check the owner’s manual provided by the manufacturer of the pistol for suggested charges. The suggested loads provide a good place to start working out the best load.
To begin your load, pour the powder into the preset powder measure making sure to fill the measure to the top. Carefully pour the powder from the measure into the chamber of the cylinder and rotate the cylinder to expose the next chamber. Repeat this process until all the chambers are charged with powder, with one exception: if the revolver is not going to be fired immediately, load only five chambers, so that the hammer can rest on the empty.
Fill the chamber, then seat a felt wad on top of the powder in the chamber.
Good habits serve the shooter well, and volumetric loading of blackpowder is a good habit to develop. Modern smokeless powders are much more efficient than blackpowder, and a few tenths of a grain weight in blackpowder can mean the difference between a safe round and a ruined gun. An overloaded cartridge can cause the cylinder to burst, resulting in injuries to the shooter and bystanders.
Blackpowder is inefficient in its combustion. In larger calibers, a difference of five grains in volume between two charges may not produce a significant difference in velocity at the chronograph, so it is really not necessary to load blackpowder by weight. Another reason to adopt the practice of loading blackpowder arms exclusively by volume is that most blackpowder substitutes do not weigh the same as true blackpowder. An example of this is Hogdon’s Pyrodex. A charge of Pyrodex measured by weight will result in a very different charge than if the charge is measured volumetrically. This can create a dangerous overload situation that could wreck a gun or cause serious injury to the shooter or bystanders. Save the worries and doubts by loading volumetrically and using a powder measure graduated for blackpowder.
The next logical step in the loading process is to set a bullet on top of the chamber, unlatch the rammer, and press the bullet into the chamber. In a perfect world, the rammer would be stopped just as the nose of the bullet was flush with the top of the cylinder and the powder was firmly compressed behind the bullet. But that’s not reality, and, so, the shooter must really learn to manage his firearm.
If the powder charge fails to fill the majority of the chamber, the bullet may be seated too deeply in the chamber to produce best accuracy. The greater the distance a bullet has to travel before it reaches the forcing cone and the rifling of the barrel, the greater the chance of the bullet becoming misaligned with the bore of the barrel. This movement is detrimental to accuracy, so filling the spare volume of the chamber is critical to attaining the best results at the target.
Extra space in a chamber can be filled using grain meal like Cream of Wheat or plain old corn meal. Both serve the same purpose of filling the empty space between the powder charge and the bullet. The functional difference between the two materials is corn meal will compress while Cream of Wheat will not, so the shooter must accurately measure the Cream of Wheat to make sure enough space is left in the chamber to allow the bullet to be seated. The chamber can simply be topped off with corn meal and the bullet seated, so corn meal is the preferred filler.
Cowboy Action Shooting is a game of speed as much as accuracy. For safety, the rules specify minimum and maximum bullet velocities in order to prevent bullets from rebounding from the targets. Lower bullet velocity also reduces the recoil of the pistol and allows the shooter to get back on target faster. Filler provides the shooter a tool with which to balance velocity, recoil, and accuracy with the reduced power loads required by the rules.
In addition to improving accuracy, a filler reduces the chance of a chain fire occurring. When used in combination with a felt wad and over-chamber grease, it offers a real safety benefit. The alternative to filler is felt wads.
As stated previously, only about 50 percent of blackpowder is consumed in combustion. The rest remains as “soot” or “fouling,” which builds up shot after shot and makes it increasingly difficult to cock and fire the pistol.

Seating the bullet. The bullet is under the ram and being swaged into the chamber.
A properly seated bullet sits below the chamber mouth.
To reduce the effects of fouling, shooters started loading wads between the powder and the bullets. These wads were made of heavy wool felt soaked in a combination of tallow and beeswax. The wads were made as stiff as possible and punched slightly oversized for the chambers. This allowed the wad to scrape fouling from the bore of the pistol each time it was fired. The lubricant formed by the mixture of tallow and beeswax melted out of the felt from the heat of the burning powder, softening the fouling and providing a bit of lubrication to the mechanism to keep things turning.
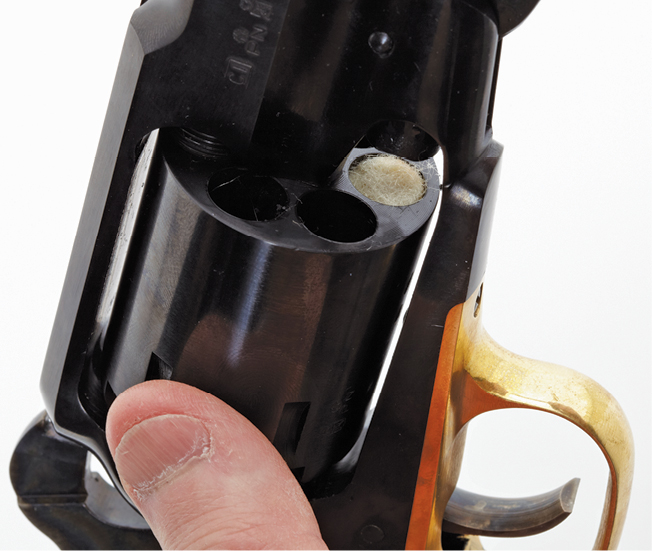
Now that the chambers have been charged with powder and the remaining empty space has been filled with cornmeal or topped with a felt wad, the bullets can be loaded into the chambers, or “seated.”
Round balls can be dropped on top of the chamber mouth and the cylinder rotated to bring the bullet under the plunger. The ramming lever is then unlatched and pressed down to force the bullet into the chamber. The bullet should be pressed into the cylinder until the front of the bullet is slightly below the chamber mouth. Failing to seat the bullet completely will cause the front of the bullet to catch on the end the forcing cone, (the end of the barrel that protrudes through the frame), and jam the pistol. If a jam of this type occurs, the solution will vary based on the type of pistol involved, as follows.
Open-top revolvers of the Colt pattern can be disassembled by removing the barrel from the frame and pulling the cylinder off the center pin. Once this has been done, reassemble the pistol with the improperly loaded bullet under the rammer and seat the bullet properly.
Solid-frame pistols like the Remington do not allow for disassembly, so the shooter is faced with a choice. In the first, the front of the protruding bullet can be shaved off with a knife until it can rotate under the barrel. This solves the problem, but it is a real risk to the shooter and the finish of the gun. A better solution is to pull out the cylinder pin and remove the cylinder from the left side of the frame. Great care must be exercised, because the end of the pawl can slip into the center pin hole, trapping the cylinder; attempting to force the cylinder out can damage the pawl. A small tool can be used to gently push the end of the pawl back into the frame channel to release the cylinder.
Since an improperly seated bullet may not be discovered until the pistol has been capped, make sure all percussion caps have been removed from the nipples before attempting to clear any jam. The best practice is to rotate the cylinder completely around at least twice between seating the last bullet and capping the nipples, to make sure any poorly seated bullets are discovered prior to capping.

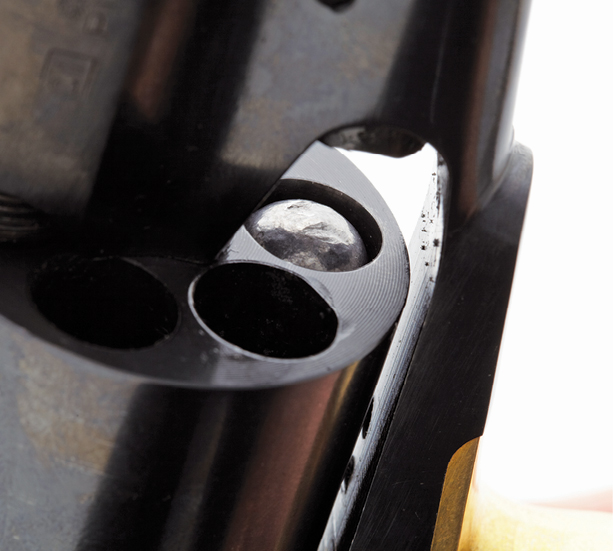
Lead shaved off the sides of the round ball, as it is swaged into the chamber mouth.
Round balls should be slightly larger than the chamber mouth before they are seated, so a ring of lead will be shaved off in the seating process. This lead can be discarded or saved for recycling if the shooter casts bullets.
Conical bullets are not as simple to load as round balls, because they must be seated so the long axis of the bullet is centered within the length of the chamber and, thus, the bore of the pistol. Failing to have the bullet properly aligned will ruin accuracy, as the bullet will be cockeyed when it leaves the barrel.
Many pistols have rams with deep tapered hollows, to facilitate the loading of conical bullets. The hollow prevents damage to the nose of the conical and helps to center the bullet in the chamber. However, this shape can damage the front of round balls. Shooters who prefer round balls will often grind out the hollow space to a more gentle curvature, to reduce this damage.
Conical bullets are longer than round balls, so they take up more space in the chamber. This means the powder charge must be reduced accordingly. Fill the groove around the outside of the conical bullet with blackpowder compatible grease. Wads and fillers are not normally necessary with conical bullets, but a single wad never hurts. The conical bullet will need to fit tightly in the chamber, to prevent it from moving forward under recoil and tying up the pistol.
Ideally, the ram’s motion should be stopped before it has reached the end of its length of travel, and that stopping point should place the nose of the bullet just slightly below the chamber mouth. Still, remember that the powder charge must be firmly compressed for proper combustion.
An alternative to wads is light grease smeared over the front of the cylinder after the bullets have been seated directly on the powder. The trouble with modern grease is that most of them are petroleum-based products. Blackpowder fouling mixed with petroleum creates tar, so petroleum products should be avoided.
Many companies that sell blackpowder shooting accessories offer non-petroleum lubes suitable for use in revolvers and as patch or bullet lube in single-shot weapons. A simple alternative to commercial lubes is a vegetable oil-based product like the common shortening available in the baking section of the grocery store.
The real trouble with grease on the front of the cylinder is it becomes runny in hot weather and will soak into anything it comes into contact with. Make sure to keep grease off the pistol’s stocks, as it will soak into that material and create discolorations. Grease is fine for a day at the range, but, if the pistol is to be carried or stored in a loaded condition, use wads.

At left is a capper loaded with caps. Center we see the capper nose placed over a nipple and, at right, the cap in place after the capper is removed.

Grease helps keep fouling soft, and it can be used as a supplement to wads and fillers. The critical thing to remember is that wads and grease help prevent chain-fire, so always use one or the other.

Use a capping tool to place caps on each nipple. The most common type used for revolvers is a snail-shaped box available from most retailers that offer blackpowder shooting supplies. In-line cappers are normally too large to fit into the space around a revolver’s nipples and, so, will not work correctly.
Before capping, make sure the pistol is pointing in a safe direction. Percussion caps are sensitive to impact and pressure, so handle them with care.
Capping is done from the right-hand side of the gun. Place a cap carefully on the nipple of each loaded chamber, making sure the caps fit snugly and are seated all the way down on the nipples. This seals the back of the powder charge against flying sparks and helps to prevent chain-fire. Once each loaded chamber has been capped, the revolver is ready to fire.
If the pistol is to be fired immediately, the hammer can now be brought back to full cock and the pistol aimed and fired, or the hammer can be lowered over an empty chamber for carry or storage.
When storing the loaded revolver, a thin coat of enamel nail polish can be applied around the mouth of the seated cap and allowed to dry. This reduces the chance that humidity will ruin the cap or contaminate the powder charge.
Old timers knew that carrying a single-action pistol with the hammer down on a loaded chamber was an accident waiting to happen. A blow to the hammer could ignite the percussion cap, resulting in a loud noise and accompanied by what was sure to become a permanent limp.
The original Colt pistols had a “safety pin,” on which the owner could safely rest the hammer. Some Remington revolvers had notches cut into the rear edge of the cylinder, between the chambers, and the hammer nose could rest in the notch. If a revolver didn’t have a safety pin or cylinder notches, the hammer nose was rested on the “bridge” between chambers.
The Ruger Old Army has excellent notches between chambers specifically designed to hold the hammer nose securely and safely. However, most replicas of Remington percussion revolvers lack safety notches deep enough to depend on. Some Colt clones have the safety pin, others do not.
The best practice is to leave one chamber unloaded and rest the hammer over that empty chamber. This practice applies to all single-action revolvers, including the cartridge models like the Colt Single Action Army, Smith … Wesson top-break models, and late model Remingtons. Many modern replicas of the classic single-action pistols, such as the Ruger Blackhawk and the Beretta Stampede, have a transfer bar that allows the user to safely carry the pistol with all the chambers loaded. If a model is equipped with a transfer bar and the manufacturer’s instructions clearly state it is safe to carry a given model of pistol with all chambers loaded, then resting the hammer on an empty chamber is not necessary.
Read the following procedure completely before practicing this manipulation. It works for almost all single-action revolvers.
Done correctly, the hammer is now resting over the empty chamber and the firearm can be holstered or placed in storage. It may be tempting to just pull the hammer back slightly from half-cock and lower it into the resting position. Resist this, because the hammer will be resting on a loaded chamber and the timing sequence will be interrupted. While this timing interruption may not damage the mechanism, it may cause the revolver to jam.
Occasionally, it becomes necessary to unload a revolver the “hard way.” In reality, the process is very simple. The tools required are a properly fitting nipple wrench, a wooden or brass drift, a wood or plastic hammer, and a container large enough to hold the cylinder with clearance for the hands.
As each bullet falls from the chamber, the remaining powder will fall into the container, too. Once the last bullet has been removed, tap the cylinder gently to remove the rest of the powder granules. Unloading is now complete. Scoop up the powder and return it to the manufacturer’s container. The bullets will not be able to be reused, but the lead can be saved for recasting.

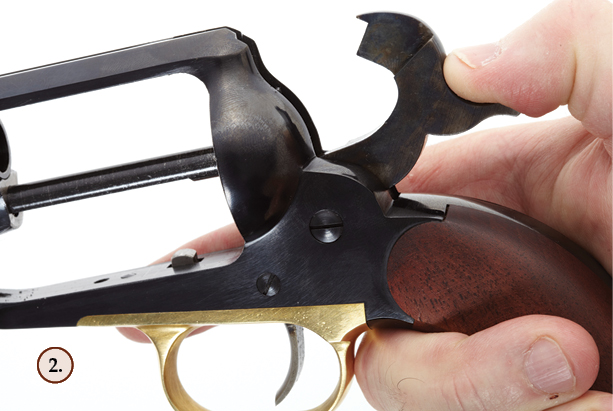
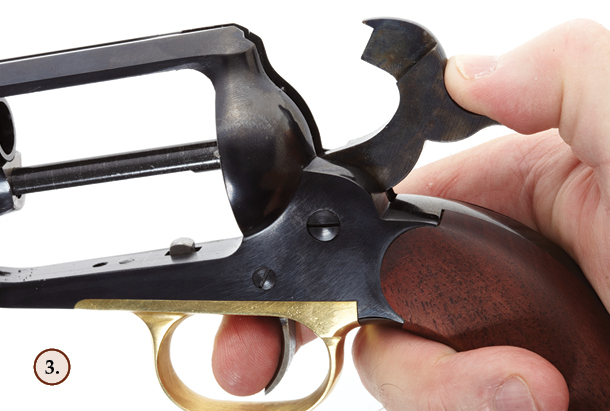
Steps 1…2: This sequence of images demonstrates how to decock a single-action revolver safely. This process will be used during assembly and disassembly, as well as during general safe handling of the weapon. Mastering this skill is critical.
Step 3: If the hammer is already fully cocked, skip this step. Otherwise, bring the hammer back to full-cock and, holding the thumb on top of the hammer, pull the trigger. Use thumb pressure to hold and prevent the hammer from moving forward.
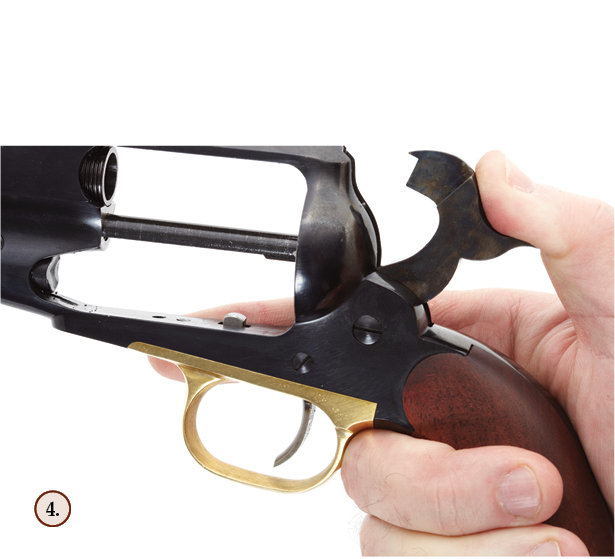
Step 4: Carefully lower the hammer back to the normal, decocked position. If the nipples have percussion caps on them, lowering the hammer in this manner will probably result in the hammer resting on an unfired cap. This is a very dangerous condition! Allowing the hammer to rest on an unfired cap could result in the pistol firing unexpectedly. Immediately, move the hammer back slightly until the bolt retracts, allowing the cylinder to rotate freely.

Step 5: Turn the cylinder clockwise, until an empty chamber is aligned with the barrel, and gently lower the hammer back to the normal rest position. Practice this technique using an unloaded revolver until it becomes second nature.
If the revolver is cocked in preparation for firing, and the shooter decides not to make the shot, use the following procedure to return the pistol to a safe condition for carry or storage.
WARNING: The following procedure is almost identical to the one just outlined. However, in this case, an error in gun handling will almost guarantee an accidental discharge of the pistol.
Use an unloaded revolver to practice these sequences until they become second nature. Lives may depend on the shooter’s mastery of this basic skill.

“Are you gonna pull them pistols or whistle Dixie?” — Clint Eastwood as the character Josey Wales, in the film The Outlaw Josey Wales. (Photo courtesy of Heritage Auctions)

In 1846, when war with Mexico was looming and Walker’s Mounted Rifles needed powerful handguns for action on horseback, Ranger Sam Walker ordered 1,000 improved Colt revolvers. The Walker model held 60 grains of blackpowder and chambered six .44-caliber balls. The massive firepower needed a much stronger frame and a larger design than earlier models. The Walkers were 153⁄4 inches long and weighed nearly 41⁄2 pounds. The reputation of the formidable Walker blackpowder firearms ensured Colt’s success. (Photo courtesy of BenelliUSA)

“Well, that one in the center: he had a flap holster and he was in no itchin’ hurry. And the one second from the left: he had scared eyes, he wasn’t gonna do nothin’. But that one on the far left: he had crazy eyes. Figured him to make the first move.” — Clint Eastwood as the character Josey Wales, in the film The Outlaw Josey Wales. (Photo courtesy of Heritage Auctions)
The westerns directed by Clint Eastwood have been criticized for being too gritty and realistic in their details. For students of the Old West, this attention to detail is one of the main attractions of the films.
In The Outlaw Josey Wales, Eastwood successfully recreates a hard-bitten ex-guerrilla who would never surrender. Josey Wales was a character created by Forrest Carter in his novel Gone to Texas, and his adventure continues in The Vengeance Trail of Josey Wales. Carter was a member of the Cherokee Nation. He wrote a narrative biography of the Apache chief Geronimo called Watch for Me on the Mountain. His works are worthy of any student of the Old West.