
The power and accuracy of the percussion revolver comes from starting with an oversized projectile and progressively squeezing it while driving it toward the target. To do this, the chambers need to be exactly the same diameter or slightly larger than the bore of the revolver. If this is not the case, the ball will fail to seal the gap between the barrel and cylinder while it is being squeezed down to bore diameter. Once in the barrel, the bullet needs to fill the grooves completely, so that the rifling can impart spin and the powder gases will not bypass the bullet, which would cause a drop in muzzle velocity. To discover whether a revolver’s dimensions are correct you will need:
Please note that no powder or percussion caps are used for this operation. Also, never attempt to unscrew the barrel from the frame for measurement. The distance the barrel is screwed into the frame affects the gap between the end of the barrel and the front face of the cylinder. Too small a gap can prevent the cylinder from turning. Too large a gap allows too much gas to escape, creating a dangerous condition and loss of bullet velocity.

Place the revolver on half-cock. Load a round ball into each chamber in the cylinder. Do not load powder. The front of the ball should be flush with the front face of the cylinder. The second photo shows the lead that is shaved off the bullets as they are loaded into the chambers. This lead should be cleaned up and disposed of safely.
Remove the cylinder from the pistol.

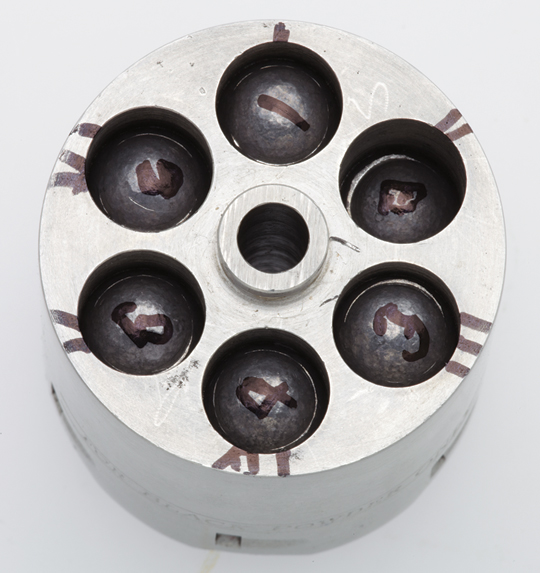
Remove the nipples from the cylinder. Use the marker to number the exposed face of the bullet and the side of the cylinder adjacent to the corresponding chamber. This is to allow the bullet diameters to be matched to a specific chamber. If one or more chamber needs to be modified, this process allows the faulty chambers to be identified. (Note: Roman numerals were used because they are easier to fit between the chamber and the edge of the cylinder.)
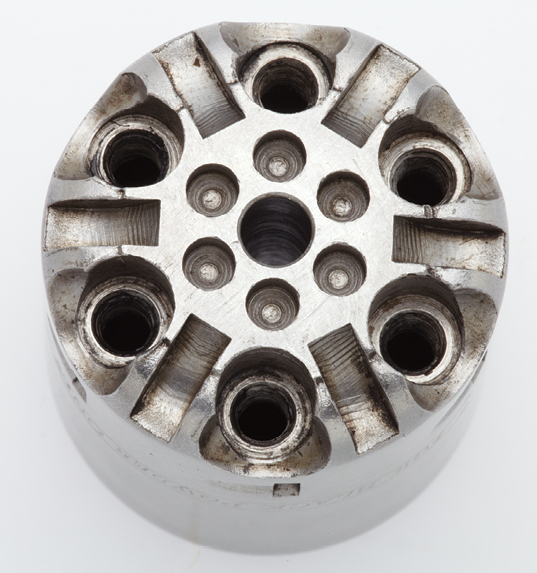
Now reverse the cylinder. Insert the thin dowel or brass rod down through the nipple seat, being careful not to mar the threads in the cylinder. Use the plastic hammer to tap the end of the dowel and drive the bullets out the front of the cylinder onto the cloth; the cloth cushions the impact of the falling bullet and prevents deformation. Set the cylinder and bullets from the cylinder aside.

Drive a bullet through the barrel using the longer wooden dowel. For open-top frame revolvers, where the barrel can easily be removed from the frame, drive the ball from the forcing cone and end of the barrel toward the muzzle, just like the bullet would normally leave the barrel when fired. Closed-top frame revolvers must have the ball driven backwards from the muzzle toward the forcing cone.
Important: Never attempt to unscrew the barrel from the frame for measurement. The distance the barrel is screwed into the frame affects the gap between the forcing cone end of the barrel and the front face of the cylinder. Too small a gap can prevent the cylinder from turning. Too large a gap allows too much gas to escape, creating a dangerous condition and loss of bullet velocity.


Pay attention to the amount of force needed to drive the ball through the barrel. If the amount of force increases as the ball approaches the frame of the pistol, it means the barrel has a constriction that must be lapped out to achieve best accuracy. If the amount of force required decreases, it means the bore is tapered toward the muzzle. This could be a good thing, provided the barrel isn’t too large at the frame end.
If the barrel has a constriction at the frame, label the bullet driven through the barrel “B1.” Then drive a fresh ball just one inch into the muzzle end of the barrel. Remove the second bullet from the muzzle end of the barrel and label this bullet “B2.”
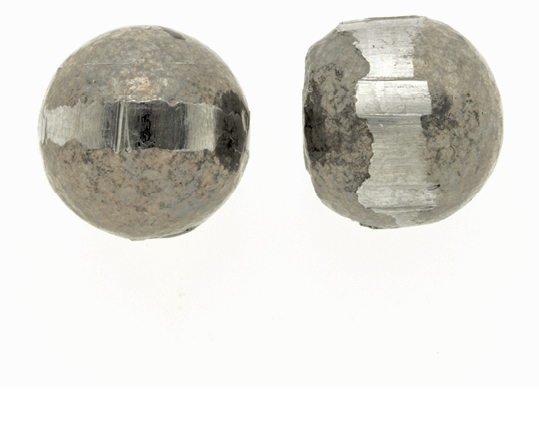
The area to be measured on the left-hand bullet is the flattened belt around the middle where the sides were shaved as the bullet was seated in the chamber. The right-hand bullet was driven through the barrel. The imprint of the rifling is clearly visible. This is a mirror image of the inside of the pistol’s barrel. The lands inside the barrel cut the grooves in the bullet. Measurements should be taken from the high spots between the grooves.
Now that all of the hammering is over, it is time to measure. As a point of reference, know that, in a perfect world, the internal dimensions will reflect a continuous taper from chamber to muzzle.
Head a column on the note paper with the letter “B” and then number from one to six in a single column. If two bullets were used for the barrel due after detecting of a constriction, include a line for B1 and B2. Now record the data.
This set of data gives us the interior diameter of each chamber and the barrel. Now compare the measurements:

Dial calipers or a micrometer can be used to measure the bullets.
Barrel constrictions can be cured by “lapping.” Lapping is a process that wears away the metal in the bore to open up the constriction by a predetermined amount. This process can be done manually or by “fire lapping.” Fire lapping is a process whereby abrasive material is embedded in the surface of a bullet and the bullet is then fired through the barrel. Manual lapping uses an abrasive head attached to a cleaning rod that is pushed back and forth through the barrel. Both methods wear away metal inside the barrel until the bore is the same diameter end to end. Lapping and fire lapping kits are available from Brownells and many other sources.
Undersized chambers are a bit more difficult to solve, because they require specialized tools and careful precision work. The best approach is to use a fluted reamer, and this method is suggested for the target shooter who wants the ultimate in precision from his pistol. A less expensive and accurate method is to lap out the chamber mouth using lapping compound and a drill press.
Fluted reamers are similar to taps used to cut threads in holes. They can be purchased from gunsmith supply houses, machine shop suppliers, and auto supply stores. The auto part dealers sometimes sell them under the name “valve guide reamer.”
When using a fluted reamer, remember that a generous use of cutting oil keeps the tool sharper. Make sure to remove metal shavings, so they do not score the chamber walls during the cutting process. Fluted reamers come in standard sizes based on increments of 11⁄64-inch as follows:
| Fluted Reamer Size Chart | |
|---|---|
| Reamer Size | Caliber Equivalent |
| 3/8-inch | .374 |
| 25/64-inch | .390 |
| 7/8-inch | .437 |
| 29/64-inch | .453 |
When cutting, the reamer must be kept square with the cylinder face. Brownells and other companies sell small jigs expressly made for this process, and use of these tools is highly encouraged. It is not necessary to ream chambers deeper than the maximum overall length of the projectile to be loaded. For instance, a .45-caliber firearms that was only used to fire round balls needs to be bored out a maximum of 1⁄2-inch deep. Remember, load consistency is critical to best accuracy, so do not cut more metal than necessary.
A drill press can be used to grind out the chamber mouths using a rotary file, or to lap the chamber mouths using lapping compound on a cloth wrapped around a dowel of the appropriate size. This method is mentioned only in the interest of thoroughness. The author does not endorse this method unless the fluted reamer (or a reputable gunsmith), is unavailable. Too many things can go wrong. If the gun owner elects to try this, go slowly and take care to preserve the chamber alignment in the cylinder, as well as obtain consistent chamber diameters.