
MY PHILOSOPHY ON WEIGHT LOSS—OR AS I LIKE TO CALL IT, MY “AERO-PHILOSOPHY”—is simple.
In order for your body to become honed and sleek—to become leaner, stronger, fitter, and faster than you were yesterday—you need to commit to exercise, watch your diet, and bolster your mental fortitude. Without all three of these factors always in play, you will never Sleekify your body in a way that goes beyond whatever few and fleeting successes you may have experienced using conventional fat-burning programs in the past.
If you want to learn a different language, there’s no faster way to do it than move to a country that speaks that language and totally immerse yourself in its culture. That same principle applies to fitness.
A body reflects whatever it does. If it’s asked to lift larger, heavier weights at a slow pace, it will develop larger, heavier muscles. But if you put it in an atmosphere of doing quick, light, highly repetitive movements and keep it there, it will reflect that as well and allow you to develop a lighter, leaner, and faster physique. That’s why cardio-based, light-weight drills and exercises—movements that are repeated over and over again at varying speeds for varied amounts of time—are the backbone of the Sleekify exercise plan and what all athletes known for their speed do in order to hone their bodies and reach their bodies’ highest potential.
It’s also why my clients come back from their checkups and brag to me about how their doctors are left scratching their heads when they come into their offices with the cardiovascular conditioning and resting heart rates of professional athletes. Their physicians may not understand why my clients are that healthy, and although it’s always gratifying to hear them say that, it never surprises me. Through Sleekify, my clients experience incredible weight loss and an indescribable influx of energy. It’s also why you will, too—and why Sleekify will have you looking like a world champion within a month.
The Sleekify exercise program is an intense, full-body plan that utilizes as many muscle fibers as possible. It consumes more oxygen than the average cardio workout and creates a higher metabolic demand on your body. However, it’s important that you pay attention to the basics and do it right, not only for safety’s sake, but for the effectiveness of the workout—I want you to succeed 100 percent!
The entire program is divided into eight unique boxing-based workouts. You’ll use each workout for a total of three days, then immediately move on to the next three-day workout in the schedule for the entire twenty-eight-day plan. Every six days, you’ll give your body a rest by taking one day off.
(Does that sound like a lot of time? It’s not, when you’re talking just twenty-eight days for a workout that doesn’t involve driving to the gym. But if you need to, you can modify this plan to fit your own time availability and commitment level. I describe how on this page.)
In a nutshell, your schedule will look like this:
Each of the eight workouts is composed of a mix of three different types of boxing-based exercises and drills.
1. AEROBOX®: In every workout, you’ll be practicing a series of shadowboxing drills that will have you throwing a variety of punches—the jab, the straight power punch, the double jab, the hook, and the uppercut—as well as a few defensive maneuvers that are meant to keep your body moving.
2. AEROJUMP™: You’ll also be executing a variety of different jump rope exercises that will allow you to achieve maximum cardiovascular results in about one-third to one half the time of conventional cardio machines.
3. AEROSCULPT™: Finally, you’ll be performing a mix of lower-body bodyweight exercises (no weights or machines required) that will improve your strength, balance, and coordination, as well as build lean, sleek muscle that will be hard to hide once the fat begins to disappear.
As you progress from week to week, you’ll learn how to perform new exercises, punches, or drills. You’ll also be reminded which past exercises, punches, or drills you’ll be repeating (and should already be familiar with) from a previous chapter.
Unlike a typical workout program, where counting repetitions is the standard, with Sleekify:
• You’ll count punches (which can range from throwing 32 up to 128).
• You’ll count sets (which, when throwing certain combinations of punches, can range from repeating a combo of punches from 8 to 32 times).
• But most important, you’ll count time. All of the Aerojump and Aerosculpt exercises—and some of the Aerobox moves—won’t ask you to count reps. Instead, you’ll do each for a certain number of seconds (which can range from 30 to 180 seconds).
CUSTOMIZING THE SLEEKIFY PROGRAM TO YOUR LIFESTYLE
While the best results will come from following this program to its fullest, life has a way of upending our best-laid plans. Here’s what I recommend:
Maximum Sleekify: To reap the most results from the program, it’s my hope that you’ll perform it—just as my clients do—to the letter, which means sticking to the twenty-eight-day program without adapting it in any way. Doing so will mean you’ll be spending about forty-five to sixty minutes exercising six days a week (taking one day off after each week) for four straight weeks.
The more you do this program, the better it will be for your body. Remember, you want your body in a state of perpetual motion. That means you could even try doing this workout—or some elements of this workout—twice a day, even if it is just performing the combinations and punches within the program at demo and exercise speed (which I’ll explain later on in the book) when you wake up, and then executing the workout at fight speed (a pace I’ll also explain later in the book) in the evening.
Minimum Sleekify: Even though the Sleekify program is convenient enough to do anywhere, I know that there will be times when you may not have as many minutes to invest.
If, on certain days, you simply do not have the forty-five to sixty minutes to devote to Sleekify, I would rather have you divide up the program into smaller portions than have you rush through it. Doing two smaller sessions of Sleekify—for example, performing two thirty-minute routines instead of one sixty-minute session—will still burn the same amount of total calories. In fact, splitting up the program temporarily revs your metabolism twice in the day instead of once, so your body burns through more calories after your workout.
If you have only a half hour to devote to your workout for the entire day, then cut the workout in half by doing half of the required repetitions, sets, and time. For example, if you’re asked to do an Aerojump exercise for 180 seconds, do it for 90 instead. If you’re told to repeat a combination of punches 32 times, then do it 16 instead.
Before you start the Sleekify workout program, it absolutely pays off in the long run for your body to really understand the new demands that are going to be made of it and to practice—and perfect—a few key moves first. That way when you begin the program, you’ll already have a level of experience with certain drills, so you’ll feel less frustration and get more from every movement.
There’s a reason why jumping rope remains the cornerstone of every boxer’s workout and has rapidly become one of the more preferred workouts for all athletes.
It helps you build and develop an aerobic foundation, requires minimal space, burns between 600 and 1,500 calories an hour (depending on your weight and the speed and intensity at which you’re jumping), plus it works both your upper and lower body simultaneously. It’s also one of the most effective ways to improve stamina, your foot and hand speed, agility, eye-foot-hand coordination, and your sense of balance simultaneously.
Unlike many forms of cardio that may also challenge your body, strengthen your heart, and burn calories, jumping rope also gets your mind involved, giving you a deeper sense of accomplishment afterward because of the concentration, rhythm, and timing required. In other words, staying in place will help you go further.
If you have any experience with jumping rope, you may need to unlearn what you may have learned in gym class. Jumping rope the right way isn’t about jumping as high as you can, pulling your heels to your butt, and slamming your feet to the floor.
That type of jump—what most people call a “schoolgirl jump”—may have been okay when you were ten years old or weighed less than a hundred pounds. But when you’re an adult—with a body that’s no longer growing, is less resilient, and is a lot heavier—that style of jumping is a major problem because it’s too abusive to your knees, shins, and feet.
For some people, the movement of jumping rope just comes naturally. For others, it may take a lot more work and time to get that rhythm down. But once you do get that rhythm down, it’s a foundation that’s yours for life—sort of like learning to ride a bike—and it will provide a platform that will allow you to build new challenging maneuvers and keep you jumping.
If that’s you, then I need you to rethink how you approach working out. What a lot of people don’t understand, and why a lot of people throw down the rope in frustration, is that nobody ever taught them how to jump rope, which, when done correctly, is a lot easier and simpler than it looks.
But I won’t lie. Your body may feel confused and ask you “What hit me?” That’s only because it’s experiencing something that it’s most likely never experienced before. You’re finally taxing it in ways that you never taxed it before, in a way you can’t achieve by running, cycling, doing step classes, or whatever aerobic activity you usually choose to use.
Last, remember that a rocket burns more fuel getting off the ground than it does when it’s airborne. What that means is this: When you’re learning something new, you exert more effort throughout the process, which means you’ll burn more calories. Each time you perform a new, challenging maneuver in my workout, you will be repeating that effort, and subsequently, burning even more calories. So when you trip up—and you will trip up, because I’ve been jumping rope for thirty-five years and I still trip up—laugh it off, and remember why you’re jumping in the first place. You’re learning to fly, so don’t let anything stop you from your goal and have the fortitude to continue.
With jumping rope—and the rest of the exercises in the program—it’s all about patience and repetition. Just putting in the effort—even if you lack coordination, speed, and strength to start—will create results. The only way you’ll never see results is by quitting before you conquer.
(This beginner exercise works on your timing and coordination, which will help you master the other variations in the program.)
START POSITION: Start by holding the rope at both ends—your arms should be down at your sides at waist level, palms facing the ceiling. Step forward so that the middle of the rope is right behind your heels.
THE MOVE: Keeping your hands close to your body, begin turning the rope forward, rotating only from your wrists. Once the rope comes down toward your feet, take a tiny hop—no more than an inch or so—to allow the rope to pass underneath you. Land on the balls of your feet—not flat-footed or on your heels (in fact, your heels should never touch the floor)—and repeat at a pace of roughly 132 rotations per minute.
• Eyes: You may look down at first, but try to keep your eyes looking forward, not staring down at your feet, which can strain your neck. If you have the option to jump in front of the mirror, do it, but if you don’t, you’ll see the rope coming down in front of you as it turns. As you see the rope come down past your eyes, jump the rope. Try to track the movement of the rope—it may be hard to do at first because it’s not in your instincts to do so, but you’ll start picking it up as you practice. Remember this: See the rope—jump the rope. It’s all about the timing.
• Arms: Keep your arms bent at the elbow at about a 90-degree angle, but concentrate on tucking your elbows in close to your sides. Bringing your hands, elbows, and arms up to shoulder level makes your shoulders do the brunt of the work (and will tire them out before the rest of your body gets a good sweat).
Raising your hands also shortens the height of the rope, which you don’t want to do—the shorter the rope, the higher you’ll have to jump off the floor in order to let it pass underneath you. Not only can you hurt your feet, shins, and hips, but this will throw you into the anaerobic zone immediately and make jumping rope feel like you’re running a series of sprints without the benefit of a warm-up. It’s like trying to do a series of high hurdles back to back to back—it’s brutal to your body and within just a few jumps, you’ll feel like you can’t do any more.
• Hands: Keep your hands at waist level the entire time—the higher you raise your hands, the shorter the rope becomes and you’ll be more likely to stumble.
Also, your wrists should be what make the rope go, so try to remember that your wrists are the motors that get the rope turning the entire time.
One thing I have to watch out for with clients is having their dominant side affect their jumps. If you’re right-handed, that means you’re most likely going to be “right-side dominant,” which causes many people to rely more on their right side—hands, arms, legs, etc.—rather than split the workload evenly with their left side.
That means as you jump, you might forget to turn your left wrist, placing most of the work on your right wrist. That’s okay at the start, since you may just want to get airborne, but just be cautious of that and try to turn your left hand in time with your right—and vice versa if you’re left-handed.
• Legs: Always keep your legs and feet together throughout the move (unless asked to do otherwise in some of the other advanced jumps in the program). Your legs act as rockets that propel you off the ground when you jump up, and conversely as shock absorbers when you land, so most of the energy from every hop is absorbed throughout your calves, quadriceps, and glutes.
I remind clients to think about a ballet dancer or basketball player as they rise up, keep their legs together, then land on the toes, then shift their bodyweight down to the balls of their feet—it should feel like one continuous, fluid motion.
• Heels: Keep your heels up off the floor the entire time—you never land or take off from your heels at any point.
• Pace: Your hands, not your feet, control the pace. Your feet react to the pace of your hands.
BEFORE YOU TAKE YOUR FIRST JUMP … MASTER THE PACE
Although as a starting pace, I like people to turn the rope about 132 times in sixty seconds, I’m not expecting you to count the entire time. Instead, it’s more about getting a feel for that pace and knowing what 132 rotations a minute feels like.
First thing to know: 132 rotations may sound like a lot, but your hands have the potential to move that fast—in fact, most people’s hands are generally faster than their legs. This drill—which I prefer clients use before they even begin attempting the basic jump—helps get the right muscles in your forearms to fire and gives your hands a sense of how fast they need to move in order to match that pace perfectly.
This drill can help cut back some of the frustration of learning how to jump, which—and be ready for it to happen—is going to happen to you because it happens to everybody. In fact, it still happens to me.
The trick: Take both handles of the jump rope in one hand—preferably your dominant hand to start—and let the rope hang down by your side. Then, without jumping, start turning the rope using only the wrist with your elbow close to your body. The rope should look almost like a propeller blade, spinning along the side of your body.
You can use a timer—or just count it out—but try to see how many rotations you can do in one minute with each hand. As you get comfortable with the pace, you can even try jumping at the same time to help work on your timing before you actually begin to hop over the rope.
If you’re truly serious about this program to help reveal your body’s true potential, this is something you’ll practice every day—even on days you don’t have to exercise. I want you to think of it as the runway to a higher level of fitness. The more you do it, the more skilled you’ll become at jumping rope, and trust me, it will more than pay off in the end.
EVERYTHING NECESSARY TO SUCCESSFULLY SLEEKIFY!
The beauty of Sleekify is that the biggest investment you’ll ever make is your time. Here are the only things you’ll need to get started:
Supportive footwear: Wear a pair of running shoes or cross-trainers to ensure your feet stay shock-protected and stable as you jump. They will also give you the grip you’ll need when throwing punches and performing many of the Aerosculpt exercises. If you’re not in the market for a new pair of shoes, then you can get away with buying a pair of gel shoe inserts for under the ball of the foot to help absorb impact.
A forgiving surface: The only area you’ll need to Sleekify is a four-foot square—but what’s below you matters. Avoid concrete, macadam, or other hard surfaces that don’t have much give. Instead, opt for springier surfaces that are easier on the joints, such as hardwood floors, a blacktop driveway, or even low-cut carpeting.
A jump rope: What I particularly recommend is a PVC rope with a ball-bearing handle like the AeroSpace Rainmaker (the one I have my clients use). The reason it’s my top choice is that you’ll get an instant response from the rope as you twirl it—the moment you flick your wrists, the rope turns for you. The Rainmaker also keeps an even arc as you spin it, so there’s always a big loop to jump through—a plus that helps prevent frustrating tangles and eases your learning curve.
Stay away from beaded varieties and weighted ropes, which can compromise your form and increase your risk of injury initially. Weighted ropes also thrust you into an anaerobic zone, which can cause your body to work much harder than it’s prepared to do. Also, watch out for ropes made from a material that’s too light. If the rope’s too flimsy, it will slow down as it rotates, causing you to jump higher and put more stress on your knees in order to jump over it.
Light hand weights (optional): To get more results each time you punch, I encourage my clients to invest in a pair of lightweight dumbbells (one to three pounds maximum) that they can hold in each hand. However, I would avoid using them until you truly feel comfortable and have your form down with each Aerobox exercise. And even then, I highly recommend using hand weights performing punches at only demo and exercise speeds—never fight speed.
AERO-TIP—
Before you start jumping, make sure the rope is the right size for you. Step onto the center of the rope with both feet, then raise the handles up to your chest—the handles should reach your armpits. If not, then adjust it accordingly. You can minimize having to shorten the rope too much by buying the right length at the start.
• If you’re shorter than 5’7”, try an eight-foot rope.
• If you’re between 5’7” and 6’2” tall, opt for a nine-foot length.
• If you’re over 6’3” tall, stick with a rope that’s ten feet long and up.
About two-thirds of the Sleekify workout routine is an upper-body cardio experience, so it engages your entire body in a way that it’s not used to. That means every muscle gets involved from head to toe, so your body burns the maximum amount of calories in minimum time. Plus, because your upper body (arms) can generally move faster than your lower body (legs), it allows you to experience a more intense workout than ever before. That’s what makes the Aerobox sections—the portions of the workout that require you to perform short bursts of shadowboxing—so vital to the program.
Many people think that when you punch, it’s all about your arms and nothing more. Not true. When you punch correctly, you’re using your legs and your core muscles just as much as your arms. In fact, your arms are merely where all of your energy gets released. But it begins and builds from your foundation, which are your core and leg muscles.
Punching is all about transferring your energy/weight forward along a specific plane or pathway. If all you use are your arms to punch when using the program, it’s far less taxing because you’ll use fewer muscles and burn far fewer calories. But if you learn how to throw every punch properly—when you understand how to turn your body in sync with each punch, when you can feel your feet gripping the floor so you can drive that power through your core muscles and out through each fist—that’s when you’ll see the most benefits.
It’s important to realize that although the pacing of Sleekify may be different than training at a real gym, the boxing techniques you’ll be performing are no different than what you would be expected to pull off at a real fight gym by the world’s best boxing trainers.
How fast you throw each punch is extremely important. Although you don’t have to be as fast as the next person, like I will continually say throughout this book, the benefit is in the effort. All you need to do is try your hardest and you will benefit the same way as someone faster. It’s about finding your personal high-performance zone.
That said, each time you punch, you’ll be asked to try to throw them at a specific speed. Here are the three speeds you’ll be expected to maintain when executing any punch or combination of punches:
DEMO SPEED: Demo speed (which you’ll see in the charts as DS) is the slowest and most basic of the tempos. Basically, each punch that you throw should take two seconds—one second for the punch to go out and one second to pull your fist back into the starting position.
Why you’ll be using this tempo is easy—it’s a great way to prepare your mind and muscles for what you’re about to ask of them. That way, your form should be perfect once you’re ready to perform the same punches at a quicker speed. As you become fitter following the program, you’ll also become more proficient at throwing each punch and combo of punches, so you’ll notice you won’t be required to throw as many punches at this speed later in the routine.
NOTE: Once you feel comfortable throwing punches, you can begin holding a pair of hand weights while performing any punch or punch combo at this speed.
EXERCISE SPEED: Exercise speed (which you’ll see in the charts as ES) is twice as fast as demo speed. You’ll know you have the pacing down if each punch that you throw takes one second—that means about ½ second for the punch to go out and about ½ second to pull your fist back in.
NOTE: Just like demo speed, as you learn each punch, you may also use hand weights while performing any punch or punch combo at this speed.
FIGHT SPEED: Fight speed (which you’ll see in the charts as FS) is the fastest (and highest-intensity) of the tempos. To do it right, you have to move about twice as fast as exercise speed, so be ready to move as quickly as possible. That means each punch should take about ½ second—¼ second for the punch to go out; ¼ second for the punch to come in.
NOTE: Fight speed is extremely fast, which makes using hand weights out of the question.
Finally—and listen closely, because this is probably the most important key to being successful at the Aerobox sections of the Sleekify workout—you must try to always fully execute every punch and move, even at the elevated speeds. Do not try to abbreviate the drills in any way—the more you can keep form as you switch up to the higher speeds, the bigger the benefit your body can expect. Will it be hard? Yes, but that’s where the treasure’s buried.
Anytime you’ll be asked to throw a punch, it will be from one of three stances—Pyramid, Orthodox, or Southpaw.
This stance is a little bit of a departure from boxing because it’s not a traditional fighting stance. Instead, the Pyramid is more of a martial arts stance I use with clients for several reasons. One, I like to have them focus on the technique of their punches and not worry about all of the complexities of where their feet should be and if they’re balanced properly. This position makes it easier to focus on one thing at a time, which in this case is punching properly. And two, I like them to be ambidextrous and be able to throw punches with either fist. This stance lets them do both with ease.
THE POSITION: Stand straight with your feet slightly wider than shoulder width apart. Bring your fists up along the sides of your face (about an inch away from it) and position them right below your cheekbones. Your palms should be facing in toward each other with your knuckles pointing toward the ceiling.
• Legs: Your knees should be slightly bent—muscles tense—with your bodyweight evenly distributed on both feet.
• Head: Keep your head and neck in line with your back and look straight ahead—don’t arch your neck forward, but let your chin drop down slightly.
• Feet: The toes of both feet should be facing forward.
• Arms: Your elbows should be slightly out to your sides and not directly below your fists.
This left foot forward, right foot back stance is what orthodox boxers (right-handed fighters like me) rely on. The position keeps your left fist and left leg closer to your opponent, leaving your back hand—your right fist—farther back so you get the weight of your body behind the punch.
To get into the stance, take a half step forward with your left foot and keep your toes pointing straight ahead. Next, take a half step back with your right foot and turn it at a 45-degree angle so that your toes are pointing away from your body. Imagine you’re standing in the center of a clock—you’ll know your feet are positioned perfectly if your left foot points to twelve and your right foot is pointing between two and three o’clock.
Twist slightly at the waist to the right (boxers do this to give their opponents less surface to hit, while it also allows for more power in the punch from the right side). Finally, bring your fists up along the sides of your face (palms facing in and knuckles pointing toward the ceiling) and you’re ready to go.
• Legs: Just like the Pyramid stance, your knees should be slightly bent—muscles semi-tense—with your bodyweight evenly distributed on both feet.
• Arms: Just like the Pyramid stance, your elbows should remain slightly out to your sides and not directly below your fists.
• Feet: You want to be on the ball of your right foot with your left foot flat on the floor—feet shoulder width apart. For now, your back foot should never be flat on the floor at any time. Meanwhile, your lead foot should be like the needle of the compass, always pointing the direction you want to travel—in this case, toward the shadow opponent in front of you.
This right foot forward, left foot back stance—used by left-handed boxers—is the exact opposite position of Orthodox, but it serves the same purpose. It keeps your right fist and right leg in closer to your opponent, so your back hand—in this case, your left fist—is the big threat.
The stance is easy to get into if you’ve already mastered Orthodox—that’s because it’s the same position, only in reverse! To do it properly, take a half step forward with your right foot (keeping your toes pointing straight ahead), then take a half step back with your left foot and turn it 45 degrees so that your toes are pointing away from your body. Remember that clock? This time, your left toes should point between nine and ten o’clock.
Twist slightly at the waist to the left (to give your imaginary opponent less surface to hit and to add power when throwing from your left side). Finally, bring your fists up along the sides of your face (palms facing in and knuckles pointing toward the ceiling).
• Legs: Just like the Pyramid stance, your knees should be slightly bent—muscles tense—with your bodyweight evenly distributed on both feet.
• Arms: Just like the Pyramid stance, your elbows should remain slightly out to your sides and not directly below your fists.
• Feet: You want to be on the ball of your left foot with your right foot flat on the floor—feet shoulder width apart. For now, your back foot should never be flat on the floor at any time.
Now that you know how to position your body to throw a punch, it’s time to learn how to do exactly that. For the purposes of Sleekify, here are the only punches you need to know:

The jab is the most versatile—and the most commonly used—punch in boxing. It may not be a knockout blow, but in my sport, it’s the workhorse that does everything from scoring points and setting up more powerful blows to keeping an opponent at a safe distance. In this program, however, it’s the fastest of the punches, so throwing a lot of them consecutively—or mixing them into more advanced combinations—will quickly get your heart pumping and your upper body sculpted and Sleekified.
This basic punch comes from the lead side of your body (in other words, whichever foot is forward). For example, if your left foot is forward (Orthodox stance) and you throw a straight punch with your left hand, that’s a jab—vice versa with your right side. So how can you do it perfectly for the purposes of my Sleekify program?
Like this:
THE MOVE: Without moving your legs—and without turning your waist—throw your leading arm forward in a straight line from your face. As you punch, rotate your fist inward so that your palm ends up facing down toward the floor. Immediately bring your fist back in a straight line to the side of your face, rotating your arm outward as you go so that your fist ends up back in the starting position.
• Arm: You want to extend your arm as far as you can without locking your elbow. So if straightening your arm to the point of locking it is 100 percent, aim for extending your arm about 98 percent of the way.
• Elbow: The most common mistake people make is that they lift their elbow up before they throw the punch. This prevents you from getting as much power because you’re strictly using your biceps and triceps to move your arm—instead of your bi’s, tri’s, chest, shoulders, and forearms.
• Hand: Tighten your fist at the moment your arm is completely extended. When it’s not “striking” an imaginary target in front of you, keep your hand in a fist, but relaxed until the next jab. Your opposite hand—whichever fist you’re not throwing—should never leave the side of your face.
• Feet: Although your body will slightly project forward as you punch, at this point don’t step forward or backward to try to pull back and make each punch more powerful—that’s actually a different punch you’ll learn later. There’s really no torque of the body with the basic jab—all of the movement (and power) comes from your arm.
• Visualize this: Have you ever seen a moving piston inside its chamber? It travels exactly the same route back that it does moving forward—and at the same speed. That’s how your arm should move, just like a piston, traveling straight and at the same speed, both going forward and coming back.
• And visualize this: Picture hitting an imaginary opponent directly in front of you with the knuckle of your middle finger. In order for that to happen, your wrist has to turn so your palm is facing the floor at the point of contact.
WAIT! HOW DO I DO IT FROM A PYRAMID STANCE? No problem. Even though this position prevents you from having a leading foot, you can still throw the punch exactly as described if your feet are even.
This full-body punch uses all of the muscles throughout your legs, hips, and core. Against an opponent, it’s a threat because all those muscles working together allow you to generate a lot of power through your punch.
All that involvement takes energy, which is why many boxers—especially heavyweights—use it sparingly in a fight. But when it comes to reaching your goals even faster, this stronger punch burns a lot more calories, so consider it a threat that will help you knock out—and off—your unwanted body fat.
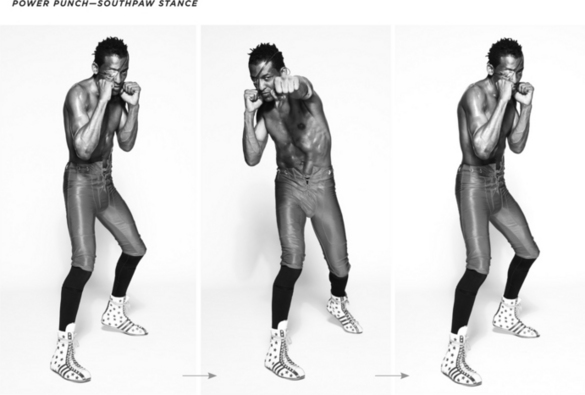
This basic punch comes from whichever fist is behind your body. For example, if your left foot is forward (Orthodox stance) and you throw a straight punch with your right hand, that’s a power punch (or power right). If your right foot is forward (Southpaw stance) and you throw a straight punch with your left hand, that’s also a power punch (or power left).
1. Using whichever fist is farthest from your opponent, throw your arm forward in a straight line from your face, rotating your arm inward so that your palm ends up down once your arm is extended.
2. As you throw the punch, simultaneously lift your back heel off the floor and pivot your back ankle outward as if you were squashing out a cigarette—keeping the ball of your back foot in place—and rotate your hips and shoulders into the punch.
3. Reverse the motion by immediately bringing your fist back in a straight line to the side of your face (rotating your arm outward as you go) while simultaneously pivoting your hips and shoulders back into the start position, lowering your back heel onto the floor.
• Hand: Just like the regular jab, tighten your fist at the moment your arm is completely extended, then keep it relaxed (but still in a fist) the rest of the time. Your opposite hand—whichever fist you’re not throwing—should never leave the side of your face.
• Core: Keep your abs tight throughout the punch. Having them contracted helps with focus and control; plus it improves your ability to coordinate all of your muscles simultaneously.

WAIT! HOW DO I DO IT FROM A PYRAMID STANCE? In my workout, there will be times when you’re throwing either a power left or right—and sometimes, alternating back and forth between the two for a series of punches.
When you throw your left hand, your right shoulder will naturally fall back, which automatically positions your right fist to be farther back and ready to deliver a power punch (and vice versa when throwing a right punch).
So even though you may start with your shoulders even with each other, once you throw the first punch in whatever combination of punches I ask you to do, your body will naturally angle itself so that you’re able to rotate and deliver a power punch with either hand from this stance. Remember, engage the core: The hawk will fall from its perch if its feet aren’t gripping the branch.

The double jab is exactly what it sounds like. It’s two jabs thrown one after another by the same fist—and an effective way of bringing the intensity of the Sleekify program to a higher level.
THE MOVE:
1. Without moving your legs—and without turning your waist or shoulders—throw your leading arm forward in a straight line from your face.
2. As you punch, rotate your fist inward so that your palm ends up facing down toward the floor once your arm is fully extended. Immediately bring your fist halfway back in a straight line, rotating your arm outward as you go, then immediately extend a second jab forward using the same arm.
3. Finally, quickly bring your fist in a straight line back to the side of your face so that your fist ends up in the starting position.
(The same tips that apply to a regular jab apply to the double jab, with just one change.)
• Arm: With the first jab, you want to extend your arm as far as you can without locking your elbow. With the second jab, you’ll retract your arm only about 50 percent, but still rotate your fist as if you were throwing a full jab. Don’t just push your fist forward—instead, continue to rotate as you go and don’t worry if your palm doesn’t end facing the floor.
• Hand: Just like the regular jab, tighten your fist as your arm is extending, then keep it relaxed (but still in a fist) the rest of the time. Your opposite hand—whichever fist you’re not throwing—should never leave the side of your face.
• Feet: Again, don’t step forward or backward to try to pull back and make each punch more powerful—just allow your arm to do all the work.
• Visualize this: Imagine a woodpecker drilling into a tree. The jab is a highly repetitive and focused quick punch designed to do damage through quick repetition rather than one powerful stroke.


WAIT! HOW DO I DO IT FROM A PYRAMID STANCE? Just like the regular jab, even though this position prevents you from having a leading foot, you can still throw the punch exactly as described.
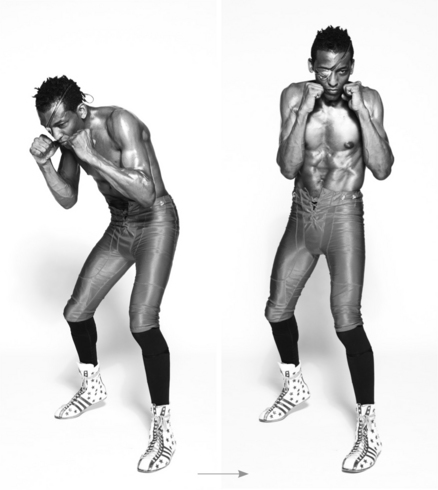
This devastating knockout punch—used when close to an opponent as a sneak attack that can slip between an opponent’s defenses and land square on their chin—is one of the most powerful punches in any boxer’s arsenal and can be thrown with either hand, no matter what stance you’re in. But for fitness purposes, it tones your upper back, biceps, and obliques. It also adds variety to your punches, which will challenge your mind and allow you to pull off greater punching combinations that will tone your upper body and burn calories at a higher rate.
The uppercut is an upward-arcing punch not unlike a golf swing, but it takes a lot of effort to do it correctly. Dexterity is a key ingredient in being a successful fighter as well as being successful at this program. For you, all the effort required for performing an uppercut means utilizing even more muscles—and burning extra calories. It doesn’t just knock down or surprise your opponent. It drops whatever unwanted fat is covering up your muscles as well.
THE MOVE:
To throw a regular uppercut, which uses the fist farther from your opponent (if you were standing in an Orthodox stance, that would be your right fist; if standing in Southpaw stance, that would be your left fist):
1. With your shoulders hunched slightly forward, bend your knees so that your body dips down about 3 to 4 inches, keeping your fists in close to your face.
2. Begin to drop your back fist as you simultaneously swing upward (like a pendulum) and outward so that as it leaves the side of your face, the palm of your fist ends up facing you, knuckles pointing at the ceiling on the upswing.
3. Simultaneously transfer your bodyweight onto your back leg and begin pivoting off the ball of your back foot. As you go, quickly twist your hips and shoulders inward—this will line up your fist directly where you want it to be (about waist level, straight below your opponent’s head) as you drive your fist upward—imagine you’re aiming directly underneath an opponent’s chin. At the point of impact, your elbow should be out and away, in front of your body.
4. Reverse the motion by bringing your fist back toward your face as you rotate back into the starting position.
To throw a lead-side uppercut, which uses the fist closer to your opponent (if you were standing in an Orthodox stance, that would be your left fist; if standing in Southpaw stance, that would be your right fist):
1. Tilt your body to the side of your leading hand (the hand you’re going to punch with) so that your body isn’t positioned perfectly straight up and down.
2. Bend your knees so that your body dips down about 3 to 4 inches as you simultaneously twist your lead shoulder back, keeping your fists in close to your face.
3. Begin to drop your front fist as you simultaneously swing upward (like a pendulum) and outward so that as it leaves the side of your face, the palm of your fist ends up facing you, knuckles pointing at the ceiling on the upswing. Your elbow should leave the body as you go.
4. Simultaneously transfer your bodyweight onto your back leg and slightly pivot off the ball of your back foot. As you go, simultaneously twist your hips and shoulders inward—this will line up your fist directly where you want it to be (about waist level, straight below your opponent’s head) as your fist arcs upward—imagine you’re aiming directly underneath an opponent’s chin.
5. Reverse the motion by bringing your fist back toward your face as you rotate back into the starting position.
• Stop your fist about head height—going farther than that will slow down your pace, while punching too low will prevent you from challenging as many muscles and give you less of a workout.
• Legs: Don’t forget to bend your knees—you want to flex and fire your leg muscles at the same time as you punch. Some of the power comes from your legs with this punch (with the rest coming from your core), so if you don’t bend your knees, you’ll never target those muscle fibers and won’t get the most out of the exercise.
• Hips: Concentrate on keeping your hips low, which helps ground you as you punch. If your hips rise, you’re trying to “jump” through the punch, instead of letting the rotation of your hips generate all the power.
• Hand: Tighten your fist at the very end of the punch, then keep it relaxed (but still in a fist) the rest of the time. Your opposite hand—whichever fist you’re not throwing—should never leave the side of your face.
• Elbow: When you throw the uppercut, extend your arm so that your elbow is away from your body. Many people keep their elbows in close, which will limit your range of motion and give you less of a workout.
• Whether you’re throwing a right or left uppercut, always tilt your body to the side the punch is coming from, so that your shoulder, fist, hip, and upper back turn into the punch at the same time.
WAIT! HOW DO I DO IT FROM A PYRAMID STANCE? Anytime I ask you to do the uppercut from this position, don’t worry about pivoting off your foot—in fact, don’t worry about your legs at all. I still want you to bend your knees, flex the muscles in your legs, and twist as you punch, but strictly focus on your core and upper body.

The hook is another punch that opponents hate because it seems to come out of nowhere. That’s because their focus is dead ahead and the hook comes from the periphery. Often as a boxer, you don’t pick it up until it’s too late, since the fist swings in from the side instead of being thrown in a straight line, making it harder to defend against.
Here’s how you do it:
THE MOVE:
To throw a regular hook, which uses the fist closer to your opponent (if standing in an Orthodox stance, that would be your left fist; if standing in Southpaw stance, that would be your right fist):
1. Keeping your fists along the sides of your face, load up your punch by twisting from the waist and turning your lead shoulder—and the entire side of your upper body—back away from your imaginary opponent. Try to imagine an archer as they pull back the string of their bow.
2. Release the punch by twisting your body forward, turning your hips into the punch as you pivot on the ball of your front foot.
3. As you twist, simultaneously raise your elbow up as you move your fist away from your face and rotate it so that your palm faces you, thumb facing the ceiling. After the punch, your fist should end up about a foot from your face, with your shoulder, elbow, and fist all at the same height directly in front of your nose.
4. Reverse the motion by simultaneously twisting your hips and bringing your arm and fist back through the same plane of motion to the starting position.
To throw a hook from the back foot, which uses the fist farther from your opponent (if standing in an Orthodox stance, that would be your right fist; if standing in Southpaw stance, that would be your left fist):
NOTE: This variation isn’t a very commonly thrown punch, but it’s still effective when used correctly—and ideal for adding more core strength into your workout. Because you throw the punch from your back side—the shoulder farther from your imaginary opponent—your arm will already be loaded back.
1. Keeping your bodyweight evenly distributed between both feet, twist your body forward, turning your hips into the punch as you pivot on the ball of your front foot.
2. As you twist, raise your elbow up as you move your fist away from your face and rotate it so that your palm faces you, thumb facing the ceiling. Your fist should end up about a foot from your face, with your shoulder, elbow, and fist all at the same height directly in front of your nose.
3. Reverse the motion by twisting your hips and bringing your arm and fist back through the same plane of motion to the starting position.
• You want to make a circular motion with your fist—it should feel like if you continued to punch, your arm would draw a circle around your entire body.
• As you twist your shoulder back home, your whole arm should come back and your elbow returns to the side of your body.
• To get into the groove of it, imagine you’re chopping tall stems of wheat with a scythe.
• Hands: The fist you’re throwing should not leave the side of your face until your shoulder begins its rotation forward. Your opposite hand—whichever fist you’re not throwing—should never leave the side of your face.

WAIT! HOW DO I DO IT FROM A PYRAMID STANCE? Even though both feet are parallel to each other in the Pyramid position, don’t worry about pivoting your feet, since any foot movement will be ever so slight when punching for speed and in combination. You’ll still get a surprising amount of explosive power when you throw the punch from this stance. And the better you get at it, the stronger and sleeker your midsection will become.
The hook can be the most difficult punch for people to learn because it’s not as much of a natural movement as the other punches. To pull it off, you have to raise your elbow up as you twist forward so that your elbow, shoulder, and fist are all in a straight line by the time you’ve executed the punch, but the timing of this sometimes takes a lot more coordination than many people have.
That’s why—for the purposes of my exercise program—I found a way to teach the hook that not only makes it easier to coordinate, but really works the abdominal and oblique muscles at the same time. My technique has you bring your arm up into the finished position—the impact position—before you even throw the punch, then lock your arm in place before twisting at the waist to put power into the punch.
Here’s how you can practice it:
THE MOVE:
1. Keeping your bodyweight centered between both feet, raise the elbow of your leading hand out to the side. Turn your wrist so that the palm of your fist is facing you, thumb facing the ceiling—your shoulder, elbow, and fist should all be at the same height directly in front of your nose (your fist about a foot from your face).
2. Now lock that arm in place—from this point, you won’t be bending it or straightening it, but keeping it fixed so that it moves with your body, not independently of it.
3. Twisting from the waist, turn your shoulder and the entire side of your body back, then swing your arm forward as you turn your hips into the punch and pivot on the ball of your front foot. Don’t drop your elbow or try to throw your fist—instead, let your body pull your arm around so the movement relies on your obliques, your abs, and your hip flexors.
4. Reverse the motion by twisting your hips and bringing your arm and fist back through the same plane of motion to the starting position.
AERO-TIP—One quick way to know if you’re throwing each punch properly is to use your elbow as your guide. At the end of every jab or power punch, your elbow should be straight; at the end of every uppercut, your elbow should be pointing straight down; at the end of every hook, your elbow should be pointing out in front of you.
AERO-TIP—Anytime you’re eager to see results fast, you’re more likely to cheat, whether you’re conscious of it or not, by altering your posture to make a specific exercise, punch, or drill easier to perform. Instead of trusting what you may see in the mirror, try recording yourself performing your Aerobox, Aerojump, and Aerosculpt moves from several different angles—particularly from the side and back. It could reveal where you might be robbing yourself of results.


