13.1 Nodes and Linked Lists
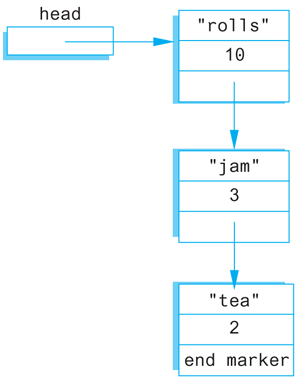
Useful dynamic variables are seldom of a simple type such as int or double, but are normally of some complex type such as an array, struct, or class type. You saw that dynamic variables of an array type can be useful. Dynamic variables of a struct or class type can also be useful, but in a different way. Dynamic variables that are either structs or classes normally have one or more member variables that are pointer variables which connect them to other dynamic variables. For example, one such structure, which happens to contain a shopping list, is diagrammed in Display 13.1.
Display 13.1 Nodes and Pointers
Nodes
A structure like the one shown in Display 13.1 consists of items that we have drawn as boxes connected by arrows. The boxes are called nodes and the arrows represent pointers. Each of the nodes in Display 13.1 contains a string, an integer, and a pointer that can point to other nodes of the same type. Note that pointers point to the entire node, not to the individual items (such as 10 or "rolls") that are inside the node.
Nodes are implemented in C++ as structs or classes. For example, the struct type definitions for a node of the type shown in Display 13.1, along with the type definition for a pointer to such nodes, can be as follows:
struct ListNode
{
    string item;
    int count;
    ListNode *link;
};
typedef ListNode* ListNodePtr;
The order of the type definitions is important. The definition of ListNode must come first, since it is used in the definition of ListNodePtr.
The box labeled head in Display 13.1 is not a node, but is a pointer variable that can point to a node. The pointer variable head is declared as follows:
ListNodePtr head;
Even though we have ordered the type definitions to avoid some illegal forms of circularity, the definition of the struct type ListNode is still blatantly circular. The definition uses the type name ListNode to define the member variable link. There is nothing wrong with this particular circularity, and it is allowed in C++. One indication that this definition is not logically inconsistent is the fact that you can draw pictures, like Display 13.1, that represent such structures.
We now have pointers inside of structs and have these pointers pointing to structs that contain pointers, and so forth. In such situations the syntax can sometimes get involved, but in all cases the syntax follows those few rules we have described for pointers and structs. As an illustration, suppose the declarations are as above, the situation is as diagrammed in Display 13.1, and you want to change the number in the first node from 10 to 12. One way to accomplish this is with the following statement:
(*head).count = 12;
The expression on the left side of the assignment operator may require a bit of explanation. The variable head is a pointer variable. So, the expression *head is the thing it points to, namely the node (dynamic variable) containing "rolls" and the integer 10. This node, referred to by *head, is a struct, and the member variable of this struct, which contains a value of type int, is called count, and so (*head).count is the name of the int variable in the first node. The parentheses around *head are not optional. You want the dereferencing operator * to be performed before the dot operator. However, the dot operator has higher precedence than the dereferencing operator *, and so without the parentheses, the dot operator would be performed first (and that would produce an error). In the next paragraph, we will describe a shortcut notation that can avoid this worry about parentheses.
C++ has an operator that can be used with a pointer to simplify the notation for specifying the members of a struct or a class. The arrow operator -> combines the actions of a dereferencing operator * and a dot operator to specify a member of a dynamic struct or object that is pointed to by a given pointer. For example, the assignment statement above for changing the number in the first node can be written more simply as
head->count = 12;
This assignment statement and the previous one mean the same thing, but this one is the form normally used.
The string in the first node can be changed from "rolls" to "bagels" with the following statement:
head->item = "bagels";
The result of these changes to the first node in the list is diagrammed in Display 13.2. Look at the pointer member in the last node in the lists shown in Display 13.2. This last node has the word NULL written where there should be a pointer. In Display 13.1 we filled this position with the phrase “end marker,” but “end marker” is not a C++ expression. In C++ programs we use the constant NULL as an end marker to signal the end of a linked list. NULL is a special defined constant that is part of the C++ language (provided as part of the required C++ libraries).
Display 13.2 Accessing Node Data

NULL is typically used for two different (but often coinciding) purposes. It is used to give a value to a pointer variable that otherwise would not have any value. This prevents an inadvertent reference to memory, since NULL is not the address of any memory location. The second category of use is that of an end marker. A program can step through the list of nodes as shown in Display 13.2, and when the program reaches the node that contains NULL, it knows that it has come to the end of the list.
The constant NULL is actually the number 0, but we prefer to think of it and spell it as NULL. That makes it clear that you mean this special-purpose value that you can assign to pointer variables. The definition of the identifier NULL is in a number of the standard libraries, such as <iostream> and <cstddef>, so you should use an include directive with either <iostream> or <cstddef> (or other suitable library) when you use NULL. No using directive is needed in order to make NULL available to your program code. In particular, it does not require using namespace std;, although other things in your code are likely to require something like using namespace std;.1
A pointer can be set to NULL using the assignment operator, as in the following, which declares a pointer variable called there and initializes it to NULL:
double *there = NULL;
The constant NULL can be assigned to a pointer variable of any pointer type.
nullptr
The fact that the constant NULL is actually the number 0 leads to an ambiguity problem. Consider the overloaded function below:
void func(int *p);
void func(int i);
Which function will be invoked if we call func(NULL)? Since NULL is the number 0, both are equally valid. C++11 resolves this problem by introducing a new constant, nullptr. nullptr is not the integer zero, but it is a literal constant used to represent a null pointer. Use nullptr anywhere you would have used NULL for a pointer. For example, we can write:
double *there = nullptr;
Self-Test Exercises
Suppose your program contains the following type definitions:
struct Box
{
    string name;
    int number;
    Box *next;
};
typedef Box* BoxPtr;
What is the output produced by the following code?
BoxPtr head;
head = new Box;
head->name = "Sally";
head->number = 18;
cout << (*head).name << endl;
cout << head->name << endl;
cout << (*head).number << endl;
cout << head->number << endl;
Suppose that your program contains the type definitions and code given in Self-Test Exercise 1. That code creates a node that contains the string
"Sally"and the number18. What code would you add in order to set the value of the member variable next of this node equal toNULL?Suppose that your program contains the type definitions and code given in Self-Test Exercise 1. Assuming that the value of the pointer variable head has not been changed, how can you destroy the dynamic variable pointed to by
headand return the memory it uses to the freestore so that it can be reused to create new dynamic variables?Given the following structure definition:
struct ListNode
{
    string item;
    int count;
    ListNode *link;
};
ListNode *head = new ListNode;
write code to assign the string “Wilbur’s brother Orville” to the member item of the node pointed to by
head.
Linked Lists
Lists such as those shown in Display 13.2 are called linked lists. A linked list is a list of nodes in which each node has a member variable that is a pointer that points to the next node in the list. The first node in a linked list is called the head, which is why the pointer variable that points to the first node is named head. Note that the pointer named head is not itself the head of the list but only points to the head of the list. The last node has no special name, but it does have a special property. The last node has NULL as the value of its member pointer variable. To test to see whether a node is the last node, you need only test to see if the pointer variable in the node is equal to NULL.
Our goal in this section is to write some basic functions for manipulating linked lists. For variety, and to simplify the notation, we will use a simpler type of node than that used in Display 13.2. These nodes will contain only an integer and a pointer. The node and pointer type definitions that we will use are as follows:
struct Node
{
    int data;
    Node *link;
};
typedef Node* NodePtr;
As a warm-up exercise, let’s see how we might construct the start of a linked list with nodes of this type. We first declare a pointer variable, called head, that will point to the head of our linked list:
NodePtr head;
To create our first node, we use the operator new to create a new dynamic variable that will become the first node in our linked list.
head = new Node;
We then give values to the member variables of this new node:
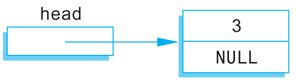
head->data = 3;
head->link = NULL;
Notice that the pointer member of this node is set equal to NULL. That is because this node is the last node in the list (as well as the first node in the list). At this stage, our linked list looks like this:
Our one-node list was built in a purely ad hoc way. To have a larger linked list, your program must be able to add nodes in a systematic way. We next describe one simple way to insert nodes in a linked list.
Inserting a Node at the Head of a List
In this subsection we assume that our linked list already contains one or more nodes, and we develop a function to add another node. The first parameter for the insertion function will be a call-by-reference parameter for a pointer variable that points to the head of the linked list, that is, a pointer variable that points to the first node in the linked list. The other parameter will give the number to be stored in the new node. The function declaration for our insertion function is as follows:
void headInsert(NodePtr& head, int theNumber);
To insert a new node into the linked list, our function will use the new operator to create a new node. The data is then copied into the new node, and the new node is inserted at the head of the list. When we insert nodes this way, the new node will be the first node in the list (that is, the head node) rather than the last node. Since dynamic variables have no names, we must use a local pointer variable to point to this node. If we call the local pointer variable tempPtr, the new node can be referred to as *tempPtr. The complete process can be summarized as follows:
Pseudocode for headInsert Function
Create a new dynamic variable pointed to by
tempPtr. (This new dynamic variable is the new node. This new node can be referred to as*tempPtr.)Place the data in this new node.
Make the link member of this new node point to the head node (first node) of the original linked list.
Make the pointer variable named
headpoint to the new node.
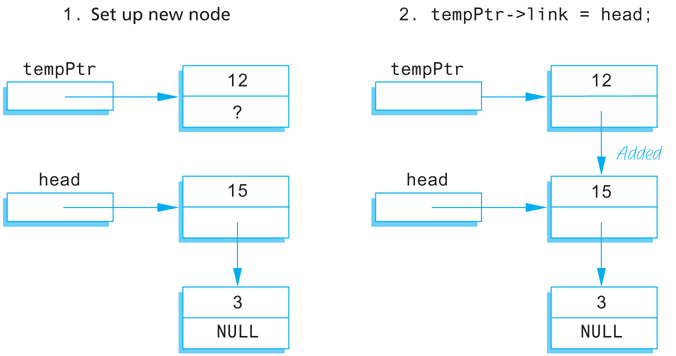
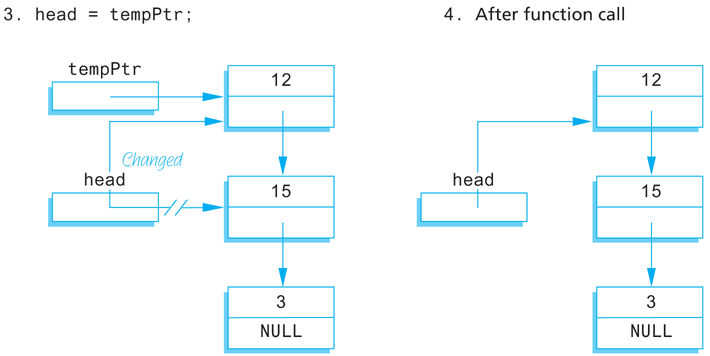
Display 13.3 contains a diagram of this algorithm. Steps 2 and 3 in the diagram can be expressed by these C++ assignment statements:
tempPtr->link = head;
head = tempPtr;
Display 13.3 Adding a Node to a Linked List
The complete function definition is given in Display 13.4.
Display 13.4 Function to Add a Node at the Head of a Linked List
Function Declaration
 1    struct Node
 2    {
 3        int data;
 4        Node *link;
 5    };
 6
 7    typedef Node* NodePtr;
 8
 9    void headInsert(NodePtr& head, int theNumber);
10    //Precondition: The pointer variable head points to
11    //the head of a linked list.
12    //Postcondition: A new node containing theNumber
13    //has been added at the head of the linked list.
Function Definition
 1    void headInsert(NodePtr& head, int theNumber)
 2    {
 3        NodePtr tempPtr;
 4        tempPtr = new Node;
 5
 6        tempPtr->data = theNumber;
 7
 8        tempPtr->link = head;
 9        head = tempPtr;
10    }
You will want to allow for the possibility that a list contains nothing. For example, a shopping list might have nothing in it because there is nothing to buy this week. A list with nothing in it is called an empty list. A linked list is named by naming a pointer that points to the head of the list, but an empty list has no head node. To specify an empty list, you use the pointer NULL. If the pointer variable head is supposed to point to the head node of a linked list and you want to indicate that the list is empty, then you set the value of head as follows:
head = NULL;
Whenever you design a function for manipulating a linked list, you should always check to see if it works on the empty list. If it does not, you may be able to add a special case for the empty list. If you cannot design the function to apply to the empty list, then your program must be designed to handle empty lists some other way or to avoid them completely. Fortunately, the empty list can often be treated just like any other list. For example, the function headInsert in Display 13.4 was designed with nonempty lists as the model, but a check will show that it works for the empty list as well.
Searching a Linked List
Next we will design a function to search a linked list in order to locate a particular node. We will use the same node type, called Node, that we used in the previous subsections. (The definition of the node and pointer types is given in Display 13.4.) The function we design will have two arguments: for the linked list and the integer we want to locate. The function will return a pointer that points to the first node which contains that integer. If no node contains the integer, the function will return the pointer NULL. This way, our program can test to see whether the integer is on the list by checking to see if the function returns a pointer value that is not equal to NULL. The function declaration and header comment for our function is as follows:
NodePtr search(NodePtr head, int target);
//Precondition: The pointer head points to the head of
//a linked list. The pointer variable in the last node
//is NULL. If the list is empty, then head is NULL.
//Returns a pointer that points to the first node that
//contains the target. If no node contains the target,
//the function returns NULL.
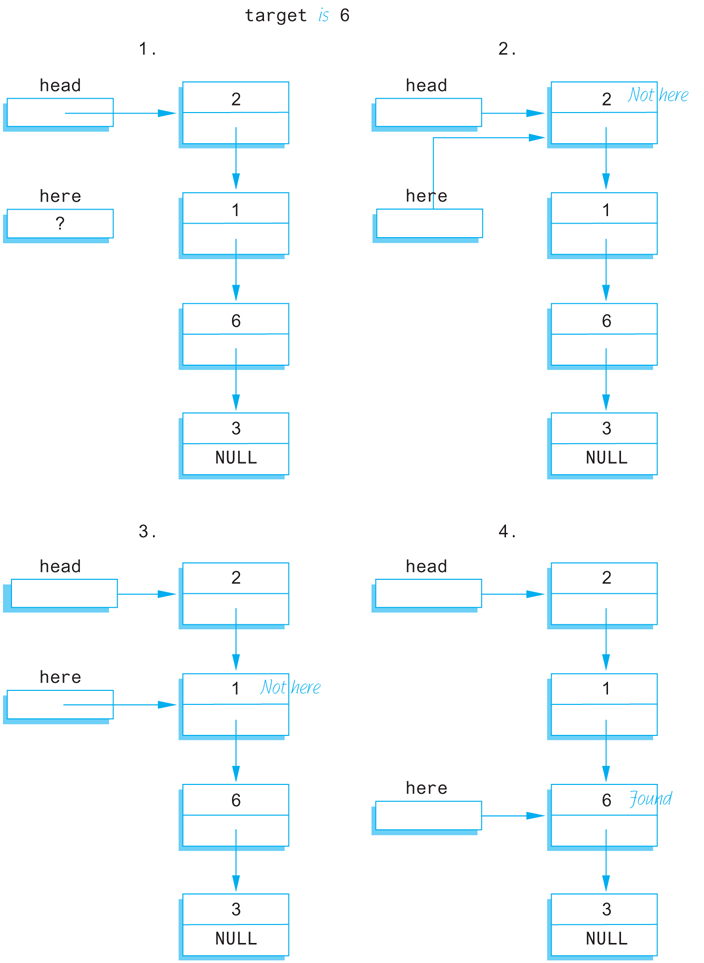
We will use a local pointer variable, called here, to move through the list looking for the target. The only way to move around a linked list, or any other data structure made up of nodes and pointers, is to follow the pointers. So we will start with here pointing to the first node and move the pointer from node to node following the pointer out of each node. This technique is diagrammed in Display 13.6. Since empty lists present some minor problems that would clutter our discussion, we will at first assume that the linked list contains at least one node. Later we will come back and make sure the algorithm works for the empty list as well. This search technique yields the following algorithm:
Pseudocode for search Function
Make the pointer variable here point to the head node (that is, first node) of the linked list.
while (here is not pointing to a node containing target
      and here is not pointing to the last node)
{
    Make here point to the next node in the list.
}
if (the node pointed to by here contains target)
    return here;
else
    return NULL;
In order to move the pointer here to the next node, we must think in terms of the named pointers we have available. The next node is the one pointed to by the pointer member of the node currently pointed to by here. The pointer member of the node currently pointed to by here is given by the expression
here->link
To move here to the next node, we want to change here so that it points to the node that is pointed to by the above-named pointer (member) variable. Hence, the following will move the pointer here to the next node in the list:
here = here->link;
Putting these pieces together yields the following refinement of the algorithm pseudocode:
Preliminary Version of the Code for the search Function
here = head;
while (here->data != target &&  here->link != NULL)
    here = here->link;
if (here->data == target)
    return here;
else
    return NULL;
Notice the Boolean expression in the while statement. We test to see if here is not pointing to the last node by testing to see if the member variable here-> link is not equal to NULL.
Display 13.6 Searching a Linked List
We still must go back and take care of the empty list. If we check our code, we find that there is a problem with the empty list. If the list is empty, then here is equal to NULL and hence the following expressions are undefined:
here->data
here->link
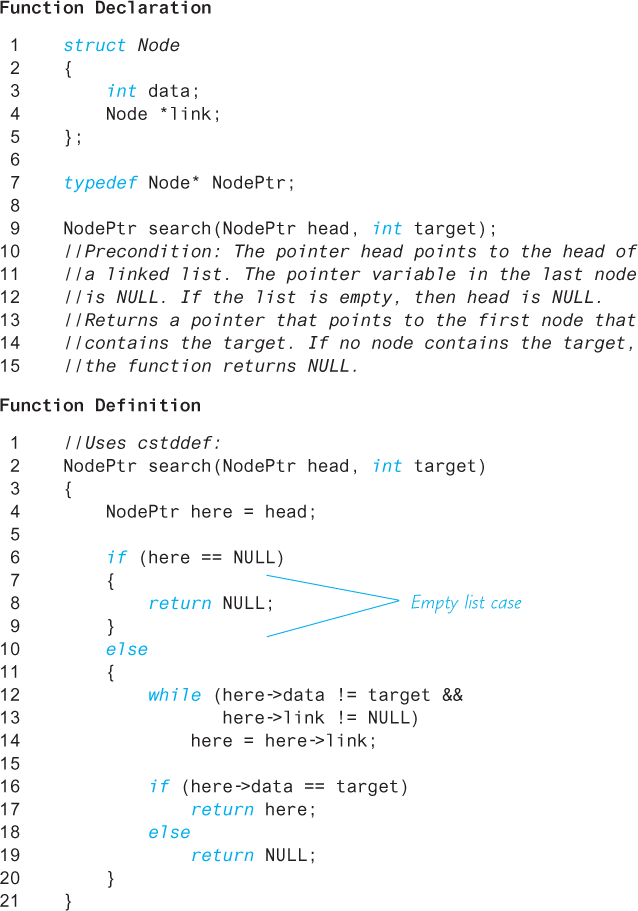
When here is NULL, it is not pointing to any node, so there is no member named data nor any member named link. Hence, we make a special case of the empty list. The complete function definition is given in Display 13.7.
Display 13.7 Function to Locate a Node in a Linked List
Pointers as Iterators
An iterator is a construct that allows you to cycle through the data items stored in a data structure so that you can perform whatever action you want on each data item. An iterator can be an object of some iterator class or something simpler, such as an array index or a pointer. Pointers provide a simple example of an iterator. In fact, a pointer is the prototypical example of an iterator. The basic ideas can be easily seen in the context of linked lists. You can use a pointer as an iterator by moving through the linked list one node at a time starting at the head of the list and cycling through all the nodes in the list. The general outline is as follows:
Node_Type *iter;
for (iter = head; iter != NULL; iter = iter->link)
    Do whatever you want with the node pointed to by iter;
where head is a pointer to the head node of the linked list and link is the name of the member variable of a node that points to the next node in the list.
For example, to output the data in all the nodes in a linked list of the kind we have been discussing, you could use
NodePtr iter; //Equivalent to: Node *iter;
for (iter = head; iter != NULL; iter = iter->link)
    cout << (iter->data);
The definition of Node and NodePtr are given in Display 13.7.
Inserting and Removing Nodes Inside a List
We next design a function to insert a node at a specified place in a linked list. If you want the nodes in some particular order, such as numeric order or alphabetical order, you cannot simply insert the node at the beginning or end of the list. We will therefore design a function to insert a node after a specified node in the linked list. We assume that some other function or program part has correctly placed a pointer called afterMe pointing to some node in the linked list. We want the new node to be placed after the node pointed to by afterMe, as illustrated in Display 13.8. The same technique works for nodes with any kind of data, but to be concrete, we are using the same type of nodes as in previous subsections. The type definitions are given in Display 13.7. The function declaration for the function we want to define is:
void insert(NodePtr afterMe, int theNumber);
//Precondition: afterMe points to a node in a linked list.
//Postcondition: A new node containing theNumber
//has been added after the node pointed to by afterMe.
Display 13.8 Inserting in the Middle of a Linked List
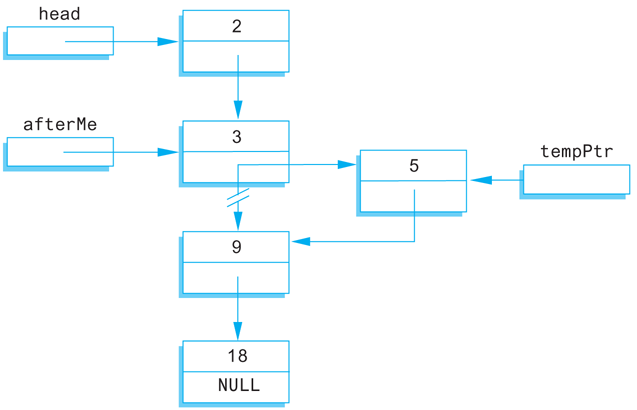
A new node is set up the same way it was in the function headInsert in Display 13.4. The difference between this function and that one is that we now wish to insert the node not at the head of the list, but after the node pointed to by afterMe. The way to do the insertion is shown in Display 13.8 and is expressed as follows in C++ code:
//add a link from the new node to the list:
tempPtr->link = afterMe->link;
//add a link from the list to the new node:
afterMe->link = tempPtr;
The order of these two assignment statements is critical. In the first assignment we want the pointer value afterMe->link before it is changed. The complete function is given in Display 13.9.
Display 13.9 Function to Add a Node in the Middle of a Linked List
Function Declaration
 1    struct Node
 2    {
 3        int data;
 4        Node *link;
 5    };
 6
 7    typedef Node* NodePtr;
 8
 9    void insert(NodePtr afterMe, int theNumber);
10    //Precondition: afterMe points to a node in a linked
11    //list.
12    //Postcondition: A new node containing theNumber
13    //has been added after the node pointed to by afterMe.
Function Definition
 1    void insert(NodePtr afterMe, int theNumber)
 2    {
 3        NodePtr tempPtr;
 4        tempPtr = new Node;
 5
 6        tempPtr->data = theNumber;
 7
 8        tempPtr->link = afterMe->link;
 9        afterMe->link = tempPtr;
10    }
If you go through the code for the function insert, you will see that it works correctly even if the node pointed to by afterMe is the last node in the list. However, insert will not work for inserting a node at the beginning of a linked list. The function headInsert given in Display 13.4 can be used to insert a node at the beginning of a list.
By using the function insert you can maintain a linked list in numerical order or alphabetical order or other ordering. You can “squeeze” a new node into the correct position by simply adjusting two pointers. This is true no matter how long the linked list is or where in the list you want the new data to go. If you instead used an array, much, and in extreme cases all, of the array would have to be copied in order to make room for a new value in the correct spot. Despite the overhead involved in positioning the pointer afterMe, inserting into a linked list is frequently more efficient than inserting into an array.
Removing a node from a linked list is also quite easy. Display 13.10 illustrates the method. Once the pointers before and discard have been positioned, all that is required to remove the node is the following statement:
before->link = discard->link;
Display 13.10 Removing a Node
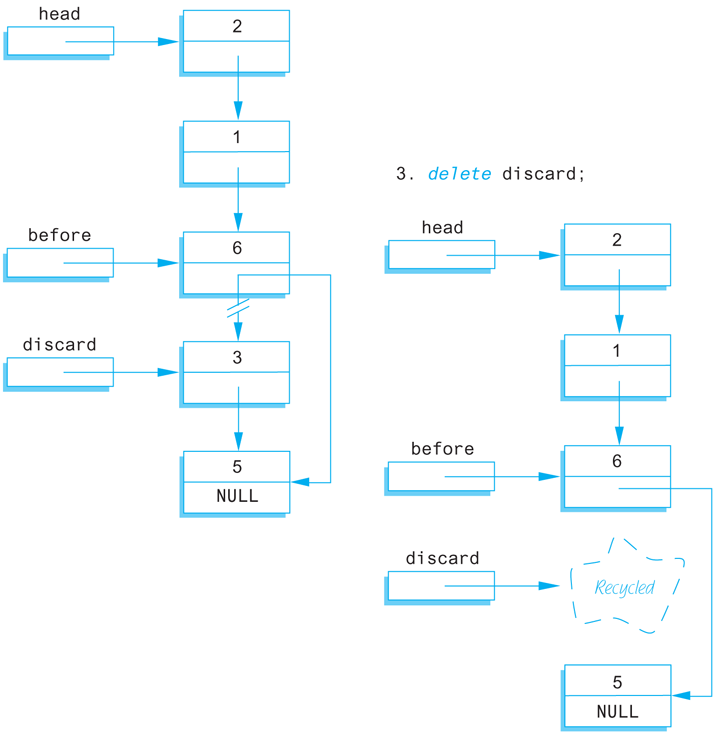
This is sufficient to remove the node from the linked list. However, if you are not using this node for something else, you should destroy it and return the memory it uses to the freestore; you can do this with a call to delete as follows:
delete discard;
Self-Test Exercises
Write type definitions for the nodes and pointers in a linked list. Call the node type
NodeTypeand call the pointer typePointerType. The linked lists will be lists of letters.A linked list is normally given by giving a pointer that points to the first node in the list, but an empty list has no first node. What pointer value is normally used to represent an empty list?
Suppose your program contains the following type definitions and pointer variable declarations:
struct Node
{
    double data;
    Node *next;
};
typedef Node* Pointer;
Pointer p1, p2;
Suppose
p1points to a node of this type that is on a linked list. Write code that will makep1point to the next node on this linked list. (The pointerp2is for the next exercise and has nothing to do with this exercise.)Suppose your program contains type definitions and pointer variable declarations as in Self-Test Exercise 7. Suppose further that
p2points to a node of typeNodethat is on a linked list and is not the last node on the list. Write code that will delete the node after the node pointed to byp2. After this code is executed, the linked list should be the same, except that there will be one less node on the linked list. (Hint: You might want to declare another pointer variable to use.)Choose an answer and explain it.
For a large array and large list holding the same type objects, inserting a new object at a known location into the middle of a linked list compared with insertion in an array is
More efficient
Less efficient
About the same
Dependent on the size of the two lists
Variations on Linked Lists
In this subsection we give you a hint of the many data structures that can be created using nodes and pointers. We briefly describe two additional data structures, the doubly linked list and the binary tree.
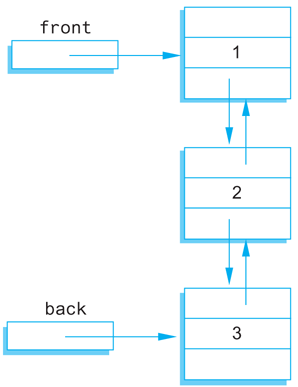
An ordinary linked list allows you to move down the list in only one direction (following the links). A node in a doubly linked list has two links, one link that points to the next node and one that points to the previous node. Diagrammatically, a doubly linked list looks like the sample list in Display 13.11.
Display 13.11 A Doubly Linked List
The node class for a doubly linked list could be as follows:
struct Node
{
    int data;
    Node *forwardLink;
    Node *backLink;
};
Rather than a single pointer to the head node, a doubly linked list normally has a pointer to each of the two end nodes. You can call these pointers front and back, although the choice of which is front and which is back is arbitrary. The definitions of constructors and some of the functions in the doubly linked list class will have to change (from the singly linked case) to accommodate the extra link.
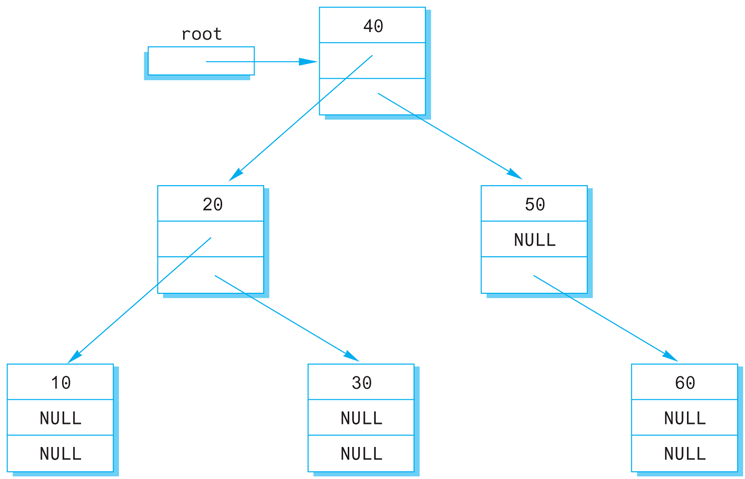
A tree is a data structure that is structured as shown in Display 13.12. In particular, in a tree you can reach any node from the top (root) node by some path that follows the links. Note that there are no cycles in a tree. If you follow the links, you eventually get to an “end.” Note that each node has two links that point to other nodes (or the value NULL). This sort of tree is called a binary tree, because each node has exactly two links. There are other kinds of trees with different numbers of links in the nodes, but the binary tree is the most common case.
Display 13.12 A Binary Tree
A tree is not a form of linked list, but does use links (pointers) in ways that are similar to how they are used in linked lists. The definition of the node type for a binary tree is essentially the same as what it is for a doubly linked list, but the two links are usually named using some form of the words left and right. The following is a node type that can be used for constructing a binary tree:
struct TreeNode
{
    int data;
    TreeNode *leftLink;
    TreeNode *rightLink;
};
In Display 13.12, the pointer named root points to the root node (“top node”). The root node serves a purpose similar to that of the head node in an ordinary linked list (Display 13.10). Any node in the tree can be reached from the root node by following the links.
The term tree may seem like a misnomer. The root is at the top of the tree and the branching structure looks more like a root branching structure than a tree branching structure. The secret to the terminology is to turn the picture (Display 13.12) upside down. The picture then does resemble the branching structure of a tree and the root node is where the tree’s root would begin. The nodes at the ends of the branches with both link instance variables set to NULL are known as leaf nodes, a terminology that may now make some sense.
Although we do not have room to pursue the topic in this book, binary trees can be used to efficiently store and retrieve data.
Linked Lists of Classes
In the preceding examples we created linked lists by using a struct to hold the contents of a node within the list. It is possible to create the same data structures using a class instead of a struct. The logic is identical except the syntax of using and defining a class should be substituted in place of that for a struct.
Displays 13.13 and 13.14 illustrate how to define a Node class. The data variables are declared private using the principle of information hiding, and public methods have been created to access the data value and next node in the link. Display 13.15 creates a short list of five nodes by inserting new nodes onto the front of the list. The headInsert function is logically identical to the same function defined in Display 13.4 except the constructor defined for the Node class is used to set the data.
Display 13.13 Interface File for a Node Class
 1    //This is the header file for Node.h. This is the interface for
 2    //a node class that behaves similarly to the struct defined
 3    //in  Display 13.4
 4    namespace linkedlistofclasses
 5    {
 6        class Node
 7        {
 8        public:
 9            Node( );
10            Node(int value, Node *next);
11            //Constructors to initialize a node
12
13            int getData( ) const;
14            //Retrieve value for this node
15
16            Node *getLink( ) const;
17            //Retrieve next Node in the list
18
19            void setData(int value);
20            //Use to modify the value stored in the list
21
22            void setLink(Node *next);
23            //Use to change the reference to the next node
24
25        private:
26            int data;
27            Node *link;
28        };
29        typedef Node* NodePtr;
30    } //linkedlistofclasses
31    //Node.h
Display 13.14 Implementation File for a Node Class
 1    //This is the implementation file Node.cpp.
 2    //It implements logic for the Node class. The interface
 3    //file is in the header file Node.h
 4    #include <iostream>
 5    #include "Node.h"
 6
 7    namespace linkedlistofclasses
 8    {
 9        Node::Node( ) : data(0), link(NULL)
10        {
11            //deliberately empty
12        }
13
14        Node::Node(int value, Node *next) : data(value), link(next)
15        {
16            //deliberately empty
17        }
18
19        //Accessor and Mutator methods follow
20
21        int Node::getData( ) const
22        {
23            return data;
24        }
25
26        Node* Node::getLink( ) const
27        {
28            return link;
29        }
30
31        void Node::setData(int value)
32        {
33            data = value;
34        }
35
36        void Node::setLink(Node *next)
37        {
38            link = next;
39        }
40    } //linkedlistofclasses
41    //Node.cpp
Display 13.15 Program Using the Node Class
 1    //This program demonstrates the creation of a linked list
 2    //using the Node class. Five nodes are created, output, then
 3    //destroyed.
 4    #include <iostream>
 5    #include "Node.h"
 6
 7    using namespace std;
 8    using namespace linkedlistofclasses;
 9
10    //This function inserts a new node onto the head of the list
11    //and is a class-based version of the same function defined
12    //in Display 13.4.
13    void headInsert(NodePtr& head, int theNumber)
14    {
15        NodePtr tempPtr;
16        //The constructor sets tempPtr->link to head and
17        //sets the data value to theNumber
18        tempPtr = new Node(theNumber, head);
19        head = tempPtr;
20    }
21
22    int main()
23    {
24        NodePtr head, tmp;
25
26        //Create a list of nodes 4 -> 3 -> 2 -> 1 -> 0
27        head = new Node(0, NULL);
28        for (int i = 1; i < 5; i++)
29        {
30            headInsert(head, i);
31        }
32        //Iterate through the list and display each value
33        tmp = head;
34        while (tmp != NULL)
35        {
36            cout << tmp->getData() << endl;
37            tmp = tmp->getLink();
38        }
39        //Delete all nodes in the list before exiting
40        //the program.
41        tmp = head;
42        while (tmp != NULL)
43        {
44            NodePtr nodeToDelete = tmp;
45            tmp = tmp->getLink();
46            delete nodeToDelete;
47        }
48        return 0;
49    }
Sample Dialogue
4
3
2
1
0