The less time you spend stressing out over how to handle quick-fix things around the house, the more time you can spend doing things you like. This chapter is geared at encouraging creative problem solving, helping you to conjure up your inner Girl or Boy Scout.
First we’ll cover all the tools a happy home homie should have lying around, and then we’ll get into setting yourself up for improvisation success. When you start to solve home problems with a stash of things like bungee cords, dowels, and binder clips, you get to reallocate time spent wandering through hardware stores and money spent paying people to fix stuff for you.
It’s empowering to fix something yourself, no matter how simple. I tend to quickly fix things for functionality and then address the fix later if my impromptu crafty solution bugs me. Making do until you can get to the hardware store or find the right deal on whatever materials you need is an art in itself. I haven’t yet found a good fold-up table, one I can use for yard sales or crafts, for free on the side of the road, so I’ll continue to rig up my table extension, which you’ll read about later in the chapter.
A few years ago my dad took me to the hardware store, where we selected a table saw as my birthday present. I’d been itching for one ever since I went to a carpenter friend’s woodworking shop and cut up cute art blocks out of one of the boards that made up my former cinder-block-and-board bookcase. I never did take that table saw out of the box, but I’m not ashamed to admit it. Eventually I sold it on Craigslist and used the money on what I get more use out of on a daily basis: groceries.
As with all subjects covered in this book, home handiwork skills include a knowledge of the bare-bones basics and ways to be fancier about the work if you so choose. Using a table saw is certainly on the fancier end of the skill spectrum. I hope that after reading this chapter you’ll identify unique solutions and implement your own creative ideas that pertain to your home situation.
This chapter does come with a minor disclaimer: please weigh the costs when considering fixing something yourself. If it’s possible to break it even further, how much does a new one cost? Knowing when to call someone who knows what he or she is doing is key, even if that person is just a pal who’s had a similar problem.
Word to the Wise
You get what you pay for in the tool aisle. Select a midrange tool over bottom-of-the-line options. It’s better to pay a little more for one tool than to have to buy a second when the first one breaks or doesn’t work properly.
Taking Stock
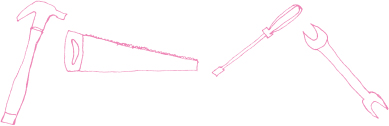
Let’s have a look at what’s in your tool kit. These are the basic tools any household should stock. You don’t want to be at home without them.
 One Phillips-head and one flat-head screwdriver (you don’t really need the big, fancy screwdriver kit)
Mini screwdriver kit, for tiny things (like eyeglass and iPhone screws)
Hammer
Hardware kit (or an assortment of screws, nails, and anchors)
Wire cutter
Adjustable wrench
Pliers
Small handsaw
9-inch torpedo level for hanging pictures and other small household tasks
Sharpening stone and oil for maintaining household scissors, knife blades, and other tools
Five-in-one tool (a painter’s tool that can be used for spackle and nail removals)
Upgrade Ideas from Readers
I asked my blog readers about their favorite tools. Here are three great suggestions for fancying up your tool kit (or adding to your wish list):
1. Dremel tools do all sorts of handy things like cutting (metal, wood, and tile), sanding, and routing
2. A hex key is that little L-shaped thing you get in every IKEA tool baggie. A set of hex keys can help you open up just about anything you have around the house.
3. Stud finder. This device detects studs (ideal places to hang heavy things on the wall) and also scans for metal and wires (not ideal places to sink a nail).
Where to Stash Your Tools
Most basic toolboxes have one big compartment and a little tray on top, which can lead to an unorganized and jumbled tool and hardware mess. My mom has always sworn by the fishing supply aisle, and not because she’s into bait and tackle. A tackle box has more slots and ways to segregate hardware than a box specially made for tools, plus tackle boxes are usually cheaper.
If you don’t have a utility room, don’t keep your tools under the kitchen sink. You don’t want to have to dig around under there every time you need to fix or hang something, and they might get water damage. We keep our tools in our all-purpose everything closet.
Other cool tool-stashing ideas I’ve seen:
Back-of-door hanging shoe rack with clear pockets
Long pieces of leather or canvas nailed to a board (which in turn is attached to a wall) with loops between the nails to hang tools
Drill Skills
The only power tool you really need to own (or share with a friend) is a power drill. You can find a decent one for about $50. I recommend a corded drill for the following reasons:
It will be lighter than a cordless drill (no monster-sized battery to lug around).
Corded drills are generally more powerful and you don’t have to worry about whether or not the battery is charged when you want to use it.
A cordless drill’s battery life expectancy goes down the less you use it (and the longer you own it), so the occasional user will get less bang for the buck by going with a cordless.
The trickiest part of using a power drill is holding it steady and knowing when you’ve reached the right tension with the screw, so as not to strip it. You don’t have to use force (as you would with a screwdriver), but you have to have a firm grasp and an intentional attitude.
Drill tips:
Predrilling (or piloting) a hole with a bit that’s narrower than your screw is pretty helpful in most drill jobs. Be sure the hole is smaller than the base of the screw (not just the external thread) or it will be too big and your screw will end up pulling out.
You can buy a set of drill bits and then proceed to drill any size hole into nearly anything you can imagine, like transforming an ordinary 5-gallon bucket into a fancy planter by drilling drainage holes.
If possible, get a drill with two handles (one on the base and another near the drill head). This gives you a better vantage and allows you to apply a more even grip. I love using my Craftsman drill with its (removable) second handle.
Anchor Basics
Anchors are great for hanging things on walls and ceilings where there is no convenient wood stud or beam behind the surface. An anchor’s stability depends on a couple of factors: direction of pull and surrounding material composition.
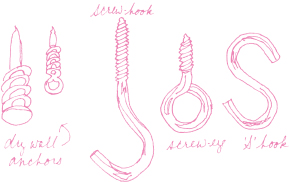
You need a threaded drywall anchor if your wall/ceiling is thin (a nail or screw goes right in and you can pull it out easily). Choose metal for a few cents more than the plastic. You can drill or screw it directly into the wall.
Pick up a metal toggle bolt or a collapsing metal sleeve anchor (sometimes called a molly bolt) to secure heavy objects. Be sure to get metal. The cheapie plastic expansion anchors always bend and warp (and drive me batty) as I’m trying to hammer them into the predrilled hole. Both of these kinds of anchors will require you to predrill a hole as wide as the anchor.
Never use a plastic expansion anchor for hanging things from the ceiling.
Move-In/Move-Out Skills
You want your deposit back in full? Patch the nail holes, people. It seems like this simple feat is all too often ignored in the turnover of rental properties. It’s no fun to arrive in a new-to-you home and find a bunch of nails that used to hold up other people’s stuff.
Go through the house with your claw hammer (the kind of hammer that has a curved tail on the head) and pull out the hardware road map of your (or the previous tenant’s) décor. Just unscrew anchored hardware, as in most cases anchors themselves are not easily removable.
Spackle paste comes in pint-sized buckets and often in squeeze tubes. I prefer the squeeze tube because it has a better chance of not drying out between uses. Squeeze or apply spackle paste into holes, then flatten and smooth the surface with a putty knife, five-in-one tool, or even the edge of a ruler. Let dry, and you’re done. Easy breezy.
You’ll want to sand the completely dry spackled patches with a medium-grit sandpaper to even out the surface if you’re also repainting.
Installing Shelving and Hanging Pictures
It only takes a few extra moments to grab a level and a pencil and make a few marks to be sure your wall hangings are straight. Your perfectionist efforts will pay off when you don’t have to reinstall the shelf or add another anchor ½ inch higher than the original one because staring at crooked shelves or slanted pictures every day started to drive you nuts.
The best way to hang large pictures and other heavy objects is to use two anchors (and two screws) when possible.
Hip Trick
Install an anchor and then screw in a vintage or quirky drawer pull to be used as a knob to hang pictures, necklaces, or other objects by using a lightweight wire.
Creative Ways to Hang Things from the Ceiling
Screw hooks are my favorite way to suspend lights, vegetable baskets, and bamboo room dividers from the ceiling.
In most cases you’ll be fine screwing the hook directly into the ceiling without an anchor and hanging your object. If your object is corded (i.e., a light), secure the dangling cord with a nail or two along the wall or corner to keep the cord away from the light and allow it to hang properly. You’ll know if you need an anchor if you give the screw hook a gentle tug and it pulls right out.
Follow directions for weight limits listed on the screw hook’s package (or by talking to someone at the hardware store if they’re sold loose). Generally, a standard screw hook holds up to 40 pounds, so you should be fine. Look specifically for a ceiling hook kit if you’d like to hang chandeliers, plants, or other heavy objects. The kit’s package will indicate maximum load.
Sometimes ceilings are just downright crappy and can’t support anything. You can still hang your wire vegetable basket in the kitchen from a single curtain rod support. You just need to be sure to get a bracket that juts out far enough from the wall to allow the basket to hang properly (not skewed at a dangerous angle so your potatoes threaten to pelt passersby).
Hip Trick
Hang unframed artwork or paintings with four medium-sized nails. Hammer in the nails (leaving about ½ inch out), two in the bottom and two around the top. Holding the piece (to keep it from falling on top of you), carefully hammer the bottom nails upward and in toward the artwork. Repeat for the top nails. Don’t smash them into the painting. Tilting them inward is usually enough to hold the piece securely on the wall.
Hip and Handy
Handy home fixery is based on two principles: curiosity and observation. Ever since I was a kid, my favorite method for discovery and innovation has been to carefully dissemble the item in question and see what’s going on in there. That’s not always practical or possible, so creative improvisation around the house goes more smoothly with a good stash of supplies to work with.
This is my quintessential list of handy things to have around the house at all times:
Bungee cords (at least three long and three short).
Twine. You’ll encounter a few different kinds in the rope and binding aisle. Look for the stiffer and extremely sturdy sisal twine for tough outdoor projects, and be sure to get the softer jute twine for easy twisting and tying, great for both indoor and outdoor use.
Wire. Look for 22-to 28-gauge galvanized steel wire; it’s totally bendable and wire cutters snip it easily. The list of things you can do in the hanging realm with this wire is endless. Wire has helped me hang four picture frames in a row using only two nails, display my prized windowpanes from our boring chain-link backyard fence, and suspend a strawberry jar from my neighbor’s back deck.
Spare plywood sheet (sturdy, flat, clean wood). Ideally you’d find something on the side of the road, but buying a 4-by-8-foot piece of plywood at the hardware store is not going to break the bank. The sheet will run you about $20. Have the handy folks at the hardware store cut it down for you while you’re there; a 4-by-6-foot size is ideal for all your table extending purposes. If you can transport it and have a place to stash it, you could even keep the whole sheet intact. You don’t need anything fancy; C-grade plywood or sheathing board will do.
Indoor extension cords. Try to find ones with three-pronged receptacles so that you can plug in any type of electronic device.
Utility clamps. We already covered the usefulness of clothespins in Chapter 1, so having a couple of giant, super-strong versions of a clothespin lying around makes life even better.
Zip ties. Use these little plastic cinching cords to affix just about any two objects. I’ve used them to secure milk crates to my bicycle rack and hang a box fan from the ceiling using two screw eye hooks.
Binder clips. In case you slept through Photo Hanging 101, binder clips are a fun way to display an unframed photo on the wall without poking holes in it with a nail or pin. Clamp your paper (or other lightweight object) and hang one of the loop handles from a nail or push pin. Office supply stores sell binder clips that are a notch above the standard black ones. Deck your walls with all silver clips or other fun colors until you have time to figure out framing.
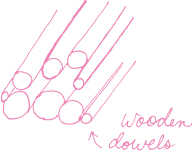
Dowels. I love these wooden rods almost as much as I love clothespins. They’re cheap, they’re handy to have around the house, and they can double as curtain rods (suspended from binder clips) in a pinch.
You can formulate all sorts of home solutions and creative improvisations with a fully stocked utility closet. It’s time to start taking theory into practice, my hip friends. The next time you’re faced with going to the hardware, home, or garden supply store, think about the simple mechanics of your ideal solution. Sure, there’s something you could go out and buy, but could you also make it just as easily?
Go to your tool and utility space and see if you have anything that might work in lieu of what they’re selling. Here are a few project ideas to inspire a new outlook in using things you already have.
Hip Trick
Get ideas for crafty solutions by paying attention to how others maximize small spaces. Restaurant and store bathrooms in big cities are my fave place to pick up nifty tricks for DIY shelving and storage. They are often the smallest rooms you’ll find anywhere, and shopkeepers must get creative with stashing cleaning and supply stocks.
Art galleries are also great places to pay attention to (and steal) creative installation ideas for your own wall hangings.
Extending Your Tabletop Space
Hosting dinner parties, potlucks, and craft gatherings really ends up boiling down to table space (as you’ll see in Chapter 10). If you own a fold-up 4-by-8-foot yard sale or craft table or by some chance landed a grown-up dinner table with actual extenders, then ignore this project idea. For all the rest of us out there who are tabletop (and potentially counter space) challenged, don’t worry, you’re not doomed to entertain on the floor.
You might not be very surprised to find out that my MO for special home-based events is to beg, borrow, or visit the thrift store. We even found a decent table on the side of the road. It’s a square card table, pseudo-sturdy, slightly shorter and fatter than our existing square dinner table.
Here’s where being handy and taking a few moments to slow down and improvise comes in. Both my kitchen table and the found card table are 3 feet square. The first time I combined them (the afternoon before a dinner gathering) I realized that what I had in mind—placing a large wooden plank across the tops of both to make one large table—was a no-go, because the wood was warped from summer humidity.
We also had a smaller, square plywood board, slightly shorter than the two tables’ width, and it had two small holes about the size of quarters drilled into opposite sides. I whipped out various bungee cords and hooked them through the holes in the plywood (in case of animated dinner conversations) and shoved books along the perimeter of a second wood plank stuck in for extra stability (and to help level out the 1½-inch slope from kitchen table to card table), making a flat surface for guests. I topped the whole affair with a vinyl craft tablecloth to buffer the books against spills.
Later that evening, guests were none the wiser that below the cups, plates and my great grandma’s lace tablecloth lurked layers of improvisation.
Word to the Wise
When taking something apart, keep a notepad handy to write down (or draw) where the pieces are supposed to go when it is properly assembled. You don’t want your excavation story to end up reading like Humpty Dumpty.
Building a Trellis or Tomato Plant Cage
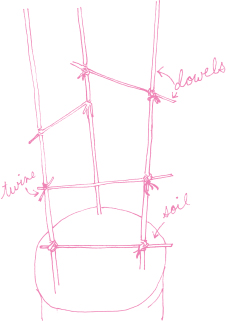
This simple and particularly magical combination of dowels and twine will save you money at the garden store and leave you with reusable materials to construct another specialized structure as your garden and outdoor space needs change.
Supplies needed:
Two to four ½-inch-diameter wooden dowels (or wood molding pieces) for the base. Taking into consideration what kind of structure you’re going to make and how high you need it to go, you can find the longer pieces of wood molding in the flooring section of the hardware store. They come in quarter-rounds and rectangular shapes. When building a cage for vines and bean plants, the molding pieces are the tallest, sturdiest, and cheapest materials for the job; dowels (48 inches long) work great for bushy plants like tomatoes that need support most at the base. (My cucumbers have topped their 8-foot cage supports, so I’m glad I gave them enough room!)
Two 1/8-inch-diameter dowels cut into three or four pieces to serve as ledges between the legs of the base. Cut them to fit the distance between the legs.
Jute twine cut into 12-inch pieces; start with ten pieces and cut more if you need them.
Step 1: Insert the ½-inch dowels in the ground (or in containers if you have ’em) to form the base structure of your trellis or cage.
Step 2: Wrap twine around a small dowel to form a couple of loops. Leave a 3-inch tail.
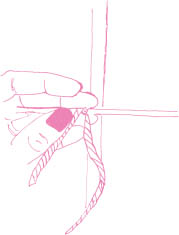
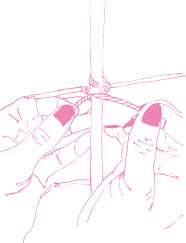
Step 3: Tightly wrap the long end of the twine around the top of the base to anchor the small dowel to the base. Continue wrapping twine around the small dowel where it meets the base. Continue until you have just enough of a tail to meet the original 3-inch tail. There’s no right way to do this; just be sure you’re keeping the twine tight. You don’t want there to be any slack between the layers of twine or else your dowel will come loose.
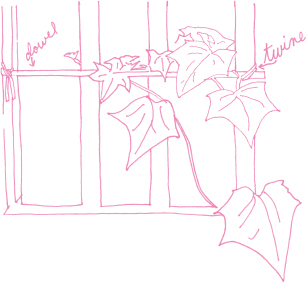
Step 4: Tie the two tails together, knot twice, and repeat on the other end to form a ledge connecting two of the base legs. Make as many ledges as you need.
You can also use this method to add a ledge to an existing deck railing for plants to climb and rest on, which maximizes the utility of your existing structure.
Share Your Toys
Another good reason to get to know your neighbors (beyond sharing food and fun) might be to form a tool-share collective. It’s pretty silly for people who live near each other to all own the same power tools. A tool-share group can be as organized as you care to make it, which means you and the upstairs neighbor might occasionally swap power tools to complete home projects or the guy across the street uses his free-standing garage to house your street’s collective stash of tools, which might be checked out on an as-needed basis.
There are considerations that should be discussed in advance, like how your group handles responsibility for broken items or what rules surround borrowing from the group.
Resources
Books
The Sharing Solution: How to Save Money, Simplify Your Life & Build Community by Janelle Orsi and Emily Doskow. Great primer on how to start a tool-share (and all other types of sharing groups) with friends, neighbors, or local community members.
Dare to Repair: A Do-It-Herself Guide to Fixing (Almost) Anything in the Home by Julie Sussman and Stephanie Glakas-Tenet.
Web
Ace Hardware (acehardware.com). Step-by-step how-to and FAQ sections online. In-store customer assistance is also top-notch, and there are Ace stores across the country.
The Natural Handyman (naturalhandyman.com). A wealth of information about home repair things most of us know little about. The handyman writer is quirky and explains hardware and construction recommendations well.