Chapter 3
Sur veying the Chrome Browser
IN THIS CHAPTER
 Taking an in-depth look at the Chrome web browser
Creating and managing bookmarks
Dealing with your browser history
In late 2008, after a brief beta run, Google released the first consumer-ready version of its Chrome web browser. Google’s goal was to create an alternative to popular existing web browsers such as Internet Explorer, Safari, and Firefox. The application was launched globally in 43 languages, and Chrome quickly gained about 1 percent of the web-browser market.
Chrome’s stripped-down approach, and its speed and extensibility, proved to be popular with a wide range of users, from dabblers to the technologically savvy. It was quickly developed for other operating systems like MacOS, Linux, as well as mobile platforms Android and iOS. Today, Chrome accounts for over 60 percent of all web browsing on the Internet.
At their core, web browsers are nothing more than vehicles for surfing the web. In this chapter, you take an in-depth look at the Chrome browser for Chromebook. Learn how to create and manage your bookmarks, manage your browser history, and surf without leaving a record in your browser history. Finally, in case you prefer other browsers like Firefox or DuckDuckGo, I show you how to find, install, and run these browsers.
Navigating the Chrome Browser
Before breaking down the Chrome browser into its different pieces, let me give you a quick tour. Figure 3-1 shows an open Chrome browser window. At the top-left corner is the tab — in this figure, the only tab — featuring the word Google and the Google icon; below the tab are the navigation buttons. To the right is the navigation bar, also referred to as the Omnibox.
On the far right of the Omnibox is an icon that looks like three little dots — the Settings button. Below the Omnibox is the bookmark bar, and below the bookmark bar is where web pages are loaded.

FIGURE 3-1: The layout of the Chrome browser.
Sizing the Chrome window
To launch Google Chrome on your Chromebook, just click the Chrome icon in the bottom left of your screen. (Refer to Figure 3-1.)
The first time you use Chrome, it opens only one browser window, which contains one tab. You can launch additional windows by holding the Ctrl key and clicking the Chrome icon again or by pressing Ctrl+N.
 Instead of opening additional windows, consider using multiple tabs within a single window to achieve the same effect. (I introduce tabs in the next section.)
You can close an open Chrome browser window by clicking the X-shaped Close button in the top-right corner of the browser window (as I discuss in Chapter 2) or by pressing Ctrl+W.
When a window is maximized, it takes up the entire screen of your Chromebook. If you want Chrome to take up only a portion of your screen, however, you have a few options. These include
- Restoring a window to a nonmaximized size: You can de-maximize a window by clicking the box-shaped Maximize icon at the top-right of the browser window, or by clicking the header space between the tab and the Maximize button. Either method shrinks your window, allowing you to move it around on the screen.
Minimizing a window: Minimizing shrinks the active window so that it’s hidden from the screen but not closed. Minimizing is helpful when you want to open a different application or perform some function on your Chromebook without having the Chrome window in the way. To minimize a window, hover your cursor over the Minimize button until a drop-down menu of options appears, and then click the button in the middle.
If you have only one Chrome window open, you can also minimize it by clicking the Chrome icon in your shelf.
Working with tabs
More often than not, you find that using Chrome window tabs is much easier and more efficient than opening and managing multiple windows. The tab system is a lot like tabs on folders in your filing cabinet. Take a look at Figure 3-2 to see what Chrome tabs look like. You can have one website open per tab and almost a limitless number of tabs open in one Chrome window.
By default, when you launch Chrome or open a new Chrome window, one tab is opened. To open additional tabs, click the New Tab button located to the right of the last tab in your browser window.
 Multiple tabs make it easier to surf the web without losing your place. You can also open additional tabs by pressing Ctrl+T. You can close a tab by clicking the X in the right corner of the tab or by pressing Ctrl+W.

FIGURE 3-2: Chrome browser tabs.
Using the Omnibox and the navigation buttons
Chrome’s Omnibox and navigation buttons allow you to surf the web. They’re located at the top of the Chrome browser window. (Refer to Figure 3-1.) In the Omnibox, you can enter a URL (such as www.bbc.com) or a search term or phrase (such as “hardware stores in Seattle”). Chrome and other browsers work in this way.
From left to right, the navigation buttons found to the left of the Omnibox are
- Back: Allows you to navigate to the web page that you were on previous to the current page.
- Forward: Takes you forward one page in your browser history. Chrome isn’t psychic, however; this button remains grayed-out and inaccessible until you’ve used the Back button. Go backward one page, and clicking the Forward button returns you to your original page.
- Refresh: Reloads your current page. Sometimes you might want to use the Refresh button to load new information that may be in the process of launching. Have you ever been tracking a package in shipment? You might click the Refresh button repeatedly to view updates on the progress of your shipment. (We are all guilty of this.)
Saving your place with the bookmark bar
Just as a bookmark helps you remember your place in a book you’re reading, so Chrome’s bookmarks allow you to quickly pick up where you left off. If you find a place on the Internet to which you want to return in the future, you can create a bookmark so that you can get there with a click of the mouse. With Chrome bookmarks, you don’t have to write down a URL or record it somewhere else (like a document or worksheet); let Chrome remember it for you!
To create a bookmark in Chrome, first navigate to the web page you want to save and then click the star icon on the right side of the Omnibox. This action automatically adds the name and address of the site to your list of bookmarks in the Bookmark Manager. If your bookmark bar is enabled, and if you have space available, your new bookmark also appears there.
You can also bookmark a page simply by pressing Ctrl+D while you’re on the page that you want to bookmark.
Chrome can store an almost unlimited number of bookmarks in your Bookmark Manager. Chrome also gives you the option of saving a small number of bookmarks in the bookmark bar in the browser window. The bookmark bar is located directly under the navigation buttons and Omnibox. As you can see in Figure 3-3, the bookmark bar has limited space. Keep your best bookmarks — the places you visit most frequently — in the bookmark bar.
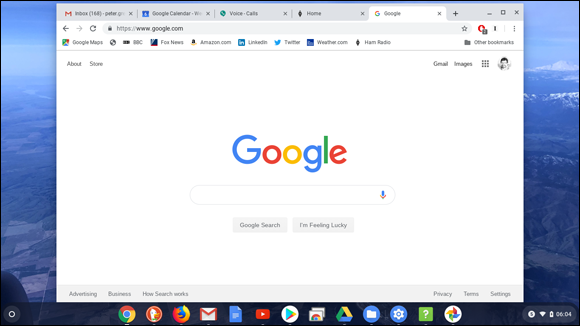
FIGURE 3-3: The bookmark bar has limited space.
If you can’t see the bookmark bar, it may not be turned on. To turn it on, follow these steps:
Click the Settings button on the right side of the Omnibox.
The Settings menu appears.
Hover your cursor over the Bookmarks option in the Settings menu.
A submenu appears.
Select the Show Bookmarks Bar option.
The bookmark bar appears in your browser window.
Now your favorite places on the Internet are only one click away!
The Chrome browser also remembers where you visit, and Chrome helps you in yet another way. To see how, click the + (plus sign) icon in the Chrome browser to add another tab. In the window that appears, Chrome displays icons for up to eight recent or frequently visited sites. Just click one of those to visit the page. (See Figure 3-4.) You can also hover over any of the icons and click the x in the top-right corner of the box that appears around it to remove it from the list.

FIGURE 3-4: Chrome shows recent sites in a new blank tab.
Customizing and Controlling Chrome
You can access many of Chrome’s functions and advanced settings in the Settings menu. The Settings menu contains quite a bit of general-purpose functionality. Within the Settings menu, you can
- Launch a new tab
- Open a new window
- Open a new incognito window (more on this in the section “Going incognito,” later in the chapter)
- View your browser history to find a page you visited in the past
- View files you have downloaded in the past
- Access and manage bookmarks
- Zoom in to make web pages appear larger or smaller
- Print the current page you are viewing
- Cast the page to another device, such as a television
- Find text on a page
- Copy and paste text
- View and change Chrome and Chromebook settings
- Get help
The Settings menu also has features and settings for advanced users and developers alike. With these options, you can
- View or save the HTML source of a web page
- Clear browsing data
- Manage Chrome browser extensions
- Inspect web page elements
- Debug JavaScript
If you’re not sure how to go about doing something in the Chrome browser, the Help page is a good place to start looking.
You can access the Help page by clicking the Settings button on the right side of the Omnibox, clicking Help, and then clicking Get Help. The Settings button looks like a vertical stack of three lines, as shown in Figure 3-5.

FIGURE 3-5: The Help page.
Managing bookmarks
The Bookmark Manager is a tool in the Chrome browser used to manage your bookmarks. To access the Bookmark Manager, click the Settings button to the right of the Omnibox and then hover your cursor over the Bookmarks option in the menu that appears. In the resulting submenu, select Bookmark Manager, as shown in Figure 3-6.
In the Bookmark Manager, you can perform the following actions:
- Add or edit bookmarks
- Delete bookmarks
- Organize bookmarks into folders
- Add or remove bookmarks to the bookmarks bar
- Search for saved bookmarks
The Bookmark Manager window is divided into two main sections: folders for organizing bookmarks on the left and the bookmarks themselves on the right.
You can add new folders to the section on the left by following these steps:
In the Bookmark Manager, click the Organize button to the right of the Search field, as shown in Figure 3-6.
A menu of options appears.
Click Add new folder.
A new folder is added to your folder list.
Type in the desired name for your folder and click Save.
Your new folder is saved in the Bookmark Manager.

FIGURE 3-6: The Chrome browser Bookmark Manager.
On the right side of your Bookmark Manager window is the bookmark folder contents pane. In this pane, you see bookmarks and subfolders. You can organize your bookmarks in this pane by dragging the bookmarks to any position you want. If you want to add a bookmark to one of the folders in the leftmost pane, just click and drag the bookmark to the desired folder.
To delete a bookmark, simply select it and hit the Delete key.
Managing your history and downloads
As you surf the Internet, you create a breadcrumb trail of activity, otherwise known as your Internet history. The Chrome browser stores your history so that you can go back to a page that you may not have bookmarked. Because the sites you visit are stored in your history, in the event your Chrome browser window unexpectedly closes while you’re surfing the web, Chrome remembers all the websites that were loaded into tabs and windows prior to closing.
In addition to tracking the websites you visit, Chrome manages the files downloaded with your Chrome browser. The Download Manager keeps track of files downloaded and logs where they reside on your Chromebook. The Download Manager also gives you options for re-downloading lost files and for pausing large downloads for resuming at a later time.
There are advantages to keeping track of your Internet and download history. For one thing, it can improve your web-surfing experience: Sometimes when you visit a website, Chrome saves information about that website on your computer so that it will load faster the next time you visit it. Also, many parents use Internet history to keep track of their children’s web-surfing habits in order to keep their kids safe.
To view your Internet history, click the Settings button. In the Settings menu that appears, select the History option to open the History page, shown in Figure 3-7.

FIGURE 3-7: The Chrome browser History page.
The Chrome History page is broken up into three distinct sections:
- The Search History box: The top of the page contains the search box for quickly searching through your browsing history.
Device-specific history: The section below the search box contains the recent web history grouped by the browsing device.
As noted earlier in the book, when you log in to your Chromebook, Chrome imports all your browsing data, bookmarks, and plug-ins to your device. If you use the Chrome browser on your smartphone or another computer, Google tracks your web history and makes it accessible wherever you log in to a Chrome browser.- Complete browsing history: Below the device-specific section of the History page is your complete browsing history from each of your devices, combined into one list and organized by date and time.
On the right side of each history entry is a menu icon that looks like three little dots. Clicking this icon gives you the option to remove the site from your history.
Erasing your browsing history
Before you sell your computer (or loan it to someone else), you may want to remove any personal information first. Your browsing history certainly qualifies as personal information. To erase your entire browser history, just follow these steps:
In the History page, click the Clear Browsing Data link.
A window with several options appears, as shown in Figure 3-8.

FIGURE 3-8: The Clear Browsing Data window.
(Optional) Click All Time to select from the drop-down list a period of time in your history that you want to delete.
All Time is typically the default.
Select the Browsing History check box.
Deselect all remaining boxes, unless you want to remove those items as well.
 In addition to clearing your browsing history, you can clear out several other items by selecting their associated boxes. These items include
 - Download history: A list of files you have downloaded from Internet sites
- Cookies and other site data: Small files that keep track of your login status and other preferences on websites
- Cached images and files: Images and other files that remain in your Chromebook, helping web pages you’ve visited before load faster if any of the large image files are unchanged
If you click the Advanced button in the Clear Browsing Data window, several more items appear that you can also clear, including
- Passwords: If you instructed the Chrome browser to save any passwords you entered when logging in to various web sites, you can clear them here.
- Auto-fill form data: This is data such as your email address and home address, which Chrome can remember to make filling out forms easier and faster.
- Site data: This data includes HTML5-enabled storage types such as application caches and application data associated with some websites.
If you’re browsing the web quite a bit, these collections of information can get rather large and begin eating up your available storage space. For this reason, try to periodically clear out that information.
- Click Clear Browsing Data.
Going incognito
Sometimes you may want to browse without the worry of creating a trail of crumbs for someone to follow. You may be using a public computer or a computer that’s not yours. Or maybe you’re planning to surprise someone and you don’t want him to stumble across your surprise when he uses the Chrome browser on your computer. Whatever your reason for wanting to not leave a history trail, Chrome gives you the option to go incognito.
For Chrome, going incognito means opening an incognito browser window. This window is separate from any other open browser windows, and it functions differently. In an incognito browser, Chrome doesn’t keep a record of the sites you visit or any files you download, and any cookies sent to an incognito browser are deleted when the browser is closed. The browser goes incognito only up to a point, however. Although Chrome doesn’t keep records of your history in an incognito browser, your Internet service provider, employer, or anyone else monitoring web traffic still can. An incognito browser window is simply a good way to surf the web without needing to manually clear the history from your account.
Follow these steps to open an incognito window in the Google Chrome browser:
In Google Chrome, click the Settings button to the right of the Omnibox (search field).
The Launcher opens.
Click New Incognito Window.
Your incognito browser window opens.
You can also type Ctrl+Shift+N to open a new incognito window.
You know you’re incognito if you see the silhouette of a person wearing a hat and sunglasses in the top-left corner of your Chrome browser window, as shown in Figure 3-9.

FIGURE 3-9: The Incognito window.
Changing Search Engine Providers
By default, Google is the search engine used when you type any search term in the Omnibox (search field) in your Chrome browser. For a variety of reasons, you might prefer to use another search engine, such as Yahoo!, Bing, About.com, and hundreds of others. There are choices associated with many different retail stores, for instance, and setting your browser search engine to one of these if you are a frequent shopper might be handy.
To manage and change your Chrome browser search engine, follow these steps:
- Click the Settings button to the right of the Chrome browser Omnibox (search field).
- Click Settings.
- Scroll down until you see the Search Engine section.
Click Manage Search Engines.
The Manage Search Engines window appears, as shown in Figure 3-10.The Default search engines are those that are most often used. The Other search engines are additional search engines that you can also use.
- To select any of these search engines as your new default, click the More Actions button (three little dots to the right of the search engine name), and select Make Default.

FIGURE 3-10: Selecting a new default search engine.
In your browser, the search engine used when you type searches into the Omnibox is identified by a small icon at the left of the Omnibox.
If the site you want to use as your default search engine does not appear in the list, you can bookmark the site and use the site directly for searching.
Using Other Browsers
Other browsers exist besides Chrome, and they’re available for your Chromebook.
Some people just prefer other browsers. For me, it’s Firefox. I won’t judge you, and I doubt anyone else will, either. Firefox has a great reputation, and so does DuckDuckGo.
To install the Firefox browser, follow these easy steps:
- Open the Google Play app.
In the search window, type Firefox.
You see a result that resembles Figure 3-11. Remember, Firefox is from Mozilla, and you should see that company name showing as the source for Firefox.

FIGURE 3-11: Installing the Firefox browser.
- Click Install.
When the installation is complete, click Open.
The Firefox browser starts.
If you think you will want to use Firefox often, go to the shelf and Alt-click and then click Pin to pin Firefox to the shelf.
This way, it’s always there when you want to use it.
Installing the DuckDuckGo privacy web browser is just as simple as installing Firefox. Search for DuckDuckGo in the Google Play app, click Install, and then click Open. Pin it to the shelf if you like.
The DuckDuckGo web browser is popular with people who don’t like to be tracked. Unlike Google Chrome, which sends a lot of information about your web surfing history to Google, DuckDuckGo performs no tracking at all. However, the use of any browser (even in incognito mode) does not stop websites you visit from tracking your visits.