Chapter 12
Mustering Your Music
IN THIS CHAPTER
 Navigating Google Play Music
 Creating and managing your music library
 Accessing the complete Google Play catalog
 Making playlists
 Creating a radio station
Before the Internet, the primary delivery mechanism for broadcast music was radio and television. Broadcast media effectively dictated what was popular simply because you had no other way to get exposed to new music unless you scoured the record (or CD) bins at the local music store. Or maybe you had friends with cool older siblings who gave out mixtapes to broaden your musical horizons. The Internet turned the entire media industry on its head by providing access to anything (everything!), anywhere, anytime.
These days, purchasing physical music media is primarily done by collectors and super-fans. Broadcast radio is shrinking and consolidating, and satellite radio is still hanging on. The expansion of the Internet, broadband access, and wireless technology have revolutionized the way the world consumes music. It’s a buyer’s market in the music industry.
In this chapter, you explore the ins and outs of Google’s digital music platform, Google Play Music. Upload your digital music library to Google Play and have it sync to your Chromebook and other wireless devices. Search the Google Play catalog of more than 20 million songs and stream them to your Chromebook. Learn how to create playlists that you can share with other Google Play users, or simply search for radio stations that play an endless stream of tunes to get you through the day. It’s never a dull moment with Google Play.
If you are a Pandora, Spotify, Apple Music, or Amazon Music user, you can fully enjoy those services on your Chromebook. Even the high-end TIDAL Music service is available. This chapter explores them as well.
Getting Started with Google Play
Google Play is Google’s online marketplace, very similar to Apple’s iTunes Store. Google Play sells videos, televisions shows, books, music, and applications for Android, Chromebook, the Chrome browser, and more.
 As is the case with all the applications on the Google platform, access to apps is linked to your Google Account. If you have multiple Google Accounts, make sure that you’re logged in to your Chromebook with the account that you want to be associated with Google Play. Launch Google Play by opening the Launcher and clicking the Google Play Music icon.
If you’re logging into Google Play for the first time, a Welcome screen appears. You need to decide what level of service you want. Google Play Music offers two levels of service. The free version is free indefinitely, but it has limited functionality.
With the free version, you can
- Upload your music collection (up to 20,000 songs) and stream it to any Chromebook, Android, iOS, laptop, or other web-enabled, Internet-connected device.
- Purchase new music through Google Play, and download it or stream it to your Chromebook, Android, iOS or other device.
With the paid version, you get everything the free version offers, but you also can
- Listen to custom radio stations with personalized recommendations.
- Access the Google Play catalog of 20 million songs, completely advertisement-free.
Creating a Standard Account
To begin using the standard (free) version of Google Play, follow these steps:
Open the Launcher menu and click the Google Play Music icon.
The Google Play Music app opens in a Chrome browser, and asks whether you want to select the Individual or the Family paid service.
To proceed with standard access, scroll down and click the No Thanks link.
Also, deselect the Email Me … link if you don’t want to get news and offers about Google Play in your email.
The main Google Play Music window opens. If this is the first time you’ve started Google Play Music, it will ask for permission to access photos, media, and files on your device.
Click Allow.
You’re taken to your Google Play Music account, as shown in Figure 12-1.
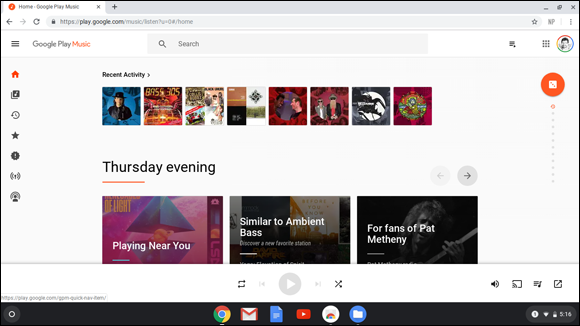
FIGURE 12-1: Google Play Music.
The Google Play Music site has a lot of controls:
- Menu: Opens a menu with more actions that you can perform, shown in Figure 12-2, and explained shortly.
- Home: Click to take you back to your Google Play Music main page.
- Music Library: Click to view your music library. When you first start using Google Play Music, your library is empty.
- Recents: Click to show recent items you have listened to, including albums, artists, stations, podcasts, and so on.
- Top Charts: Click to show currently popular music.
- New Releases: Click to show new music.
- Browse Stations: Click to show available radio stations.
- Podcasts: Click to show any available podcasts.
- Play Controls: These are
- Repeat mode: Repeat songs or albums.
- Back: Plays previous track.
- Play: Plays music.
- Forward: Plays next track.
- Shuffle songs: Plays songs in random order.
- Volume: Adjusts music volume.
- Cast: Causes your music to be played through a TV or external speaker.
- Queue: Lets you view the list of songs to be played after the current selection.
- Mini Player: Reduces the size of the Google Play Music window.
- Streaming Selections: Shows you available selections for streaming music.
- View More Selections: Just like it says.
- Music Selections: Shows more stations and other music you can play.
- I’m Feeling Lucky: Lets Google select what to play next.
- Playlist Drawer: Shows your playlists.
- Search: Lets you search for music by artist, song, album, or station.
- Recent Selections: Shows albums or stations you played recently.
Okay, as promised, here are the choices available in the Google Play Music menu shown in Figure 12-2:
- Music Library: Shows your purchased music. (Your library is empty until you start purchasing songs and albums.)
- Recents: Shows recently played songs and albums.
- Top Charts: Shows the most popular music.
- New Releases: Shows newly released music songs and albums.
Browse Stations: Shows “radio” stations that are available.
 Radio stations in streaming music services are similar to “over the air” radio stations in that they often have a theme. Over-the-air radio stations are transmitted using AM or FM radio signals and are available in a small geographic area. Streaming radio stations are available over the entire world.
- Podcasts: Shows any available podcasts.
- Upgrade to Family Plan: Depending on what plan you are on, this shows the individual plan or family plan, or it may not appear at all.
- Upload Music: Transfer music you already own into your library.
- Settings: Change how Google Play Music works.
- Trash: Shows music you have discarded.
- Help & Feedback: Get help on using Google Play Music.
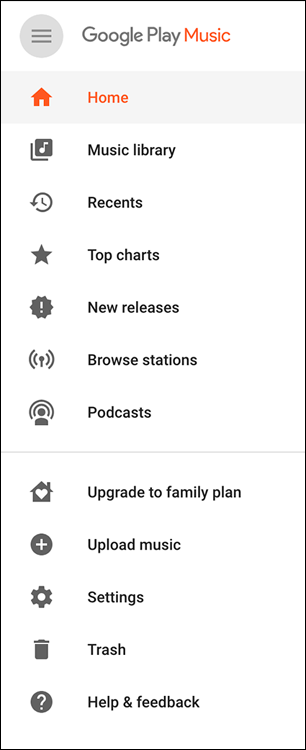
FIGURE 12-2: The Google Play Music menu.
Upgrading to a Premium Account
If you want to upgrade from the free version of Google Play Music to the paid service, follow these steps:
In the Google Play Music main window, click the Menu button (refer to Figure 12-1).
The menu appears.
Click Subscribe Now.
Your subscription choices appear. You might be as lucky as I was, and Google will have an offer like what you can see in Figure 12-3. Select Individual or Family and click your choice.
If you already have one or more credit cards registered with Google, it asks you to select which one to use. If you don’t, you’re asked to enter a credit card number. (Google will probably ask for your credit card even if you have a free trial, because it hopes that you will think their music service so fine that you’ll agree to the paid subscription.)
A page loads, asking you to select the genres you like, as shown in Figure 12-4.
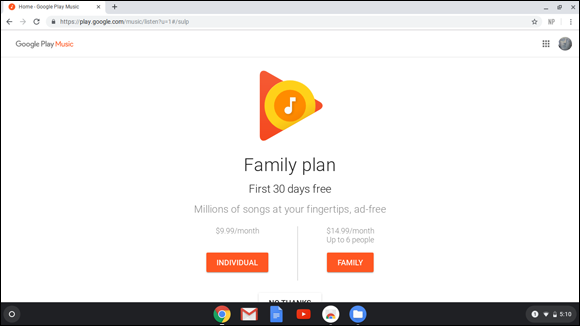
FIGURE 12-3: Selecting your Google Play Music subscription.
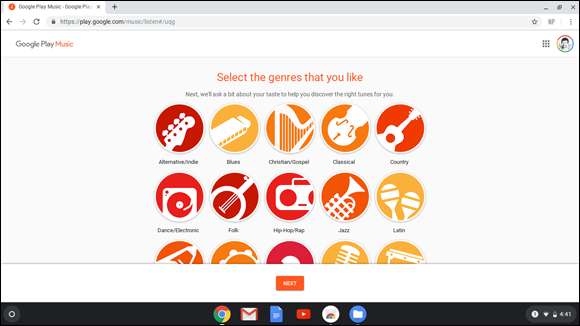
FIGURE 12-4: Selecting your favorite genres.
Select the genres you like.
As you click each one, the icon shows a checkmark. If you select one by mistake, just click it again to deselect it. Be sure to scroll down because more choices may exist than are visible on the screen.
When you have made your genre choices, click Next.
A new page loads, asking you to select the artists you like. As with the genre selection above, click each one you like. If you scroll down far enough, you might see a Show More Artists icon. Click that to show more, and keep selecting. If you selected several genres in Step 3, you might see quite a list of artists to choose from!
If you find that you’re viewing artists you don’t care for, you can also click Back to change your genre selections.
When you have completed your artist choices, click Done.
Google Play loads your account, signaling the completion of the account creation process.
Accessing Music in Google Play
With Google Play Music, the world is your oyster. After you’ve selected your favorite genre(s) and artists, Google Play Music displays popular radio stations that play the music you like, as well as other music selections such as Local Favorites, Recommended New Releases, and Top Albums.
Google Play Library
The Google Play library is where all of your favorite radio stations reside, as well as your music uploads and music purchases. In the standard (free) account, your Google Play view defaults to your music library. If you aren’t in your library, you can get there by locating and clicking the Music Library link on the left side of the page, or by clicking the Menu icon and then clicking Home. Your library loads, revealing all your music that’s available to stream.
If you opted for the standard account and haven’t uploaded or purchased any music, your library is initially empty. Even so, you have three options for playing music (or four, if you have a premium account):
- Radio Stations: Stream music from Google Play’s universe of radio stations organized by genre and artist.
- Add Your Music: Upload your own music.
- Shop: Search the Google Play store for songs that you want to purchase and add to your Google Play library.
- Listen: If you are a paid subscriber to Google Play Music, simply search for any music you want to listen to. You can make selections by genre, artist, album, and song.
Google Play Radio
On Google Play Music, a “radio station” is simply a music stream in a particular genre. It’s not the same as AM or FM stations, but is more like the stations on Sirius or XX, but without DJs. Google Play Music “radio” stations play only music, all day and all night.
Google Play Radio has dozens (maybe hundreds) of radio stations. From the main page, click any of the little dots beneath the big orange I’m Feeling Lucky icon on the right side of the screen (refer to Figure 12-1). Each one takes you to a different selection of stations to listen to.
Click one of those dots to try it. Doing so takes you to a station page, or a page with a selection of stations. Hover over them to see the white-and-gray Play button, and click one to start listening.
When a station starts playing, the name of the song that is playing appears at the bottom-right corner of the window. Album art might appear as well. In the middle of the window at the bottom, the Play button is now a Pause button. To the right of that is the Skip button. If you have a free account, you can skip up to six times an hour; if you have a paid subscription, you can skip all you like (but if you are skipping that much, maybe you want to choose another station). To the right of Skip is the volume control. The next icon is the Cast button, which you use to cause your music to play through a Bluetooth speaker, a TV or monitor with a Google Chromecast device, or some other device that you can cast to.
Mini Player
After you have your music streaming the way you like, you can switch to the mini player if you have other things to do on your Chromebook and want to keep an eye on your music player. See Figure 12-5, which shows the mini player in front of a browser window.

FIGURE 12-5: The Google Play Music mini player.
The Mini Player has a limited set of controls, from left to right across the bottom of the mini player window:
- Thumbs Up: Click this if you like the song that is playing.
- Skip Back: Play the previous song. This control is relevant only if you are listening to an album. On a radio station, this control is grayed out.
- Pause: Stop the music momentarily. When you have paused it, the icon changes to Play. Click Play to continue playing.
- I’m Feeling Lucky Radio: This control is just above the Pause/Play button and switches you to I’m Feeling Lucky radio, where Google chooses the music to play.
- Skip: In an album, clicking this control makes the next song play. On a radio station, it skips to the next song to be played (in the free version of Google Play Music, you can skip up to six times per hour).
- Thumbs Down: Click if you don’t like a given song. This control also skips to the next song.
Searching for an artist’s station
Even with the free version of Google Play Music, you have an almost infinite number of stations available to play. If you search for a favorite artist in the search bar, many different stations appear, including one named for the artist. Not every song will be by that artist, but the songs will all be of the same genre — and many of the songs played will be by the artist so named.
Purchasing music you hear on a radio station
While listening to music on a Google Play Music station, you might hear a song that you just have to own. Google Play Music makes doing so easy, but to see how to do it, take another look at the radio controls, shown in Figure 12-6.
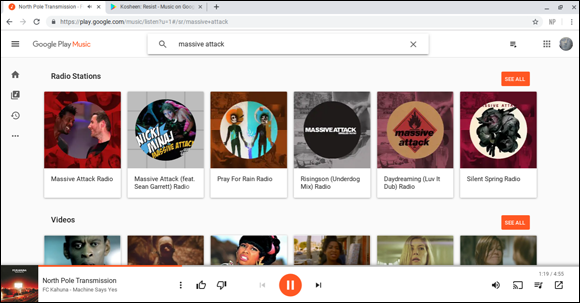
FIGURE 12-6: The Google Play Music radio controls.
To the left of the Pause, Thumbs Up and Thumbs Down buttons is an Options menu button (three vertical dots). Click the Options button to gain access to the following actions:
- Start Radio: Starts a radio station associated with the artist now playing. You can always find your way back to the previous station by clicking the Home button, clicking Recents, and selecting the station you were playing before.
- Share: Lets you tell your friends about the song you are listening to.
- Buy: Opens a new browser tab, where you can purchase this album and add it to your library.
To purchase music that you are listening to on Google Play Music, follow these steps:
To purchase music playing on the radio, click the small menu button to the left of the Play/Pause button and click Buy; to purchase music you see in a search for music, click Buy.
A screen appears that looks similar to what is shown in Figure 12-7. In many cases, you will have the option to purchase an individual song or an entire album. The example in Figure 12-7 includes both options.
- Click the button showing the price, whether for a song or an album.
- A new window appears that shows your selection and the payment method. Review these items carefully and then click Buy to purchase the selected music.
If Google asks you to verify your account, input your password.
Google asks for this verification to prevent others who may see your unlocked Chromebook from purchasing on your behalf.
When Google offers you the chance to listen to your purchased music right away, click Listen to play it or click Close to close the window.
The music you purchased is now in your library.
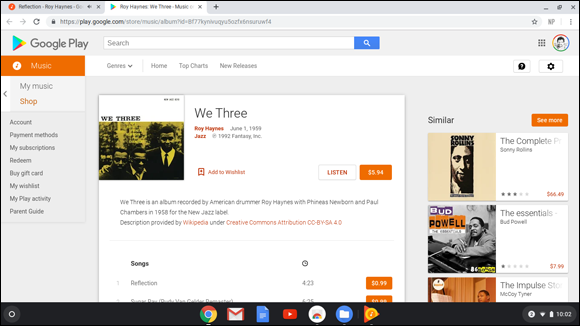
FIGURE 12-7: Purchasing music on Google Play Music.
Uploading music
If you have music from another source in digital form, you can add it to your Google Play Music library. You might have your music files on an SD card, a thumb drive, an external hard drive, or online in Google Drive or even iCloud or OneDrive. Whatever your music’s source, follow these steps to upload it to your Google Play Music library:
Click the Upload Music button from the Google Play menu (refer to Figure 12-2).
The Add Music window appears.
You now have two methods available for adding your music files. You can click Select from Your Computer, or you can drag and drop from the Files app. I describe the Select from Your Computer option here.
- Click Select from Your Computer.
- Navigate to the folders on your Chromebook that contain the music you want to upload.
- Select the file(s) or folder(s) that you want to upload.
Click Open.
You might see a window that says, “To add your music, install Google Play Music for Chrome.” If so, click Continue to add the Google Play Music extension to the Chrome browser. You need to install this only once on your Chromebook.
When you’re done, the added music appears in your library.
Google Play queues the files and uploads them in the background.
You can monitor the progress of your file upload by clicking the Processing Music button (which displays the flashing upload indicator icon) in the bottom-left of the Google Play window.
If you have a large music collection on your Chromebook, you can upload the entire collection by following these steps:
- Click the Google Play Music menu button (refer to Figure 12-2) and then click Settings.
- Scroll down in the Settings window until you see the Music from This Computer section.
Click the Add Your Music button.
In the window that opens, you can opt to add all current music as well as any new music that you add later.
Creating Playlists
Playlists are the modern version of mixtapes. Back in the day, I made mixtapes on reel-to-reel and cassette tapes. Today, creating playlists in Google Play Music is easier than recording mixtapes. A playlist is a collection of songs that you want to play in a specific or randomized order. You can have a playlist for working out, another one for relaxing, another for working on your motorcycle, and another for romance. Google Play gives you the ability to build playlists composed of songs that you’ve uploaded to your library or, if you have a paid account, with songs available from the entire Google Play catalog. Google allows you to have up to 1,000 songs in a playlist!
All your playlists appear in the Playlists part of your library. Even when you run Google Play Music for the first time, you may have some auto playlists that are already present in your library.
To create a playlist, follow these steps:
- Navigate to Artists, Albums, or Songs in your music library. Continue until you are viewing songs you want to add to a playlist.
- When viewing a song, hover to the right of the song title until the More Options menu appears.
Click the menu and then click Add to Playlist.
If you don’t have any playlists, select New Playlist. If you do have one or more playlists, they appear. Figure 12-8 shows the New Playlist window.
- Enter the name of your playlist in the Name text box and give it a nice description in the Description text box.
- For now, keep the playlist private by keeping the Make Public selector off.
Click Create Playlist.
Your new playlist appears in the Playlist area of your library.
To add more songs, simply repeat the preceding procedure by selecting songs and adding them to existing or new playlists.
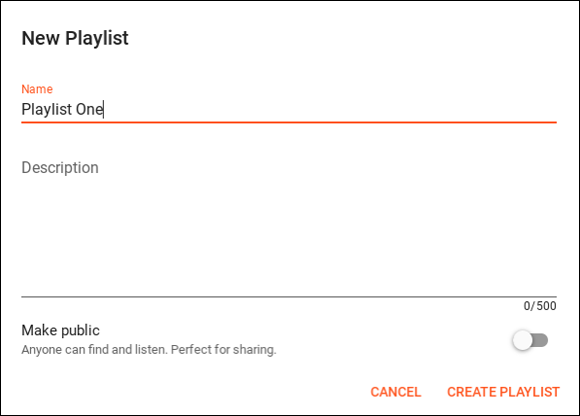
FIGURE 12-8: Creating a new playlist in Google Play Music.
Sharing playlists
Chances are good that you’ll create an epic playlist that will be remembered for all the ages. It would be nearly criminal to keep such a playlist to yourself. You need to share it! To share a playlist, follow these steps:
- Click Music Library in the Play Music window.
Click Playlists.
Your playlists appear.
Click the playlist you want to share from your list of playlists.
Your playlist is displayed.
Click Share.
The Share Playlist window appears, revealing sharing details and options, as shown in Figure 12-9.
- At the bottom of the window, click the Make Public selector.
Click Done.
Your playlist is now searchable in Google Play and available to all users.

FIGURE 12-9: The Playlist share window.
If you want to share your playlist with friends through email or on social media, you can generate a link to your playlist and send it out to every deserving soul in your network. Locate your playlist link by following these steps:
Open the Options menu for the playlist.
The Playlist Options menu appears.
- Click the Share button.
Choose Copy Link.
The URL is copied onto the Clipboard. You may then send the link to others through email or social media.
You also see two links for Facebook and Twitter. Clicking one or the other opens a new window in which you can create a social media posting that includes the link for your playlist.
Playing music on external devices
In addition to playing music on your Chromebook, you can connect headphones or external speakers by plugging them in to the headphone jack, if it exists. But you have more options as well: You can play music on Bluetooth speakers or “cast” your music to an external device such as a Chromecast connected to a TV, or to a monitor that has speakers.
To play music to a Bluetooth device, you must first “pair” the device to your Chromebook. Follow this procedure:
- Turn on the Bluetooth device and put it into pairing mode using the procedures for the device.
- On your Chromebook, click the Status area, which is in the lower-right corner of the Chromebook display where the time of day and battery status icons appear.
- If the Bluetooth icon is gray, click it to turn on Bluetooth.
- Click the menu beneath the Bluetooth icon to open the Bluetooth settings.
Wait for the device name to appear and then click it.
The device should successfully pair with your Chromebook. Now, if you play music with Google Play Music, the audio should play from the Bluetooth speaker.
To cast music to an external device such as a Google Chromecast or a TV with built-in cast capability, follow these instructions (assuming that your Chromecast or other device is already set up):
- Start the Google Play Music app and select music to play.
Find and click the Cast button, which is near the lower-right corner of the Google Play Music window.
The Cast play.google.com window opens. (See Figure 12-10.)
In the window, look for the name of the device you want to cast to and click that name.
Music should now be playing through the device.
- When you want to stop playing music through the device, click the device again in the Cast play.google.com window (click the Cast button to get the window to appear if you don’t see it). Then click the device to disconnect it.
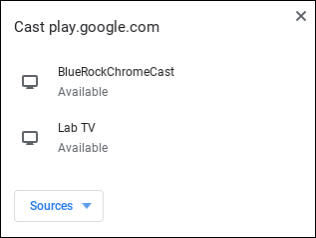
FIGURE 12-10: Casting music to an external device.
Enjoying Streaming Music with Pandora
If you are a fan of the Pandora music streaming service, you’re in luck: It works just great on Chromebooks. Pandora is a bit different from Google Play Music. With Pandora, you merely select and listen to streaming music channels. You don’t have a music library, and you don’t purchase songs or albums. In truth, Pandora closely resembles the radio stations of Google Play Music.
Like Google Play Music, Pandora has free and paid subscription options. And, you guessed it: The free service includes occasional advertising, whereas the paid service is ad-free.
To listen to Pandora, follow these steps:
- Open a new tab in your Chrome browser.
- Navigate to
https://www.pandora.com/. Log in or sign up.
You’re now on Pandora. You see the initial screen, which looks like Figure 12-11.
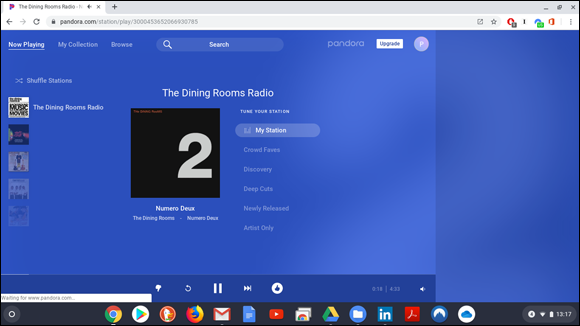
FIGURE 12-11: The Pandora music streaming service.
If you’re new to Pandora, you see an assortment of music genres. Browse around and choose genres and stations you like. You can create a new station by searching a genre or artist in the search window. Pandora shows you stations as well as albums. When you see one you like, click the Option button (three little dots) and then click Collect to add to your collection. You can’t add playlists to your collection, but you can listen to them.
You can share any station or playlist by clicking Share from the Option menu. Like Google Play Music, Pandora provides Facebook and Twitter Share buttons, as well as the ability to copy a link that you can post in social media, email to a friend, or even save as a browser bookmark.
When you tire of the advertising on your stations, click the Upgrade button near the upper-right corner of the Pandora window (Pandora generously makes this available no matter where you are in Pandora).
If you want more capabilities, such as casting Pandora to a Google Chromecast, you need to download the Pandora app. Just go to the Google Play Store, search for Pandora, and click Install. Then click Open to start. If you plan to use the Pandora app often, you can pin it to the Launcher.
The Pandora app, shown in Figure 12-12, is similar to the Pandora website, with a different arrangement. All the concepts are the same, however. You browse stations and playlists, add those you like, and listen to them.

FIGURE 12-12: The Pandora app for Chromebooks.
Streaming with Spotify
If Spotify is the music service that floats your boat, you’re in luck; it is fully supported on the Chromebook. Spotify is a bit like the streaming radio part of Google Play Music: You browse and search for genres and artists you like and build a collection of music to stream for every mood.
If you’re new to Spotify and want to try it, just click the Sign Up link and fill in the form. Doing so takes you to a Download Spotify page, as shown in Figure 12-13. Click the Chromebook link that should appear near the bottom of the window (you may need to scroll down).
Clicking this link doesn’t actually download anything, but it takes you to the browser version of Spotify where, as with Google Play Music and Pandora, you browse and search for the kinds of music you like.
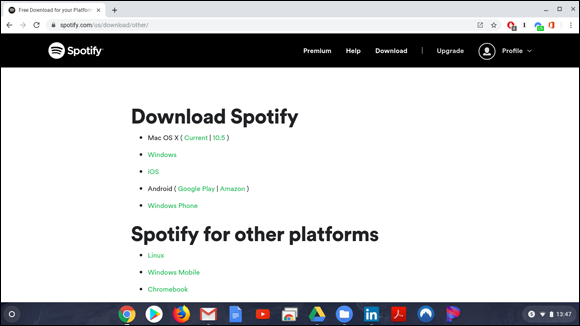
FIGURE 12-13: The Spotify download page.
You may notice, near the bottom-left corner of the Spotify window, a Download App link, shown in Figure 12-14. Clicking this indeed downloads the Spotify app, which you can pin to the Launcher if you plan to use it a lot. Again as with Pandora and Google Play Music, you can take your pick: Use the app or the web player to enjoy Spotify music and curate your own playlists. You can also opt to download and install Spotify from the Google Play Store.
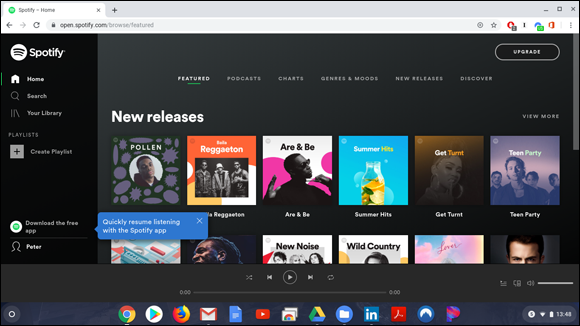
FIGURE 12-14: The Spotify streaming music service web player.
Amping Up Amazon Music
 If you’re an avid fan of the Amazon Music service, you’re in luck because it works great on a Chromebook. It’s so simple that I could practically skip this section altogether.
Amazon Music offers two levels of membership:
- Prime Music: Two million curated songs that are included with the popular Amazon Prime membership
- Amazon Music Unlimited: Fifty million songs available in student, individual, family, and single-device (Amazon Echo or Fire TV) plans
To use Amazon Music in either plan, follow these steps:
- Start your Chrome browser and go to
https://music.amazon.com/. - Sign in using your existing Amazon credentials, or create a new Amazon account.
- Select Prime Music or Amazon Music Unlimited if you aren’t already a subscriber.
- Select Albums, Artists, Songs, Genres, or music you have purchased from Amazon in the past. (See Figure 12-15.)
- Enjoy your music!
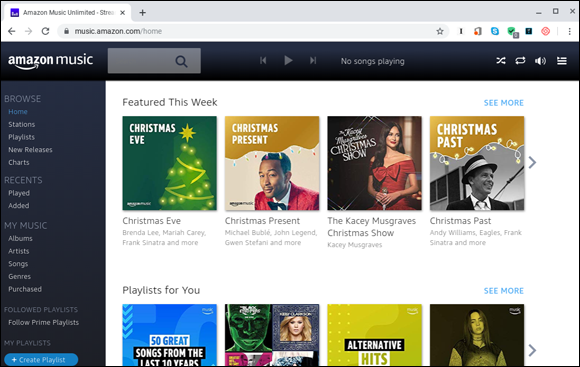
FIGURE 12-15: The Amazon Music stream service.
Rocking with Apple Music
 You might think that Apple Music would not be available on a Chromebook. Think again. Apple Music, the paid subscription service from Apple that launched in 2017, is available on virtually all devices: Windows PCs, Macs, Android phones and tablets, iPhones and iPads, and Chromebooks. It’s fully functional as well.
The Apple Music service works through an app that you download from Apple. To get started with Apple Music on your Chromebook, follow these easy steps:
- Launch the Google Play Store app.
Search for Apple Music and then click Install.
Apple Music is now installed on your Chromebook, as shown in Figure 12-16.
- Click Open.
- Follow the prompts to sign in with your Apple account.
Start playing music.
Your player fills the screen, as shown in Figure 12-17.
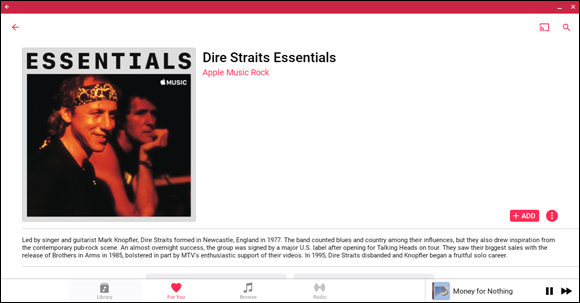
FIGURE 12-17: The Apple Music music player spinning classic rock hits.

FIGURE 12-16: Installing the Apple Music music player on a Chromebook.
 With the standard free account, Google Play allows you to upload up to 50,000 songs. If your collection is bigger than that, just upload the music you listen to most and leave the back catalog on a jump drive.