Chapter 19
Troubleshooting and Disaster Preparation
IN THIS CHAPTER
 Troubleshooting network connections and browser issues
 Resolving power issues
 Facing disaster with the Chromebook Recovery Utility
 Looking for Chromebook help online
Technology is great until something breaks. I know, right? That saying probably goes back to the cavemen who discovered fire. The reality is, we live in an imperfect world, and nothing works perfectly all the time, even well-designed technology. For that reason, it’s always good to consider those areas in which life with your Chromebook could go sideways.
You can’t use your Chromebook to the fullest without Internet access. For that reason, this chapter shows you how to troubleshoot network connectivity issues. You also learn how to troubleshoot and possibly remedy issues with your battery. In case the sky starts falling and your Chromebook operating system becomes corrupt, you want to be sure that you have a restore disk so that you can reinstall Chrome OS and get back to work as fast as possible. If all else fails, Google has a vast database of helpful resources online to provide solutions for any Chromebook problem. This chapter tells you where to go and how to search through these resources to get answers fast!
Resolving Internet-Connectivity Problems
Chromebooks require a connection to the Internet to be able to serve their purpose in the portable-computing ecosystem. For that reason, every Chromebook comes equipped with high-speed Wi-Fi. Some Chromebooks even come with cellular connectivity, allowing them to get online wherever a cell signal is present. If you’re having trouble connecting to a wireless network, check these possible solutions before calling tech support:
- Ensure that the Chromebook’s Wi-Fi controller is turned on. Check the Wi-Fi indicator in the settings panel of the shelf. If the Wi-Fi indicator is gray and the words Not Connected appear beneath it, as shown in Figure 19-1, the wireless adapter has been shut off. Turn it on by following these steps:
- Open the settings panel on the shelf and click the Wi-Fi icon.
In the menu that appears, click the Wi-Fi icon.
Your wireless adapter turns on and the Wi-Fi logo turns from gray to blue, giving you the option to select from all available Wi-Fi networks.
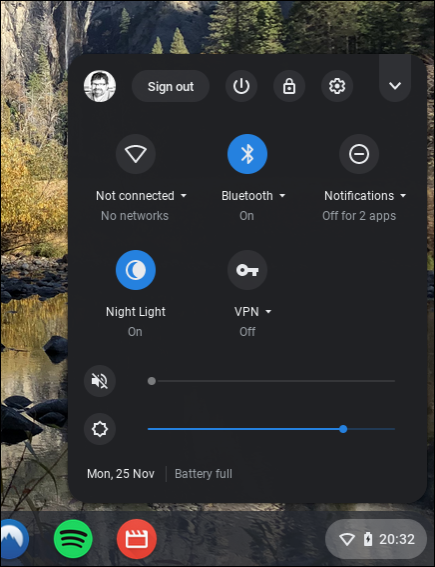
FIGURE 19-1: The wireless adapter is turned off.
- Make sure that your Chromebook is connected to a Wi-Fi network. Look at the Wi-Fi indicator that appears in the Settings area of your shelf. If you have bars and no X and you still can’t connect, verify that you’re connected to the correct network by following these steps:
Click anywhere in the settings panel on the shelf.
The settings menu appears, revealing several options. Just below the Wi-Fi logo is the name of the network to which your Chromebook is connected.
If the connected network isn’t the network you want to connect to, click the text just below the Wi-Fi icon.
The Wi-Fi Network menu appears.
- Scroll through the list, shown in Figure 19-2, to find the desired network, and then select it.
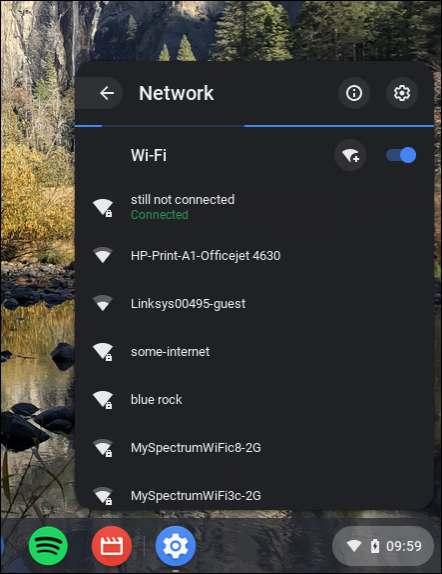
FIGURE 19-2: Selecting a Wi-Fi network for an Internet connection.
If your wireless controller is turned on and you’re connected to a network but you still can’t connect to the Internet, try restarting your Chromebook. This restart flushes your Chromebook memory, power cycles all of your Chromebook hardware, and restarts the Chrome OS operating system, giving everything a chance to start fresh. Restarting devices is the easiest and most common fix for glitches like connecting to a network or the Internet.
If you’ve restarted your Chromebook and you’re connected to the network, but you still can’t connect to the Internet, ask the owner of the network to restart the Internet gateway. The gateway may be a home Internet router, cable modem, or DSL modem. If you’re in an office or school, you may want to first check with other users to see whether they are having connectivity issues.
If your smartphone can provide a mobile Wi-Fi hotspot, you might turn that on and see whether your Chromebook can connect to that and access the Internet. A word of caution: Unless you are on an unlimited data plan, you want to do this only temporarily as a test to see whether your Chromebook can reach the Internet via a different Wi-Fi access point. If you can reach the Internet through your smartphone’s Wi-Fi hotspot, this could mean that the other Wi-Fi network you are trying to connect to is having problems.
Looking into Browser Issues
From to time, browsers seem to take a holiday and not work quite right. Sometimes, though, it’s just the website that’s being ornery. But how can you know?
Some of the problems you’re likely to run into include:
- Websites won’t load, or they are “stuck”
- Websites seem to load partially but are missing images, or pages look incomplete
- Websites can’t be reached
When I’m troubleshooting issues like this, these are the actions I try:
- Close the tab and then try the website on a different tab. Believe it or not, this approach sometimes works.
- Close and restart the browser. I usually configure my browser to continue where I left off, meaning that all the tabs that were open when I last used my browser will be there when I restart it (or restart the Chromebook itself). Figure 19-3 shows the Continue Where You Left Off setting, which is under On Start Up on the Settings window.
- Try another browser. On every device that I use for Internet access, I have the browser that the system came with (Safari on iPhones, iPads, and Macs; Chrome on Android phones and Chromebooks), and I have at least one other browser. I usually have two spare browsers, as follows:
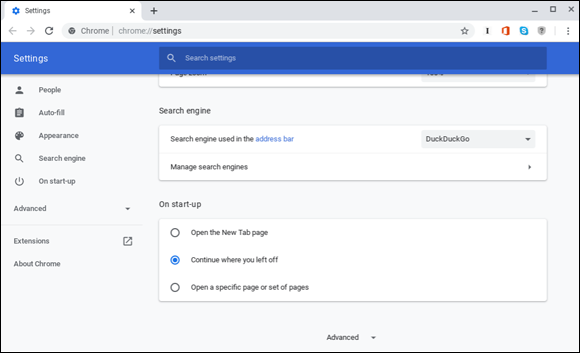
FIGURE 19-3: Configuring Chrome to restart where it left off.
- Firefox: This is a very secure and user-friendly browser that is popular and has been around for a long time. Get a copy at
www.mozilla.org/firefox. Brave: This browser is very much like Chrome itself, so much so that it will run most — if not all — Chrome browser extensions. In every way that matters, Brave is like Chrome except that it does not send tracking information to Google.
If your website was reachable and behaved as expected with an alternative browser, either the website itself has a problem, or the Chrome browser may need to be restarted. If you followed these steps in sequence, you have probably already restarted it.
Brave and Firefox are available in the Google Web Store. Click the launcher, click Google Web Store, search for Firefox or Brave, and install it.
- Firefox: This is a very secure and user-friendly browser that is popular and has been around for a long time. Get a copy at
- Disconnect Wi-Fi and then reconnect to it. I cover this suggestion earlier in this chapter. It just might help!
- Sign out of your Chromebook. Signing out and then signing back in might fix things. Figure 19-4 shows the Sign Out icon in the upper-left corner.
- Try browsing as Guest. To see whether you have an issue with your user account on the Chromebook, try signing out and then signing back in as Guest. Remember, though, that as a Guest, you can’t save any files or access or save a bookmark.
- Restart your Chromebook. Sometimes, restarting (also called rebooting) your Chromebook is the only action that helps. Click Shut Down (refer to Figure 19-4) and then, after your Chromebook has powered off, press the Power button to restart it.
If none of these efforts fix your problem, skip to the, “Finding Help Online” and “Using the Chromebook Recovery Utility” sections, later in this chapter.
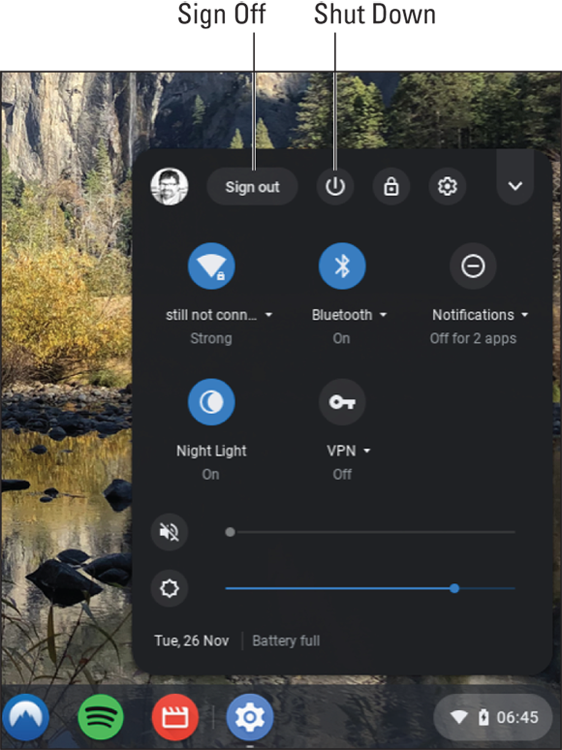
FIGURE 19-4: The Sign Off and Shut Down icons.
Resolving Power Problems
Sometimes batteries go bad. Sometimes they even go out in a literal blaze of glory. Don’t worry: The odds of such happenings with your Chromebook battery are lower than your chances of winning the lottery. However, Chromebooks — same as other brands of laptops — can have power problems like the following:
Your battery’s charge doesn’t last nearly as long as it should, or its capability to stay charged decreases with each use. Refer to your device manual or look online to identify estimated battery life based on your level of device usage. Then verify your Chromebook’s battery consumption by following these steps:
- Plug your Chromebook into the power charger until you reach a 100-percent charge.
- Verify the charge level of your battery by opening the Settings panel on your shelf and examining the battery indicator at the bottom.
- Verify that the battery indicator says Battery Full before disconnecting your power charger.
Take note of the time and begin working with your Chromebook. Check the battery indicator again to monitor how quickly it reduces in charge. When the battery is low enough to justify plugging it in, take note of the time again to see how long the battery lasted. If it’s within normal usage limits as defined by the manufacturer of your Chromebook, you may want to adjust your usage. Maybe your screen is a bit on the bright side, for instance. Reducing the brightness level also reduces battery usage.
On the other hand, if your battery loses charge faster than your manufacturer’s specifications, follow these steps before returning to the manufacturer or point of purchase:
- Plug your Chromebook into a power source and charge the battery to 100-percent full.
- When the Chromebook has reached 100 percent, unplug it and use the device until power dwindles to 5 percent or less but not until it shuts off.
- Repeat this process at least ten times before testing to see whether the battery life has extended.
If your battery still won’t maintain a charge, return to the point of purchase or contact the manufacturer for service. If your Chromebook is no longer under warranty, you may be able to have a local computer repair shop replace the battery.
Another influence on battery life to consider is your browser. One of the tabs on your browser may be running code on your computer nonstop. Unfortunately, no easy way exists to confirm this suspicion. Closing specific browser tabs, or exiting the browser altogether, might help you to isolate the problem to excessive CPU usage. Another app running in the background can also be the culprit: Try exiting all the other apps running on your Chromebook to see whether doing so helps at all.
The battery won’t charge at all, so your Chromebook must stay connected to the power adapter, or your Chromebook won’t turn on when plugged in. Attempt to use another power adapter. If the symptoms persist with the other power adapter, your battery is likely toast. If the other power adapter rectifies the situation, you likely have a faulty power adapter.
If your Chromebook is one of the newer models with USB-C power (see Figure 19-5 for an example), you might be able to easily find another power adaptor to try. USB-C is becoming the new standard for laptop power plugs. If, on the other hand, your power cord is the “metal tip” variety like the one shown in Figure 19-6, you’ll probably need to obtain another battery from the manufacturer.
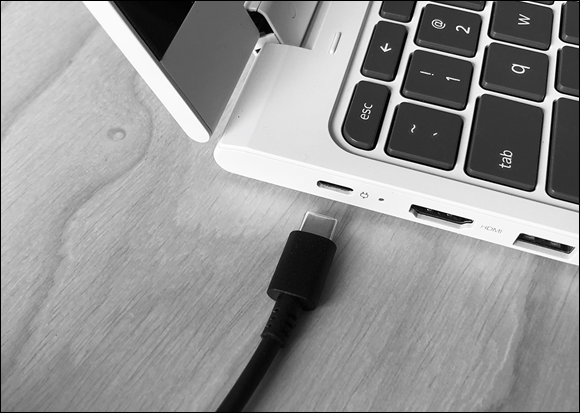
FIGURE 19-5: A USB-C style power adaptor.
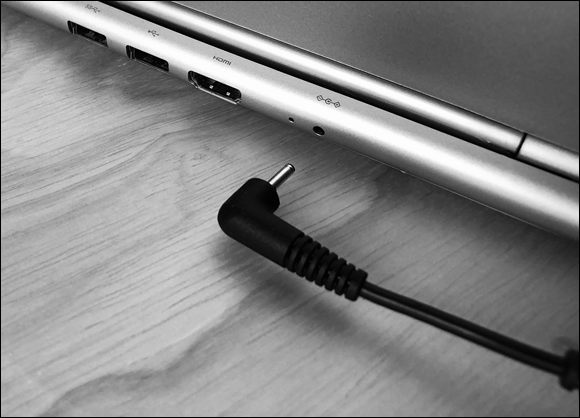
FIGURE 19-6: A “metal tip” style power adaptor.
Finding Help Online
If you ever find yourself in a situation that you can’t solve with this book or with your Chromebook’s help manuals, try the Chromebook Help Center online. You can visit the Help Center, shown in Figure 19-7, at https://support.google.com/chromebook. The Help Center provides answers to some of the most common Chromebook questions relating to setup, connecting a Chromebook to the Internet, printing, working with media, and more. If your question is a little more refined and technical, you also have the option to explore the Chromebook Help Forum, where you can ask questions and receive helpful answers — or find others who have had the same issues, with helpful answers waiting to be found.
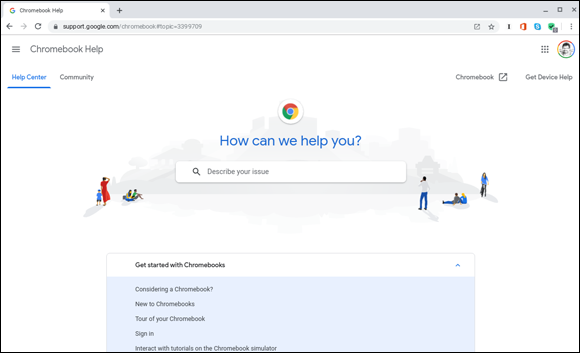
FIGURE 19-7: The online Chromebook Help Center.
After you arrive at the Help Forum, you can either search or browse topics. The easiest way to get started is to type your problem or issue in the Search bar and press Enter. For example, if you’re having issues with the battery in your Chromebook, search with the following query: Chromebook battery problem. Or you can get more specific: Chromebook battery will not hold a charge. Several results will appear for you to browse through.
Using the Chromebook Recovery Utility
Chrome OS is great, but it’s not an infallible operating system. Things can go awry with your Chromebook. If your Chromebook ever gives you a message saying that Chrome OS Is Missing or Damaged, you may have to reinstall the operating system. Reinstalling the operating system removes all locally-stored data from your Chromebook, but if you’re getting the missing-or-damaged error, chances are you’ve already lost your data anyway.
Google has provided a way for you to recover your Chromebook. The process is relatively simple; it involves downloading a recovery program and storing it on an external USB drive or SD card. If your Chromebook is already dead or dying, chances are you can’t use your Chromebook to do this. But the good news is that you can create a recovery program using another computer, even a Windows or a Mac.
Reinstalling the Chrome OS operating system requires a recovery drive (like a USB jump drive or an SD card) to get you back up and running. To create a recovery drive, follow these steps:
- Do one of the following:
- If you are on a Chromebook, open the Chrome Web Store and search for Chromebook Recovery Utility.
If you are on a PC or a Mac, open the Chrome browser and go to the Chrome Web Store at
https://chrome.google.com/webstore. Search for Chromebook Recovery Utility. You need to log in to your Google account as well.If the utility is not found, try this link:
https://chrome.google.com/webstore/detail/chromebook-recovery-utili/or perform a Google search for Chromebook Recovery Utility.
Add the extension to your browser.
Figure 19-8 shows this app. As the figure shows, I did this on my Mac to show how you can use another computer to jumpstart your Chromebook.
When the browser extension has been added, launch the utility, as shown in Figure 19-9.
The Chromebook Recovery Utility launches.
- Follow the prompts until you’re asked to enter the model number of your Chromebook.
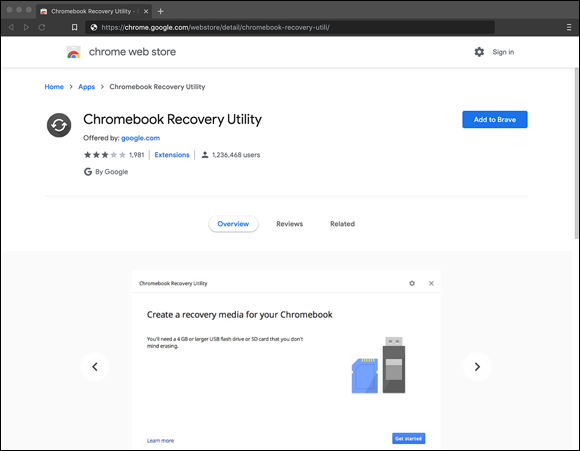
FIGURE 19-8: Installing the Chromebook Recovery Utility.
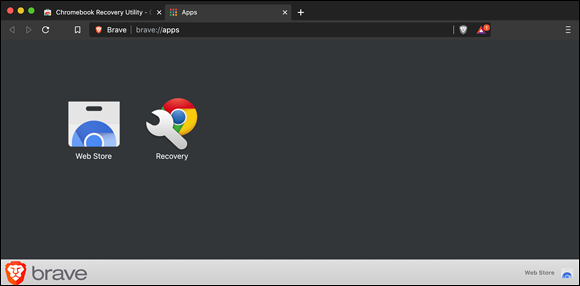
FIGURE 19-9: Launching the Chromebook Recovery Utility.
Click Continue.
The Utility asks you to insert a USB drive or SD card, as shown in Figure 19-10.
Select the media that you want to use as your recovery drive and click Continue.
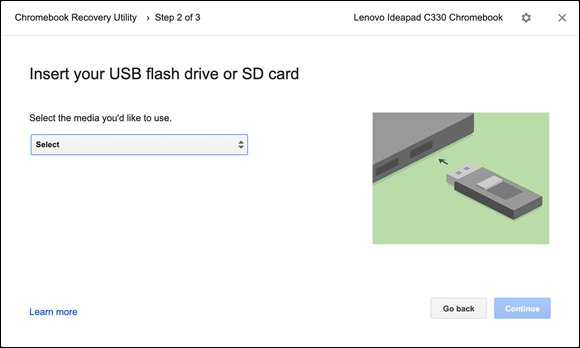
FIGURE 19-10: Insert your USB drive or SD card.
 Anything still on your USB drive or SD card will be deleted after you create the recovery image. Now is the time to ensure that you used the right media.
Click Create Now.
Your Chromebook begins downloading and installing the software needed to make your recovery drive.
 Right about now, you should be getting a cup of coffee and reviewing your stocks because this process takes the better part of ten minutes.
Chromebook notifies you when your recovery media has been successfully created.
- Remove your SD card or USB drive from your Chromebook and click Done.
To recover your Chromebook by reinstalling Chrome OS, follow these steps:
At the Chrome OS Is Missing or Damaged screen, insert the recovery media into your Chromebook’s USB or SD slot.
Your Chromebook automatically detects the recovery media.
Wait for the operating system to install the OS automatically.
The Chromebook begins its recovery.
After Chromebook finishes recovering your system, remove the recovery media.
Your Chromebook reboots automatically.
Your Chromebook is now be in the same state as it was when you first purchased it and powered it on. Your steps from here are the following:
- Connect to a nearby Wi-Fi network to get online.
- Sign in to your Google account.
- Install any additional apps you want to use.
All your Google experiences, such as Gmail, books, docs, sheets, photos, movies, and chats, will be right where you left them. Also, if you happen to be a Microsoft Office 365 user, your documents and spreadsheets will be waiting for you as well. All you will have lost is any data that was stored locally on your Chromebook.