Chapter 1: Dynamic Range and Digital Photography

© Pete Carr
Practical Effects of Limited Dynamic Range
On the surface, High Dynamic Range (HDR) photography is about overcoming technological limitations. Cameras, whether film-based or digital, don’t perform as well as eyes and brains when it comes to collecting and interpreting light. You don’t even have to think about it — your eyes adjust to the ever-changing amount of light around you, and you’re able to discern details in deep shadows and bright highlights automatically.
When you take a photograph, however, you have one fleeting chance to collect what details the camera can capture. You must learn to deal with its limitations as you try to balance shadows and light in a single exposure. Many photographers spend their lives working to achieve this balance.
HDR photography is a relatively new technique that overcomes the limitations of a single photo by using multiple exposures to produce an image that illustrates a high dynamic range scene (reality) with low dynamic range data. It is a powerful way to extend the camera’s responsiveness to light. You find out how to do that in this book, beginning with this chapter.
Digging deeper, HDR photography is an exciting avenue of artistic expression. Many choose to push the limits of photography with HDR, while others prefer to present their subjects very naturally. There is no absolute right or wrong approach — it’s up to you and your audience.
Dynamic Range
Within the context of photography, dynamic range refers to the range of brightness (from very little to a lot or from a lot to even more) in the scene to be photographed.
This property is also known as the contrast ratio of the scene. Dynamic range can be characterized by the terms of exposure value (EV) levels, zones, levels, or stops of range.
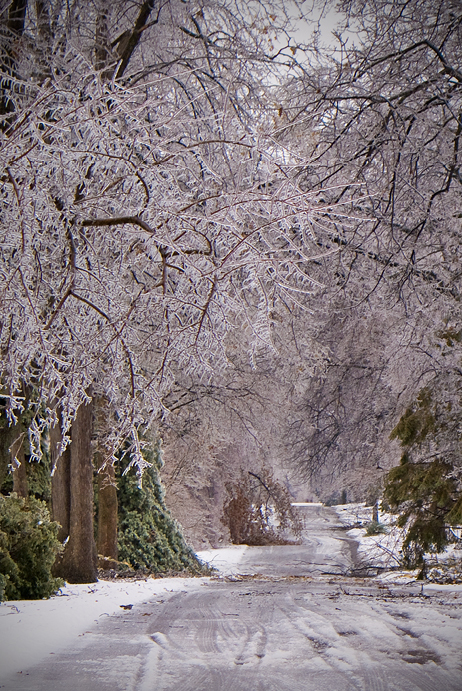
First, look at a scene with a reasonably low dynamic range, as shown in Figure 1-1. Here, you see a winter scene looking down a lane bordered on both sides by ice-covered trees, some of which have been damaged by a recent ice storm. The light-gray sky is barely visible. The street, trees, and sky are all fairly light, but there are no intense highlights. Dark tones are represented by a bit of foliage and tree branches. All in all, this scene was easily captured by the camera. In fact, contrast was enhanced during RAW file processing to balance the highs and lows.
1-1
About This Photo An example of a scene with a smaller dynamic range. (ISO 160, f/8.0, 1/100 second, Sony 18-70mm f/3.5-5.6 at 60mm) © Robert Correll
Some scenes, such as that shown in 1-2, clearly have a greater contrast ratio, or dynamic range, than others. Shooting during midday, into the sun during the Golden Hour, around bright lights, or with reflections pushes highlights to the extreme. Anchoring the low end of the spectrum are shadows and other less well-lit areas in the scene.

1-2
About This Photo Scenes such as this one push the dynamic range of your camera and require careful processing. (ISO 100, f/8.0, 1/250 second, Sigma 10-20mm f/4-5.6 at 14mm) © Robert Correll
The exposure challenge in a scene like that shown in 1-2 is to rein in the highlights in the sky and clouds while exposing the rest of the scene well enough so that it can be seen. Careful RAW file processing was essential to presenting this photo. The clouds and other highlights were protected and the foliage on the riverbanks was brightened. In other words, the dynamic range of the scene was captured reasonably well by the camera raw exposure, but these highs and lows had to be squeezed to fit into the file format required for viewing and printing.
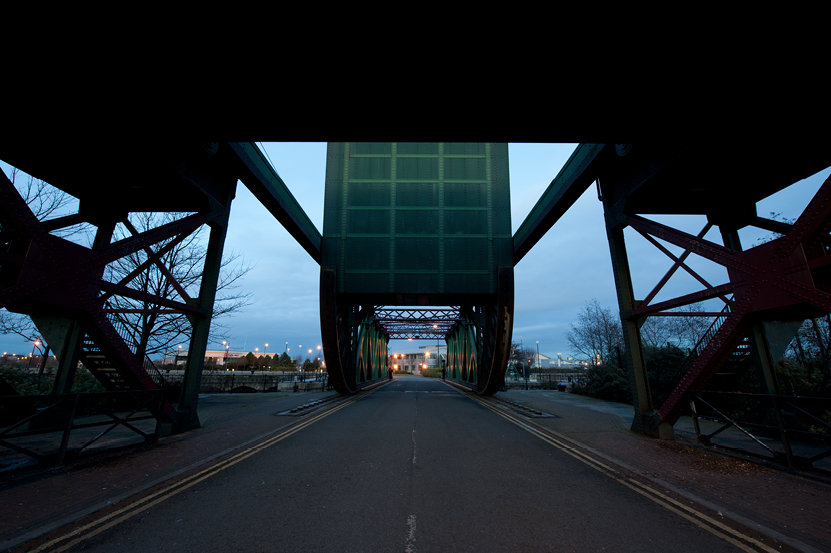
The challenge when shooting in shadow, such as inside a building, on a cloudy day, or during either predawn or dusk, is to capture details in low light, as shown in 1-3. The underside of the bridge is in shadow, which presents an exposure dilemma. You must capture darker details by increasing ISO, aperture, or slowing the shutter, all without causing the scene outside the bridge to be overexposed. Quite often, this is impossible in a single photograph without resorting to flash or extra lighting.
1-3
About This Photo Standing under a bridge, the outside is perfectly exposed, but the image lacks detail inside the bridge. (ISO 200, f/13, 3 seconds, Nikon 14-24mm f/2.8 at 14mm) © Pete Carr
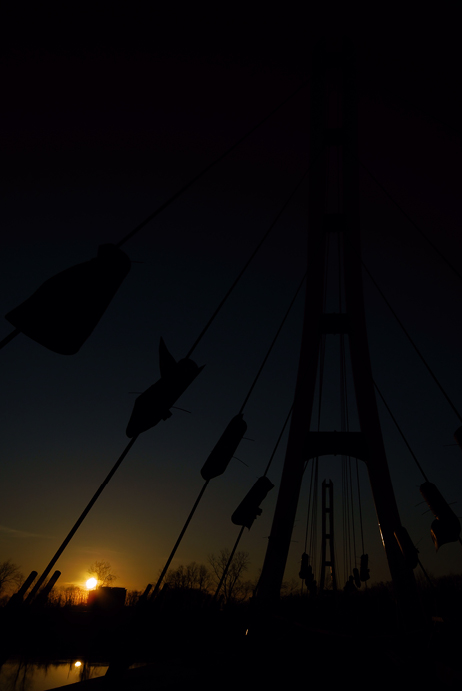
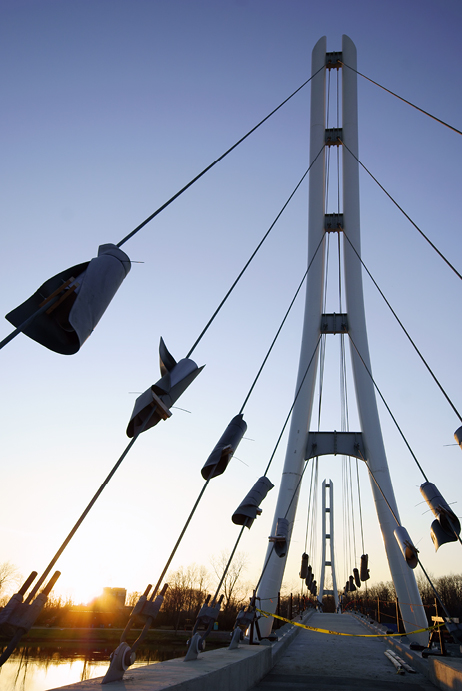
The dynamic range of a camera tells you how many stops of brightness it can capture in a single exposure. For example, can it capture the sun and shadows in one photo? In the case of 1-4 and 1-5, the answer is no. The photo in 1-4 was underexposed by four stops in order to capture the sun, and reduce or eliminate detail-hiding glare. This photo illustrates the peak of the upper end of this scene’s dynamic range. The next exposure, 1-5, captures the opposite end of the scene’s dynamic range. In this case, the bridge and other dark elements in the foreground and in the distance are visible, but the sun and sky are washed out by glare. This is closer to how the scene looked in person, although the meter indicated the photo was overexposed by 4 stops (+4 EV).
1-4
About This Photo One photo isn’t enough to capture this range of light. Compare this version, underexposed by four stops, with 1-5. (ISO 100, f/8.0, 1/4000 second, Sigma 10-20mm f/4-5.6 at 18mm) © Robert Correll
1-5
About This Photo This photo and 1-4 illustrate the large dynamic range of this scene. Compare details in the sun, sky, and bridge. (ISO 100, f/8.0, 1/60 second, Sigma 10-20mm f/4-5.6 at 18mm) © Robert Correll
Practical Effects of Limited Dynamic Range
HDR is not meant to replace, nor is it always a good substitute for, the single-exposure photography that we’re all used to. However, the fact that your camera has a dynamic range often inadequate to the task at hand can have undesirable effects on your photos.
This section briefly illustrates what happens when highlights are too bright, shadows are too dark, or both.
Blown-out highlights
Blown-out details, quite often skies, are the result of limited dynamic range. Too much light overexposes parts of the scene and the camera literally cannot measure any more light. The resulting image has no details in the overexposed areas.
A bright sky is notoriously hard to capture well and not ruin the rest of the photo. For example, when given a choice between capturing a nice building at the cost of a blown-out sky or capturing a building that is too dark but has a nice exposed sky, most photographers (and their cameras) choose a blown-out sky. Why? Because, although blowing out a sky runs contrary to most digital photography guidelines, the building is the subject of the photo.
This dilemma is illustrated in 1-6. The cathedral is the subject of the photo and, as such, deserves to be well exposed. The sky, however, limits the amount that you can raise the exposure without blowing it out. The camera does not have enough dynamic range to capture both at the same time. Notice that the ISO was raised to capture details on the darker building. Although you could choose to lengthen the exposure time, that was impractical in this case due to people moving around next to the building.
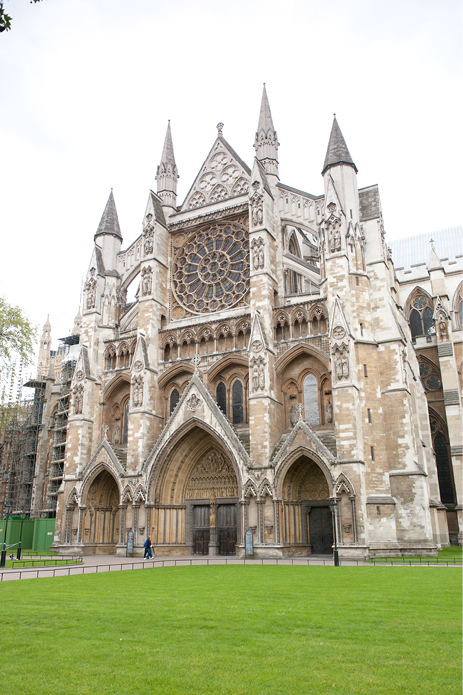
1-6
About This Photo An example of a blown-out sky. The building is nicely exposed but the background is completely lost, or blown out. (ISO 640, f/8.0, 1/100 second, Nikon 24-70mm f/2.8 at 29mm) © Pete Carr
When you know you can’t expose both the building and the sky correctly, you have a choice: Shoot for the building or shoot for the sky, and if necessary, try to fix the problems in processing. HDR, however, presents another way. The point of HDR is to enable you to bring out more detail in scenes that demand more dynamic range than your camera has, as shown in 1-7.
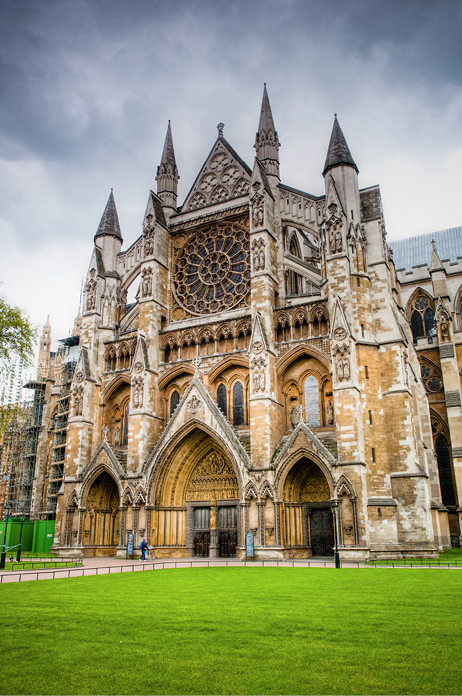
1-7
About This Photo HDR brings the sky back into this image and emphasizes other details in the foreground. HDR exposures bracketed at -1/0/+1 EV. (ISO 640, f/8.0, 1/100 second, Nikon 24-70mm f/2.8 at 29mm) © Pete Carr
Notice that the sky in 1-7 is not blown out at all. In fact, it has a wealth of details. Clouds that were not visible before (that’s what happens when the sky blows out) are clearly present and add to the character of the photo.
Details lost in shadow
At the opposite end of the scale is when you lose details in the shadows or the dark areas of your photos. Silhouettes caused by sunsets are the usual cause when shooting land- and cityscapes, although you also run into this problem when shooting indoors in dark spaces or any other time your subject is backlit.
What happens in this case is the camera (or the photographer) decides to expose for the bright areas of the scene, underexposing everything else. This protects the sky but turns the foreground to silhouette and shadow. In the case of 1-8, the ship and quay in the foreground, plus the ships and buildings across the water, have turned to black shapes.

1-8
About This Photo This image intentionally shows huge areas in silhouette. (ISO 200, f/8.0, 1/200 second, Sigma 10-20 f/4-5.6 at 18mm) © Pete Carr
Although this is often aesthetically pleasing, there are times when you want to be able to capture details in the shadows without blowing out the sky. HDR offers a viable alternative (see 1-9) by enabling you to capture the bright sky and a well-lit foreground in separate exposures. Notice that everything that was in shadow in 1-8 (the normal exposure) is visible in 1-9.
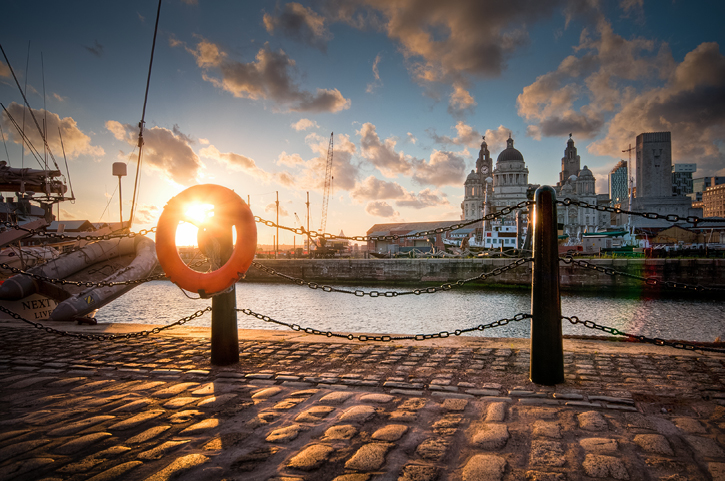
1-9
About This Photo The same scene after three bracketed exposures are merged to HDR and processed. HDR from three exposures bracketed at -2/0/+2 EV. (ISO 200, f/8.0, 1/200 second, Sigma 10-20 f/4-5.6 at 18mm) © Pete Carr
Traditional Solutions
Over the years, photographers have developed quite a few solutions for getting around the limited dynamic range of their cameras — both film and digital. This section gives you a taste of more traditional methods so you can see how they compare to the HDR examples shown in this chapter and throughout the book.
Adding lighting
Additional lighting helps you bypass the dynamic range issue altogether. By controlling the light differences between subject and background, you can manage the overall contrast ratio so that it falls within your camera’s capabilities. For example, if you are a studio photographer, you essentially have complete control over a scene’s lighting and background environment to achieve whatever artistic effect you desire, such as that shown in 1-10.

1-10
About This Photo The lighting in this standard studio shot has been carefully manipulated to precisely create this crafted look. (ISO 100, f/13, 1/125 second, Nikon 85mm f/1.8) © Pete Carr
If you need less light, you can dim it, block out windows, bounce it, or move it back. If you want more light, you can add it, use reflectors, or move it closer to the subject. If you want more contrast, you can choose a different background or turn it white, and remove shadows for a high-key effect (that is, intentionally lowering the overall contrast ratio of a scene, most often resulting in a very bright-looking photo). You can put lights above, behind, below, or to the side of the subject. You can modify the light by adding reflectors, brollies, softboxes, snoots (if you don’t know what these are, check out a lighting or camera sales website), and more.
Whatever your artistic goal, the point is to manage the scene so that you have total control over the contrast and overall dynamic range. Lighting on location is far trickier because you lose some of this control. You may have no choice when it comes to background lighting, which is often up to nature. However, you can control how bright the model is and, therefore, balance that with the background. If you have a few lamps, strobes, or reflectors, you can illuminate the model nicely. Again, this reduces the contrast between your subject and the background, which in turn reduces the dynamic range of the image.
Using filters
Filters are also a tried-and-true method of controlling exposure. There are two main types of Neutral Density (ND) filters: Graduated (ND grad) and nongraduated. Both types come in various strengths. Unlike software solutions to exposure, you can see the effect before you take the photo and adjust your settings on location.
Landscape photographers use ND filters to darken their photos (most often, because they can’t select a low enough ISO and fast enough shutter speed given a wide aperture). ND filters filter out all wavelengths of light equally, resulting in an evenly reduced exposure.
ND grad filters are particularly well suited to scenes with simple horizons, such as beaches and long-distance landscapes, where the sky is very bright and has to be toned down dramatically compared to the foreground. ND grad filters are perfect solutions for these types of scenes, as they keep the sky from being blown out.

A filter is a thin piece of glass (some are made from other materials like plastic) that goes in front of the lens of your camera. They are manufactured to filter out certain wavelengths of light. Filters are often clear but some are polarized and others are colored. Many filters are round and screw onto the front of the lens. Others are rectangular and slide into a mount that attaches to the lens.
ND grad filters can also be used in more complicated scenes, such as that shown in 1-11. In this case, the end of the street and sky may look uneven, but the horizon line between the road and buildings is straight enough to make an ND grad filter a viable option. Beside this, the bright building at the end of the street dominates your attention. It wasn’t as important that the buildings beside it be brightened. The ND grad filter helped brighten and balance the light of the road leading away with the brighter building, which was darkened by the filter.
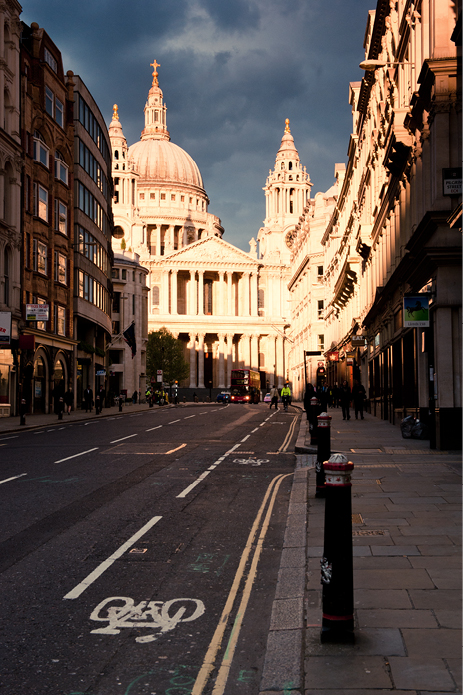
1-11
About This Photo This scene illustrates an ND grad filter in action with minimal processing applied. It helped retain detail in the brightest area of the photo while brightening the road. (ISO 800, f/8.0, 1/160 second, Nikon 24-70 f/2.8 at 45mm) © Pete Carr
ND filters are not without their problems, however. If the horizon is not perfectly straight (trees, hills, buildings, and mountains get in the way and complicate things) and you use a graduated filter, details on the intervening scenery are likely to be underexposed. Additionally, mountains or other objects may look like they have halos around their tops.
In short, ND filters can be used at any time, but ND grad filters are best used when the landscape is neat and tidy. HDR works in any of these situations because it is not dependant on the horizon line being level.
Contrast masking
Contrast masking is a software technique that evens the contrast of an image. The idea is to use a new layer to bring out details in the shadows or darker areas, and tone down highlights in others. In 1-12, the sky is a bit washed out and the details are unimpressive in the shadows, particularly the monument.
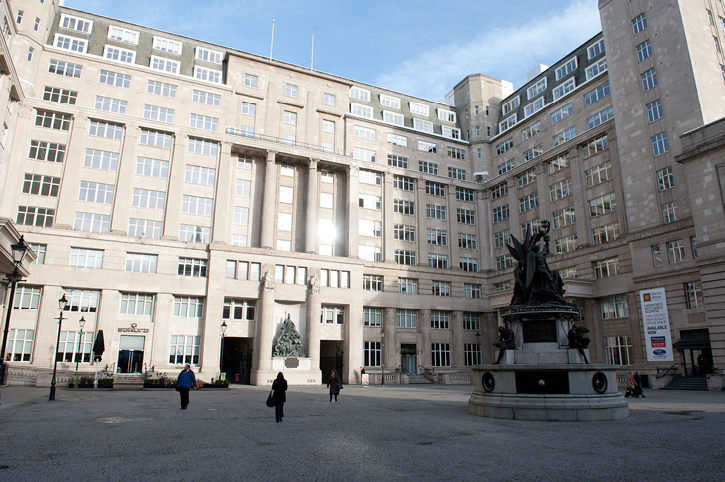
1-12
About This Photo Exchange Flags in Liverpool. This scene includes a loss of detail in shadow areas. (ISO 800, f/8.0, 1/800 second, Nikon 24-70mm f/2.8 at 24mm) © Pete Carr
In brief, contrast masking involves duplicating the photo layer in your favorite photo-editing software (from the layers panel); desaturating (reducing the color intensity to zero, resulting in a grayscale image) that duplicate layer; and then inverting it (inverting the brightness of each pixel of an image, resulting in something that looks like a black and white negative). Desaturating the duplicate layer focuses the end result on brightness rather than color. Inverting the layer pushes the original highs and lows in the opposite direction.
At that point, apply a Gaussian Blur (a sophisticated blurring algorithm that blurs each pixel) to the layer to soften the effect a bit. The final steps are changing the blend mode of the duplicated, desaturated, inverted layer to Overlay. This lightens dark areas and darkens bright areas of the lower layer.

A lot of Photoshop jargon is used in this section (contrast masking is probably the most intense). Photo editing techniques often rely on sophisticated tools and methods, for which full explanations are beyond the scope of these examples. For further information, please consult your photo editor’s help file.
You can also selectively erase portions of the contrast masking layer to help restrict the effect to specific areas. For example, portions of the building might look fine without contrast making, so just erase (or mask out) those areas of the contrast mask.
The effect of contrast masking on the photo in 1-12 is illustrated in 1-13. It brings out more detail, but in some ways it looks a little off. The right side of the building looks weird compared to the left.

1-13
About This Photo Exchange Flags in Liverpool. This scene includes more detail in the shadow areas. Contrast masking may work in some situations, but it can be an inelegant solution. (ISO 800, f/8.0, 1/800 second, Nikon 24-70mm f/2.8 at 24mm). © Pete Carr
Exposure blending
You could call exposure blending an early form of HDR. In fact, it began (as many software techniques have) in the darkroom. The idea was to take more than one photo and blend them while making the print. Today, exposure blending is predominately a software process, and (as with HDR) begins with taking more than one photograph.
For example, to photograph a landscape with a bright sky, you take one photo of the land properly exposed, then take another and set the exposure for the lighter sky. You can take as many photos as you want, each differently exposed, as long as you use a tripod and keep the scene composed identically between exposures. Later, blend them in Photoshop as different layers (see 1-14).
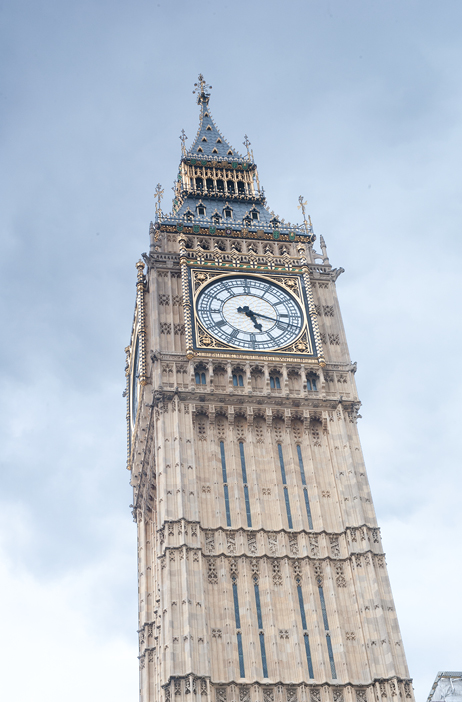
1-14
About This Photo Two exposures are merged together in Photoshop to create a balanced photo of the Clock Tower that holds Big Ben. (ISO 640, f/16, 1/100 second, Nikon 24-70mm f/2.8 at 58mm) © Pete Carr
There are several ways to perform exposure blending in software. You can change blending modes from soft light to pin light or erase (or mask) parts of the image you don’t need, and then work them until they blend together. Ultimately, this can be a tricky and time- consuming process.
HDR photography is very similar to this on the front end (taking the exposure-bracketed photos), but is vastly different in software. HDR software such as Photomatix automates blending and other aspects of this task.
Tweaking shadows and highlights
Another reasonably simple solution to overcoming your camera’s limited dynamic range is to tweak the shadows and highlights of your photo in your favorite image-processing application. You can recover some detail from a JPEG using this technique in a standard graphics program, such as Photoshop Elements. However, it is easy to ruin the image if you try and push too hard. JPEGs have only a stop or so of enhancement in them before they are ruined by noise and color banding. You can also use this technique on previously processed camera raw exposures that have been saved as TIFFs.
This technique is illustrated in 1-15 and 1-16, which show a mastodon sculpture in the grass. In the before shot (1-15), the sky is on the verge of blowing out. At the same time, the mastodon is in darkness. After applying a moderate Shadows/Highlights adjustment in Photoshop Elements, the mastodon is lightened and the bright area of the sky has been toned down a bit (see 1-16). Afterward, both photos were converted to black and white with a hint of sepia toning to age them.
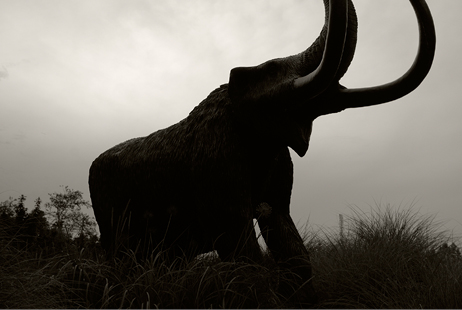
1-15
About This Photo A mastodon sculpture in shadow. Notice that the sky is on the verge of blowing out. (ISO 100, f/8.0, 1/200 second, Sigma 10-20mm f/4-5.6 at 20mm) © Robert Correll
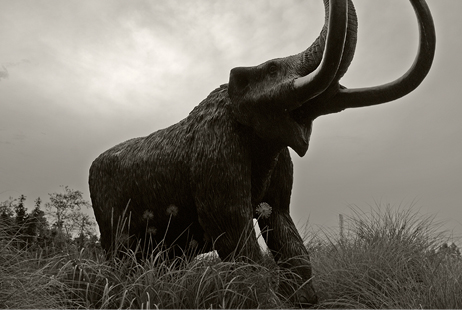
1-16
About This Photo The same image after a Shadows/Highlights adjustment in Photoshop Elements to recover detail. (ISO 100, f/8.0, 1/200 second, Sigma 10-20mm f/4-5.6 at 20mm) © Robert Correll
Although you may still want to use this technique, properly shot HDR reduces the need for most shadow and highlight tweaking for anything but aesthetic reasons.
Dodging and burning
Dodging and burning are two techniques that also have their roots in the darkroom. Dodging involves lightening specific areas of a photo. For example, if someone’s face is a bit too dark, you can dodge to lighten it and make the person stand out more. Burning darkens areas of the photo. If, for example, the sky is too light, a small amount of burning can bring it back in line with the rest of the photo. In these ways, different areas can be exposed with different amounts of light, resulting in customized exposure levels across the photo.
In theory, dodging and burning are simple. However, the default exposure strengths in Photoshop and other applications are set so high that it’s almost impossible to get good results without a good deal of tweaking. The key is to take it easy and set the strengths correctly. If necessary, apply evenly over more than one application. Using a pen tablet helps tremendously.
The Dodge and Burn tools are located together on the Tools palette of Photoshop. The Dodge tool looks like a small paddle that holds back light and the Burn tool is a small hand. Here are some tips to help you dodge and burn:
• After selecting the Dodge tool, set the Painting Mode range to Shadows to bring details out of darker areas.
• Start with the Exposure between 10 and 20 percent when dodging and then alter it as needed.
• Set the Painting Mode range for the Burn tool to Highlights to darken overly bright areas or Shadows to deepen existing dark areas.
• When burning, set Exposure under 10 percent to start and alter as needed.
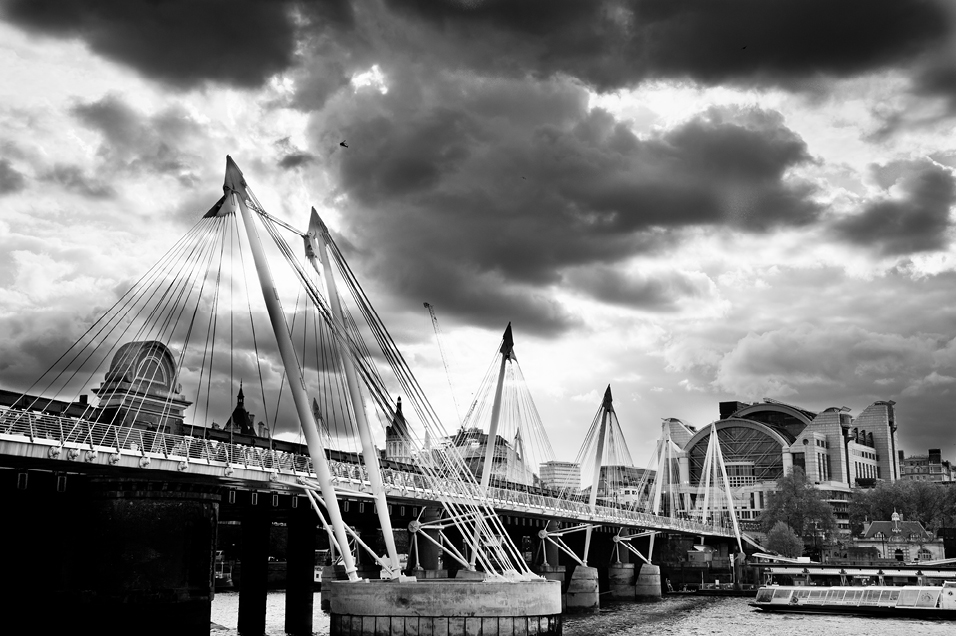
Doing a poor job with the Dodging and Burning tools can create halos around the areas you manipulated, so be prepared to experiment and start over. It’s also possible to increase noise levels in areas as you dodge. Additional noise may not be a problem, especially if you’re working with black-and-white photos (see 1-17). In those cases, a little extra noise looks like film grain and is aesthetically pleasing.
1-17
About This Photo This classic black-and-white photo has been enhanced with dodging and burning. (ISO 250, f/6.3, 1/800 second, Sigma 10-20mm f/4-5.6 at 10mm) © Pete Carr
On the whole, even when shooting HDR, you should be prepared to continue dodging and burning. However, your attention should be much more focused on subtle details, rather than trying to rescue a photograph.
Fill Light and Recovery
If you use Adobe Lightroom or Adobe Camera Raw (available within many Adobe products, including Photoshop Elements), there are two quick and easy ways to rescue hidden details from standard photos: Fill Light and Recovery.
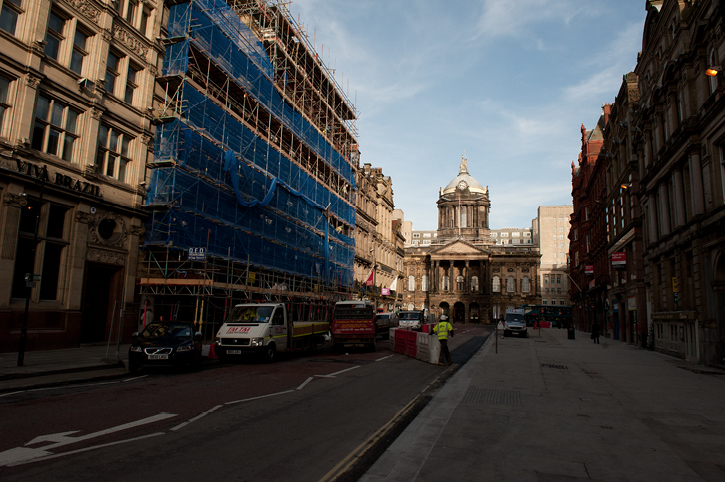
Details get lost in shadow because the limited dynamic range of the camera forces the photo to be underexposed in darker areas to avoid clipping the highlights (see 1-18). Fill Light selectively brightens the dark and midtones of a photo, moving them toward the lighter end of the histogram. If you’re using HDR, the multiple exposures capture these details more suitably in the first place, so you don’t have to resort to using Fill Light to bring them out.
Overexposed highs normally happen with skies and other bright objects, again, due to the limited dynamic range of the camera. In this scenario, if the subject is exposed correctly, it leaves the sky white or blown out. To fix this, Recovery does the opposite of Fill Light. Recovery takes the highs of a photo and brings them down into a reasonable balance with the rest of the photo.

Generally speaking, it is not wise to overdo Fill Light or Recovery as you may lose contrast and tone, or elevate noise.
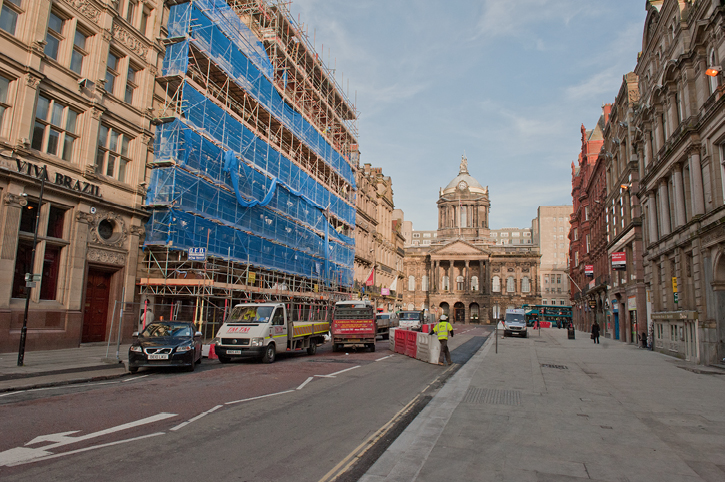
Both techniques are illustrated in 1-18 and 1-19. The shadows in the street were brightened with Fill Light and the sky was protected from being blown out by Recovery. As you can see, the trouble with this technique is that it doesn’t increase the dynamic range of the scene. It only helps you bring out or protect the data that is already there.
1-18
About This Photo Castle Street in Liverpool. This image has a lot of shadow in the foreground. (ISO 800, f/8.0, 1/1600 second, Nikon 24-70mm f/2.8 at 24mm) © Pete Carr
1-19
About This Photo Castle Street in Liverpool. Fill Light and Recovery can be used to bring out the detail in the shadows while retaining detail in the highlights. (ISO 800, f/8.0, 1/1600 second, Nikon 24-70mm f/2.8 at 24mm) © Pete Carr
Processing camera raw exposures
Processing RAW photo files (which includes Fill Light and Recovery) is a very good technique for increasing exposure flexibility because, unlike 8-bit JPEGs, camera raw images contain the full dynamic range of the original photograph as captured by the camera. In other words, when a camera converts sensor data to a JPEG file, it reduces the dynamic range of the photo in order to fit within the 8-bit-per-channel restriction of the JPEG file format. Cameras often let you choose an artistic style (such as portrait, landscape, or vibrant) for it to use when it converts from RAW files to JPEGs. However, when you convert the file yourself, you control the process. The trade-off for this control, though, is an altered workflow, increased time spent processing, and space.
In the end, working directly with camera raw photos is a step toward HDR, but still stops short of it. A camera raw photo has more dynamic range compared to a JPEG, but you’re still limited by the processing options of the RAW file editor. Current RAW file editors reveal a traditional, single- exposure mind-set that excludes some techniques unique to HDR applications. For example, you cannot blend or merge exposures, generate HDR, or tone map a 32-bits-per-channel HDR image.
The HDR Solution
To sum up, you’ve discovered the problem — your camera has a limited dynamic range. As a result, it’s easy to lose details (especially when photographing high-contrast scenes) by blowing out highlights and leaving shadows in the dark. There are a number of traditional measures that photographers have come up with over the years to try and overcome or correct these problems. Although these techniques are successful to varying degrees, there is finally a technique that allows more light to be captured with the same camera.
That technique is HDR photography. It increases your camera’s dynamic range by using more than one photo — each with a different exposure — to capture a scene. Later, you take the exposure brackets (with a collectively superior dynamic range than a single photo) and use HDR software to create a finished photo that you can print and view.
Shooting exposure brackets
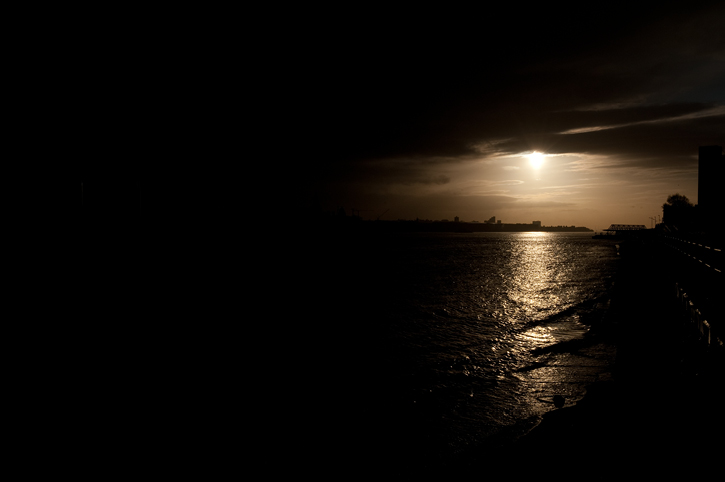
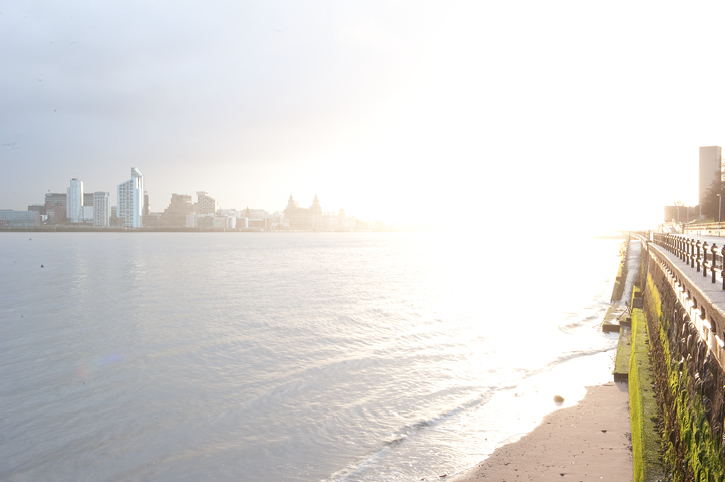
The point of shooting brackets is that each one has a different exposure, allowing you to expose for highlights, shadows, and all points in between (see 1-20, 1-21, and 1-22). Although two exposures are better than one, and more than three may be good in very high-contrast situations, three brackets is generally the ideal number.
Image 1-20 is a normal exposure with a good balance of highs and lows (which depends on the subject). This is what you should be shooting already. Image 1-21 is deliberately underexposed to bring down highlights and keep them from being blown out. Image 1-22 is overexposed to bring up the shadows so you can see what is in them. With exposure brackets, the exposure of each photo differs by a discrete amount, most often +/- 1 or 2 EV, depending on the ability of your camera.

1-20
About This Photo An average exposure. This is probably what you’d get on a normal day. (ISO 200, f/22.0, 1/80 second, Nikon 24-70 f/2.8 at 38mm) © Pete Carr
1-21
About This Photo This image has been underexposed by three stops to bring out the detail in the sky. (ISO 200, f/22, 1/1250 second, Nikon 24-70 f/2.8 at 38mm) © Pete Carr
1-22
About This Photo This image has been overexposed by 3 stops to bring out the detail in the skyline but at the expense of the sky, which is now just white. (ISO 200, f/22, 1/5 second, Nikon 24-70 f/2.8 at 38mm) © Pete Carr
Using single exposures
There is another approach to HDR covered in a bit more detail in Chapter 4. It is not technically HDR but, rather, a tone-mapping trick. To perform it, you load a single RAW photo file (or the false exposure brackets created by processing the single exposure multiple times) into an HDR program and tone map the result as if you are working with an actual set of exposure brackets.
This technique is especially useful for photographs of moving objects and other scenes where you do not have the time (or the ability) to shoot exposure brackets, as shown in 1-23.

1-23
About This Photo Having fun in the Greektown area of downtown Detroit. Pseudo-HDR brings out all of the intricate details. (ISO 100, f/8.0, 1/250 second, Sony 18-55mm f/3.5-5.6 at 22mm) © Robert Correll
While this method can be handy in some situations (it is a viable technique to process single camera raw exposures, regardless of whether it is HDR), this book focuses on taking bracketed exposures.

See Chapter 4 for more information on single exposure HDR.
Merging brackets in HDR software
The second aspect of HDR takes place in software. Basically, you load the bracketed exposures (RAWs, JPEGs, or RAW files converted to TIFFs) into HDR software, such as Photomatix Pro, tick a few boxes that define the HDR options you want, and it then creates a 32-bit HDR file. This produces an interim HDR file that you use to tone map. You can save the HDR file in a number of industry-standard file formats, like OpenEXR, Radiance RGBE, or Floating Point TIFF, before you start tone mapping (this can be useful if you want to use the HDR image in another program).
Tone mapping the result
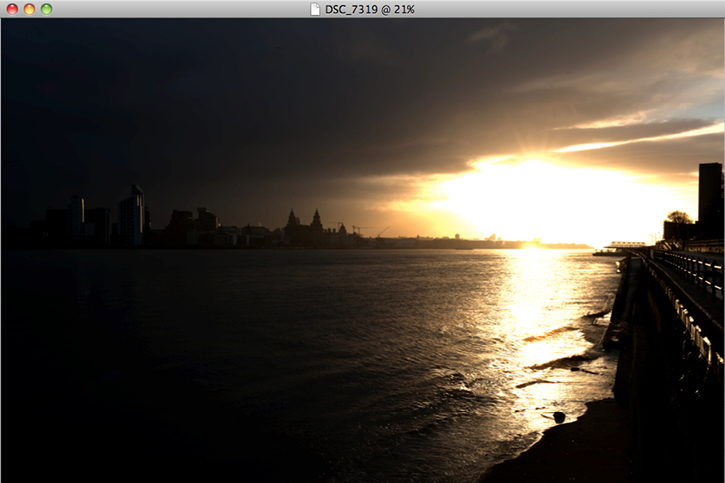
What comes next is where the magic of HDR happens: tone mapping. Simply put, tone mapping is the process of compressing the tones in an HDR image from 32 bits per channel to 8- or 16-bits per channel, and selectively setting relative brightness and contrast levels.
As you can see in 1-24, an HDR image isn’t usable unless you tone map it. This is because your screen (and this printing process) doesn’t have the ability to show that much information.
1-24
About This Figure An HDR image in Photomatix. Image © Pete Carr
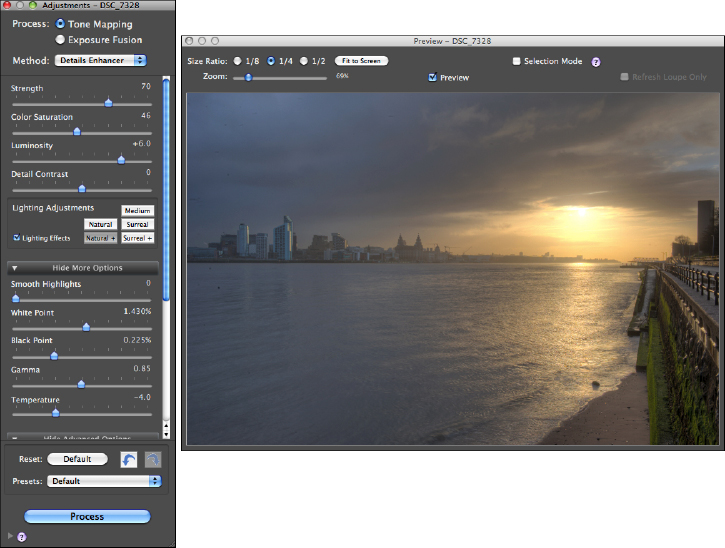
HDR software is specifically optimized for this purpose and automates much of the process (see 1-25). You don’t have to create complex masks, use blending modes, or vary the opacity of different image elements to achieve your purpose. After saving the tone-mapped file as a JPEG or TIFF, you can further process it with your favorite image editor prior to distribution.
1-25
About This Figure The tone-mapping process in Photomatix. Image © Pete Carr
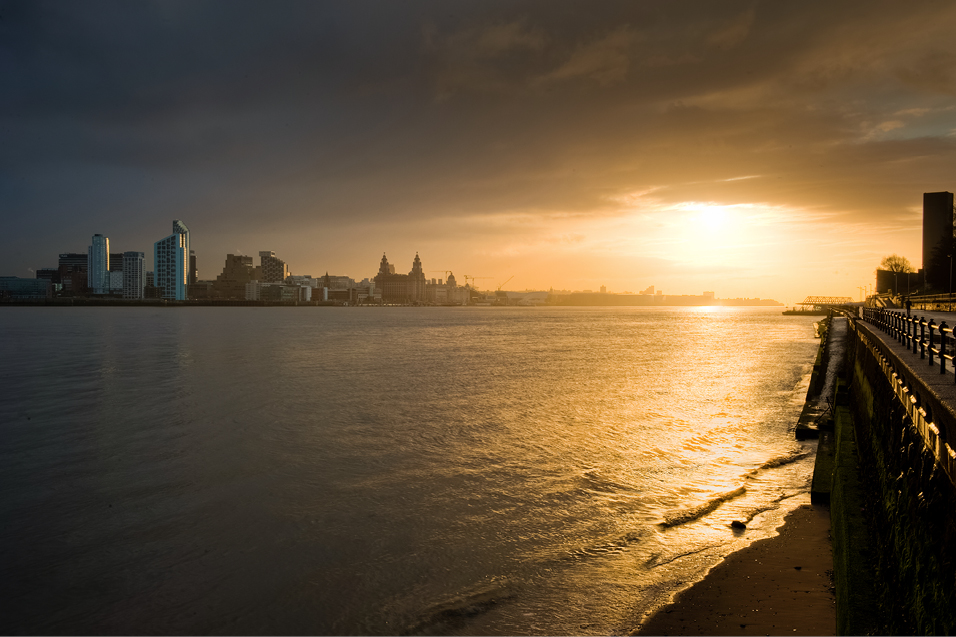
A completed, tone-mapped HDR image is shown in 1-26. It was taken from nine bracketed photos that were merged into HDR and then tone mapped to create the look you see here. Notice that the sun is in view. This should cause the camera to underexpose everything else, resulting in dark shadows or silhouettes. However, details on the facing side of the arch and, in fact, the rest of the photo, are clearly visible. This is the power of HDR. You can retain more detail in your photos, shoot in a wider range of lighting conditions, and craft your final product to suit your artistic tastes.
1-26
About This Photo River Mersey in Wirral, United Kingdom. Shooting directly into the sunrise can be done without sacrificing the detail of the cityscape. HDR from seven exposures bracketed at -3/-2/-1/0/+1/+2/+3 EV. (ISO 200, f/22, 1/60 second, Nikon 24-70 f/2.8 at 38mm) © Pete Carr
Assignment
Photograph a Sunset
This chapter has given you a lot of information about dynamic range and digital photography. Now it’s time to become personally involved in the process. Grab your camera and capture a sunset. This scene will have a large dynamic range. Although you may want to experiment with filters or other exposure techniques, shoot at least one photo relying on the camera’s inherent dynamic range. Try and take the best photograph you can, and note afterward where the exposure compromises are.
Next, use one of the editing techniques discussed in this chapter to recover, or bring out detail in, the shadows and highlights. Think about the advantages of HDR when planning your photo. After you finish reading the book, return to this scene and reshoot it for HDR, if possible.
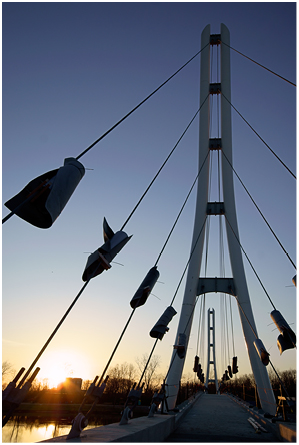
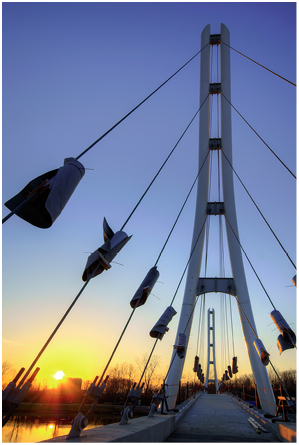
Robert took the photo on the left near sunset from one side of a foot bridge under construction. The challenge in this situation was striking a balance between not blowing out the sunset and preserving some detail in the shadows. Afterward, he used contrast masking to darken the sun, and brighten the foreground and parts of the suspension bridge. Taken at ISO 100, f/8, 1/125 second, Sigma 10-20mm f/4-5.6 at 18mm.
Compare the non-HDR result (on the left) to the same scene shot and processed as HDR (on the right). In this case, three brackets were used, shot at a range of -3/0/+3 EV. The center bracket was taken at ISO 100, f/8.0, 1/500 second, Sigma 10-20mm f/4-5.6 at 18mm.
© Robert Correll
© Robert Correll

Remember to visit www.pwassignments.com after you complete this assignment and share your favorite photo! It’s a community of enthusiastic photographers and a great place to view what other readers have created. You can also post comments, read encouraging suggestions, and get feedback.