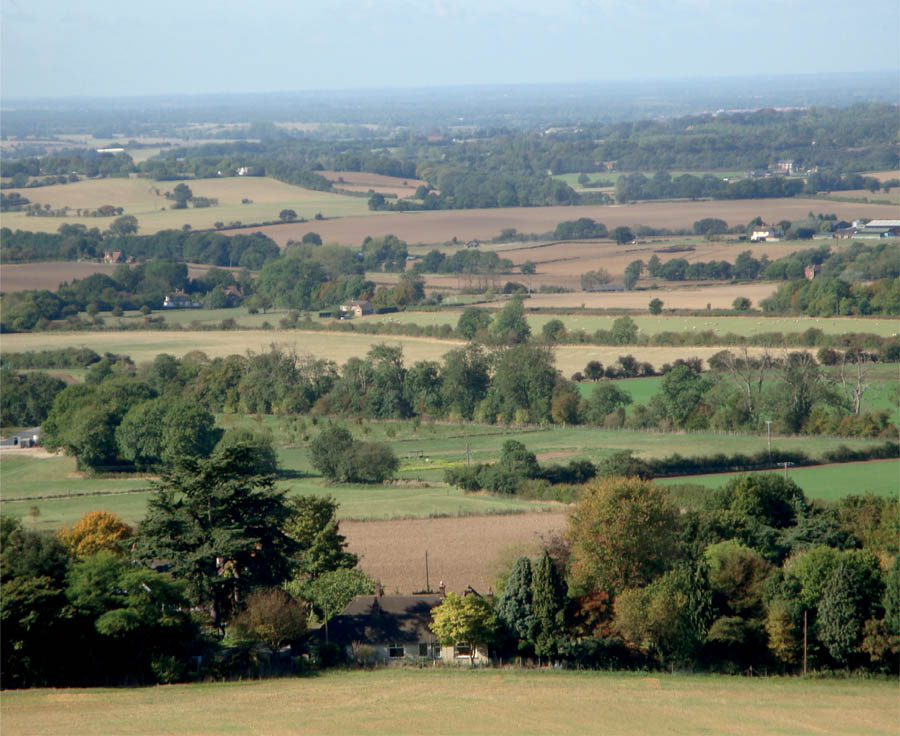
The patchwork quilt of the countryside. The hedge rows have many large trees breaking the line; these would, in years gone by, have been the edge of a much larger wood.
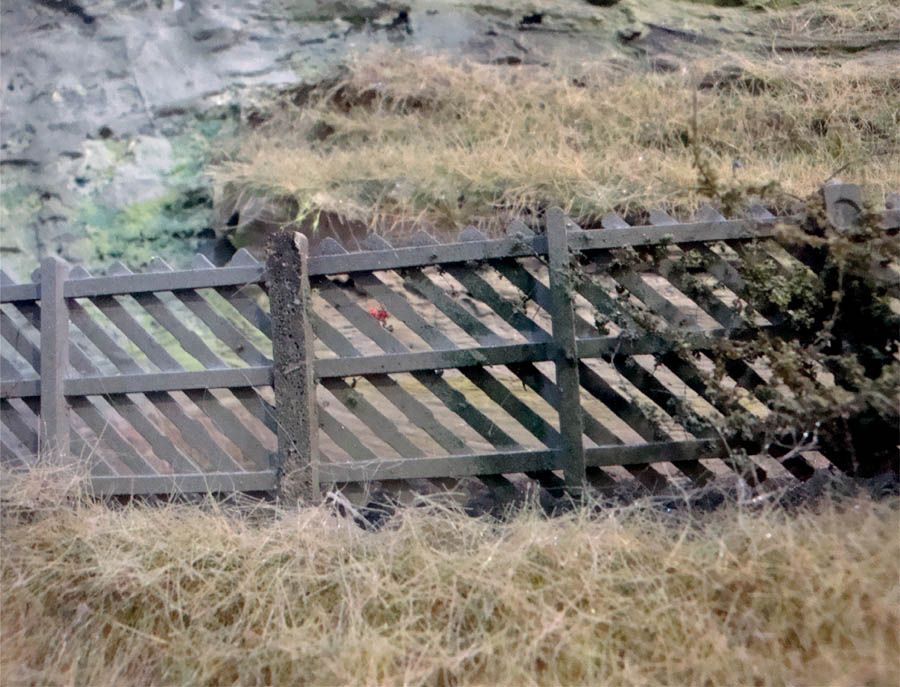
The railway companies of the past developed their own distinctive styles of fences, and by looking at the fencing you could generally tell which company owned that piece of land. The Midland Railway (later part of LMS and then British Rail’s LMR) had diagonal fencing, while the Southern Railway had concrete post and concrete panels.
The main styles of fencing are adequately covered by the major model railway manufacturers, and by following their instructions a very adequate fence can be made. To alter or change the look of these fences you can add a few brambles and perhaps some creeping vegetation.
The patchwork quilt of the countryside. The hedge rows have many large trees breaking the line; these would, in years gone by, have been the edge of a much larger wood.
Fencing typifies ownership of railway land, in this case the Midland Railway (recreated with Slater’s Plastikard).
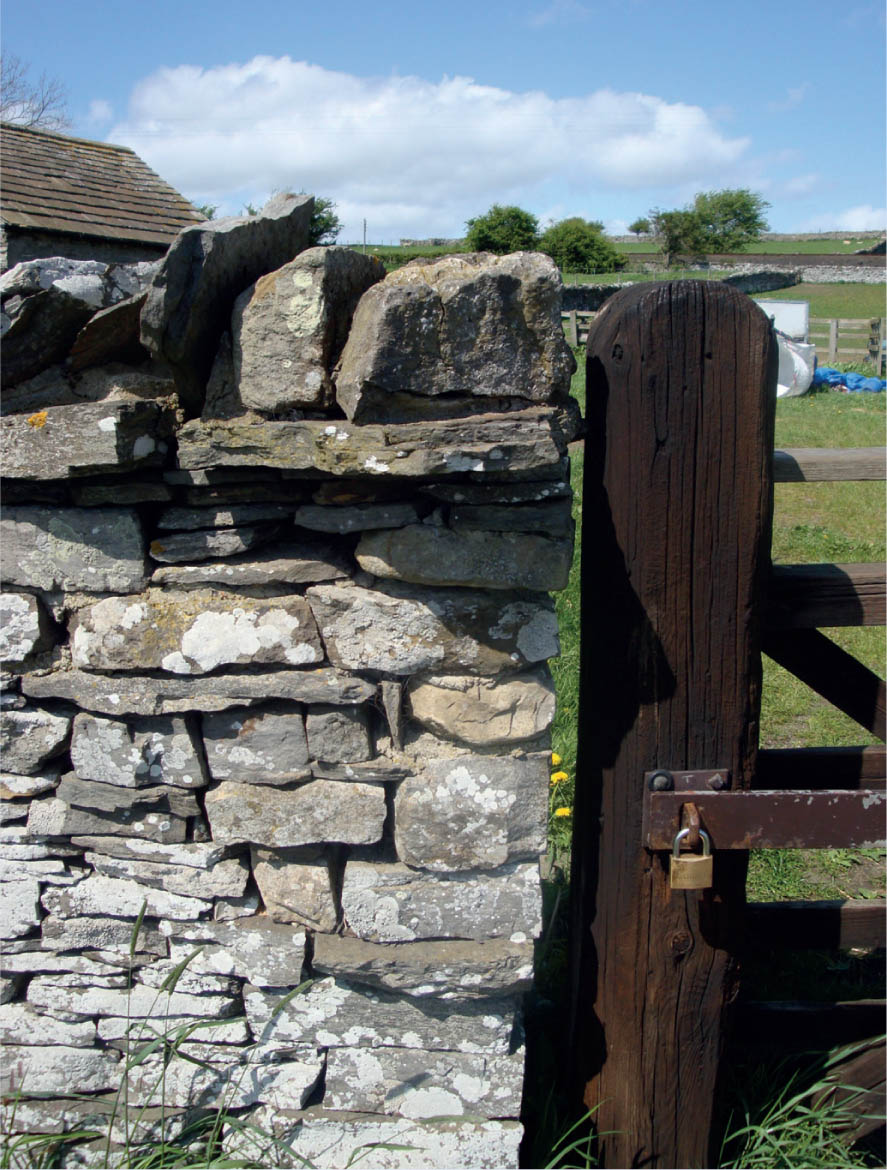
This is a vast subject and only the trained eye can recognize which part of the country they are in by looking at the dry-stone walls. The type of stone will dictate the style of walling, though the principles for building a wall of this kind remain the same where-ever you are. Some areas, however, have very few drystone walls, if any: the local stone where I live is called Kent Rag and really does not lend itself to the craft.
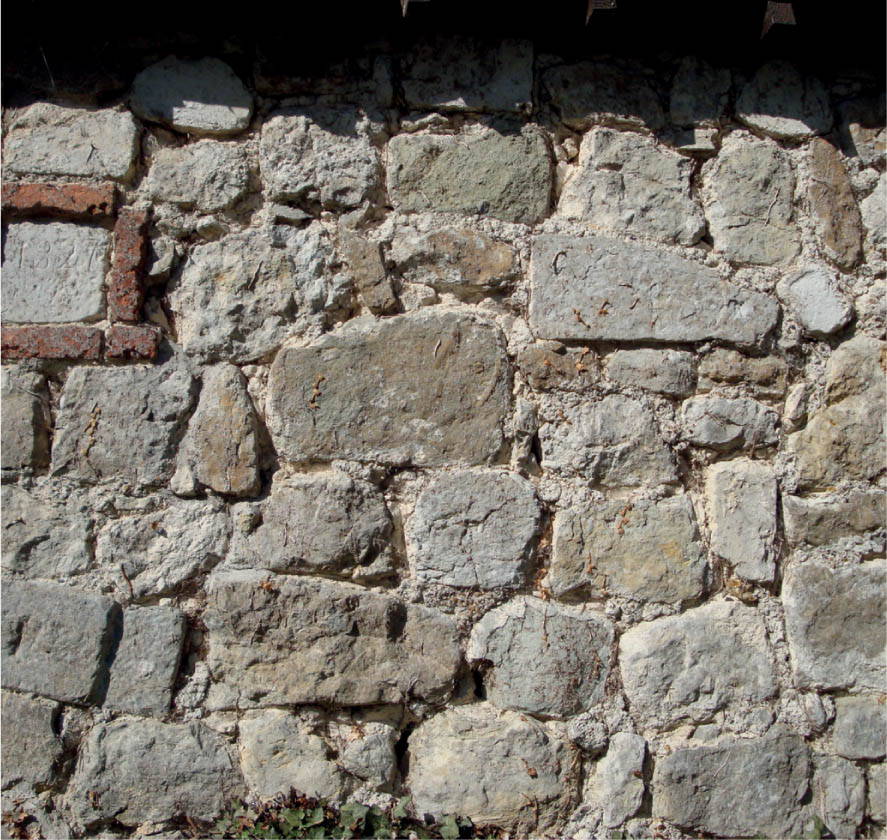
The wall here is not dry-stone, but a Kent Rag stone bonded with a lime and grit mortar. This kind of wall would surround a church – as in this case – or a farmyard. Many buildings in the area would be made of the same, local stone.
When most of these walls were built stone was a cheap and readily available material. Landowners would clear the stones and small boulders from the land so they could plough the ground and allow livestock to graze; the stone that was cleared was then used to build the walls to keep livestock in and intruders out. The dry-stone waller became a skilled and much sought-after craftsman.
There are many miles of walls that have lasted for centuries and have needed very little maintenance. The craftsmen of the past could build walls absolutely anywhere: mountains, fells and moors did not deter them and in the more scarcely populated areas of the UK one can find dry-stone walls in the most inhospitable environments.
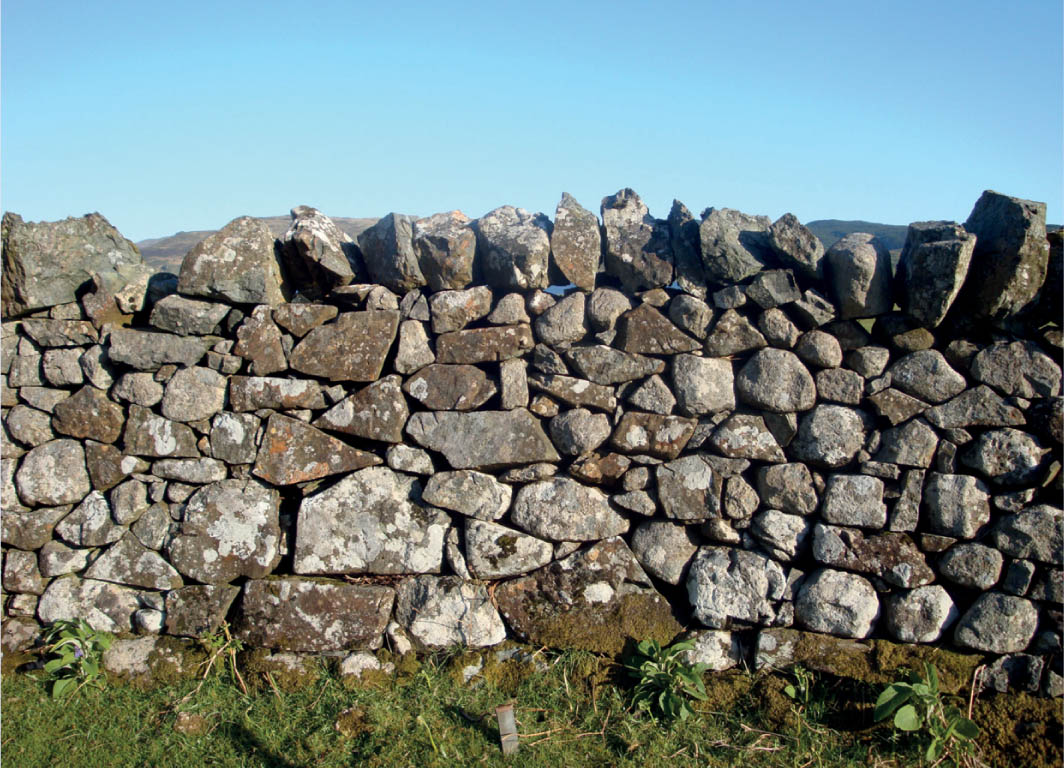
The style and type modelled will demarcate the area. In the Peak District in Derbyshire and the Yorkshire Dales, the land is like a patchwork quilt of walls, the styles of which are quite different. Likewise the walls that mark out the land in south-west Scotland differ enormously from those in north-east Scotland. In the north-east they tend to be granite and were built to keep cattle from straying. The stones in these walls are of a regular shape and tremendous weight, making it easier to run straight courses. Because of their regularity there was less need for coping stones: if there were any, they were massive granite blocks weighing anything up to 50kg (over 100lb). Imagine having to lift these on to the top of a newly constructed wall!
Some dry-stone walls were built as a single skin with daylight showing through the courses. This was a deliberate ploy by the waller and farmer alike, as it looked unsafe to the livestock who would otherwise have tried to jump or climb over it. Most of the solid dry-stone walls will have a taper to them, being narrower at the top than the bottom.
Finally, the colour carries a lot of information: for instance the honey-coloured Cotswold stone would not look right in the north-west of Scotland with its dark granite, and vice versa.
This method is very time consuming, but it produces a truly realistic-looking wall and is particularly useful when the wall is close to the viewer. It is much better to model small sections at any one time.
Place a small sheet of polythene on the landscape where the wall is going to be built, to form the foundation of the wall. This will allow the wall to follow the contours of the land.
Begin by pinching a small amount of air-drying clay from the pack. Roll this between the thumb and forefinger to form little balls or pellets about the size of a small pea. As the clay will dry very quickly, work has to be fairly rapid. The first course is then lightly pressed into a neat bed of PVA glue that has been spread on the polythene.
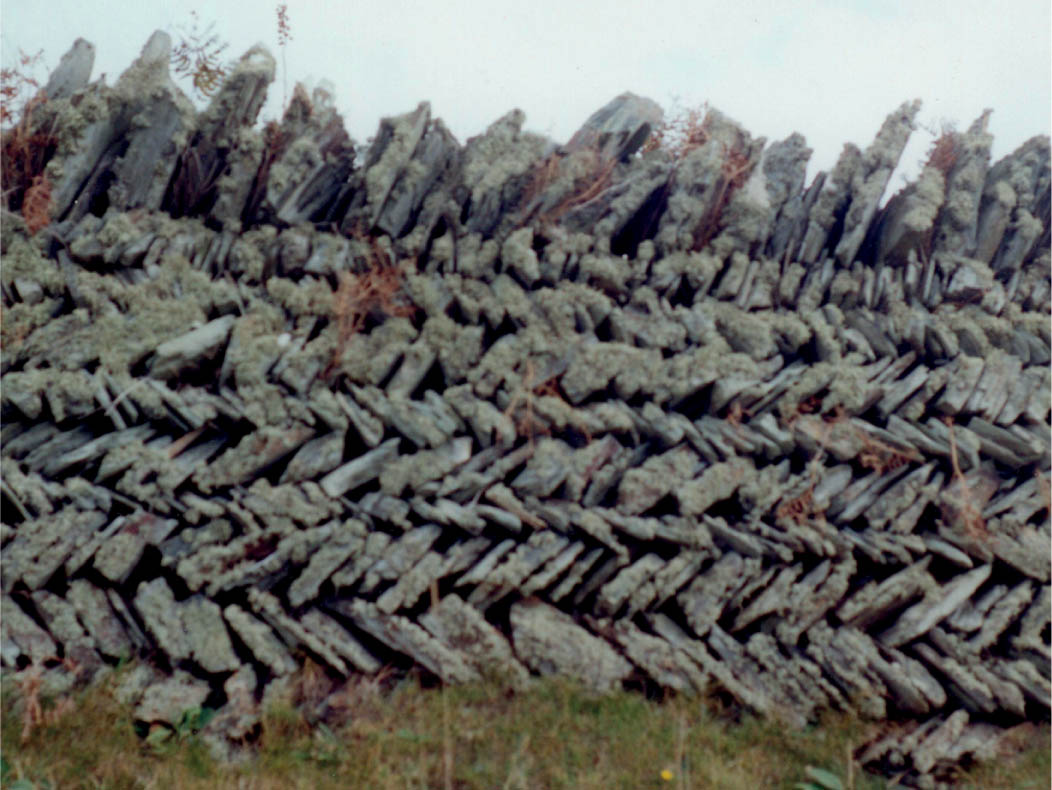
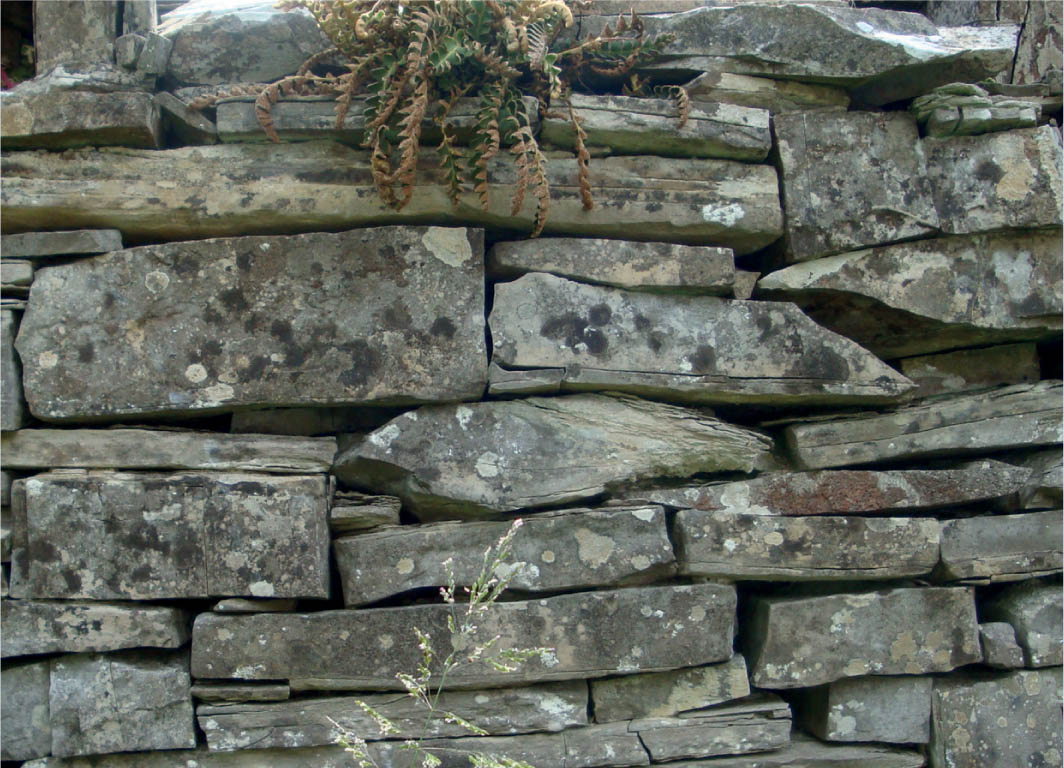
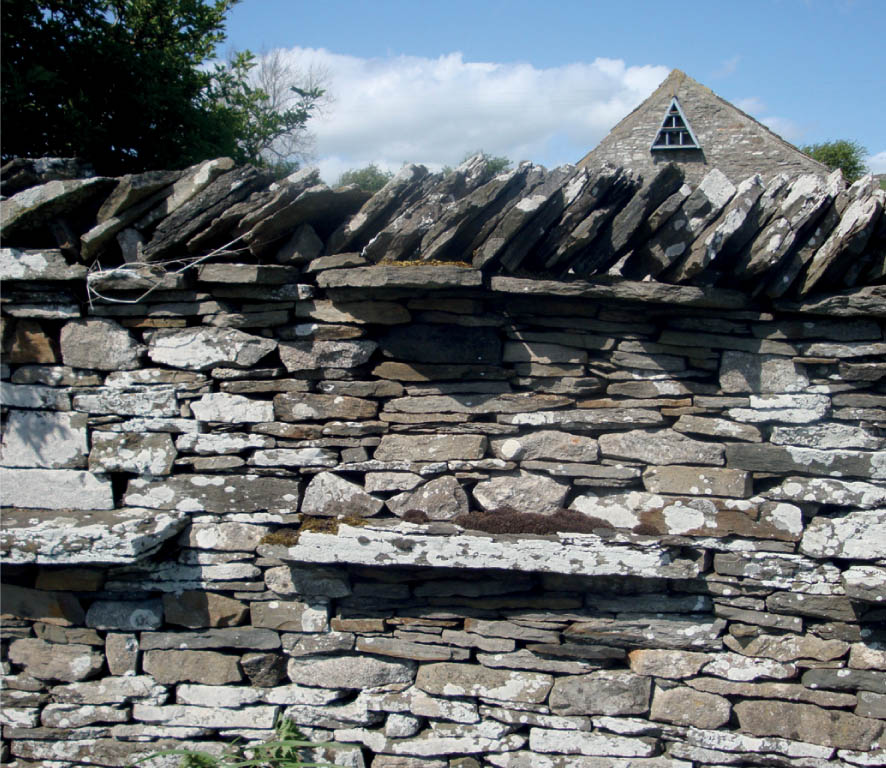
DIFFERENT STYLES OF DRY-STONE WALL
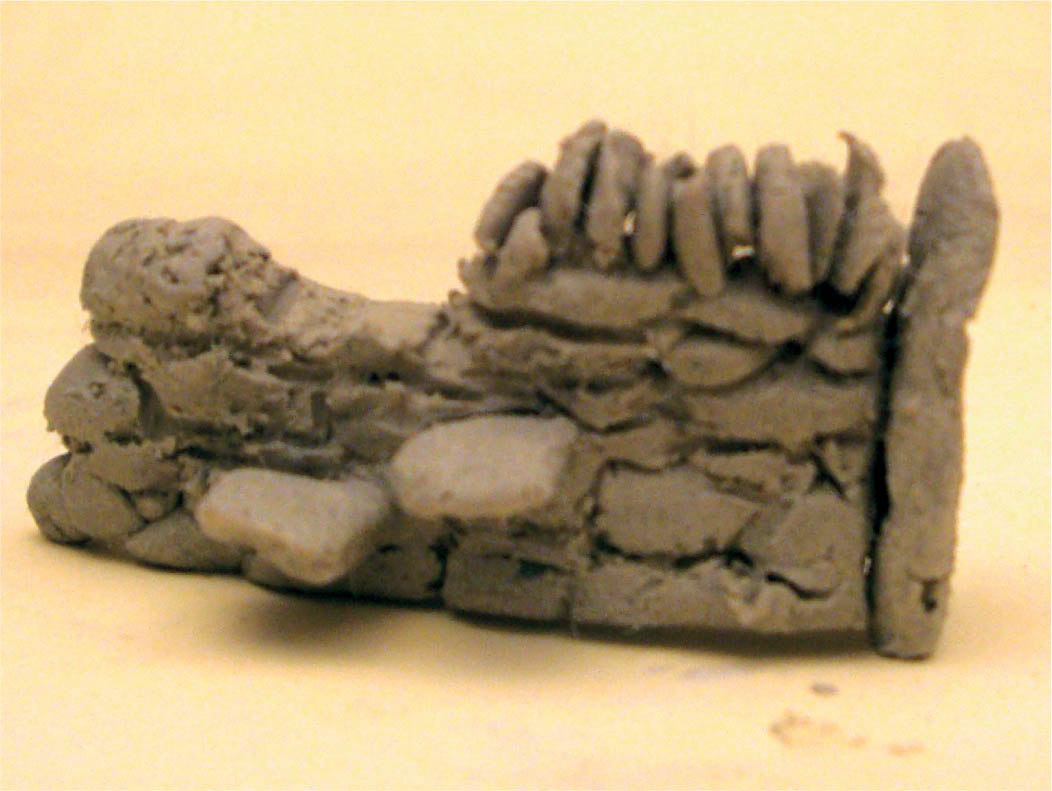
How do they stand there? Note the small packing pieces and the coping stones. The stones here are just laid on top of the wall, and not really picked out to stand on edge.
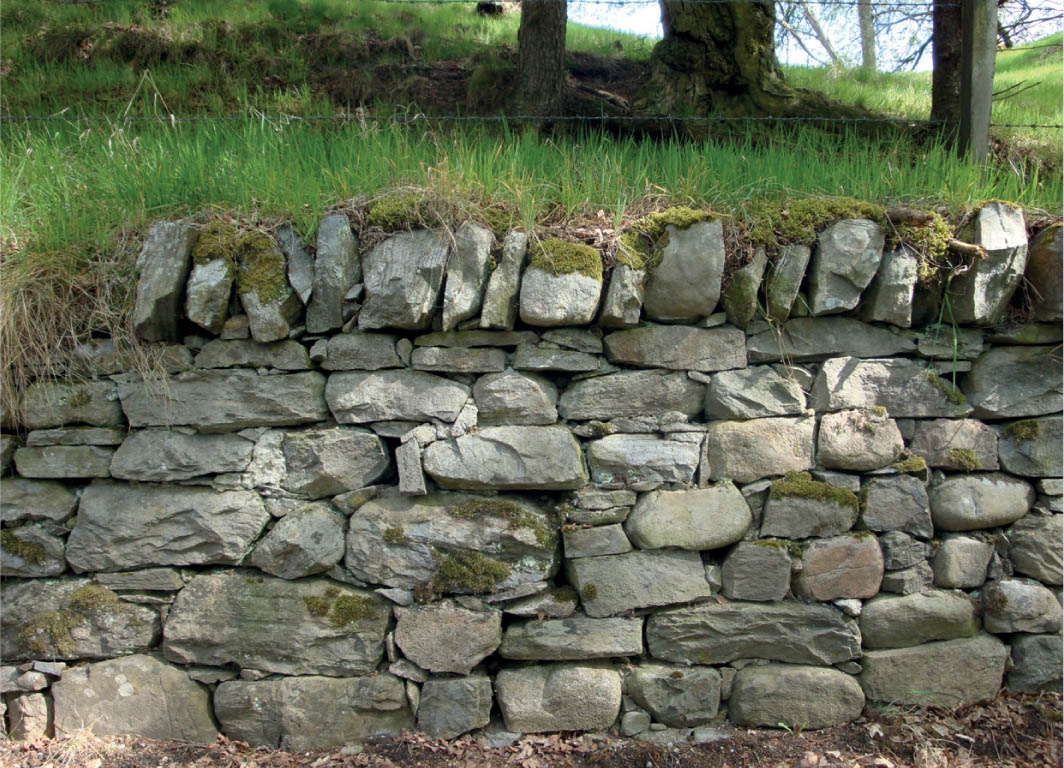

This wall has specifically been built as a retaining wall with a good bond and a strong coping. Some mortar has been used in a patch repair, but this is rare and is difficult to see.
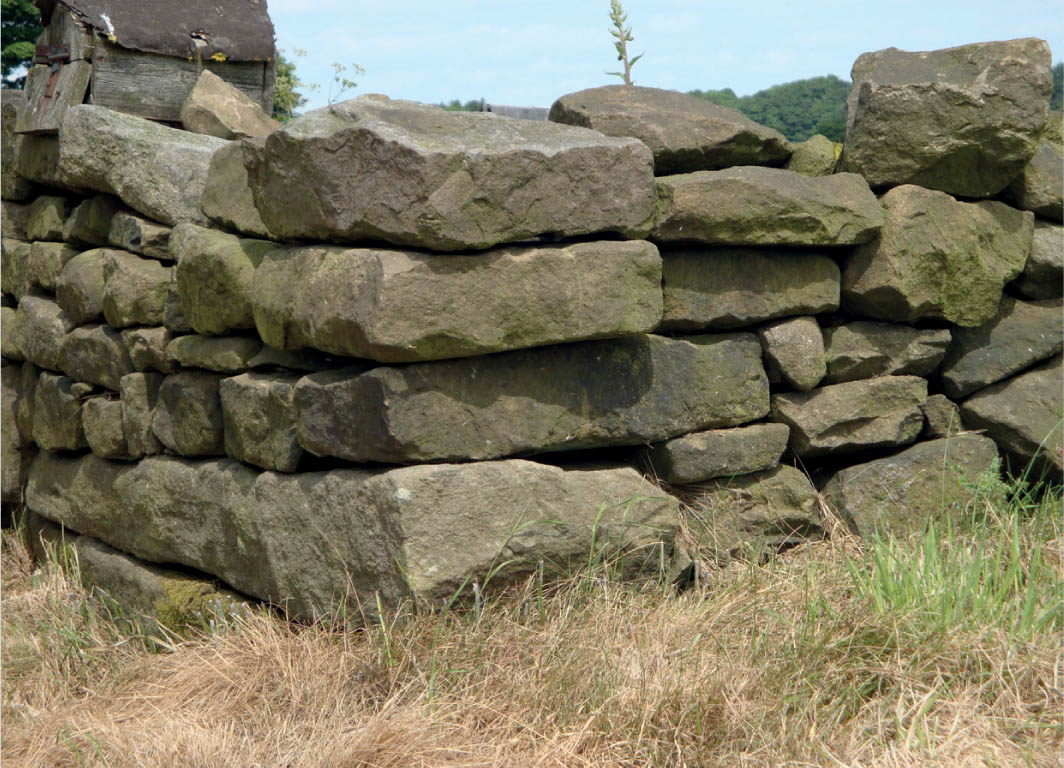
Not a typical finish to a corner, but none the less very effective.
Two variations in coping stones. The first is typical of Somerset (Mendip) and the second of the Yorkshire Dales. The third one shows a neat and tidy wall end and return.
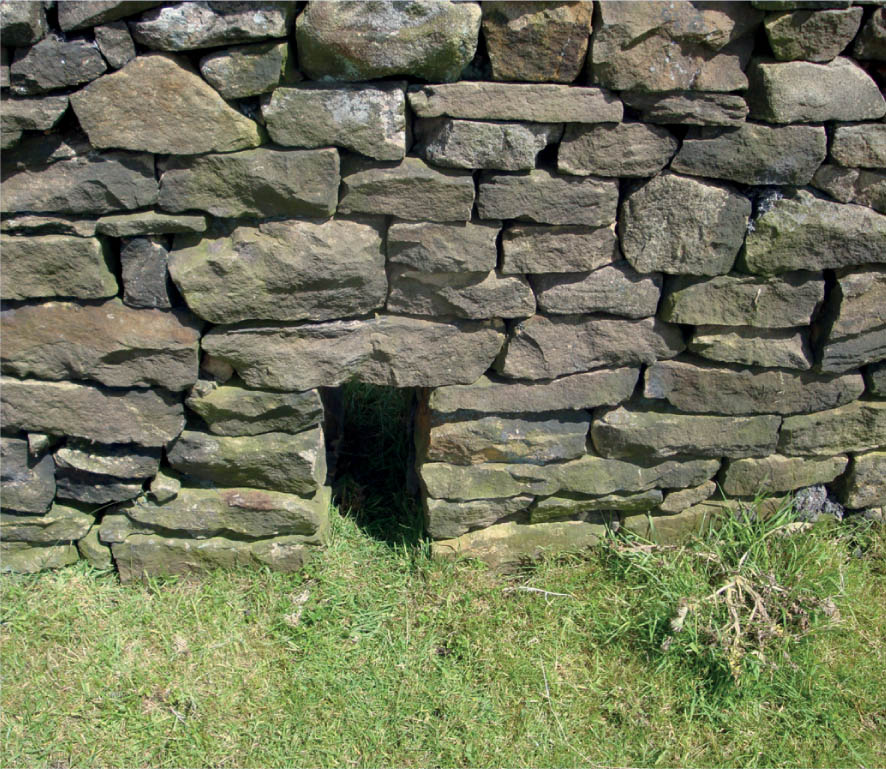
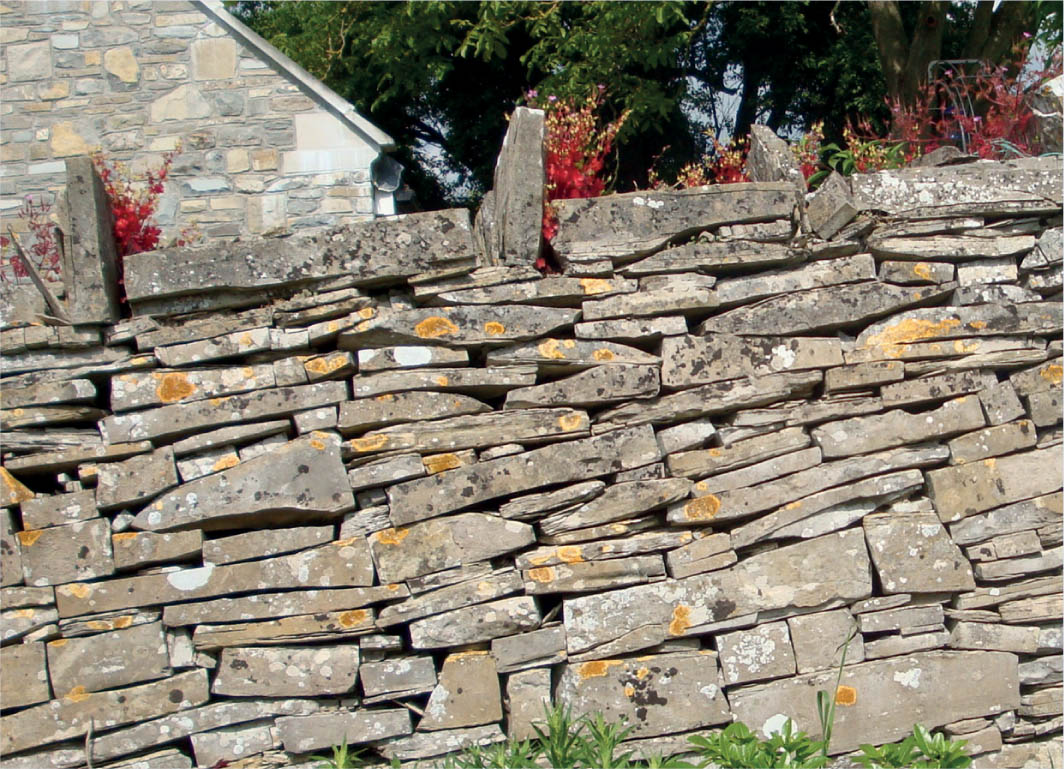
A drainage hole: so often seen, but not often modelled.
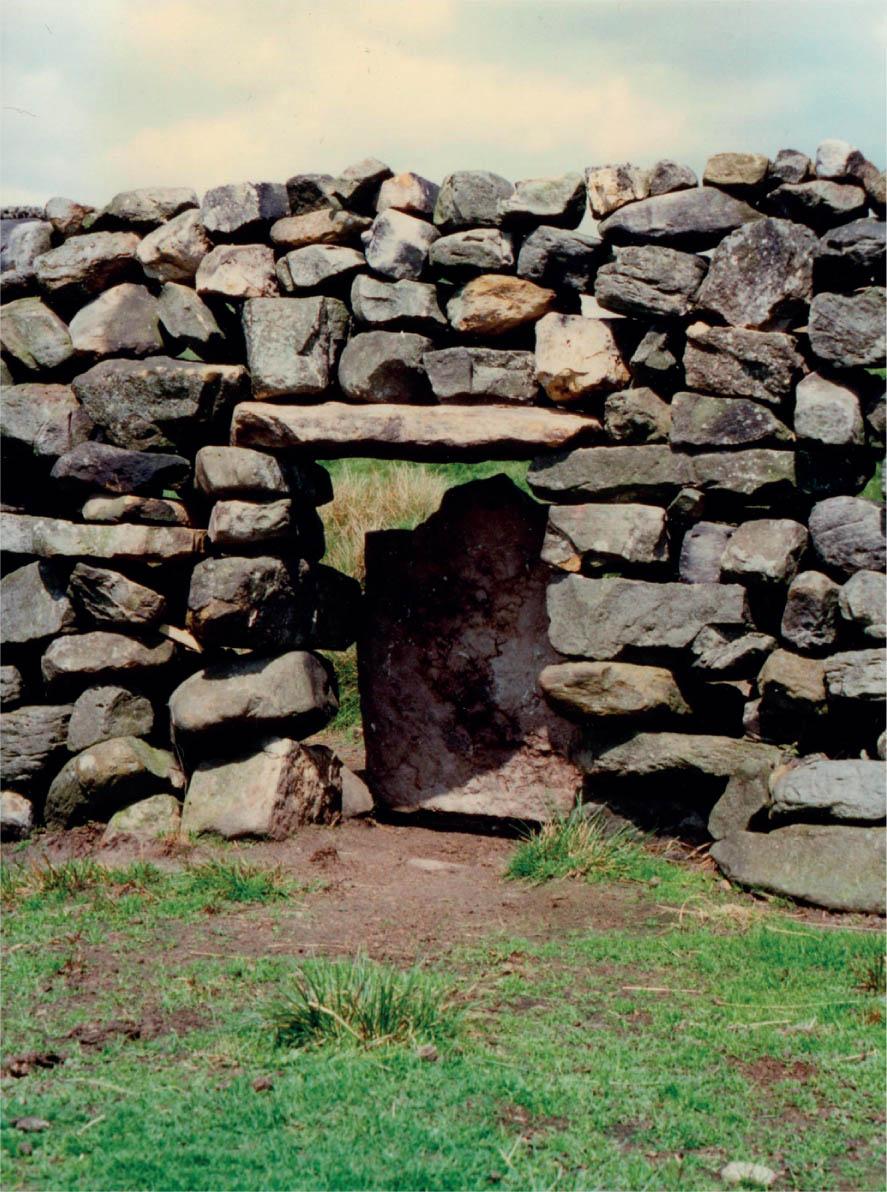
An animal ‘through’ or ‘creep’ hole will allow sheep to pass from one field to another without the need to open gates and can be (as in this case) closed off very easily.
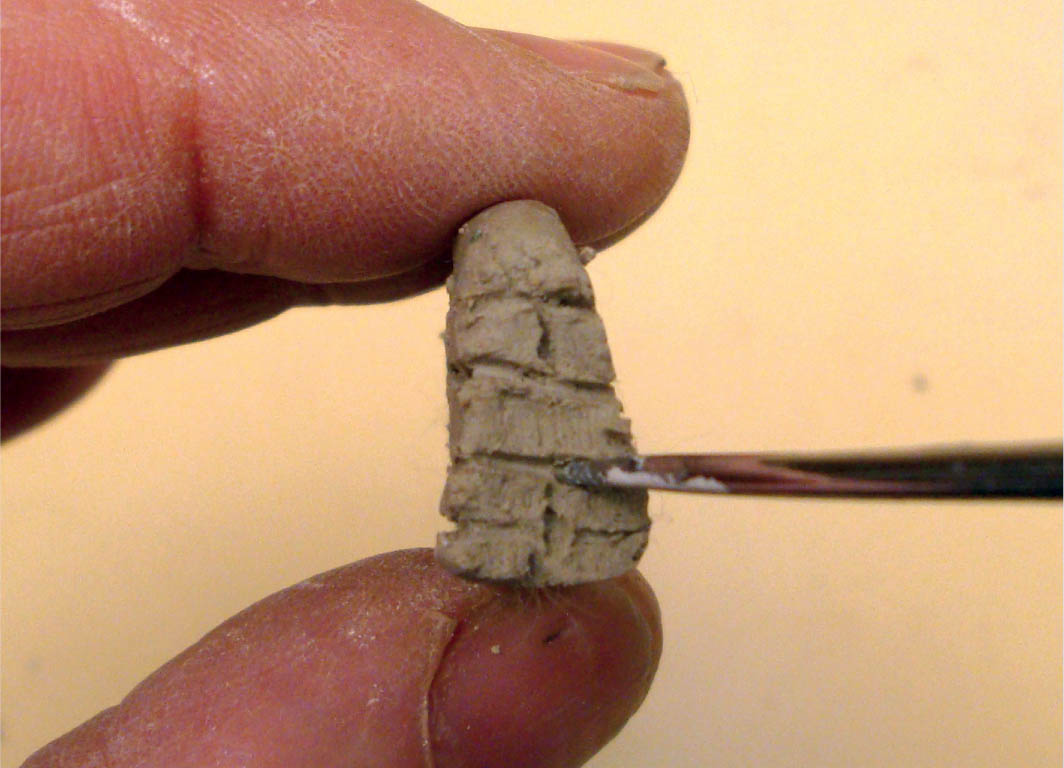
BUILDING A DRY-STONE WALL FROM AIR-DRYING CLAY
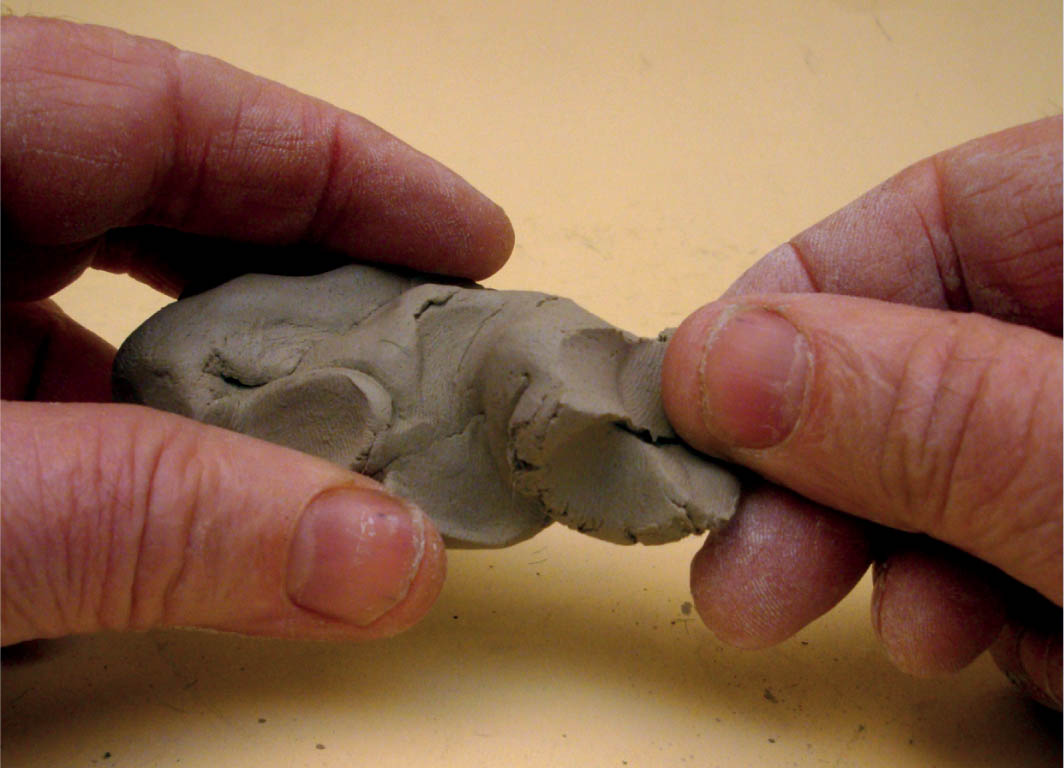
1. Pinch off a small amount of air-drying modelling clay.
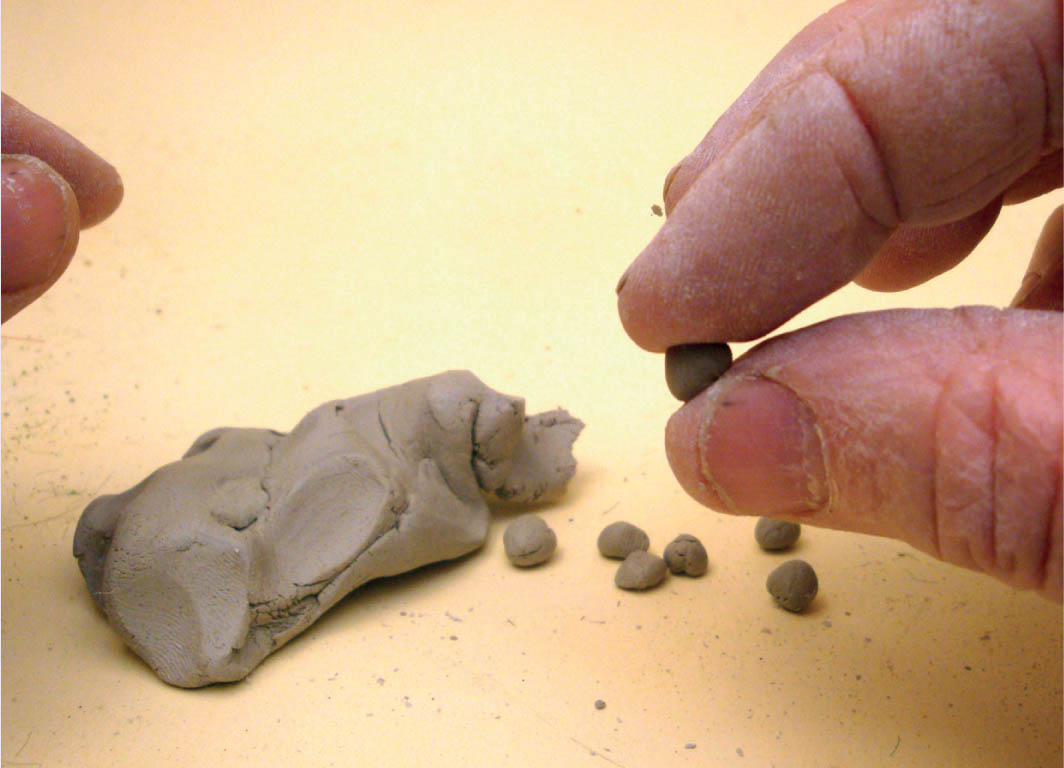
2. Roll the clay into small pellets about the size of a small pea.
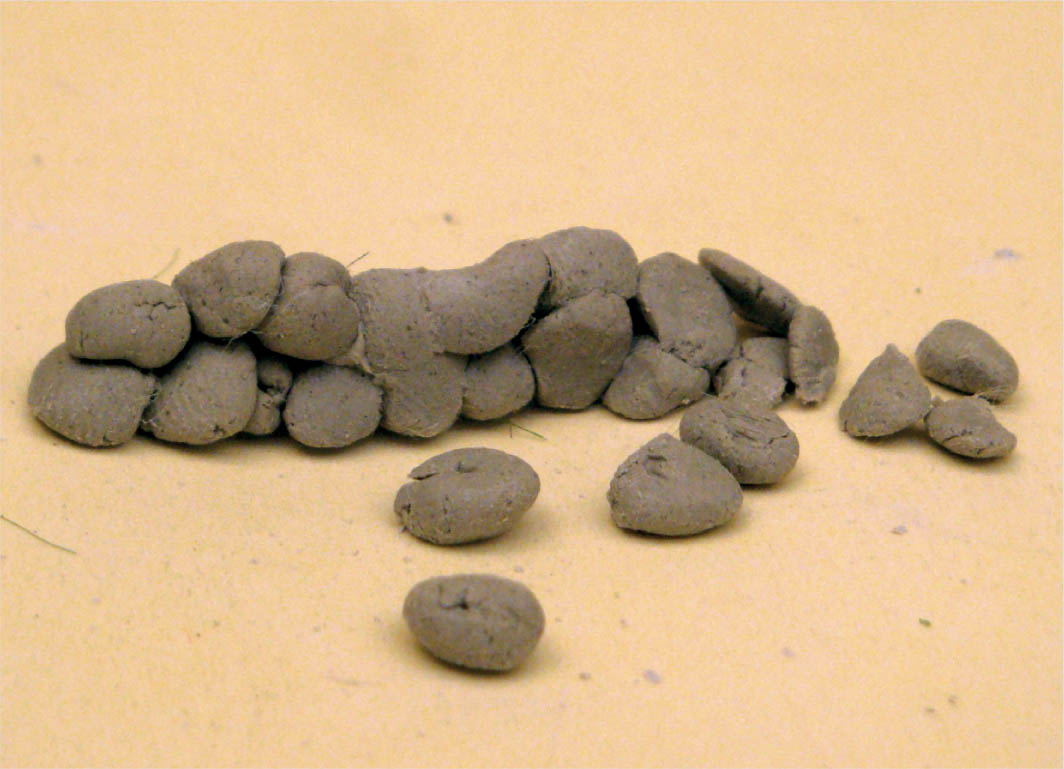
3. Start by laying some pellets lightly pressed together.
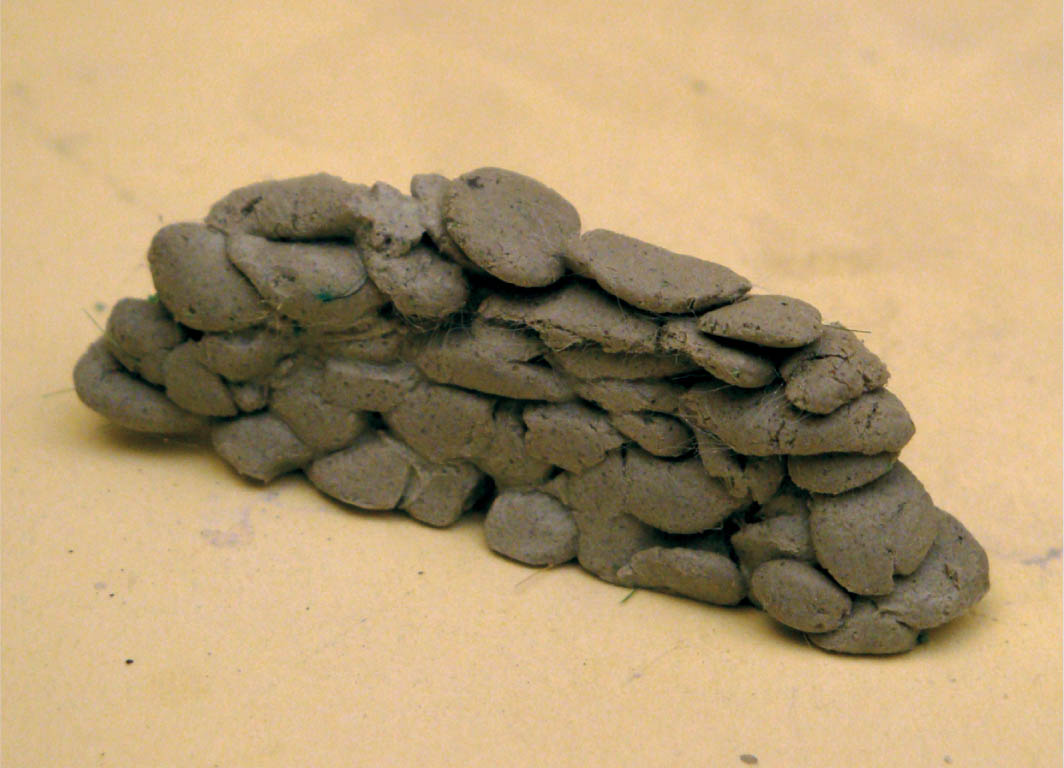
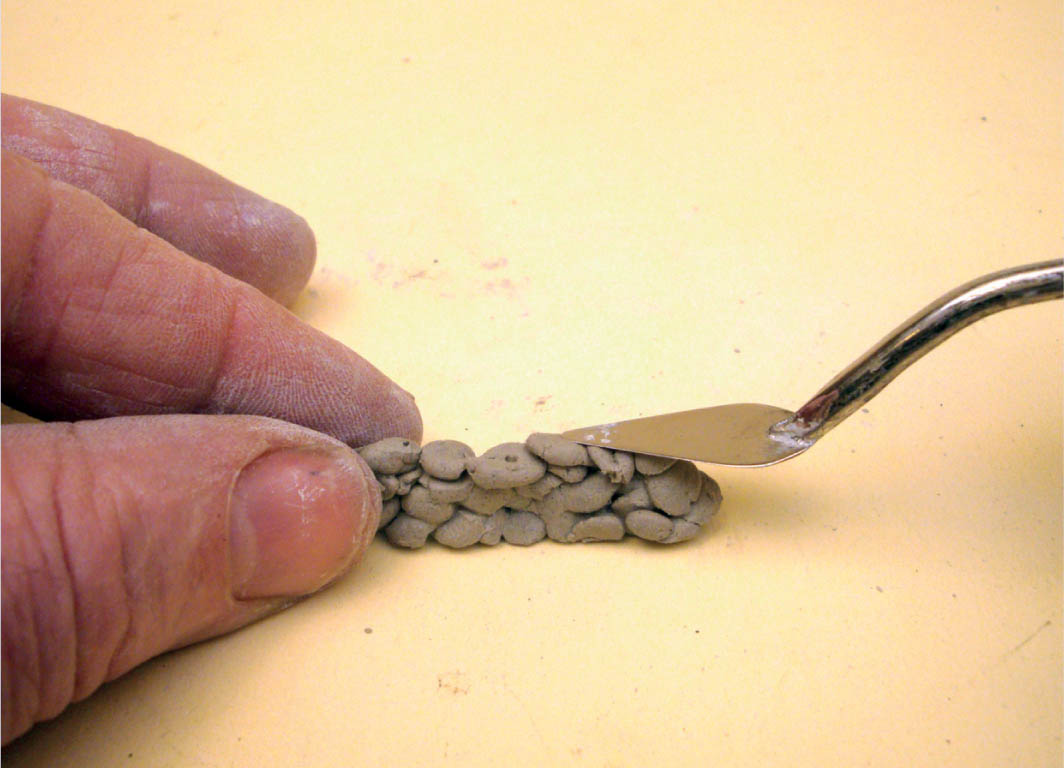
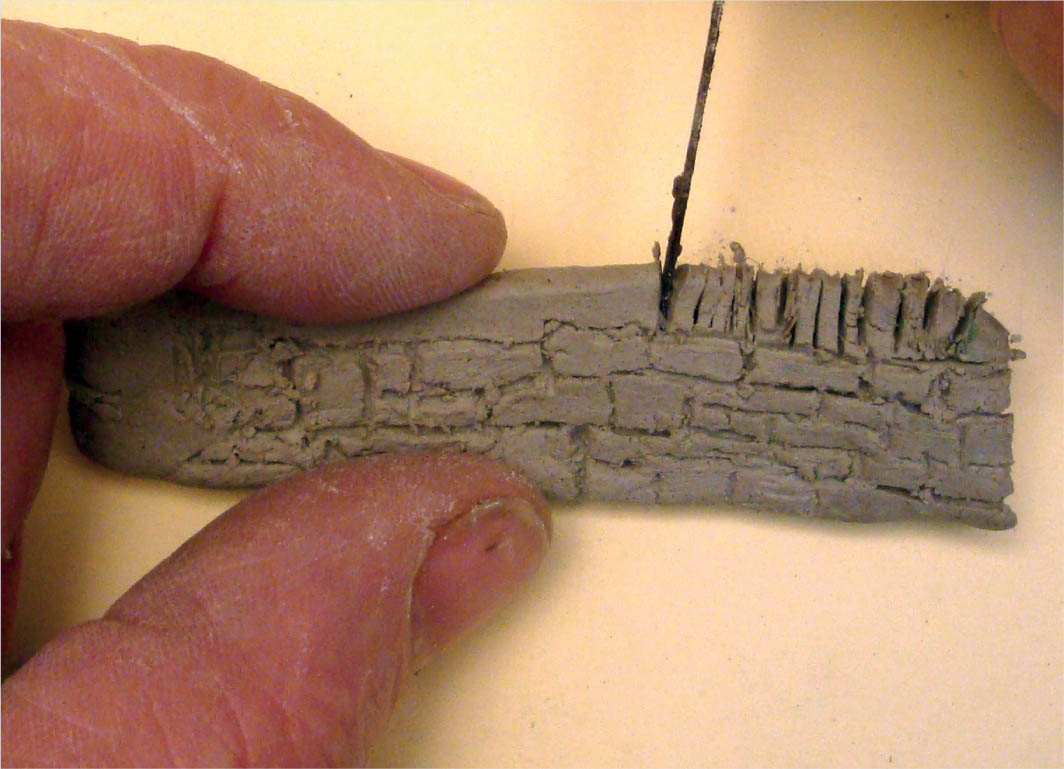
4. When you have reached the required height, gently press and pat the stones to compact them.
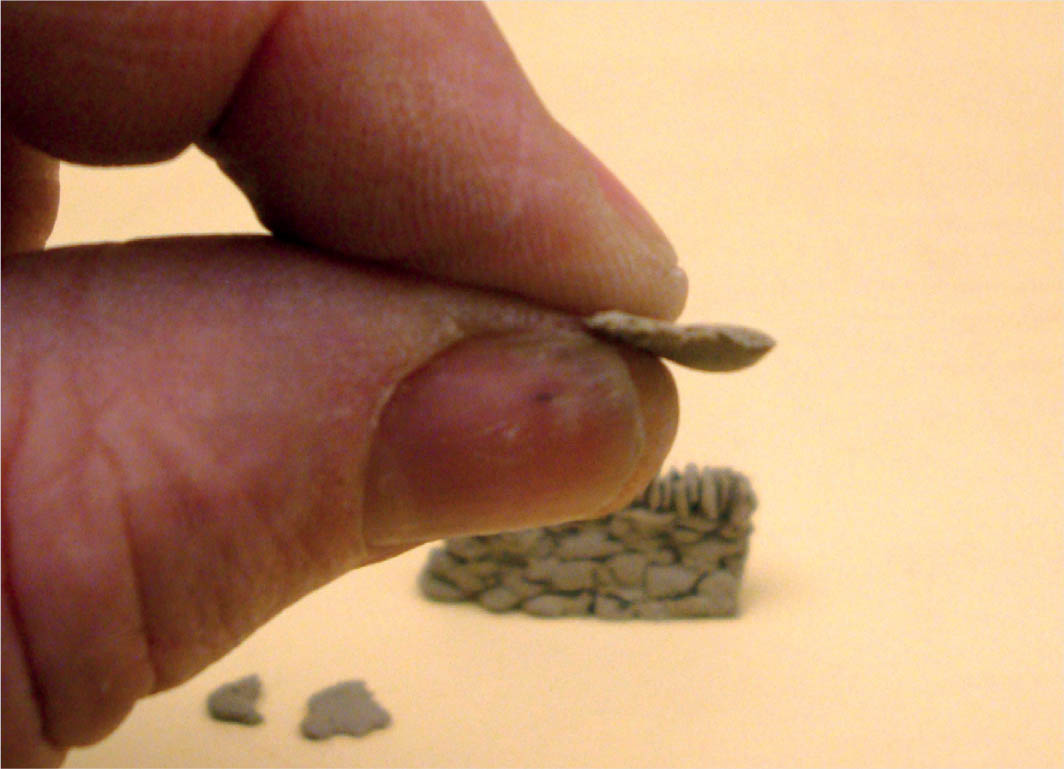
5. Pinch off a further piece of clay, then roll and flatten it to form a flat stone.
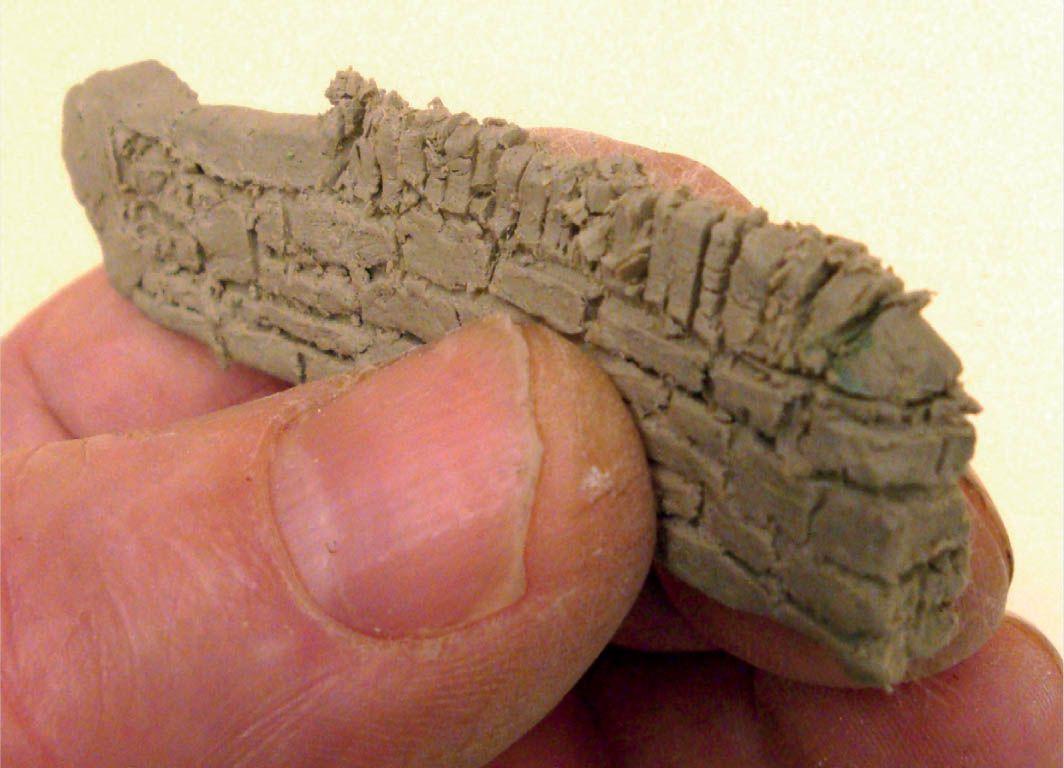
Each course is built up much as a dry-stone wall would be built in real life. For the larger scale, modellers make two skins with a little batter (slope) to make the wall appear narrower near the top. This doesn’t need to be very much, but it will give a real feel to the model. When reaching a steeper drop, try to keep the courses as level as possible, much as the waller would do.
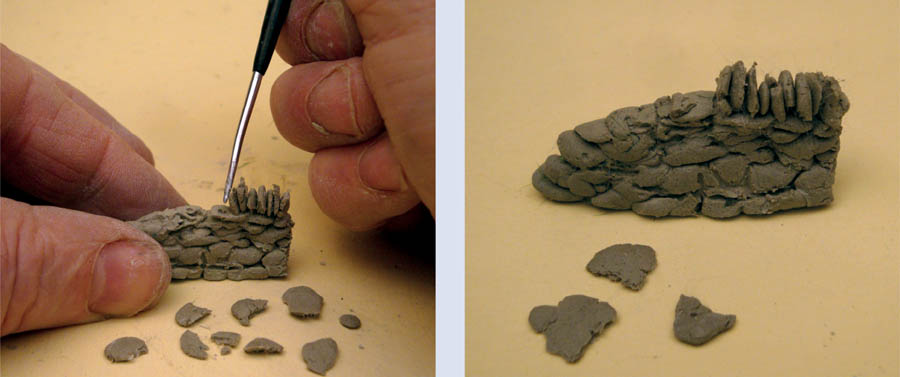
Once the model has reached the right height, the coping stones can be added along the top edge. You will need to keep the wall a little damp for this to be done. Before you add the coping stones, press lightly down on the structure so that all is bonded together.
The coping stones are made by squashing the little pellets until they are almost completely flat; their precise form depends on the stone and the area being modelled. The coping stones are set in place by gently pressing them into the damp wall. With a touch of water on a paint brush, mould the bottom of the coping stone into the top course of the wall. Gently pat the sides with a palette knife: it will squash the pealike pellets slightly, giving them a more realistic shape.
The finished end to a wall is very important and should show the correct bonding. If there is a field gate, a ‘hiker’s through’ (sometimes called a ‘squeeze stile’) or a step stile, this will need a little extra care.
The squeeze stile or hiker’s through is usually represented by the dry-stone wall being properly returned and a large vertical stone placed in the ground at a slight angle; the same thing applies on the other side, so that the two large vertical stones form a V. This is achieved by rolling a longer piece of air-drying clay, patting it flat and shaping it with a palette knife. Plant this against the end of the wall with a touch of PVA glue.
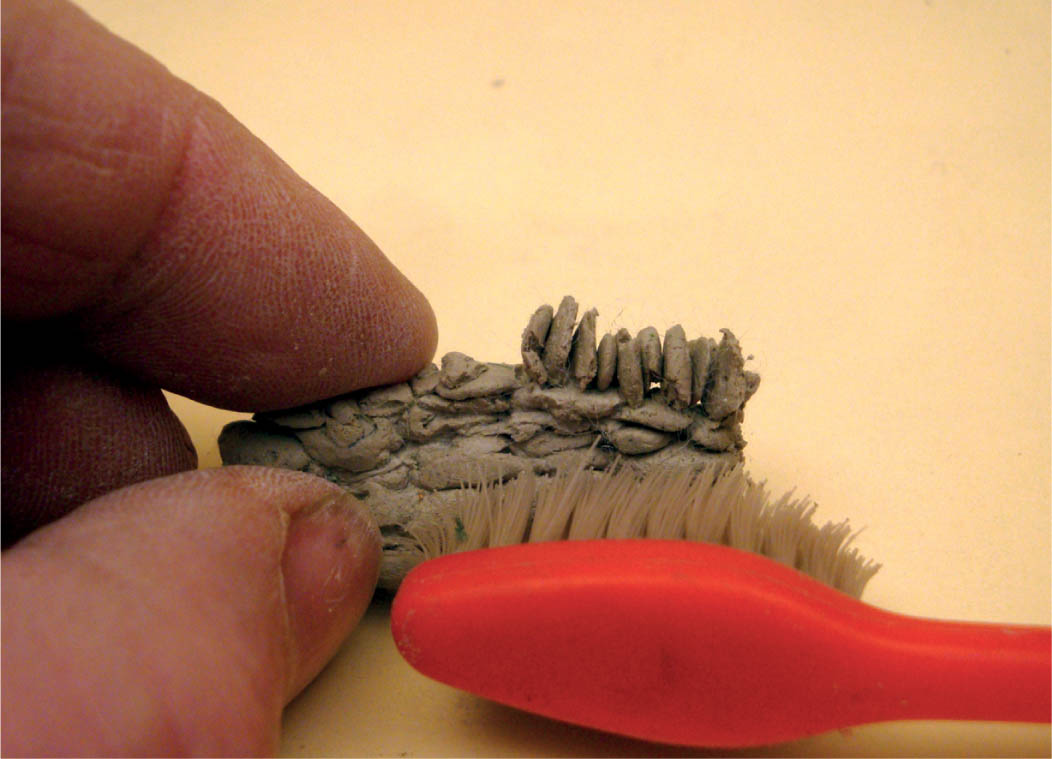
Where a step style is being modelled, larger stones are made. They must be wider than the wall and are laid horizontally so they project through either side of the wall, much like a staircase. The top two or three courses are left off, and no coping stones are required. Once everything has dried and settled, brush the wall with an old tooth brush. By brushing the wall all superfluous knobs and the like will be taken off. This process will ‘age’ the wall by putting a fine grain effect on the stones.
You can represent a wall that has not been maintained as it should have been and has begun to collapse by breaking out a small part of the model and placing a small pile of stones on either side of the model. Then perhaps a cheap or temporary repair by the farmer can be replicated by a fence post or two with barbed wire put across the hole.
A step stile can make an interesting break in a wall, particularly if at or near to the front of the model. Carefully mould some clay into fairly large stones and press these on both sides of the wall with a touch of PVA, or build them in as you go.
After everything has dried, carefully brush over the wall to ‘age’ the stone.
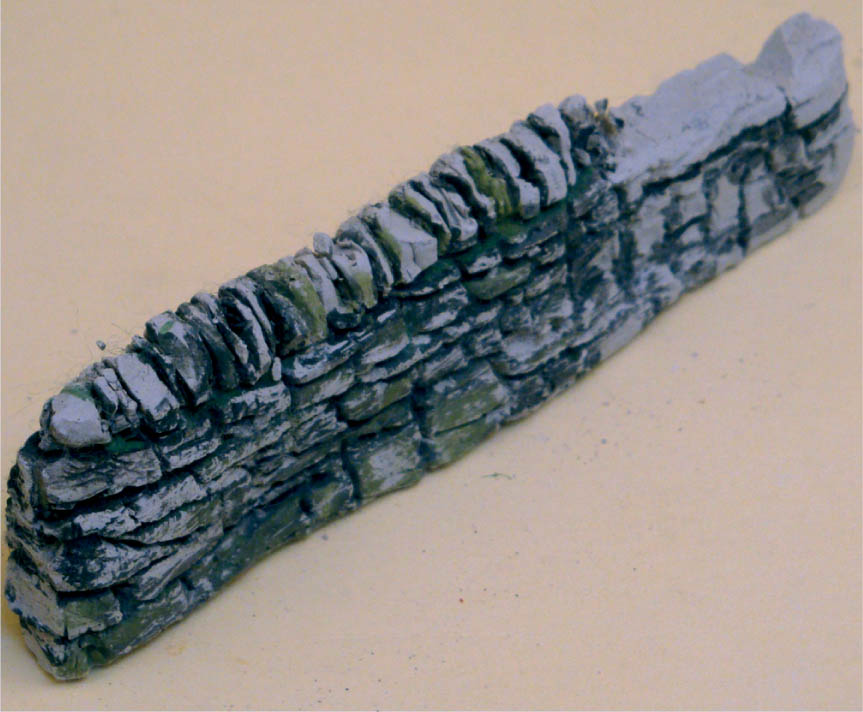
To paint the wall use water-colours, starting with a very dark colour. Float the colour into the joints to show up any imperfections in the stones, as well as the courses. Follow this with a general colour for the stone. Then pick out any individual stones just to give that extra bit of detail and interest. Once all this has dried, carefully remove the polythene and glue the wall in place using a hot-melt glue gun or strong quick-drying glue.
This approach is used for short sections of wall perhaps around a farmyard or churchyard, or even the backs of terraced housing.
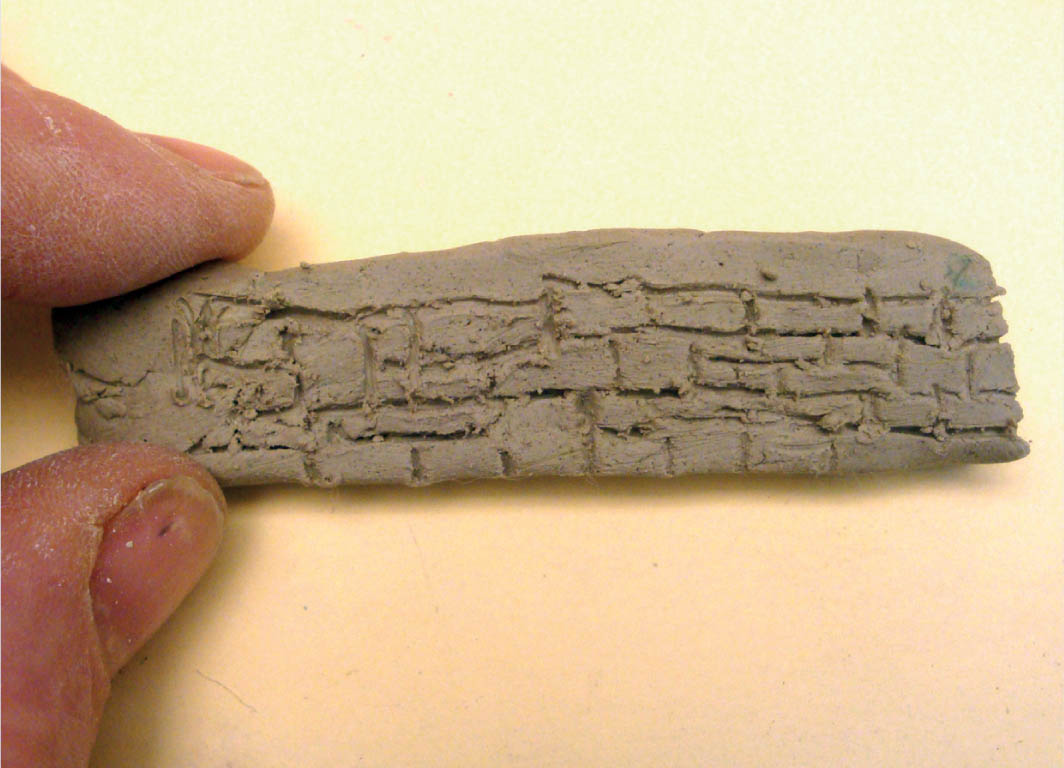
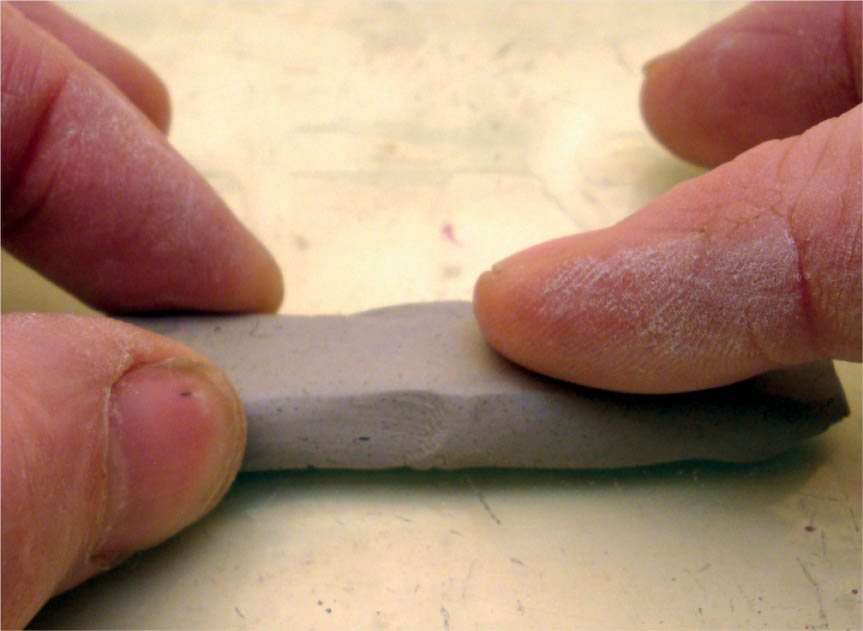
Form a block of modelling clay to the height of the wall, including the coping stones. Smooth this out, making it as straight as you can with the aid of a little water. Lay it on its side on a piece of glass or plastic sheet. Starting at the bottom, scribe joints into the clay with an engineer’s scribe or something that has a sharpened tip. Be careful to keep the surface damp, as it will dry fairly rapidly. Make sure there are no straight joints (vertical joints that run from the top to the bottom of the wall). They should be avoided at all times as they show a weakness in the wall. The coping stones are cut across the top of the wall with a modelling knife, preferably one with a worn-out blade as sharpness is not a prerequisite here.
A length of wall can be made in small sections, each section being glued down individually. The end of each section is left blank and with slight indents, something like a rebate; this way, when the sections are stuck together the joint can be disguised. This is achieved by pressing into the rebate a piece of clay that is then scribed to match. When it is all dry, give the completed wall a quick brush-over with an old tooth brush and paint it with water-colours.
MAKING SOLID CLAY WALLS
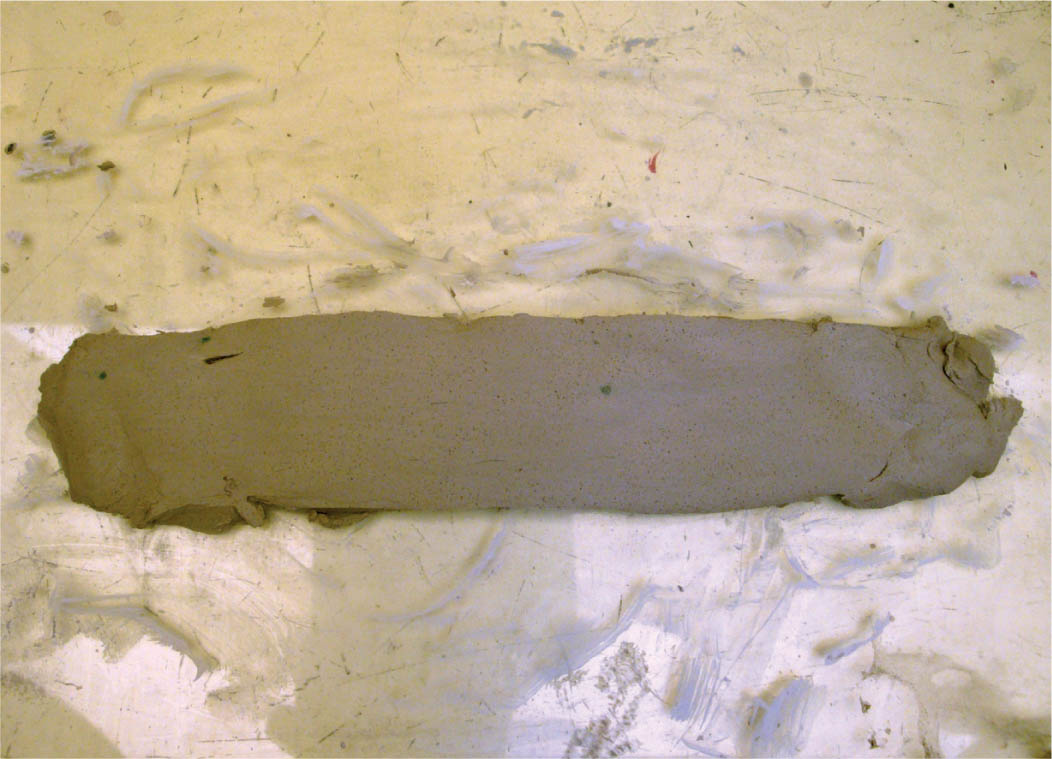
1. Solid block dry-stone walls.
2. Form a solid block of clay the height of the wall including the coping stones.

3. Scribe the stones whilst the clay is still slightly damp.
5. The ends of the wall should be finished with a good bond.
6. Cut the coping stones using a craft knife or similar; a sharp blade is not necessary.
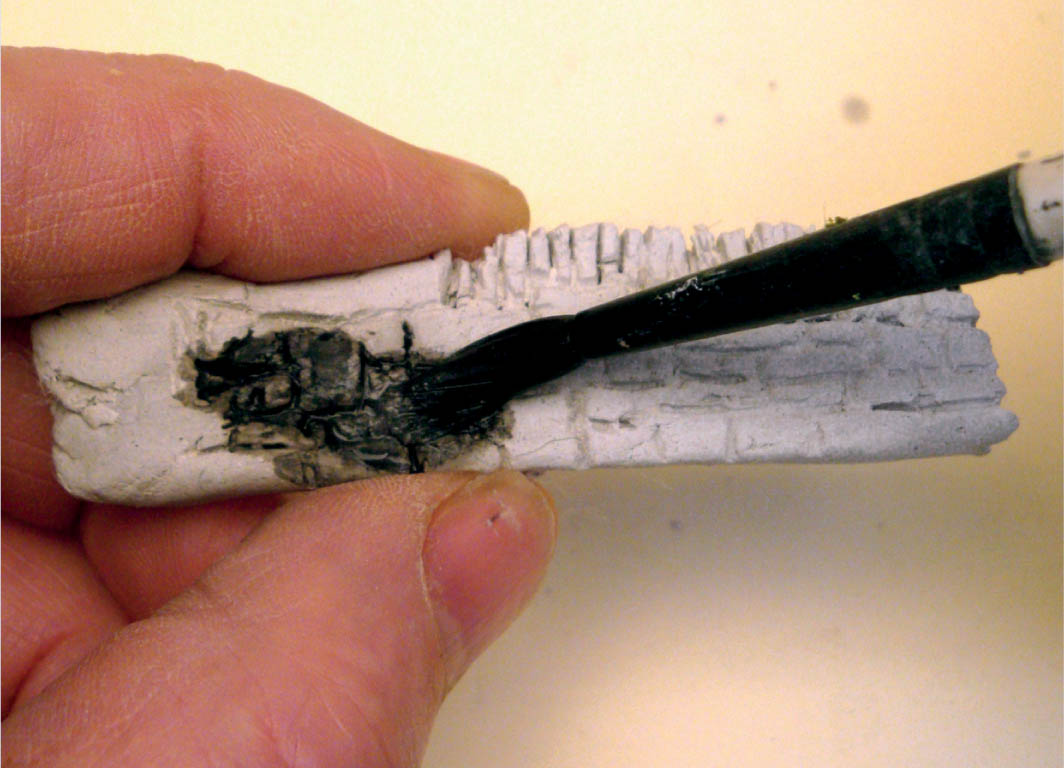
8. A wash of a dark colour will bring out the detail in the stones. When this is dry, start to pick out individual features.
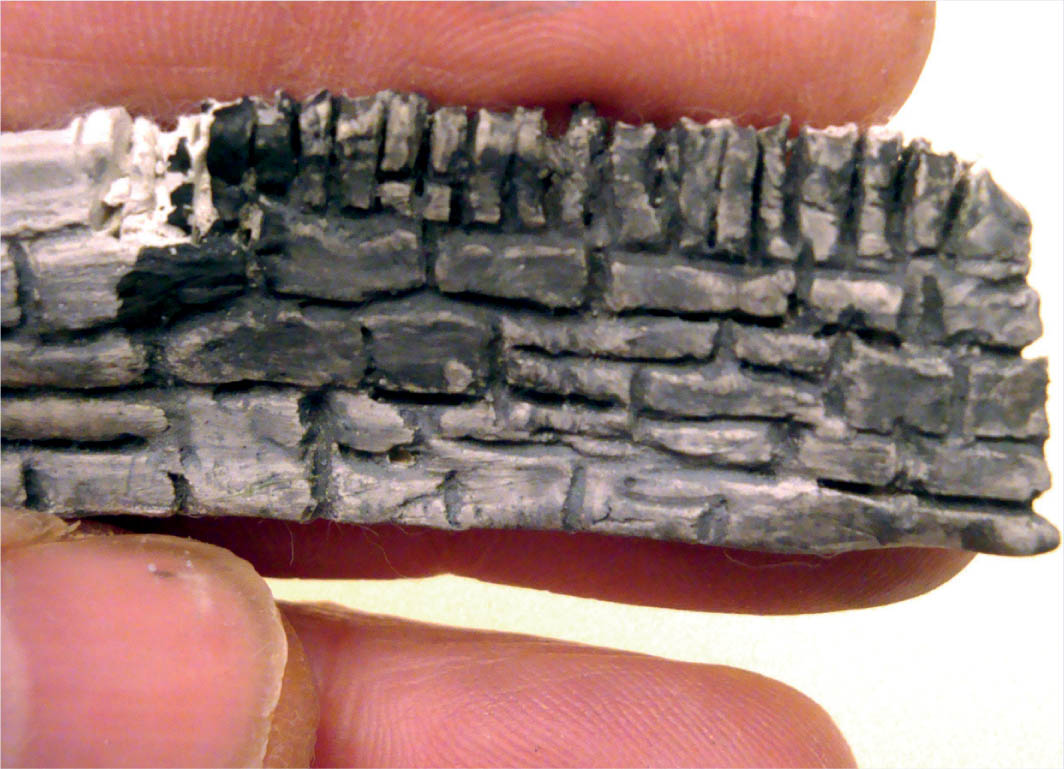
9. The finished solid clay wall.
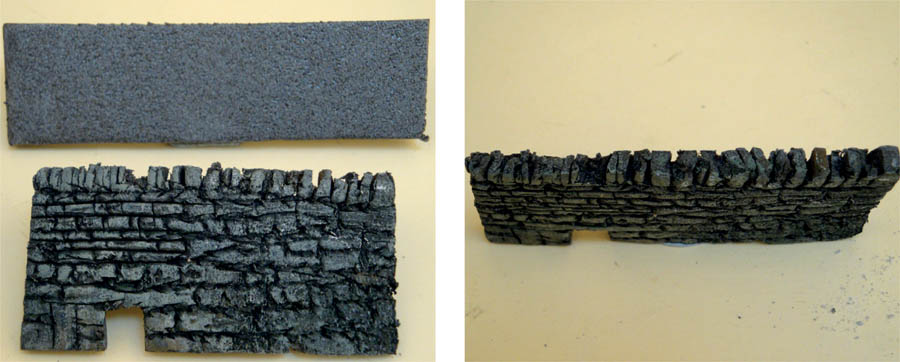
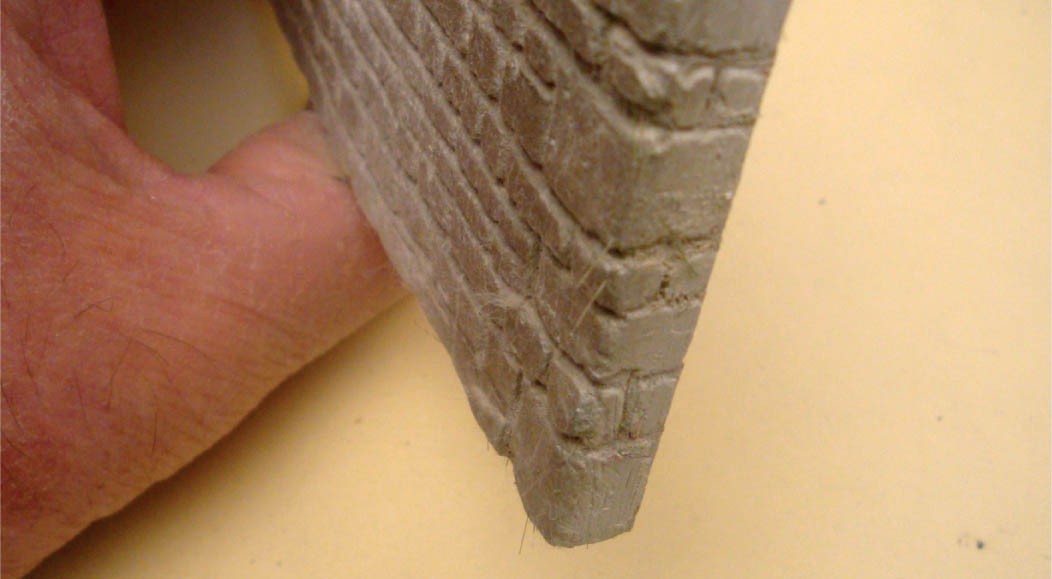
Depron is a high-density lightweight polystyrene board used by model aircraft hobbyists. It comes in sheet form and from 2–6mm in thickness; it is extremely good for scribing and will take acrylic paints well. Depron is a lot quicker to use than the aforementioned methods, but when finished is none the less quite realistic.
Depron walls are quick to make and, if accurately scribed, will look quite convincing. Always make sure you use a sharp blade when cutting Depron, as a blunt blade will drag the edge and the finish will be wholly unacceptable.
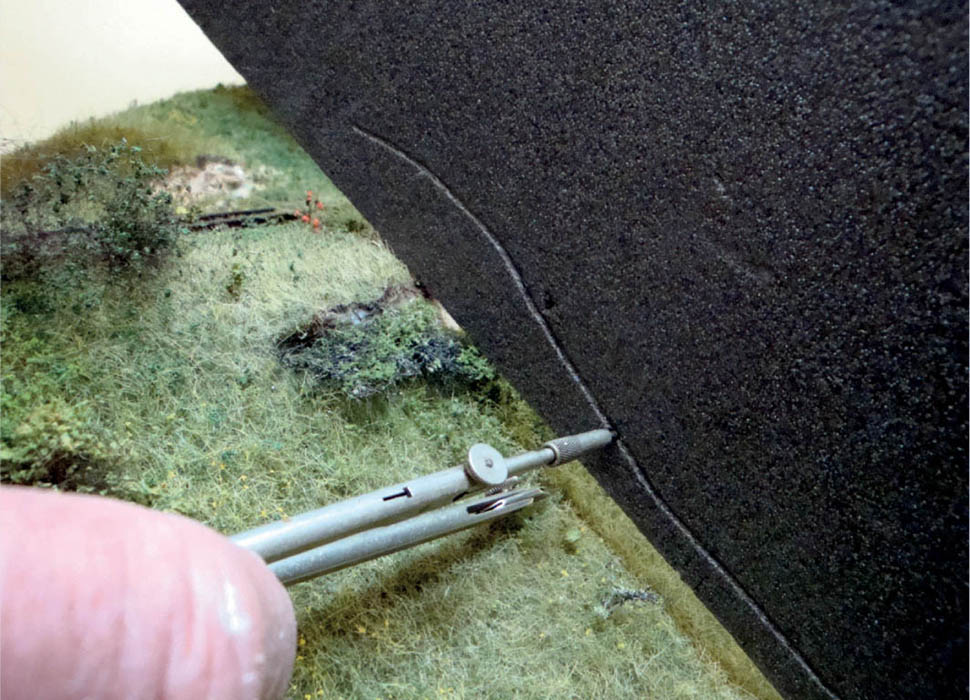
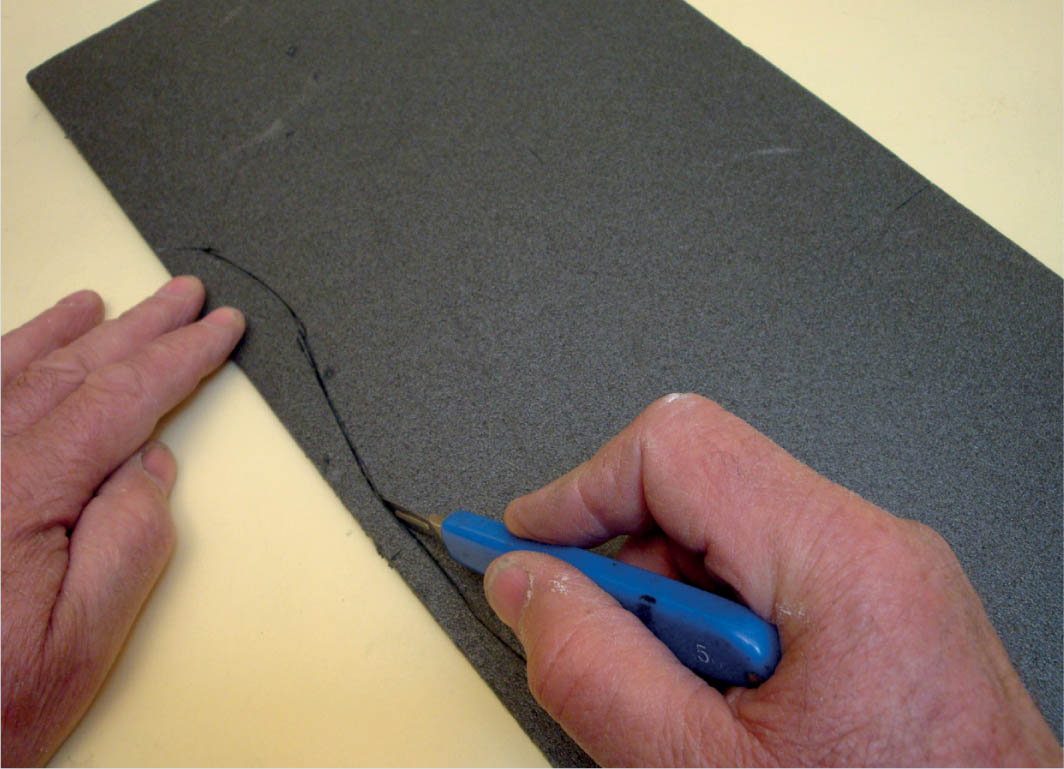
To make the wall fit the landscape (especially if it is hilly), begin by holding a pre-cut piece of Depron vertically. Open a pair of dividers out across the gap at the lowest point of the landscape. Next, place the opened dividers at the ‘top of the hill’ and, keeping the points pressed against the landscape, draw the dividers down the hill to the bottom of the sheet.
Place the sheet flat on the work bench and cut along the scribed line. Open the dividers to the chosen height of the wall and, resting one point against the cut edge, draw a parallel line across the sheet. Cut along that line with your scalpel or craft knife. Make sure the blade is very sharp as the Depron will drag against a blunt blade and destroy any sharp edge you may wish to have.
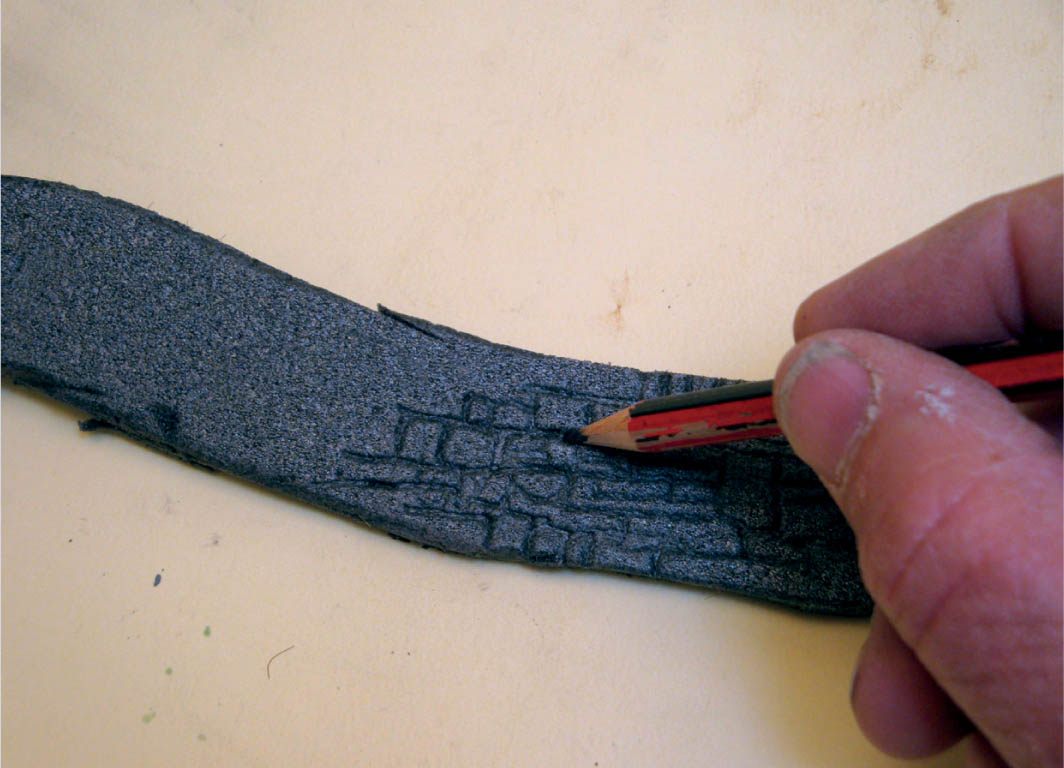
With a sharp pencil or engineer’s scribe, draw the stones onto the surface, remembering to keep the courses as parallel as possible. If there is a very steep incline, try to keep the courses horizontal. Scribe the other side of the Depron sheet in a similar manner, trying to match the courses as closely as possible; of course, if the back side of the wall is not seen, then any detail is irrelevant.
If a thicker wall is required, then scribe two skins and stick them back-to-back with a small spacer at the bottom to give a batter to the wall. Use Copydex or a solvent-free adhesive to do this.
The coping stones are then scribed in and suitable cuts made to represent the edge-on appearance of the stones. Any additional features such as ‘throughs’ or ‘creep holes’ (which allow sheep to pass from field to field) can be scribed and cut out. Any returns on the ends of the walls, stiles and so on can be fabricated and stuck on as a retro fit.
MAKING DEPRON WALLS
1. To make the wall fit the landscape (especially if it is hilly), begin by holding a pre-cut piece of Depron vertically. Take a pair of dividers and open them out across the gap at the lowest point of the landscape. Next, place the opened dividers at the ‘top of the hill’ and, keeping the points pressed against the landscape, draw the dividers down the hill to the bottom of the sheet.
2. Place the sheet flat on the work bench and proceed to cut along the scribed line. Open the dividers to the chosen height of the wall and, resting one point against the cut edge, draw a parallel line across the sheet.
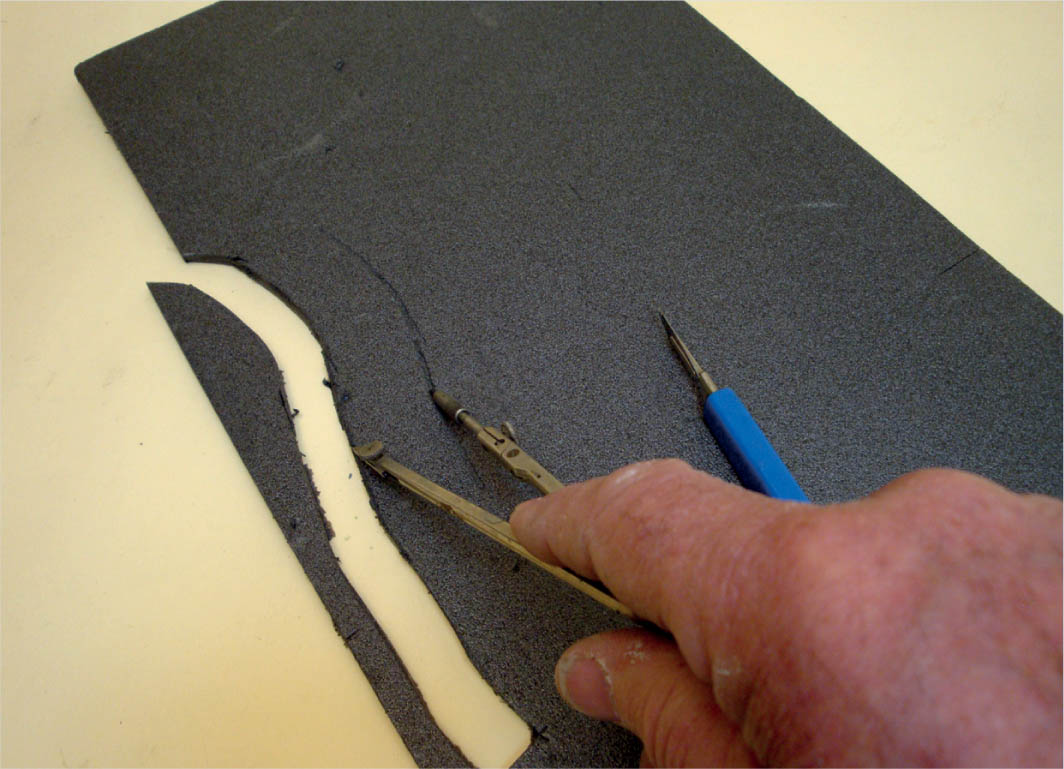
3. Cut along that line with your scalpel or craft knife. One point here, make sure the blade is very sharp as the ‘Depron’ will drag against a blunt blade and destroy any sharp edge you may wish to have.
4. With a sharp pencil or engineer’s scribe, draw the stones onto the surface, remembering to keep the courses as parallel as possible.

5. The wall will sit comfortably on the hillside and can be fixed with a solvent-free adhesive.
Painting Depron requires a slightly different approach as it is not porous. A priming coat is needed, which usually consists of an acrylic paint the shade of which will match the underlying stone colour.
Make sure all the surfaces are covered with the primer, including all the joints. After it has dried apply a coat of a thinned mix of black/dark grey acrylic paint to the courses – the capillary attraction draws the diluted paint along the courses. Once this has dried, paint the individual stones. Details such as ferns growing out of joints are easily added later on. These can be made from latex/cellulose crumb and/or static fibres.
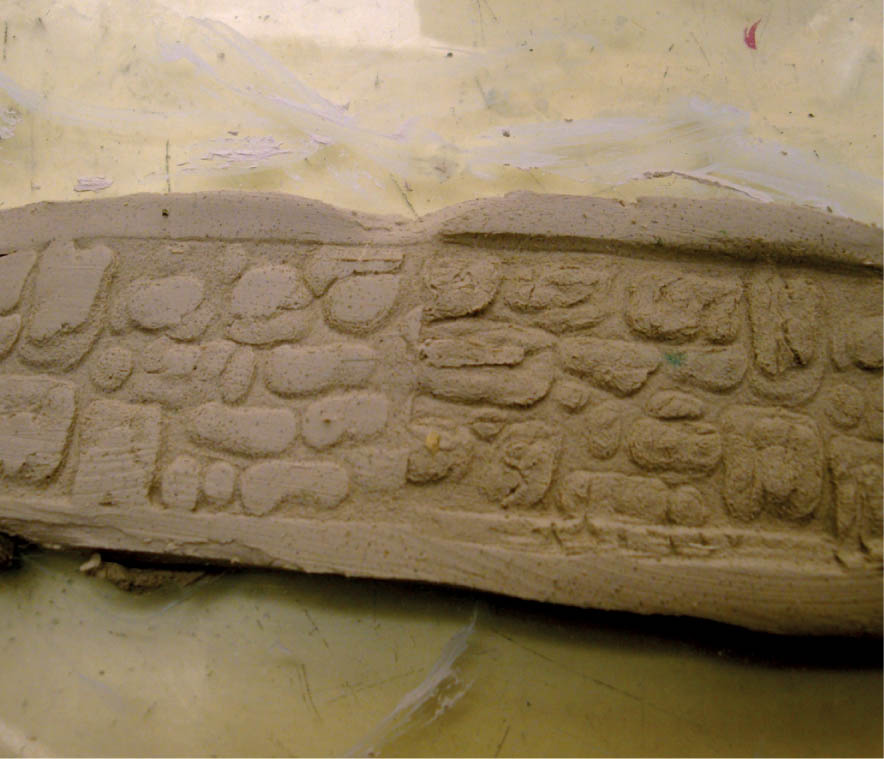
Although not representative of any particular style of stone wall, this method is very useful and a quick way of creating a long length of wall. It is created by making a mould, which is pressed into the wet modelling clay. This can be a standalone wall or glued to a card heart.
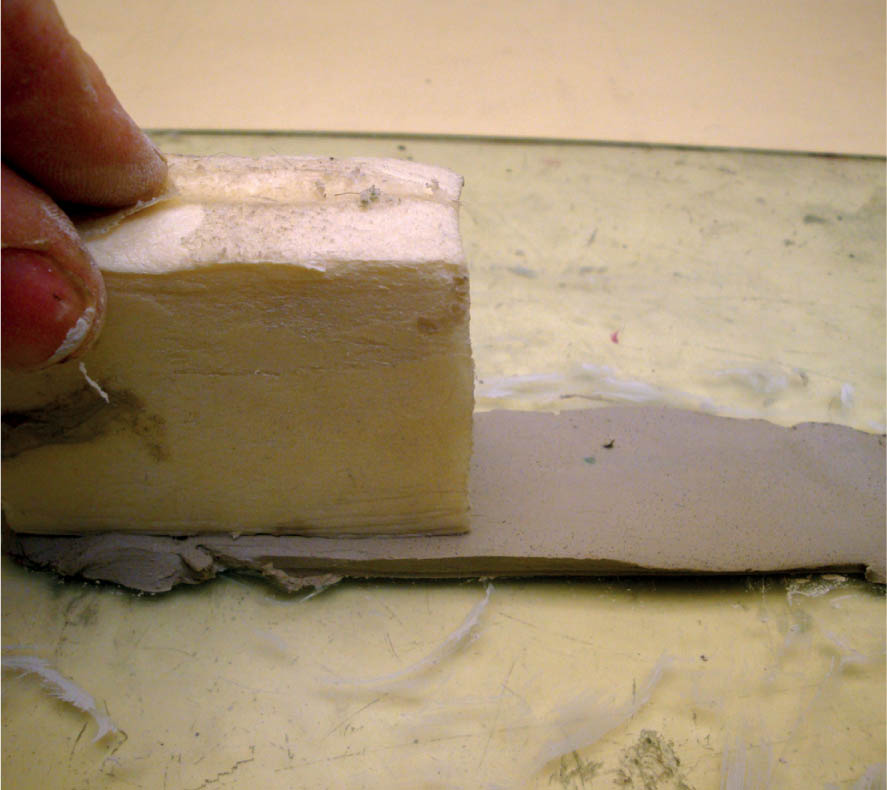
Making the mould is simplicity itself, but the work must be carried out in a well-ventilated area as it involves melting styrene board. Cut a block of styrene foam to 70mm long by 30mm wide by 25mm thick (2¾×1¼×1in).
Fabricate an extension to a soldering iron with a piece of brass that has a small, flat area the size of the iron tip; this extension is used to dissipate some of the heat from the iron, over which it is slipped. Alternatively, use an old tip on an iron with the temperature turned right down. When the iron is hot, dab the tip into the edge of the styrene block: after a little practice you will see how long you need to hold the iron in the styrene. This will make irregular holes that can be left as they are or, by moving the iron, elongated to represent larger stones.
Try to avoid straight joints. Work your way across the block until the whole area is covered, taking some stone indents off the edge of the block: this will give a staggered joint when the next impression is made. The space between these holes will look like pointed mortars, after you have made the impression.
Lay a piece of plate glass on the bench and press a piece of modelling clay onto the glass. Whilst this clay is still wet, press the mould block into the clay. Work your way along the clay until the end is reached.
Make several more pieces like this, leaving them on the glass plate until they are dry. They can then be lifted off and either stuck back to back, as described in the Depron section, or on to a card heart, making a reasonable representation of a wall.

1. Dip the hot soldering iron into the styrene block’s edge. With a little practice you will soon see how long to leave the iron on the styrene. Move the iron around to make larger indents to represent bigger stones.
2. Press a piece of modelling clay onto a sheet of glass.
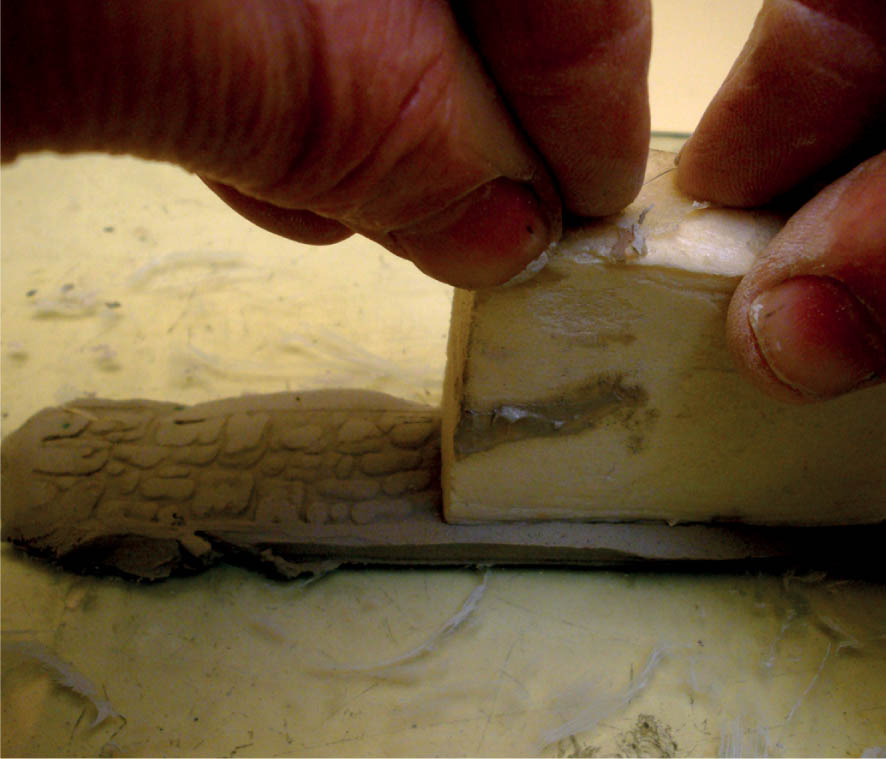
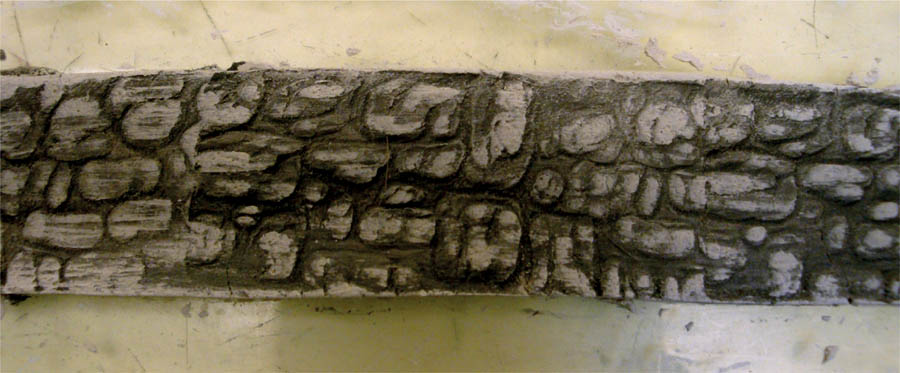
3. Push the mould into the wet clay, working your way along to the end. On each pressing, match the joint as carefully as you can. Make several of these impressions in one session and leave them to dry. Then remove the strips of walling and glue them to a heart of card, or back-to-back as described for the Depron wall system.
The same can be done with thicker pieces of modelling clay. Work up a piece of clay to the required height and thickness, remembering to put a little batter to the sides. Stand it up on the plate-glass bed and impress the wall using two moulds, sandwiching the clay between them and working your way along as described previously. Flatten the top with a knife and then proceed to make and bed the coping stones, as described earlier in this chapter. They are then glued on with PVA and, when all is dry, give the wall a good brushing with a toothbrush.
Embossed plastic and card sheets have been available from various manufacturers for many years and represent good value for money. They cover a vast array of different styles, from dressed stone to cut, square-edged stone walls with regular joints. However, situations may arise where you have to make your own because suitable products aren’t available for a specific requirement.
A good foundation is important and for this foam-board is recommended; this is a card-faced styrene sandwich. A thin MDF or hardboard such as the type used for backing pictures in picture frames is also very handy. The hardboard should be used with the smooth face to the back of the work. Start by cutting the backing to shape and checking its fit on the model.
Lay the board on a flat surface and prime the back with either PVA or paint. This coating will act as a balance to the air-drying clay on the front and will reduce any tendency to curl or distort.
Paint neat PVA glue onto the surface and, whilst this is still wet, press the air-drying modelling clay into it. After the whole area is covered, smooth it over with a wetted thumb or a palette knife and leave it to dry. When the clay has cured give the face a light sanding with a 150 grit glass paper.
Set the stone courses out with a soft pencil: a harder lead will mark the surface too deeply, and if any mistakes are made these will be harder to erase. When you are happy with the general layout, scribe the pencilled-in stonework with an engineer’s scribe or suitably sharpened tool. This is a time-consuming method, but in the end very satisfying.
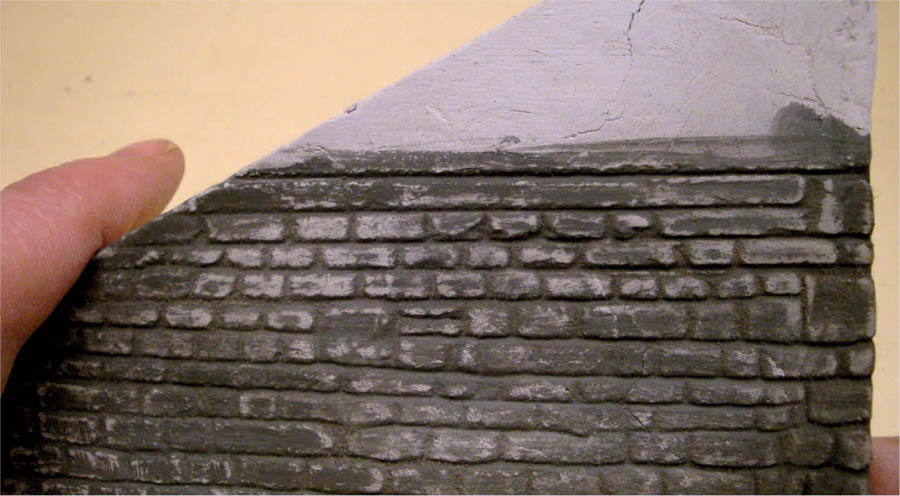
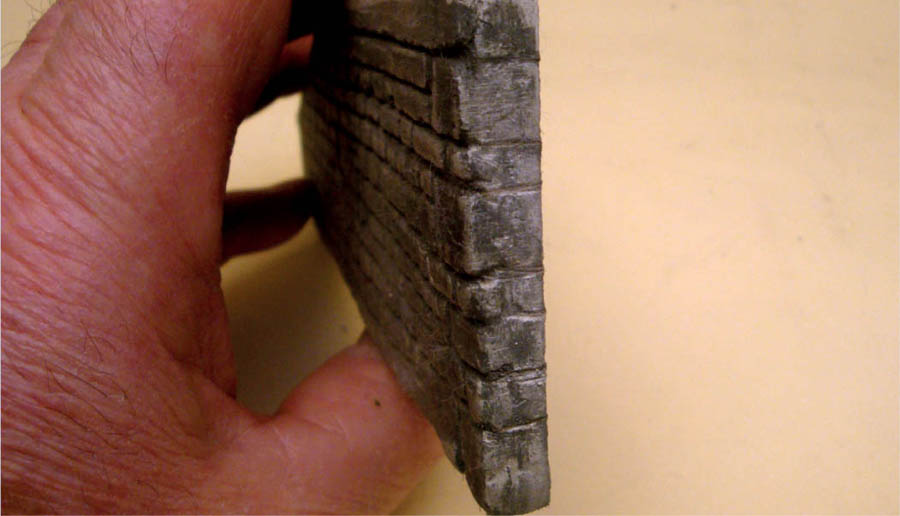
External corners are finished with either a straightforward bonding on the return or by quoining: this is large dressed stones or similar set with an alternate head and stretcher pattern. The work is then coloured using water-based paint.
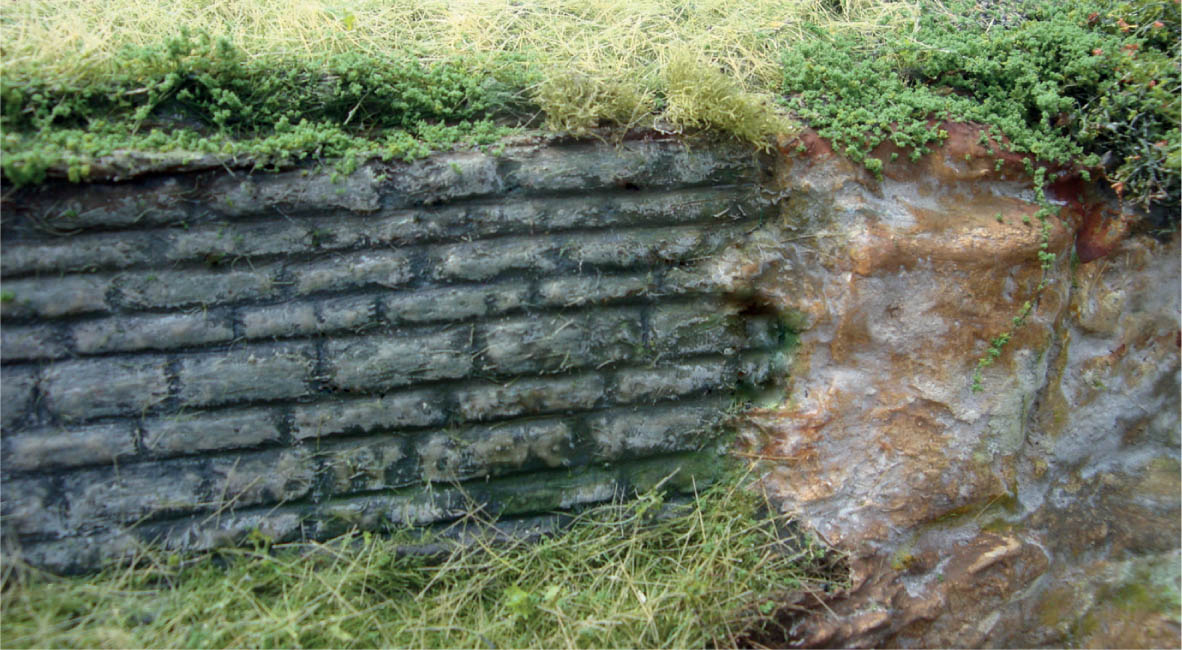
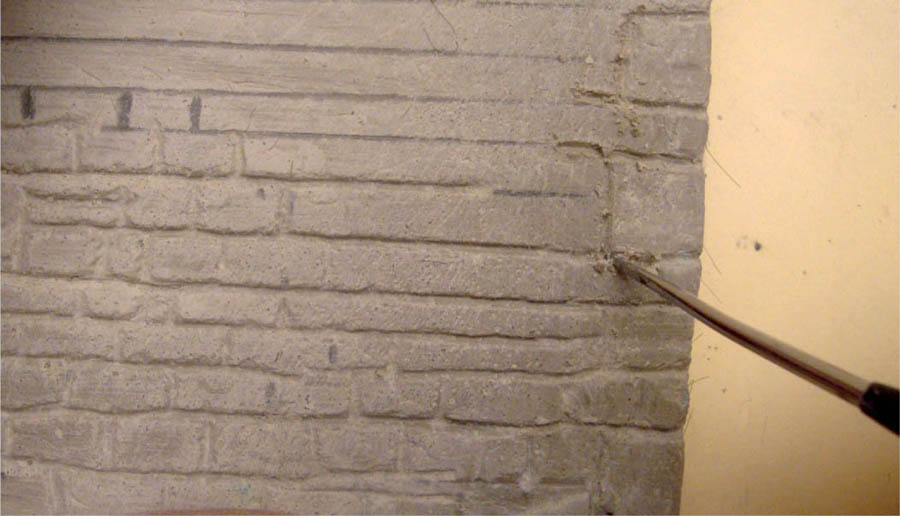
Embossed or moulded plastic sheet can be useful in certain situations. This particular piece is made with Slater’s Plastikard and has had a thin coat of a precoloured plaster mix.
MAKING A RETAINING WALL FROM AIR-DRYING CLAY

1. Coat both sides of the backing with PVA glue to balance out the tension formed by the coatings. If you don’t do this, the backing will bend and ruin all your hard work.
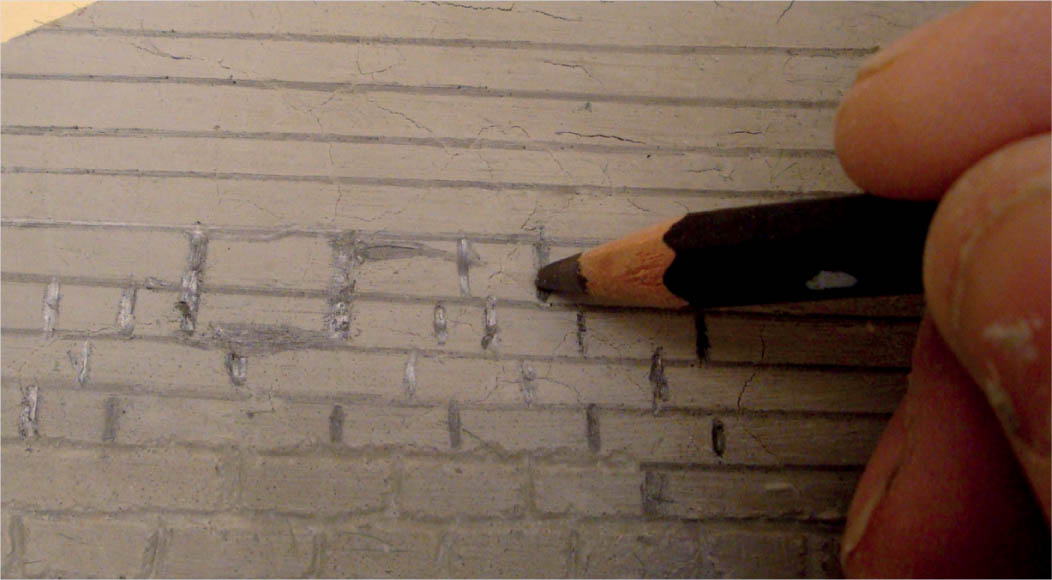
2. After you have spread the air-drying clay over the backing and smoothed it over with a palette knife, let it dry. Lightly sand the surface and set out the stonework with a soft pencil.

3. Begin to scribe the stonework.
4. Scribe in any quoining or straightforward stone returns.
6. Brush over the whole wall with a toothbrush and paint.
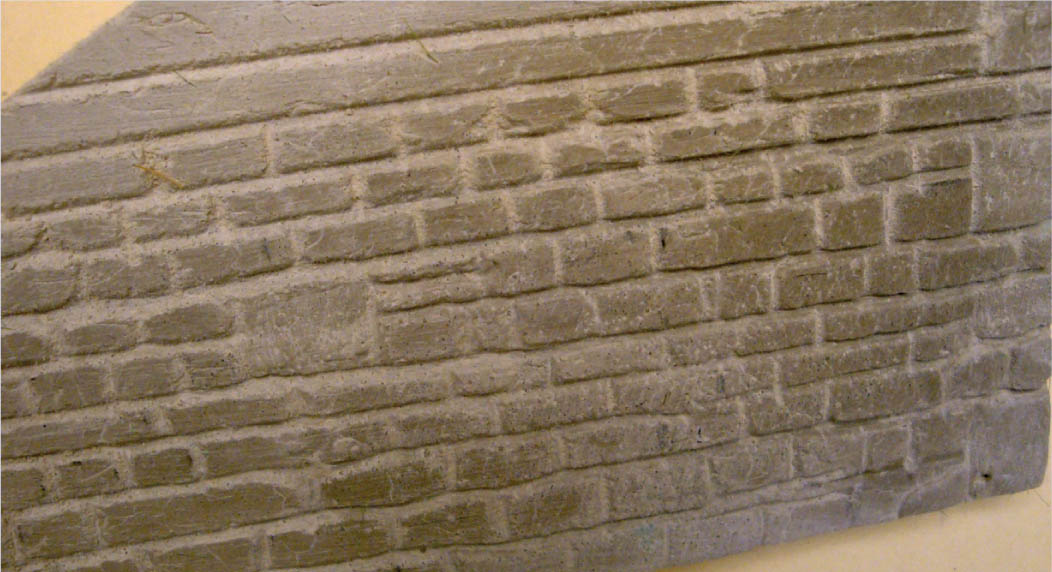
7. The finished retaining wall.
Hedgerows are, like dry-stone walls, a good barrier for keeping in stock and demarking boundaries, and generally taken for granted. They need little maintenance save an annual trim, usually carried out in late winter or the early spring.
To represent hedgerows in the autumn and winter months requires quite a bit of work as usually all that can be seen is bare ‘twiggery’. An exception to the rule is the evergreen holly, which, as a hedgerow tree, is probably more common than is generally realized. it will stand and grow above the normal hedge height if not cut down regularly.
If you put the hedgerow in the foreground of your model, a great deal more detail will be required, and about as much work is needed to create a realistic-looking hedgerow as to create a ‘naked’ winter tree. Spring and summer hedgerows are much easier to make. There is a wealth of detail that can be added to a summer hedgerow, with many shades of green along with flowers on top as well as at the base.
You can occasionally use a hedge as an excuse to cover an unfinished model as maybe Mother Nature would do, creeping in to cover over a wall or derelict building.
There are several ways to make hedgerows in the smaller scales. One such way is the use of industrial floor scrubbers, as described in Chapter 5.
Cut a floor scrubber to a rough size using a heavy pair of scissors, pulling and teasing out the dense matting as you go, trimming and shaping the hedge with the scissors. Spray small areas near the top a dark shade of brown and, as the floor scrubber is black, leave the base in that colour – the brown colour is used to represent new growth. Apply a spray adhesive to the whole hedge and sprinkle it with a scatter material. Then fix the hedge down onto the model using either a hot-melt glue gun, UHU or a thick bed of PVA. Sprinkle more crumb at the base.
For any flowers that are needed, lightly spray with adhesive/hair spray, apply a very small sprinkling of colour, and then spray again with varnish or hair spray.
For the larger scales, more work is needed on the scrubbers. Vary the colour and texture of the leaves: paper leaves (Selkirk) is extremely good for this.
Pinch off some postiche (doll’s hair) and tease it out. Spray it with hair spray and drop it into a container of latex or cellulose crumb. Roll it over a couple of times, give it a quick shake, tease it out again and lay this across the top of the hedge. Smaller detail such as flowers can then added whilst the adhesive is still wet. Don’t put too much colour on: all you need is an impression of the relevant flower colour. What that colour is will depend, as mentioned earlier, on the time of year and the type of plants you may want to represent.
Another method is to take a small piece of floor scrubber and tease it out until it is almost single-stranded. Then treat it by laying it over the hedge as above with the postiche, or drape it over a wall, fence or the ground. A further application of adhesive/varnish will fix it. This is the best method for brambles e.g. blackberries and wild roses.
A word of caution about acrylic varnishes: some have a whitish finish when they dry, so you must be careful where the varnish is used, experimentation is highly recommended.
Gorse is a little easier in this sense: the pinched-out scrubber is sprayed with adhesive, dipped into the green crumb and sprayed again. Whilst this is still wet, a small pinch of yellow is sprinkled over the ‘plant’. The plant is fixed down using a hot-melt glue gun or strong glue.
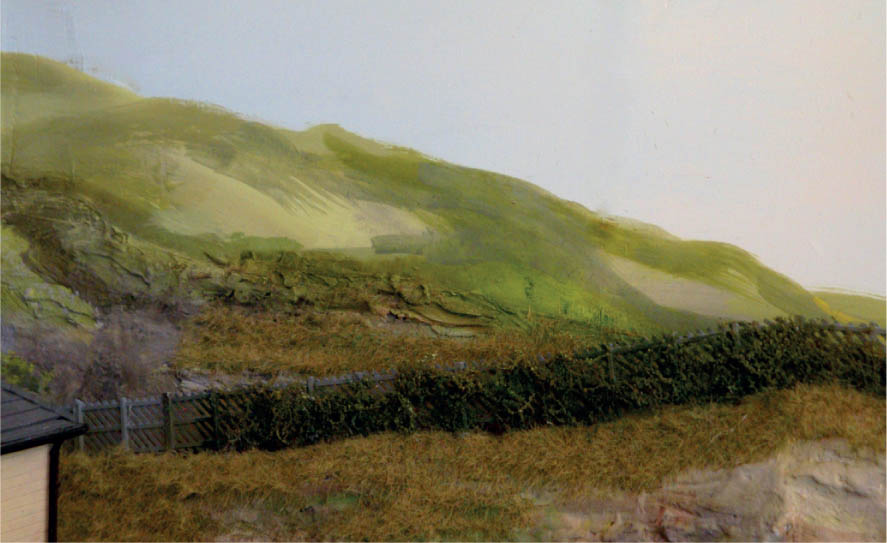
Foliage can be draped over a fence to further enhance the scene.
The plant can be made in the same way as the ‘twiggery’ described in Chapter 5 with the exception that the branches start very close to the base of the trunk. These branches can then be bent to form a wall-like shape. The plant is then coated and the foliage applied: it is better to add this bit by bit, as too heavy a canopy will not be right for a winter hedge.
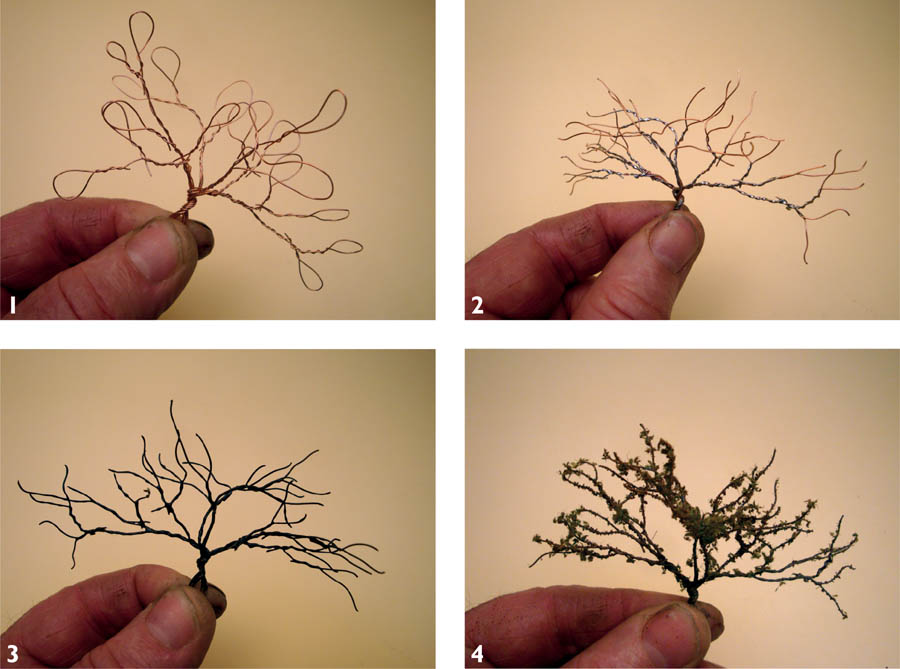
Pre-form the hedge from copper wire in a similar manner to making a naked tree. Twist fine wires together to make a tree in miniature, as described under ‘Fine Multi Strand Wire’ in Chapter 5.
Make the branches more horizontal with an obviously short trunk. Each plant will have a lot more spreading branches and they will be much closer together. The branches will need to start very low down the trunk. These branches can be twisted off all round the trunk, and then bent back to form a wall-like appearance.
Touch-solder all the intersections and paint everything with either a decorative plaster mix (this mix should have a little PVA added) or ‘Flexi-Bark’. Whether it should be painted or not will depend on the colour of the bark when it has dried. If the overall colour is mid-grey, leave it as it is: this will look suitably winter-like. Remember to leave enough wire to form a ‘tap root’.
If the hedge is to represent a beech or hornbeam, then a few leaves may still be left on the branches: dried tea leaves or Selkirk foliage will come in useful here. Spray the hedge with a strong adhesive and sprinkle a small amount of the tea leaves onto the branches. Build the amounts up slowly, checking the density as you go. To have a too-heavily foliated plant will not look right, as there will be some leaf drop during the autumn and through the winter. It would be better to batch-make these plants for consistency and plant them when everything has dried.