In the book, The DevOps 2.1 Toolkit: Docker Swarm (https://www.amazon.com/dp/1542468914), I argued that the best way to create a Swarm cluster in AWS is with a combination of Packer (https://www.packer.io/) and Terraform (https://www.terraform.io/). One of the alternatives was to use Docker CE for AWS (https://store.docker.com/editions/community/docker-ce-aws). At that time Docker for AWS was too immature. Today, the situation is different. Docker for AWS provides a robust Docker Swarm cluster with most, if not all the services we would expect from it.
We'll create a Docker for AWS cluster and, while in progress, discuss some of its aspects.
Before we start creating a cluster, we should choose a region. The only thing that truly matters is whether a region of your choice supports at least three Availability Zones (AZ). If there's only one availability zone, we'll risk downtime if it would become unavailable. With two availability zones, we'd lose Docker manager's quorum if one zone would go down. Just as we should always run an odd number of Docker managers, we should spread our cluster into an odd number of availability zones. Three is a good number. It fits most of the scenarios.
In case you're new to AWS, an availability zone is an isolated location inside a region. Each region is made up of one or more availability zones. Each AZ is isolated, but AZs in a region are connected through low-latency links. Isolation between AZs provides high-availability. A cluster spread across multiple AZs would continue operating even if a whole AZ goes down. When using AZs inside the same region, latency is low thus not affecting the performance. All in all, we should always run a cluster across multiple AZs within the same region.
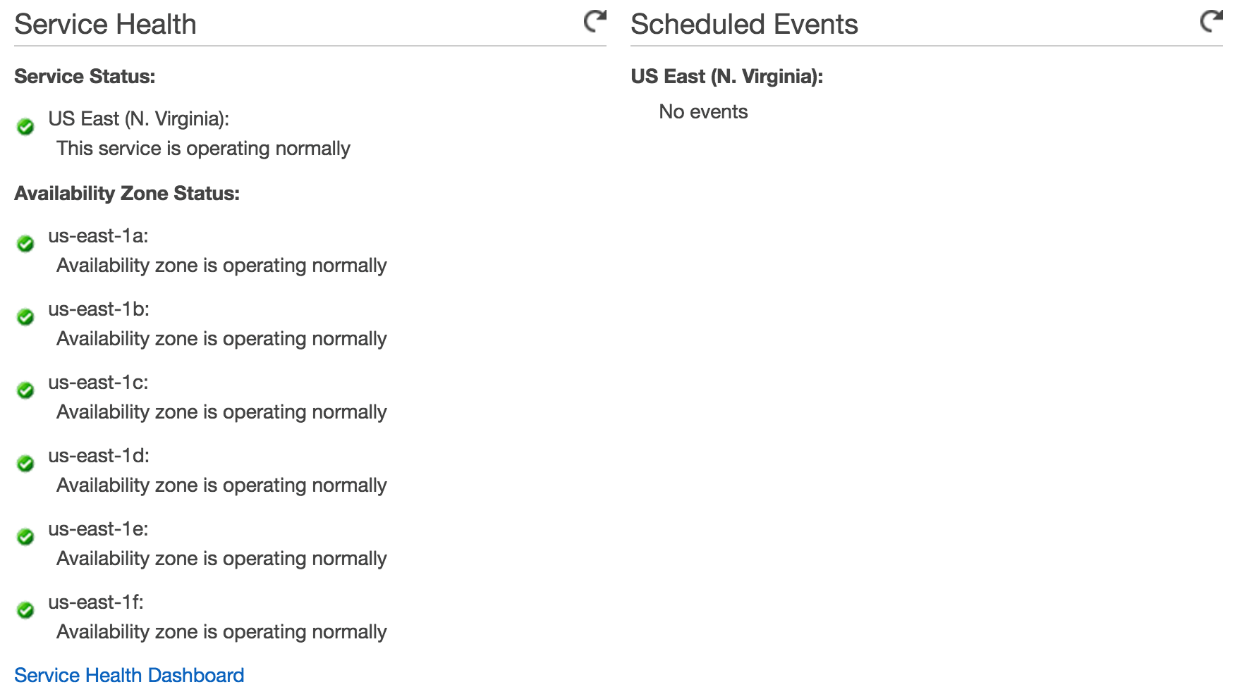
Let's check whether your favorite AWS region has at least three availability zones. Please open EC2 screen (https://console.aws.amazon.com/ec2/v2/home) from the AWS console. You'll see one of the availability zones selected in the top-right corner of the screen. If that's not the location you'd like to use for your cluster, click on it to change it.
Scroll down to the Service Health section. You'll find Availability Zone Status inside it. If there are at least three zones listed, the region you selected is OK. Otherwise, please change the region and check one more time whether there are at least three availability zones.

There's one more prerequisite we need to fulfill before we create a cluster. We need to create an SSH key. Without it, we would not be able to access any of the nodes that form the cluster.
Please go back to the AWS console and click the Key Pairs link from the left-hand menu. Click the Create Key Pair button, type devops22 as the Key pair name, and, finally, click the Create button. The newly created SSH key will be downloaded to your system. Please copy it to the docker-flow-monitor directory. The project already has /*.pem entry in the .gitignore file so your key will not be accidentally committed to GitHub. Still, as an additional precaution, we should make sure that only you can read the contents of the file.
chmod 400 devops22.pem
Now we are ready to create the cluster. Please open https://store.docker.com/editions/community/docker-ce-aws in your favorite browser and click the Get Docker button.
You might be asked to log in to AWS console. The region should be set to the one you chose previously. If it isn't, please change it by clicking the name of the current region (For example, N. Virginia) button located in the top-right section of the screen.
We can proceed once you're logged in, and the desired region is selected. Please click the Next button located at the bottom of the screen. You will be presented with the Specify Details screen.
Please type devops22 as the Stack name.
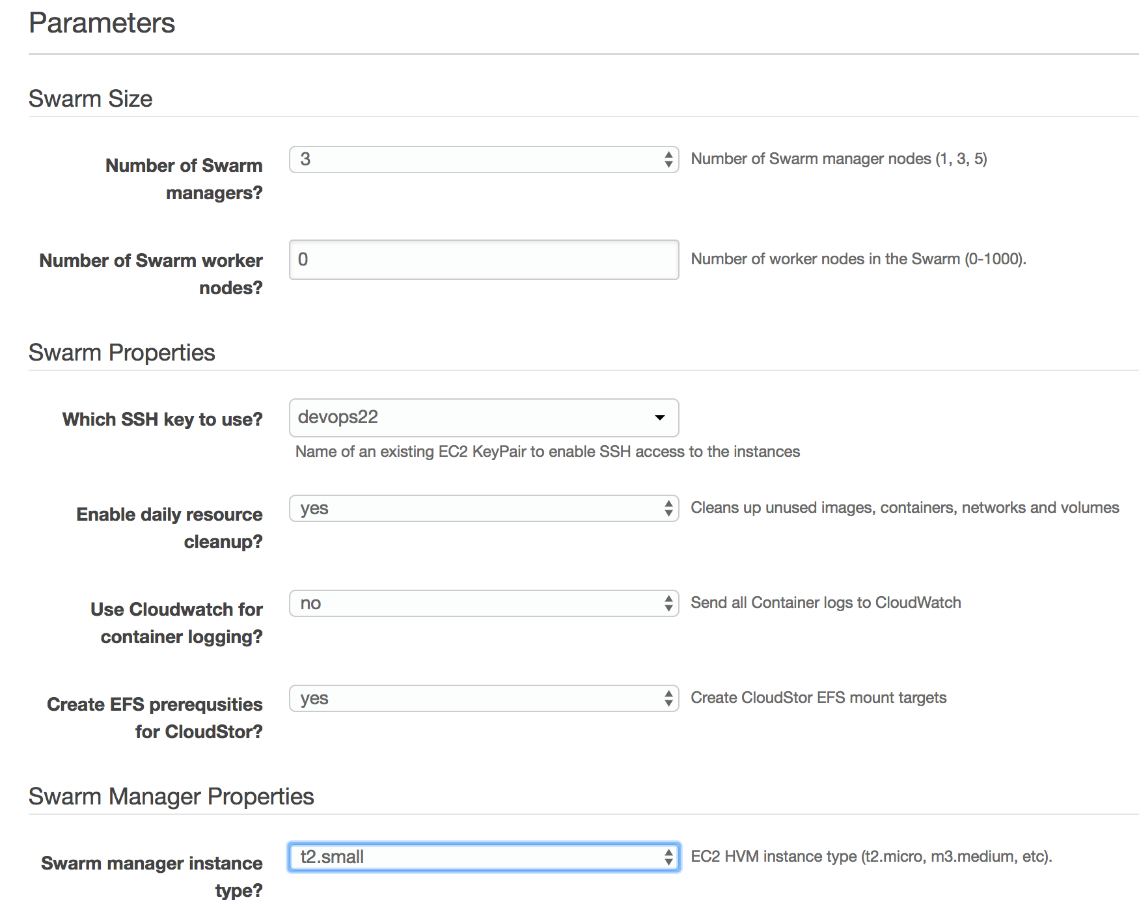
We'll leave the number of managers set to three, but we'll change the number of workers to 0. For now, we will not need more nodes. We can always increase the number of workers later on if such a need arises. For now, we'll go with a minimal setup.
Please select devops22 as the answer to Which SSH key to use?.
We'll do the opposite from the default values for the rest of the fields in the Swarm Properties section.
We do want to enable daily resource cleanup so we'll change it to yes. That way, our cluster will be nice and clean most of the time since Docker will prune it periodically.
We will select no as the value of the Use CloudWatch for container logging? drop-box. CloudWatch is very limiting. There are much better and cheaper solutions for storing logs, and we'll explore them soon.
Finally, please select yes as the value of the Create EFS prerequisites for CloudStor drop-box. The setup process will make sure that all the requirements for the usage of EFS are created and thus speed up the process of mounting network drives.
We should select the type of instances. One option could be to use t2.micro which is one of the free tiers. However, in my experience, t2.micro is just too small. 1 GB memory and 1virtual CPU (vCPU) is not enough for some of the services we'll run. We'll use t2.small instead. With 2 GB of memory and 1 vCPU, it is still very small and would not be suitable for "real" production usage. However, it should be enough for the exercises we'll run throughout the rest of this chapter.
Please select t2.small as both the Swarm manager instance type and Agent worker instance type values. Even though we're not creating any workers, we might choose to add some later on so having the proper size set in advance might be a good idea. We might discover that we need bigger nodes later on. Still, any aspect of the cluster is easy to modify, so there's no reason to aim for perfection from the start.

Please click the Next button. You'll be presented with the Options screen. We won't modify any of the available options so please click the Next button on this screen as well.
We reached the last screen of the setup. It shows the summary of all the options we chose. Please go through the information and confirm that everything is set to the correct values. Once you're done, click the I acknowledge that AWS CloudFormation might create IAM resources checkbox followed by the Create button.
It'll take around ten to fifteen minutes for the CloudFormation to finish creating all the resources. We can use that time to comment on a few of them. If you plan to transfer this knowledge to a different hosting solution, you'll probably need to replicate the same types of resources and the processes behind them. The list of all the resources created by the template can be found by selecting the devops22 stack and clicking the Resources tab. Please click the Restore icon from the bottom-right part of the page if you don't see the tabs located at the bottom of the screen.
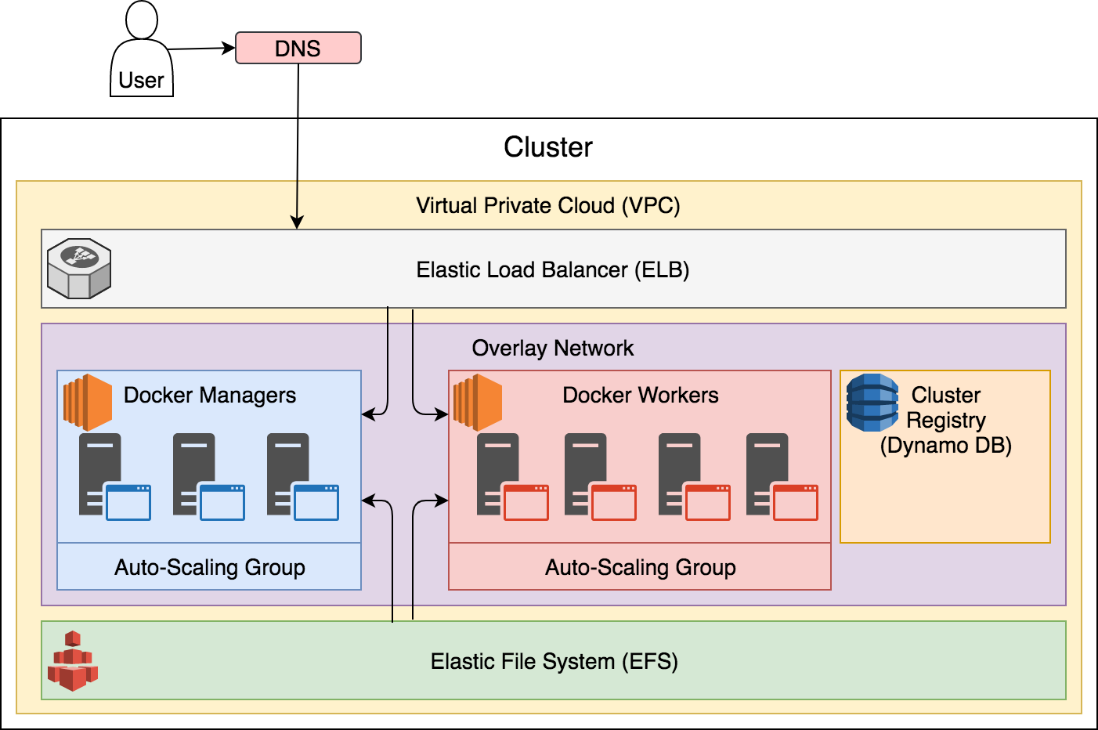
We won't comment on all the resources Docker for AWS template creates but only on the few that are crucial if you'd like to replicate a similar setup with a different vendor.
VPC (Virtual Private Cloud) makes the system secured by closing all but a few externally accessible ports. The only port open by default is 22 required for SSH access. All others are locked down. Even the port 22 is not open directly but through a load balancer.
ELB (Elastic Load Balancer) is sitting on top of the cluster. In the beginning, it forwards only SSH traffic. However, it is configured in a way that forwarding will be added to the ELB every time we create a service that publishes a port. As a result, any service with a published port will be accessible through ELB only. The load balancer itself cannot (in its current setting) forward requests based on their paths, domains, and other information from their headers. It does (a kind of) layer 4 load balancing that uses only port as the forwarding criteria. It does a similar job as the ingress network. That, in itself, is not very useful if all your services are routed through a layer 7 proxy like Docker Flow Proxy (http://proxy.dockerflow.com/), and since it lacks proper routing, it cannot replace it. However, the more important feature ELB provides is load balancing across healthy nodes. It provides a DNS that we can use to setup our domain's C Name entries. No matter whether a node fails or is replaced during upgrades, ELB will always forward requests to one of the healthy nodes.
EFS (Elastic File System) will provide network drives we'll use to persist stateful services that do not have replication capabilities. It can be replaced with EBS (Elastic Block Storage). Each has advantages and disadvantages. EFS volumes can be used across multiple availability zones thus allowing us to move services from one to another without any additional steps. However, EFS is slower than EBS so, if IO speed is of the essence, it might not be the best choice. EBS, on the other hand, is opposite. It is faster than EFS, but it cannot be used across multiple AZs. If a replica needs to be moved from one to another, a data snapshot needs to be created first and restored on the EBS volume created in a different AZ.
ASGs (Auto-Scaling Groups) provide an effortless way to scale (or de-scale) nodes. It will be essential in our quest for self-healing system applied to infrastructure.
Overlay Network, even though it is not unique to AWS, envelops all the nodes of the cluster and provides communication between services.
Dynamo DB is used to store information about the primary manager. That information is changed if the node hosting the primary manager goes down and a different one is promoted. When a new node is added to the cluster, it uses information from Dynamo DB to find out the location of the primary manager and join itself to the cluster.
The cluster, limited to the most significant resources, can be described through the following figure:

By this time, the cluster should be up and running and waiting for us to deploy the first stack. We can confirm that it is finished by checking the Status column of the devops22 CloudFormation stack. We're all set if the value is CREATE_COMPLETE. If it isn't, please wait a few more minutes until the last round of resources is created.
We'll need to retrieve a few pieces of information before we proceed. We'll need to know the DNS of the newly created cluster as well as the IP of one of the manager nodes.
All the information we need is in the Outputs tab. Please go there and copy the value of the DefaultDNSTarget key. We'll paste it into an environment variable. That will allow us to avoid coming back to this screen every time we need to use the DNS.
CLUSTER_DNS=[...]
Please change [...] with the actual DNS of your cluster.
You should map your domain to that DNS in a "real" world situation. But, for the sake of simplicity, we'll skip that part and use the DNS provided by AWS.
The only thing left before we enter the cluster is to get the IP of one of the managers. Please click the link next to the Managers key. You will be presented with the EC2 Instances screen that lists all the manager nodes of the cluster. Select any of them and copy the value of the IPv4 Public IP key.
Just as with DNS, we'll set that value as an environment variable.
CLUSTER_IP=[...]
Please change [...] with the actual public IP of one of the manager nodes.
The moment of truth has come. Does our cluster indeed work? Let's check it out.
ssh -i devops22.pem docker@$CLUSTER_IP

docker node ls
We entered into one of the manager nodes and executed docker node ls. The output of the latter command is as follows (IDs are removed for brevity).
HOSTNAME                      STATUS AVAILABILITY MANAGER STATUS
ip-172-31-2-46.ec2.internal   Ready  Active       Reachable
ip-172-31-35-26.ec2.internal  Ready  Active       Leader
ip-172-31-19-176.ec2.internal Ready  Active       Reachable
As you can see, all three nodes are up and running and joined into a single Docker Swarm cluster. Even though this looks like a simple cluster, many things are going on in the background, and we'll explore many of the cluster features later on. For now, we'll concentrate on only a few observations.
The nodes we're running has an OS created by Docker and designed with only one goal. It runs containers, and nothing else. We cannot install packages directly. The benefits such an OS brings are related mainly to stability and performance. An OS designed with a specific goal is often more effective than general distributions capable of fulfilling all needs. Those often end up being fine at many things but not excellent with any. Docker's OS is optimized for containers, and that makes it more stable. When there are no things we don't use, there are fewer things that can cause trouble. In this case, the only thing we need is Docker Server (or Engine). Whatever else we might need must be deployed as a container. The truth is that we do not need much with Docker. A few things that we do need are already available.
Let's take a quick look at the containers running on this node.
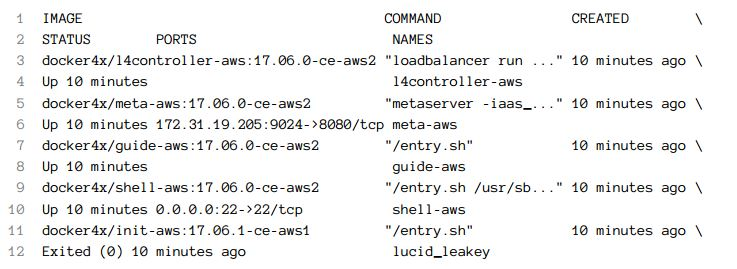
docker container ls -a
The output is as follows (IDs are removed for brevity):

We'll explore those containers only briefly so that we understand their high level purposes.
The l4controller-aws container is in charge of ELB. It monitors services and updates load balancer whenever a service that publishes a port is created, updated, or removed. You'll see the ELB integration in action soon. For now, the important part to note is that we do not need to worry what happens when a node goes down nor we need to update security groups when a new port needs to be opened. ELB and l4controller-aws containers are making sure those things are always up-to-date.
The meta-aws container provides general server metadata to the rest of the swarm cluster. Its main purpose is to provide tokens for members to join a Swarm cluster.
The guide-aws container is in charge of house keeping. It removes unused images, stopped containers, volumes, and so on. On top of those responsibilities, it updates Dynamo DB with information about managers and a few other things.
The shell-aws container provides Shell, FPT, SSH, and a few other essential tools. When we entered the node we're in right now, we actually entered this container. We're not running commands (that is, docker container ls) from the OS but from inside this container. The OS is so specialized that it does not even have SSH.
The lucid_leakey (your name might be different) is based on docker4x/init-aws might be the most interesting system container. It was run, did its job, and exited. It has only one purpose. It discovered the IP and the token of the primary manager and joined the node to the cluster. With that process in place, we can add more nodes whenever we need them knowing that they will join the cluster automatically. If a node fails, the auto-scaling group will create a new one which will, through this container, join the cluster.
We did not explore all of the features of the cluster. We'll postpone the discussion for the next chapter when we explore self-healing capabilities of the cluster and, later on, self-adaptation. Instead, we'll proceed by deploying the services we used in the previous chapters. The immediate goal is to reach the same state as the one we left in the previous chapter. The only real difference, for now, will be that the services will run on a production-ready cluster.