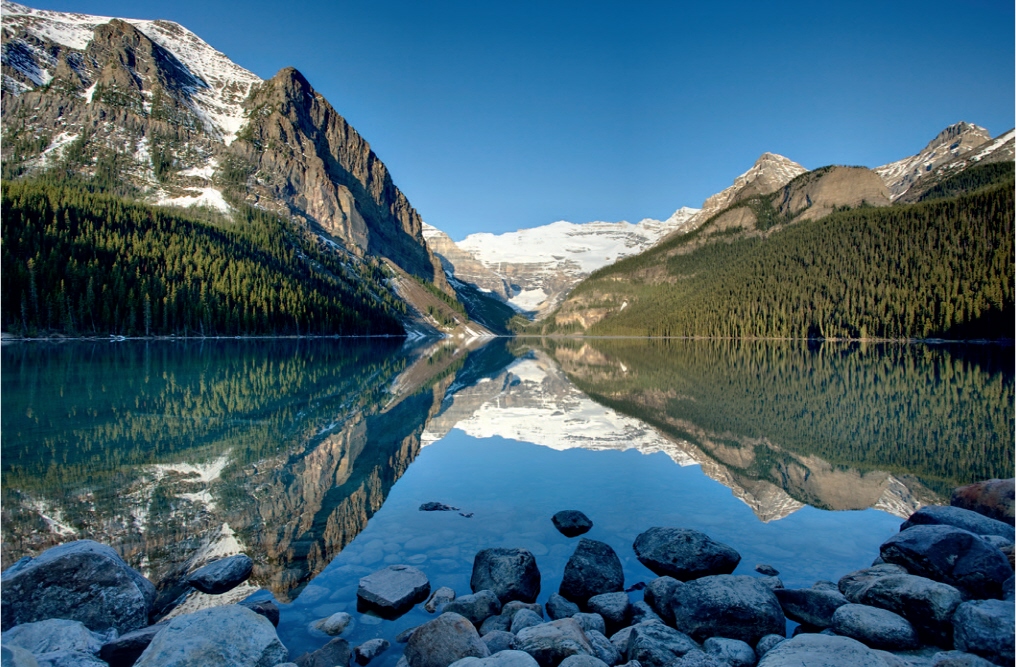
Uplands form a different ecosystem from the lower elevations that surround them, and support plants and animals that are often unique. It is the difference in the weather that makes upland habitats distinct, and the most noticeable is the much lower temperature.
On average the temperture drops 6.5 degrees Centigrade per 1,000 metres in altitude. The tops of some mountains are so high that they have permanent snow cover, even though they are in temperate or even tropical regions, and their ecosystem has more in common with the polar regions than the surrounding lowlands.
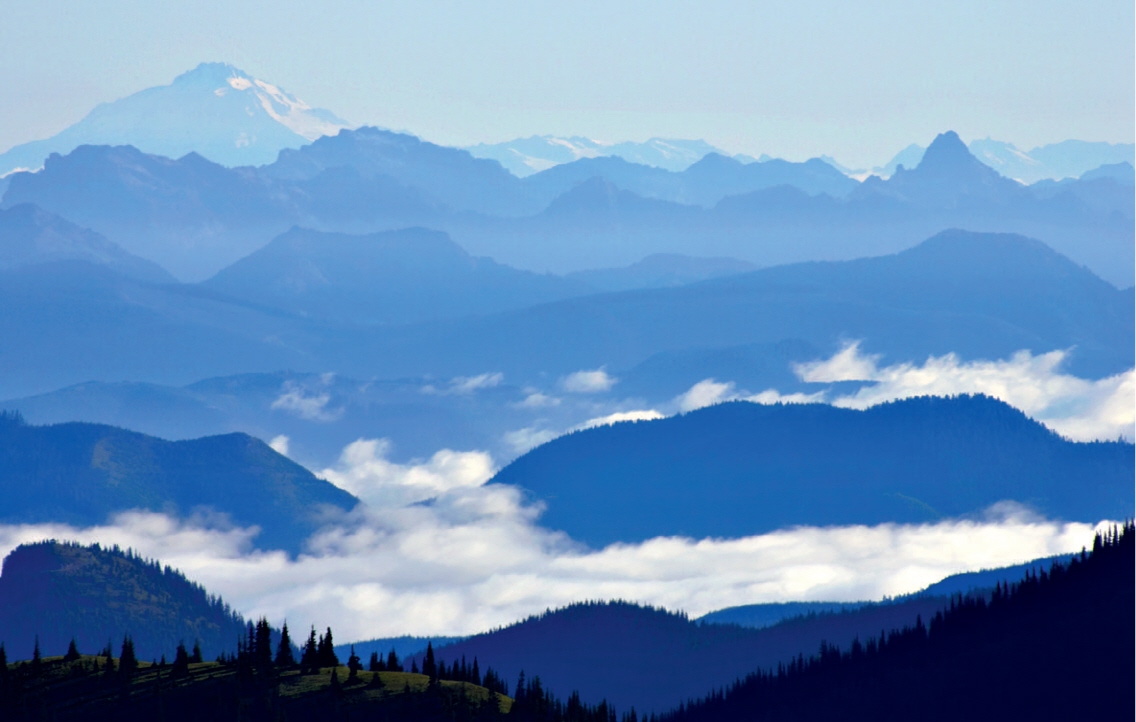
THE VIEW FROM ON HIGH
We were standing on a ridge around 200 metres above sea level when I took this picture of the Cascade Range of mountains in Washington State, in the north-west corner of the USA. The day was gloriously sunny, and from the high viewpoint you could see for many kilometres. It was early morning and the sun raked across the scene at a 45-degree angle towards us as we faced north-east. The low angle threw the nearest hills into shadow, while the high snowy mountain in the far background was lit by the sun. At such an early hour the low cloud in the valleys had not yet burned off, adding to the sense of being on high, looking down on the land.
To emphasize the repeating pattern of the ridges I used the longest lens I had with me. We walked a total of 14 kilometres that day, a lot of it uphill, so I was not carrying a big telephoto lens with me. The 100-400mm lens is a fine piece of equipment and produces excellent pictures, but it is not compatible with a 1.4x converter (although it does physically fit, the quality is poor). I needed more length than the 400mm the lens gave me, so I used a 1.3x camera body to obtain the equivalent focal length of a 520mm lens. I stopped down to f16 because I needed a reasonable amount of depth of field. I was using a tripod, but to ensure that there was absolutely no camera movement, I employed both mirror lock-up and the self-timer set at two seconds to make the exposure.
I often use mirror lock-up when taking images of static subjects at relatively slow shutter speeds, because when the mirror raises it can cause vibrations. This is not normally an issue when shooting at high shutter speeds, but at lower speeds (particularly when using a long lens, as here) it can result in unsharp images. I use the self-timer for much the same reason – at slower shutter speeds, when you press the shutter your contact with the camera can also produce vibration. An alternative to the timer is a remote camera release, but I prefer the convenience of the camera’s own self-timer, rather than using yet another piece of kit.
 CASCADE RANGE
Canon 1D Mark II, 100-400mm zoom lens @ 400mm, 1/60th sec @ f16, digital ISO 200
Washington State, USA
THE IMPORTANCE OF LIGHT
When visiting Yosemite National Park for the first time, we had clear blue skies every day. For many tourists this was perfect weather, but in the land made famous by Ansel Adams, in these weather conditions I was struggling to make anything other than basic ‘postcard’ images of the place. Dark brooding skies is what I had hoped for, not featureless blue ones. The scenery is still spectacular, of course, and when I exited the road tunnel and stopped at the aptly named Tunnel View I took a snap. This was a popular stopping point, where cars and buses full of people arrived at regular intervals, spent ten minutes taking pictures, then were off to the next viewpoint. I did my best, but you cannot fight the light and the result was a rather boring shot (opposite) of this lovely scene.
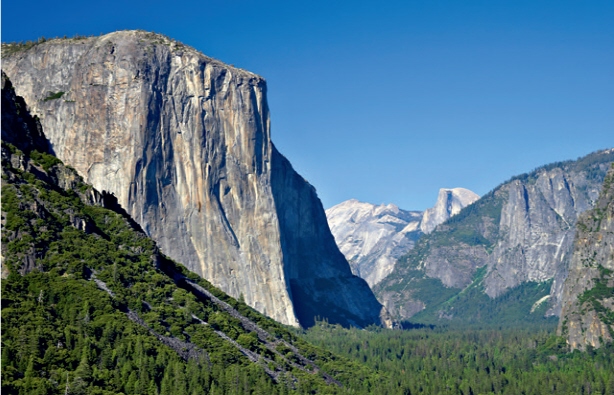
EL CAPITAN
Canon 1Ds Mark II, 28-135mm zoom lens @ 70mm, 1/80th sec @ f11, digital ISO 200
California, USA

EL CAPITAN
Canon 1Ds Mark II, 28-135mm zoom lens @ 95mm, 1/80th sec @ f10, digital ISO 100
California, USA
From our shooting point I reckoned that in the very early morning the light would be coming pretty much at us, and that the same view would provide a reasonably interesting picture at this time. We were staying about an hour’s drive from this viewpoint, and set off around 4 a.m. the next morning. When we reached the spot, the scene was even more spectacular than I had hoped it would be, with the back-lit valley stretching out before us. What made it even better was that at this early hour we were the only people for many miles around. For the first time in Yosemite, we experienced the sense of wilderness that the early explorers of this beautiful place must have felt.
The sun was in front of us, and the very bright, almost white sky contributed nothing to the image. I therefore used a slightly longer focal length and lower angle than for the first image to emphasize the shapes of the mountains and make the most of the sea of pine trees that flowed through the valley floor. This resulted in a far more interesting picture (above) than the one taken the previous day. As a photographer visiting a region for a relatively short period of time, you often find yourself having to shoot in less than ideal conditions, so finding different ways to make the most of difficult situations is essential in order to produce worthwhile images.
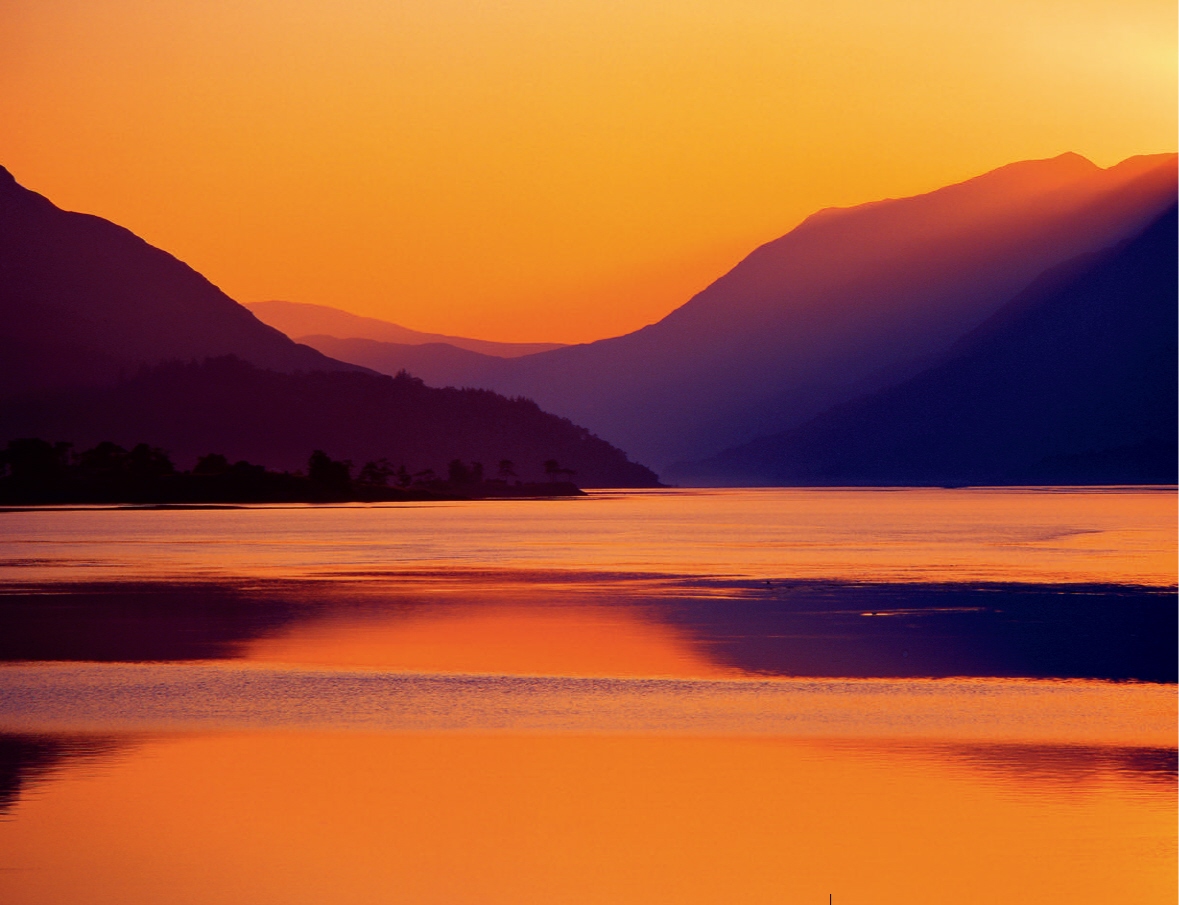
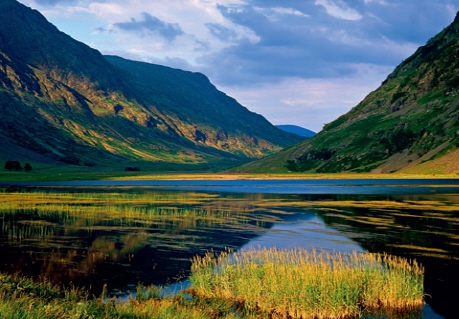
LOCH LEVEN SUNRISE
Bronica ETRs camera, 200mm lens, exposure unrecorded, Fuji Velvia film, ISO 50
Scottish Highlands, UK
COLOUR AT DAWN AND DUSK
The distinctive topography of mountain regions lends itself well to the colourful skies of dawn and dusk, the shapes of the peaks making for interesting silhouettes. I have included two images from the Scottish Highlands as examples of photography in such an environment, one taken at dawn, the other at dusk.
Clear blue skies are rarely the order of the day in Scotland, and we had spent a few days in almost constant drizzle, scouting out locations. The weather cleared the evening before this shot was taken and the forecast for the next day was much brighter, so a dawn shoot was worth attempting. The problem with this plan was that in the Highlands of Scotland in June, dawn is at around 3 a.m., so I had to make a very early start indeed. I crept out of the bed and breakfast as quietly as I could, having warned the owners of my intentions the night before in case they thought I was trying to avoid paying the bill!
Fortunately, my chosen location was just a few kilometres up the road, and I arrived on site as the sky began to colour up. Loch Leven is a large expanse of water, and even the very slight breeze left ripples on the water, although the more sheltered area close by was calm enough to record a reflection. I was disappointed that there were no clouds in the sky at all, because it is usually the clouds in the east lit by the low sun that provide most of the colour at sunrise. As the first rays of the sun cleared the top of the mountain on the right of the picture, the whole scene was flooded with orange. I quickly composed the shot to just exclude the rising sun and had the picture in the bag. The orange then slowly disappeared from the sky, and half an hour later I was back in bed, a successful morning’s work done and dusted.
The above shot was taken at the other end of the day a few minutes after the sun had set in the far north-west of Scotland, in the Inverpolly Nature Reserve. It was taken on a warm calm evening during the month of July. It is a simple composition, showing the distinctive shape of Stach Pollaidh flanked by Cul Beag and Cul Mor, all in silhouette against a lilac sky and reflected in the small loch in the foreground. Although small in the frame, Stach Pollaidh is smack-bang in the centre and dominates the picture. Unlike in the previous image, the clouds are an essential part of the picture; without them the sky would have been featureless as well as colourless – no picture at all, in fact.
This trip was the first and last that I made to the Scottish Highlands in high summer. At this time of year the air is full of biting midges, which are at their very worst close to water, especially on windless evenings, so exactly in the situations where the best images are to be found. On this particular evening it was impossible to set up the tripod close to the loch due to the density of midges. I could not set it up in the car, so walked around quickly and extended the tripod legs, then secured the camera to the head. The midges do not seem to fly fast, and even a brisk walk leaves most of them in your wake.
As I stopped to put the camera in place, a veritable cloud of midges swarmed around it and in front of the lens. There were thousands of them, and I was not happy to take the shot through the fog of insects. I left the gear in place and returned to the car for help. Having recruited my wife as chief midge remover, she used our large road atlas to fan the midges away from the front of the camera for each exposure I made. I worked fast, and we soon had our pictures and left the area. The next day I discovered that three dead midges had actually got in between the prism head and the camera body (on the Bronica the prism head is removable). Three down, several trillion to go!
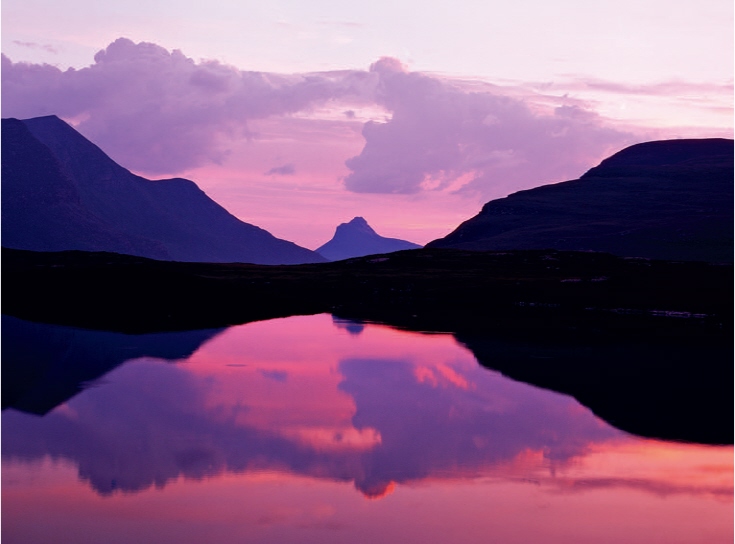
STACH POLLAIDH AT DUSK
Bronica ETRs camera, 70mm lens, exposure unrecorded, Fuji Velvia film, ISO 50
Scottish Highlands, UK
FOREGROUND
When photographing wildlife, one of the biggest errors made by inexperienced photographers is to pay too little attention to the background. The result is often a nice shot of a bird or mammal, with a mess of twigs or other animals in the background that detracts enormously from the picture. The mantra ‘background, background, background’ is the first piece of advice I give to budding wildlife photographers. When photographing wide-open spaces you are effectively concentrating on the background, and sometimes this is strong enough to create an image with real impact. However, in a lot of situations it is only by including a strong foreground element that you can achieve this.
On a visit to Glen Coe in the Scottish Highlands late one afternoon the light was interesting. However, a great deal of the mountainside was in shadow due to the angle of the sun, and I simply could not locate a composition I was really happy with. Wandering around the bank of a loch, I noticed a small patch of reeds growing close to the shore. They were lit by the low sun and added the foreground interest that the scene demanded.
I positioned the camera so that the reeds sat evenly across the triangular reflection of the sky created by the shape of the glen. The converging lines of the reflection lead the eye from the focal point of the brightly lit reeds into the picture. Without the foreground reeds the shot would be nowhere near as interesting.
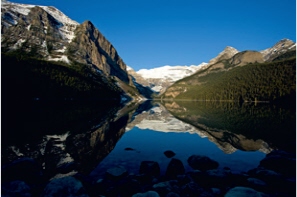
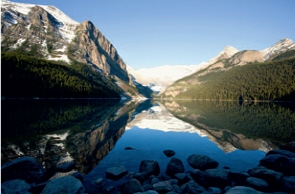
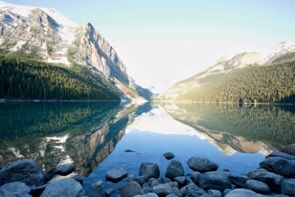
In the case of the picture below, it would have been very easy to create nice images without any foreground – the snow-topped mountains reflecting perfectly in the still waters of the lake made lovely compositions. In fact, I made several different compositions of just these elements, and also created a digital panoramic of the scene. It was our last morning in Canada, and although we had visited Vermillion Lakes in Banff National Park on several other occasions, this was the first time we had the completely calm conditions that are necessary for good reflections. The previous visits were not wasted, because we used them to scout out potential spots for when (we hoped) the conditions were right.
It was during one of these visits that I discovered the dead tree trunk lying in the water, its bleached white colour matching the snow on the distant mountains. The composition required careful consideration because access was not straightforward, and I needed to ensure that the tree did not overlap with the reflection of the mountain. To achieve this I had to shoot from a high angle, so that I was pointing the camera slightly downwards. The shot was a nice bonus at the very end of our trip to the incredibly scenic Canadian Rockies.
GLEN COE
Bronica ETRs camera, 70mm lens, exposure unrecorded, Fuji Velvia film, ISO 50
Scottish Highlands, UK

VERMILLION LAKES
Canon 1Ds Mark II, 24-104mm zoom lens @ 24mm, 1/200th sec @ f11, digital ISO 100
Alberta, Canada
HDR IMAGES
There is a limit to the brightness range that both film and digital cameras can record. This is around five or six stops of light and is known as the dynamic range. Let us be generous and settle on six stops. This means that any scene that has highlights and shadows more than six stops apart cannot be recorded on the final photographic image without loosing detail in parts of the picture. From a photographic point of view, overexposed highlights tend to be unacceptable, so when faced with a scene of high contrast, photographers have traditionally made exposures based on the highlights and left the shadows to turn black and lose detail. Many landscape photographers use graduated filters to try and overcome this, but these are based on straight lines and nature is not, so they are not perfect and their use is often obvious in the final image.
The limitations of the available dynamic range have been with us since the dawn of photography, but have at last been overcome by digital technology. It is still not possible to capture all of the information in a high-contrast image on a single digital frame, but by taking identical images at different exposures that cover the full range of the scene, you can combine them afterwards to produce an image that has an extended dynamic range. Such images are referred to as having High Dynamic Range, or HDR.
Snow-capped mountains such as those visible in the next shot from Banff National Park, where the early-morning sun lights up the white tops while the rest of the landscape remains in shadow, are impossible to capture on a single in-camera image. They are thus ideal for demonstrating the HDR technique, which is actually quite simple, as long as a few basic rules are followed.
It is important to secure your camera on a good tripod to ensure that each shot in your HDR sequence is identical in every aspect, except for the exposure. Since you are shooting the same scene in rapid succession, you should leave the camera to determine the colour balance using Auto White Balance, because it is not going to change between frames. It is also fine to use a polarising filter, because it will have the same effect on each frame. Finally, take a series of exposures to cover the complete range of tones within the scene. Because changing the aperture (f-stop) will change the depth of field, it is important to keep the same aperture for each image and change the shutter speed to control the exposure. To demonstrate this technique, I combined three digital images taken at twostop intervals to capture all the detail in the scene.
HDR 1
Canon 1Ds Mark II, 17-40mm zoom lens @ 17mm, 1/500th sec @ f8, digital ISO 100
HDR 2
Canon 1Ds Mark II, 17-40mm zoom lens @ 17mm, 1/125th sec @ f8, digital ISO 100
HDR 3
Canon 1Ds Mark II, 17-40mm zoom lens @ 17mm, 1/30th sec @ f8, digital ISO 100
LAKE LOUISE
Canon 1Ds Mark II, 17-40mm zoom lens @ 17mm, HDR Image
Alberta, Canada
HDR 1 | The first frame has been exposed for the highlights. In this image only the brightly lit snow is correctly exposed. The rest of the scene is underexposed and detail has been completely lost in the shadow areas. This is the only frame without blown highlights, and is the best that could be achieved on a single frame.
HDR 2 | This frame is two stops overexposed from the first frame and the highlights have been blown out, but the mid-tones are correct. There is still substantial loss of detail in the shadow areas, however.
HDR 3 | This frame is four stops overexposed compared to the first frame and looks dreadful when viewed on its own, but has been exposed for the shadows. Everything else has completely blown out, but there is detail in areas that in previous exposures were very dark. This is very noticeable in the foreground rocks and the trees on the left.
Final HDR Image | This was created by using a special HDR software program (there are a number available), which has effectively kept the best bits from each frame and put them together to produce an image that would have been impossible a few years ago. I also cropped the final HDR image very slightly because it did not appear perfectly level. Clearly, it is important to make any crops to the final HDR image after it has been generated, rather than to each component picture beforehand, as they then might not exactly line up for the HDR process.

SUBALPINE FLOWERS AND MOUNT RAINIER
Canon 1Ds Mark II, 17-40mm zoom lens @ 21mm, 1/60th sec @ f16, digital ISO 100
Washington State, USA
FLOWERS
At high altitudes the plant-growing season is a short one, with spring, summer and autumn being condensed into a few snow-free months. The shortened season results in many of the plants flowering at the same time, so the displays can be very photogenic. The most spectacular concentrations of blooms I have ever encountered were on the slopes of Mount Rainier in Washington State, at a location with the rather apt name of Paradise, and most of the images of flowers were taken here in early to mid-July. As usual, this section begins by representing flowers in the whole environment and works down to individual portraits, demonstrating the range of pictures that can be made using different approaches at one spot.
The first image from Mount Rainier, shown opposite, features the snow-covered mountain itself, which at 4,392 metres towers over the surrounding flower meadows that are still 1,600 metres above sea level, or around 300 metres higher that the tallest mountain in Great Britain.
To include the mountain-top in the picture, I set up the camera and angled it down slightly. Using a very wide angle lens, I placed the front flowers just a few centimetres from it. Extremely light winds, or better still no wind at all, are pretty much a requirement when photographing flowers, and as usual such conditions are most prevalent towards the start or end of the day. Apparently Mount Rainier is famous for the amount of cloud and mist that shroud the peak, and many visitors never actually see the mountain-top itself. I say apparently, because during the week or so we spent there, although there was occasionally some early morning mist, the sun shone almost constantly.

BROADLEAF LUPIN (Lupinus latifolius)
Canon 1Ds Mark II, 28-135mm zoom lens @ 135mm, 0.4 sec @ f22, digital ISO 100
Washington State, USA
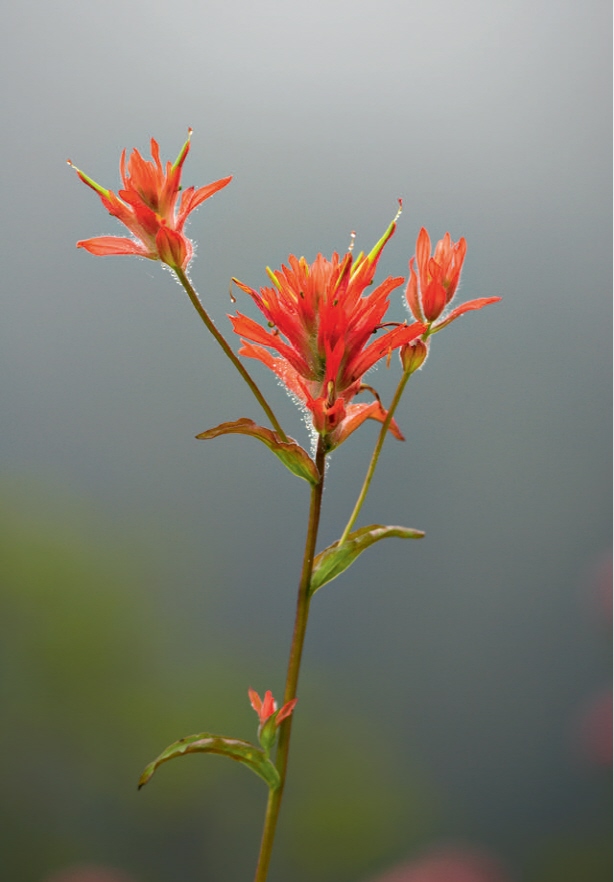
SCARLET PAINTBRUSH (Castilleja miniata)
Canon 1Ds Mark II, 100-400mm zoom lens @ 275mm, 1/640th second @ f5.6, digital ISO 400
Washington State, USA
Moving in closer to isolate a patch of flowers, the blue flowers and distinctive green leaves of the Broadleaf Lupin make a lovely combination. This lupin was one of the most common flowers growing in the subalpine meadows of Mount Rainier, but its season was short, the blooms fading after just a few days.
The sunny weather we experienced was fine for sweeping vistas of flowers that included the mountain, but for relative close-ups it was pretty disastrous, because the heavy shadows would have ruined the picture. However, in a mountain environment with steep-sided valleys, there was always a part of the mountainside that was in shadow. I worked in these areas, searching for suitable subjects.
In the days of film it was impossible to take pictures in shadow on a sunny day (unless you used colour-correction filters – which I never did), because a distinct blue cast would ruin the image. Unlike film, which had a fixed colour temperature, digital cameras can use a wide range of colour temperatures, depending on the lighting conditions and using the camera’s AWB (Auto White Balance). I found that the results were very good, with no blue casts at all.
For the final picture taken at Paradise, Mount Rainier, I closed in on a single stem of a Scarlet Paintbrush to produce a portrait of an individual plant, shown opposite. Working in a flower-rich environment, photographing individual plants was the hardest challenge. I spotted a particular flower on the edge of a road that was cut into the side of the mountain. There was a steep drop-off on the side of the road where the plant was growing, so I could isolate it against the pine-covered mountainside on the other side of the valley, some distance away. In normal light, these distant trees would have produced a rather uneven background that would not have been attractive. On this morning, however, a heavy mist was present, which gave a much more subtle and smooth look to the background. The water droplets from the mist clung to the flowers and this added atmosphere to the overall picture.
To make the most of the background I used my telephoto zoom lens to narrow the angle, and selected a large aperture to throw the background as out of focus as possible. To make sure that the plant was sharp, I ensured that it was parallel to the back of the camera, minimizing its depth in relation to the camera.
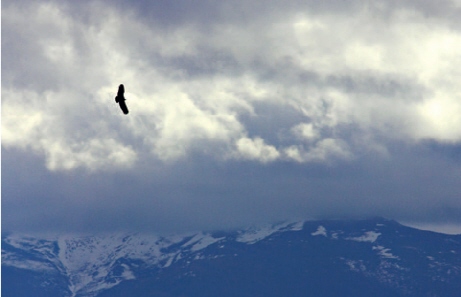
GRIFFON VULTURE (Gyps fulvus)
Canon 1D Mark II, 500mm lens + 1.4x converter, 1/2,500th sec @ f11, digital ISO 400
Spain
BIRDS
The harsh environments at the tops of mountains like those depicted above are not the most productive habitats for birds, but some species survive all year round in such places, although others only visit the higher altitudes in the summer months. Migrants often move to a warmer climate in winter, while other mountain specialists simply move to a lower altitude during the coldest months, returning to the heights only to breed in summer.

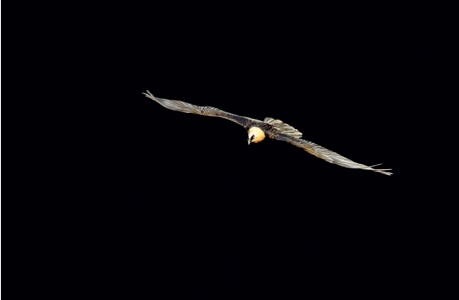
LAMMERGEIER (Gypaetus barbatus)
Canon 1D Mark II, 500mm lens + 1.4x converter, 1/1,000th sec @ f5.6, digital ISO 400
Spain
The Griffon Vulture in the image is a tiny silhouette in the frame, although it manages to dominate the scene. Working in the mountains north of Madrid, an area I was visiting specifically to photograph Griffon Vultures, I was standing on the edge of a cliff where the birds were breeding, photographing the large individuals as they flew by. These carrion feeders cover huge distances as they search for food, and a number of vultures were heading off towards a range of snow-capped mountains that was many kilometres away. The very tops of the mountains were obscured by dark clouds, and above these were lighter clouds that were back-lit by the sun. This resulted in dramatic light conditions, and I realized that I had a great backdrop. I set up for the shot, and as a vulture banked to produce a distinctive silhouette, the image that I had imagined was in the bag.
The following two pictures, shown on these two pages, are also of vultures, but are close-up portraits of the birds in flight. The species in question is the Lammergeier, an iconic mountain bird with a wide distribution in suitable habitats in Europe, Asia and Africa. The photographs were taken high up in the Spanish Pyrenees, close to the border with France. My wife and I spent a week in this mountain habitat, walking many kilometres each day to reach a lookout point high over a deep gorge where the birds would occasionally put in an appearance, drifting serenely by. For much of the time they were simply too distant for good photography, but just occasionally they would come within range of my telephoto lens. The brief fly-bys were frenetic, because I had just a few moments to get some pictures. There was no way I could afford to start adjusting the exposure when a bird appeared, so I set it manually and was ready to shoot. The two images demonstrate how important it was to have used manual exposure – in both cases the bird is correctly exposed, despite the huge differences in tone of the backgrounds. The limestone walls of the ravine in the picture opposite are slightly lighter than mid-tone, and an automatic exposure would have recorded the bird itself as too dark. With some judicious postprocessing you could have got away with this. This would not have been possible in the case of the above picture, which was taken as the Lammergeier caught the sun when it flew across a deep gorge that was completely in shadow. An automatic exposure would have rendered the dark ravine as a mid-tone and the bird would have been overexposed by several stops, ruining the picture.
LAMMERGEIER (Gypaetus barbatus)
Canon 1D Mark II, 400mm lens + 1.4x converter, 1/1,000th sec @ f5.6, digital ISO 400
Spain
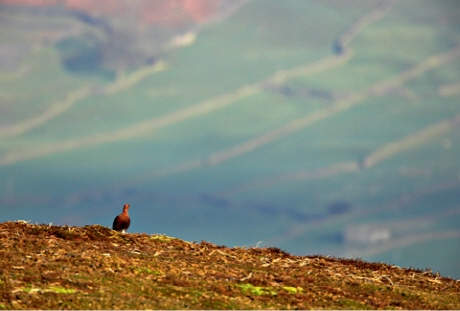
From the mountains of the Pyrenees we travel to the rather less exotic moorlands of the UK for our next bird species, the Red Grouse. This species stays on the high moorland all year round, scraping away the snow in winter to feed on the heather shoots. The high heather moors are difficult to cultivate, but often managed by humans and burned regularly to encourage fresh young heather shoots. In some areas the hunting of Red Grouse is an important source of income.
The Red Grouse image on the top shows the bird in its moorland habitat, with a farmer’s fields in the valley far below forming the background. The bird, like the Griffon Vulture, was placed to one side of the frame and is looking into the picture. The bare moorland in the foreground was not very interesting, so I excluded as much of it as possible from the picture. Careful positioning of the subject is essential when it is such a small part of the overall image.
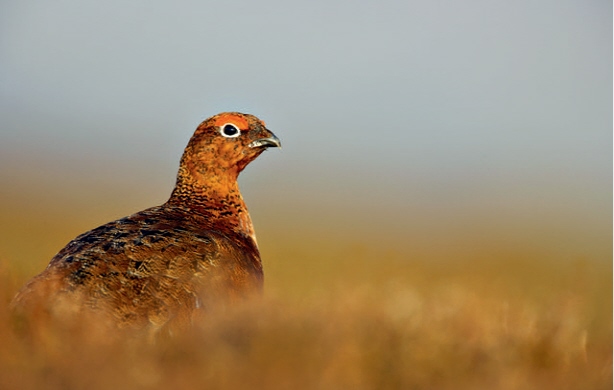
The next image was taken on the same morning and is a much closer view of the Red Grouse foraging among the heather by the side of the road in the early-morning light. The out-of-focus heather that surrounds the bird emphasizes its subtle plumage, and again the bird is positioned to one side of the frame so that it is looking into the picture. Both images were taken on the uplands of the Yorkshire Dales National Park in early spring. At this time of year the male birds can often be found at the sides of the small roads that cross the moor, and can be photographed using the car as a hide. Early morning is the best time because there is little traffic; the birds tend to wander further from the road as traffic builds up later in the day.
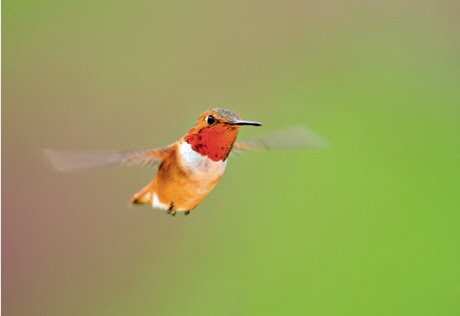
The final bird image from the mountains is one of a summer migrant that would find it impossible to survive the winter in this habitat. This is the diminutive Rufous Hummingbird, which makes the long journey north from the Yucatan Peninsula in Mexico every year to breed as far north as Alaska. Given that the bird is only a few centimetres long, this is an incredible journey for it to undertake. Because hummingbirds feed primarily on flower nectar, their summer visits are timed to make the most of the seasonal flower feast. Hummingbirds also eat very small insects such as gnats and midges, which are abundant in these mountain habitats during high summer when the birds are rearing their young. As soon as the flowers fade and the insects disappear, there is no more food for the hummingbirds and they set off south again.
Hummingbirds are easily attracted to feeders full of sugar water, and many people hang these out in their gardens during the summer. I photographed this individual hovering in front of one such feeder using natural light on a bright overcast day. A Rufous Hummingbird is less than 8 centimetres long, so I fitted my 400mm f4 lens with a 25mm extension tube. This enabled me to focus more closely than is normally possible with this lens, and to almost fill the frame with the tiny bird. The glossy colourful gorget on the bird’s throat does not photograph well in bright sunlight, so bright overcast is best. Such overcast conditions resulted in shooting at only 1/800th of a second. Because the wings beat at more than 50 times a second, they were always going to end up as a blur, but I quite like this effect – most importantly for me, the head is sharp.
RED GROUSE (Lagopus lagopus scoticus)
Canon 1Ds Mark II, 500mm lens + 1.4x converter, 1/1,000th sec @ f6.3, digital ISO 400
Yorkshire, UK
RED GROUSE (Lagopus lagopus scoticus)
Canon 1Ds Mark II, 500mm lens + 1.4x converter, 1/500th sec @ f7.1, digital ISO 400
Yorkshire, UK
RUFOUS HUMMINGBIRD (Selasphorus rufus)
Canon 1D Mark II, 400mm lens + 25mm extension tube, 1/800th sec @ f4, digital ISO 400
Canadian Rockies
MAMMALS
As is the case with birds, many species of mammal cannot survive the winter at high altitudes and can only be found in this habitat in the summer months. Some winter at lower elevations, returning to the lush alpine meadows to feed only when the snow has gone. Others do spend the entire winter on their breeding grounds, but because there is not enough food for them they sleep through the entire winter – they hibernate.
The Black-tailed Deer is one of the species that winters at lower elevations, but in the summer it can be found grazing on the abundant vegetation on the slopes of Mount Rainier in Washington State. This is a very popular national park within easy driving distance of Seattle, so it can get very busy, especially at weekends. The deer are quite nervous animals and are easily spooked, so the best time to see them is in the early morning, before the crowds arrive and disturb them. On misty mornings they seemed particularly tolerant, and we came across a small group feeding close to a trail. We used slow and deliberate movements – far less likely to frighten any animal than fast and jerky actions – and after the deer stopped and looked up at us they resumed feeding. I took a few pictures before moving off slowly and leaving them in peace.

BLACK-TAILED DEER (Odocoileus hemionus columbianus)
Canon 1Ds Mark II, 100-400mm zoom lens @ 180mm, 1/320th sec @ f6.3, digital ISO 200
Washington State, USA

GOLDEN-MANTLED GROUND SQUIRREL (Spermophilus saturatus)
Canon 1D Mark II, 100-400mm zoom lens @ 400mm, 1/1,600th sec @ f5.6, digital ISO 200
Washington State, USA
One of my favourite groups of mammal that can be found in mountain regions is the rodents. These are incredibly active creatures during the summer, frantically feeding and rearing their broods before winter descends again. Most of them hibernate in underground burrows, sometimes for up to seven or eight months at a time. They can also be very confiding and are often found around picnic areas, where they scavenge for food.
Feeding is something that certainly occupies much of the daytime activity of ground squirrels, and they seem to make the most of the short flower season. The Golden-mantled Ground Squirrel is common in much of the Rocky Mountains range in both the USA and Canada. I spent some time following these lovely little animals around, and when one stood upright on its back legs and started feeding on a patch of lupin flowers it made a charming picture. Because the rodent was some distance away, I placed it on the right-hand side of the image, looking into the picture – exactly the same compositional technique as that used for the bird pictures.
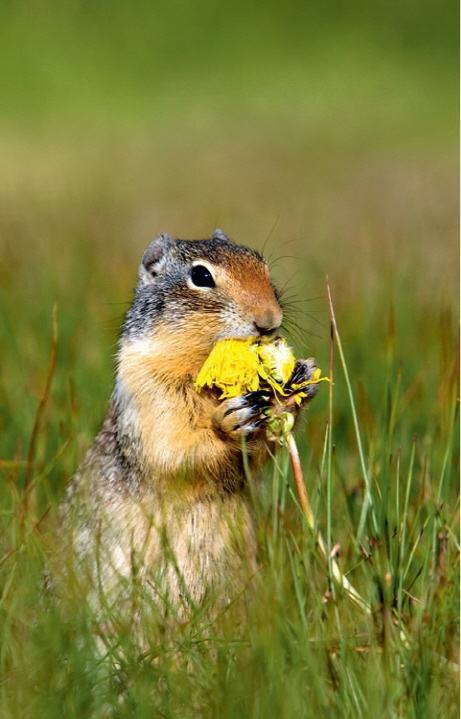
The next picture, of the closely related Columbian Ground Squirrel, also shows the subject feeding on a flower, in this case a dandelion flower. This species of ground squirrel breeds in small colonies, and when I came across one on a south-facing bank by the side of a lake I simply sat down and waited. When I first arrived the rodents disappeared down their burrows, but after just a few minutes they started to emerge and go about their business. This individual came across a large dandelion flower, squatted down in an upright position and started to devour the flower, which did not take long.
COLUMBIAN GROUND SQUIRREL (Spermophilus columbianus)
Canon 1D Mark II, 70-200mm zoom lens + 1.4x converter @ 280mm, 1/2,000th sec @ f6.3, digital ISO 400
Canadian Rockies
The little rodents seemed to ignore me completely. and I lay down to get a squirrel’s eye view of my subject. Unlike the Golden-mantled Ground Squirrel, the Columbian Ground Squirrel was large in the frame, so I turned the camera on its side into portrait mode, since this best suited the upright stance of my subject. Although this picture and the one preceding it were of essentially the same scene, the different size of the subject in relation to the rest of the frame dictated the composition.
Having spent some time watching the behaviour of the Columbian Ground Squirrels at close quarters, I noticed that they would spend a lot of time running around the colony area, often taking the exact same routes. When they ran they moved very fast indeed – they are pretty much at the bottom of the food chain, so I guess this is a survival trait that has evolved over time. Photographing this behaviour was not going to be easy, but I wanted to give it a try. Due to the fact that they used regular paths, I had at least a chance of being in the right place as one flashed by.
I sat myself down and waited by the side of the lake where the squirrels regularly ran by. I am used to photographing birds in flight, but against a blue sky the autofocus has little to distract it, so it locks on to the bird. With the squirrels being on the ground, there were lots of other bits of the scenery that the camera could lock onto. This made it harder for the camera’s autofocus to lock on in the first place, and to stay on the subject. To increase the chances of a sharp image, I would pick up a squirrel in the frame when it was some distance away, then track it through the viewfinder as it shot towards and in front of me. I was shooting with the Canon EOS 1D Mark II body, which can take 20 frames before the buffer fills up, and shoots at 8 frames per second. This gave me just two and a half seconds of photography. As a squirrel approached I waited until I could see the whites of its eyes before pressing the shutter and holding it down as it went past. I managed to get some lovely shots that show it with all four legs off the ground, seemingly frozen in mid-air.

COLUMBIAN GROUND SQUIRREL (Spermophilus columbianus)
Canon 1D Mark II, 70-200mm zoom lens + 1.4x converter @ 280mm, 1/3,200th sec @ f5.6, digital ISO 400
Canadian Rockies