Compilation: how Ruby translates your code into a new language

nothing like your original code.
Now that Ruby has tokenized and parsed my code, is Ruby ready to actually run it? For my simple “10.times do” example, will Ruby now finally get to work and iterate through the block 10 times? If not, what else could Ruby possibly have to do first?
The answer depends on which version of Ruby you have. If you’re still using Ruby 1.8, then yes: Ruby will now simply walk through the nodes in the AST and execute each one. Here’s another way of looking at the Ruby 1.8: tokenizing and parsing processes:
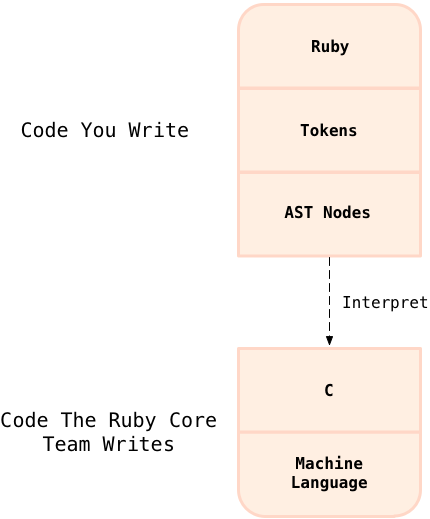
At the top as you move down you can see how Ruby translates your Ruby code into tokens and AST nodes, as I described above. At the bottom I show the Ruby 1.8 interpreter itself – written in C and, of course, compiled into native machine language code.
I show a dotted line between the two code sections to indicate that Ruby 1.8 simply interprets your code – it doesn’t compile or translate your code into any other form past AST nodes. After converting your code into AST nodes, Ruby 1.8 proceeds to iterate over the nodes in the AST, taking whatever action each node represents – executing each node. The break in the diagram between “AST nodes” and “C” means your code is never completely compiled into machine language. If you were to disassemble and inspect the machine language your computer’s CPU actually runs, you would never find instructions that directly map to your original Ruby code. Instead, you would find instructions that tokenize, parse and execute your code… instructions that implement the Ruby interpreter.
However if you have upgraded to Ruby 1.9 or Ruby 2.0, then Ruby is still not quite ready to run your code. There’s one final step on your code’s journey through Ruby: compilation. With Ruby 1.9, the Ruby core team introduced something called “Yet Another Ruby Virtual Machine” (or YARV), which actually executes your Ruby code. At a high level, this is the same idea behind the much more famous Java Virtual Machine (or JVM) used by Java and many other languages. To use the JVM, you first compile your Java code into “byte code,” a series of low level instructions that the JVM understands. Starting with version 1.9, Ruby works the same way! The only differences are that:
Ruby doesn’t expose the compiler to you as a separate tool; instead, it automatically compiles your Ruby code into byte code instructions internally without you ever realizing it.
MRI Ruby also never compiles your Ruby code all the way to machine language. As you can see in the next diagram, Ruby interprets the byte code instructions. The JVM, however, can compile some of the byte code instructions all the way into machine language using its “hotspot” or JIT compiler.
Here’s the same diagram again, this time showing how Ruby 1.9 and Ruby 2.0 handle your code:
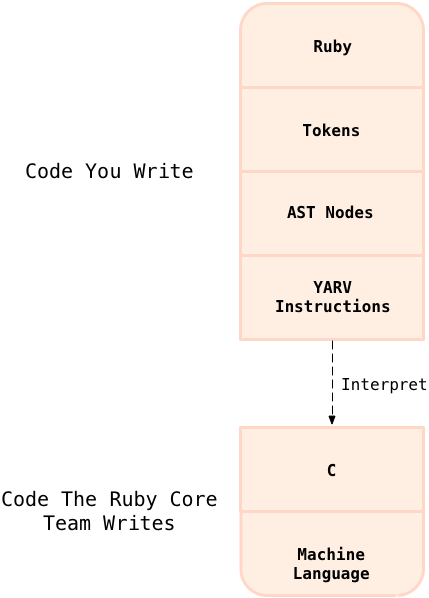
This time your Ruby code is translated into no less than three different formats or intermediate languages! After parsing the tokens and producing the AST, Ruby 1.9 and 2.0 continue to compile your code to a series of low level instructions called “YARV instructions” for lack of a better name.
I’ll cover YARV in more detail in the next chapter: what the instructions are and how they work, etc. I’ll also look at how much faster Ruby 1.9 and Ruby 2.0 are compared to Ruby 1.8. The primary reason for all of the work that the Ruby core team put into YARV is speed: Ruby 1.9 and 2.0 run much faster than Ruby 1.8 primarily because of the use of the YARV instructions. Like Ruby 1.8, YARV is still an interpreter, although a faster one: your Ruby code ultimately is still not converted directly into machine language by Ruby 1.9 or 2.0. There is still a gap in the diagram between the YARV instructions and Ruby’s C code.
Stepping through how Ruby compiles a simple script
But now let’s take a look at how Ruby compiles your code into the instructions that YARV expects – the last step along your code’s journey through Ruby. Here’s an example Ruby script that calculates 2+2 = 4:
puts 2+2
And here’s the AST structure Ruby will create after tokenizing and parsing this simple program – note this is a more technical, detailed view of the AST than you would get from the Ripper tool… what we saw above in Experiment 2:
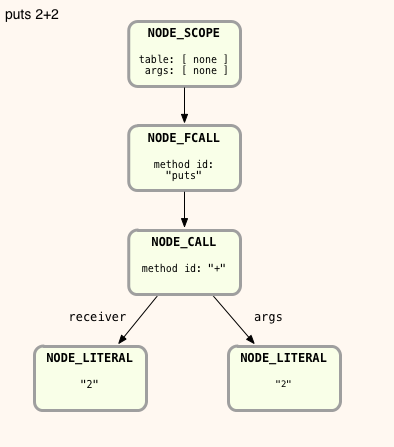
The technical names I show here, NODE_SCOPE, NODE_FCALL, etc., are taken from the actual MRI Ruby C source code. To keep this simple, I’m also omitting some AST nodes that aren’t important in this example: nodes that represent arrays of the arguments to each method call, which in this simple example would be arrays of only one element.
Before we get into the details of how Ruby compiles this program, let me mention one very important attribute of YARV: it is a stack oriented virtual machine. As I’ll explain in the next chapter, that means when YARV executes your code it maintains a stack of values, mainly arguments and return values for the YARV instructions. Most of YARV’s instructions either push values onto the stack or operate on the values that they find on the stack, leaving a result value on the stack as well.
Now to compile the “puts 2+2” AST structure into YARV instructions, Ruby will iterate over the tree in a recursive manner from the top down, converting each AST node into one or more instructions. Here’s how it works, starting with the top node, NODE_SCOPE:
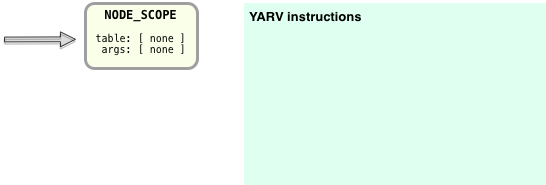
NODE_SCOPE tells the Ruby compiler it is now starting to compile a new scope or section of Ruby code – in this case a whole new program. Conceptually I’m indicating this scope on the right with the empty green box. The “table” and “args” values are both empty, so we’ll ignore those for now.
Next the Ruby compiler will step down the AST tree and encounter NODE_FCALL:
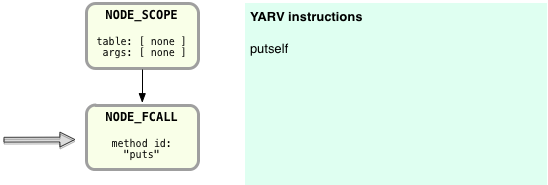
NODE_FCALL represents a function call, in this case the call to puts. Function and method calls are very important and very common in Ruby programs; Ruby compiles them for YARV using this pattern:
Push receiver
Push arguments
Call the method/function
So in this example, the Ruby compiler first creates a YARV instruction called putself – this indicates that the function call uses the current value of the “self” pointer as the receiver. Since I call puts from the top level scope of this simple, one line Ruby script, “self” will be set to point to the “top self” object. The “top self” object is an instance of the “Object” class automatically created when Ruby starts up. It’s sole purpose is to serve as the receiver for function calls like this one in the top level scope.
Next Ruby needs to create instructions to push the arguments of the puts function call. But how can it do this? The argument to puts is 2+2 – in other words the result of some other method call. Although 2+2 is a very simple expression in this example, puts could instead be operating on some extremely complex Ruby expression involving many operators, method calls, etc. How can Ruby possibly know what instructions to create here?
The answer lies in the structure of the AST: by simply following the tree nodes down in a recursive manner, Ruby can take advantage of all the work the parser did earlier. In this case, Ruby can now just step down to the NODE_CALL node:
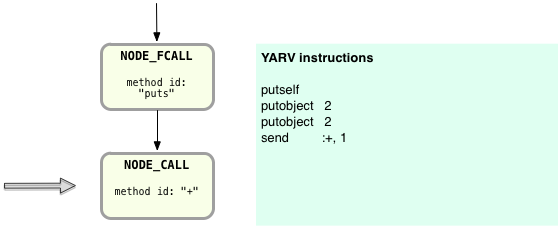
Here Ruby will compile the + method call, which theoretically is really the process of sending the + message to the 2 Integer object. Again, following the same receiver – arguments – method call format I explained above:
First Ruby creates a YARV instruction to push the receiver onto the stack, the object 2 in this case.
Then Ruby creates a YARV instruction to push the argument or arguments onto the stack, again 2 in this example.
Finally Ruby creates a method call YARV instruction – “send :+, 1”. This means “send the ‘+’ message” to the receiver: whatever object was previously pushed onto the YARV stack, in this case the first Fixnum 2 object. The 1 parameter tells YARV there is one argument to this method call, the second Fixnum 2 object.
What you have to imagine here – and what we’ll go through more carefully in the next chapter – is how YARV will execute these instructions. What will happen when Ruby executes the “send :+” instruction is that it will add 2+2, fetching those arguments from the stack, and leave the result 4 as a new value on the top of the stack.
What I find fascinating about this is that YARV’s stack oriented nature also helps Ruby to compile the AST nodes more easily. You can see how this is the case when Ruby continues to finish compiling the NODE_FCALL from above:
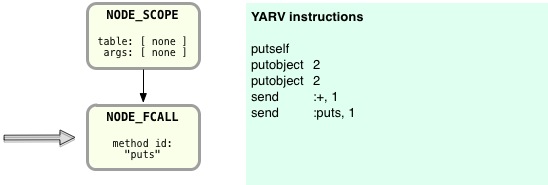
Now Ruby can assume the return value of the “2+2” operation, 4, will be left at the top of the stack, just where Ruby needs it to be as the argument to the puts function call. Ruby’s stack oriented virtual machine goes hand in hand with the way that it recursively compiles the AST nodes! On the right you can see Ruby has added the “send :puts, 1” instruction. This last instruction will call the puts function, and as before the value 1 indicates there is one argument to the puts function.
It turns out Ruby later modifies these YARV instructions one more time before executing them: the Ruby compiler has an optimize step, and one of Ruby’s optimizations is to replace some YARV instructions with “specialized instructions.” These are special YARV instructions that represent commonly used operations such as “size,” “not,” “less-than,” “greater-than,” etc. One of these special instructions is for adding two numbers together: the opt_plus YARV instruction. So during this optimization step Ruby changes the YARV program to:
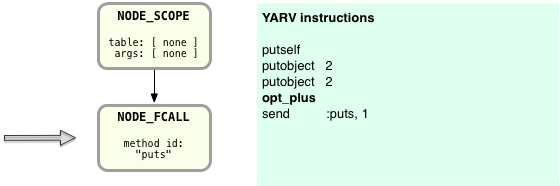
You can see here that Ruby replaced “send :+, 1” with opt_plus – a specialized instruction which will run a bit faster.
Compiling a call to a block
Now let’s take a somewhat more complex example and compile my “10.times do” example from before:
10.times do |n|
  puts n
end
What really makes this example interesting is the fact that I’ve introduced a block as a parameter to the times method. Let’s see how the Ruby compiler handles blocks. Here is the AST for the the “10.times do” example – again using the actual node names and not the simplified output from Ripper:
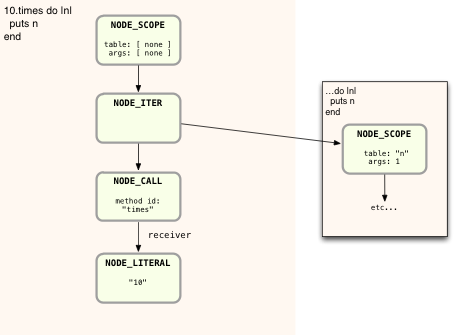
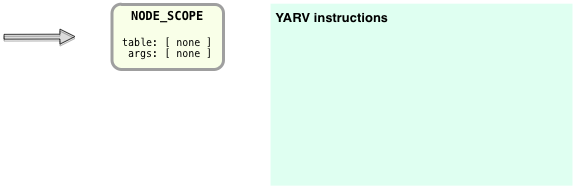
This looks very different than “puts 2+2,” mostly because of the inner block shown on the right side. I did this to keep the diagram simpler, but also because Ruby handles the inner block differently, as we’ll see in a moment. But first, let’s break down how Ruby compiles the main portion on the script, on the left. Ruby starts with the top NODE_SCOPE as before, and creates a new snippet of YARV instructions:
Now Ruby steps down the AST nodes on the left, to NODE_ITER:
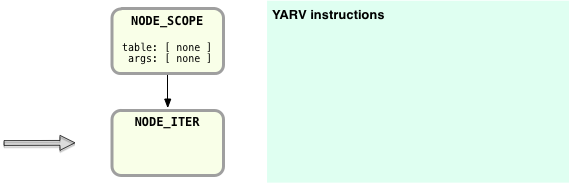
Here there is still no code generated, but notice that above in the AST there are two arrows leading from NODE_ITER: one continues down to the NODE_CALL, which represents the 10.times call, and a second to the inner block on the right. First Ruby will continue down the AST and compile the nodes corresponding to the “10.times” code. I’ll save some space and skip over the details; here’s the resulting YARV code following the same receiver-arguments-message pattern we saw above:

You can see here that the new YARV instructions push the receiver, the Integer object 10, onto the stack first. Then Ruby generates an instruction to execute the times method call. But note how the send instruction also contains an argument “block in <main>.” This indicates that the method call also contains a block argument… my “do |n| puts n end” block. In this example, NODE_ITER has caused the Ruby compiler to include this block argument, since in the AST above there’s an arrow from NODE_ITER over to the second NODE_SCOPE node.
Now Ruby will continue by compiling the inner block, starting with the second NODE_SCOPE I showed on the right in the AST diagram above. Here’s what the AST for the inner block looks like:
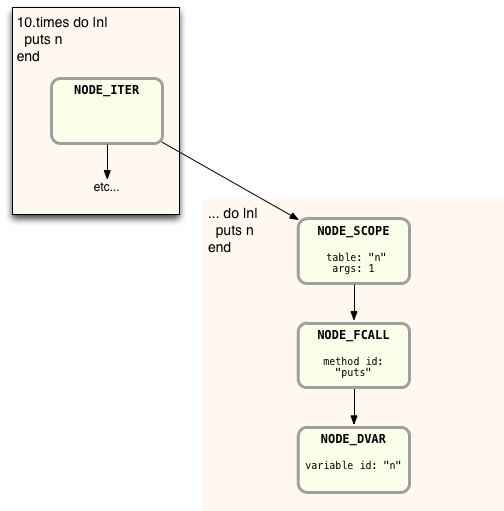
This looks simple enough – just a single function call and a single argument n. But notice I show a value for “table” and “args” in NODE_SCOPE. These values were empty in the parent NODE_SCOPE but are set here for the inner NODE_SCOPE. As you might guess, these values indicate the presence of the block parameter n. Also notice that the Ruby parser created NODE_DVAR instead of NODE_LITERAL which we saw before. This is because n is actually not just a literal string or local variable; instead it is a “dynamic variable” – a reference to the block parameter passed in from the parent scope. There are also a lot of other details that I’m not showing here.
Skipping a few steps again, here’s how Ruby compiles the inner block:
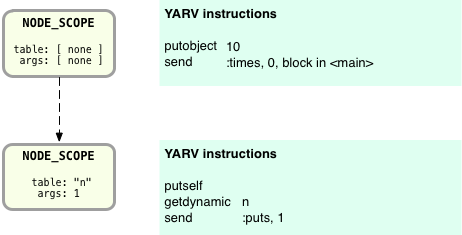
On the top I’ve shown the parent NODE_SCOPE, and the YARV code we saw above. Below that I’ve displayed a second green box containing the YARV code compiled from the inner block’s AST.
The key point here is that Ruby compiles each distinct scope in your Ruby program, whether it’s a block, lambda, method, class or module definition, etc., into a separate snippet of YARV instructions. Again, in the next chapter I’ll take a look at how YARV actually executes these instructions, including how it jumps from one scope to another.
Now let’s take a look at some of the internal code details of how Ruby actually iterates through the AST structure, converting each AST node into YARV instructions. The MRI C source code file which implements the Ruby compiler is called compile.c, not surprisingly. To learn how the code in compile.c works, you should start by looking for a function called iseq_compile_each. Here’s what the beginning of this function looks like:
/**
  compile each node
  self:  InstructionSequence
  node:  Ruby compiled node
  poped: This node will be poped
 */
static int
iseq_compile_each(rb_iseq_t *iseq, LINK_ANCHOR *ret, NODE * node,
                  int poped)
{
This function is very long and again consists of a very, very long switch statement… the switch statement alone is 1000s of lines long! The switch statement branches based on the type of the current AST node and generates the corresponding YARV code. Here’s the start of the switch statement:
type = nd_type(node);
...
switch (type) {
Here node was a parameter passed into iseq_compile_each, and nd_type is a C macro that returns the type from the given node structure.
Now let’s take a quick look at how Ruby compiles function or method calls nodes into YARV instructions using the receiver/arguments/function call pattern from earlier. First search in compile.c for this case in the large switch statement:
case NODE_CALL:
case NODE_FCALL:
case NODE_VCALL:{                /* VCALL: variable or call */
  /*
    call:  obj.method(...)
    fcall: func(...)
    vcall: func
  */
Here as the comment explains NODE_CALL represents a real method call (like 10.times), NODE_FCALL a function call (like puts) and NODE_VCALL a “variable” or function call. Skipping over some of the C code details – including optional SUPPORT_JOKE code used for implementing the goto statement – here’s what Ruby does next to compile these AST nodes:
/* receiver */
if (type == NODE_CALL) {
    COMPILE(recv, "recv", node->nd_recv);
}
else if (type == NODE_FCALL || type == NODE_VCALL) {
    ADD_CALL_RECEIVER(recv, nd_line(node));
}
Here Ruby calls either COMPILE or ADD_CALL_RECEIVER:
In the first case, for real method calls (NODE_CALL), Ruby calls COMPILE to recursively call into iseq_compile_each again, processing the next AST node down the tree that corresponds to the receiver of the method call or message. This will create YARV instructions to evaluate whatever expression was used to specify the target object.
If there is no receiver (NODE_FCALL or NODE_VCALL) then Ruby calls ADD_CALL_RECEIVER which creates a pushself YARV instruction.
Next Ruby creates YARV instructions to push each argument of the method/function call onto the stack:
/* args */
if (nd_type(node) != NODE_VCALL) {
    argc = setup_args(iseq, args, node->nd_args, &flag);
}
else {
    argc = INT2FIX(0);
}
For NODE_CALL and NODE_FCALL Ruby calls into the setup_args function, which will recursively call into iseq_compile_each again as needed to compile each argument to the method/function call. For NODE_VCALL there are no arguments, so Ruby simply sets argc to 0.
Finally Ruby creates YARV instructions to execute the actual method or function call:
ADD_SEND_R(ret, nd_line(node), ID2SYM(mid),
           argc, parent_block, LONG2FIX(flag));
This C macro will create the new send YARV instruction.
Experiment 1-3: Using the RubyVM class to display YARV instructions

It turns out there’s an easy way to see how Ruby compiles your code: the RubyVM object gives you access to Ruby’s YARV engine from your Ruby program! Just like the Ripper tool, using it is very straightforward:
code = <<END
puts 2+2
END
puts RubyVM::InstructionSequence.compile(code).disasm
The challenge is understanding what the output actually means. Here’s the output you’ll get for “puts 2+2:”
== disasm: <RubyVM::InstructionSequence:<compiled>@<compiled>>==========
0000 trace            1                                               (   1)
0002 putself
0003 putobject        2
0005 putobject        2
0007 opt_plus         <ic:2>
0009 send             :puts, 1, nil, 8, <ic:1>
0015 leave
You can see the same instructions that I showed earlier in my diagrams, with some additional technical details that I omitted above for sake of clarity. There are also two new instructions that I dropped completely: trace and leave. trace is used to implement the set_trace_func feature, which will call a given function for each Ruby statement executed in your program, and leave is similar to a return statement. The line numbers on the left show the position of each instruction in the byte code array the compiler actually produces.
The “<ic:1>” and “<ic:2>” notation shown with both opt_plus and send indicates these two method calls will use an inline method lookup cache to speed things up later when Ruby executes the YARV instructions.
The other values shown with the send instruction - “send :puts, 1, nil, 8” indicate that:
puts takes one argument,
there is no block parameter (nil), and
This is a function call, and not a normal method call (8).
Using RubyVM it’s easy to explore how Ruby compiles different Ruby scripts; for example, here’s my “10.times do” example:
code = <<END
10.times do |n|
  puts n
end
END
puts RubyVM::InstructionSequence.compile(code).disasm
Here’s the output I get now - notice that the “send :times” YARV instruction now shows “block in <compiled>” which indicates that I am passing a block to the “10.times” method call…
== disasm: <RubyVM::InstructionSequence:<compiled>@<compiled>>==========
== catch table
| catch type: break  st: 0002 ed: 0010 sp: 0000 cont: 0010
|------------------------------------------------------------------------
0000 trace            1                                               (   1)
0002 putobject        10
0004 send             :times, 0, block in <compiled>, 0, <ic:0>
0010 leave
== disasm: <RubyVM::InstructionSequence:block in <compiled>@<compiled>>=
== catch table
| catch type: redo   st: 0000 ed: 0012 sp: 0000 cont: 0000
| catch type: next   st: 0000 ed: 0012 sp: 0000 cont: 0012
|------------------------------------------------------------------------
local table (size: 2, argc: 1 [opts: 0, rest: -1, post: 0, block: -1] s3)
[ 2] n<Arg>
0000 trace            1                                               (   2)
0002 putself
0003 getdynamic       n, 0
0006 send             :puts, 1, nil, 8, <ic:0>
0012 leave
Now you can see that Ruby has displayed the two YARV instruction snippets separately: the first one corresponds to the global scope, and the second to the inner block scope.
Another important detail to learn about here is the “local table.” This shows a listing of the variables that are available in each scope. In my “10.times do” example, the local table for the inner scope contains a single variable: “n<Arg>” - the block parameter. The “<Arg>” text indicates that n is a parameter to this block. The text “argc: 1 [opts: 0, rest: -1, post: 0, block: -1]” describes what kind of arguments were passed to the method or block that this YARV code snippet corresponds to. Here’s how it works:
“argc” indicates the total number of arguments.
“opts” shows the count of optional variables that were passed in, e.g. “var=1, var2=2.”
“rest” shows the number of arguments included by the splat operator, e.g. “*args.”
“post” shows the number of arguments that appear after the splat operator, e.g. “*args, y, z”, and
“block” is true or false indicating whether or not a block was passed in.
It’s easier to see how the local table works by creating a few local variables in a Ruby script and then compiling it:
code = <<END
a = 2
b = 3
c = a+b
END
puts RubyVM::InstructionSequence.compile(code).disasm
Running, I get:
== disasm: <RubyVM::InstructionSequence:<compiled>@<compiled>>==========
local table (size: 4, argc: 0 [opts: 0, rest: -1, post: 0, block: -1] s1)
[ 4] a          [ 3] b          [ 2] c
0000 trace            1                                               (   1)
0002 putobject        2
0004 setlocal         a
0006 trace            1                                               (   2)
0008 putobject        3
0010 setlocal         b
0012 trace            1                                               (   3)
0014 getlocal         a
0016 getlocal         b
0018 opt_plus         <ic:1>
0020 dup
0021 setlocal         c
0023 leave
Notice that the local table now contains three variables: “a,” “b,” and “c:”
local table (size: 4, argc: 0 [opts: 0, rest: -1, post: 0, block: -1] s1)
[ 4] a          [ 3] b          [ 2] c
These are the three local variables created by my Ruby code. You should also note YARV uses the instructions setlocal and getlocal to set and get local variables. One confusing detail here is that the local table size is shown as 4, even though I have only defined three variables. YARV uses the extra space in the locals table when it executes your code – I’ll cover this in detail in Chapter 2.
Another important detail about the RubyVM output worth learning about are “catch tables.” These have to do with how YARV implements program control features such as redo, next, break, throw/catch, raise/rescue, etc. Let’s try adding a redo statement to the inner block in my example program…
code = <<END
10.times do |n|
  puts n
  redo
end
END
puts RubyVM::InstructionSequence.compile(code).disasm
… and see how Ruby compiles that:
== disasm: <RubyVM::InstructionSequence:<compiled>@<compiled>>==========
== catch table
| catch type: break  st: 0002 ed: 0010 sp: 0000 cont: 0010
|------------------------------------------------------------------------
0000 trace            1                                               (   1)
0002 putobject        10
0004 send             :times, 0, block in <compiled>, 0, <ic:0>
0010 leave
== disasm: <RubyVM::InstructionSequence:block in <compiled>@<compiled>>=
== catch table
| catch type: redo   st: 0000 ed: 0020 sp: 0000 cont: 0000
| catch type: next   st: 0000 ed: 0020 sp: 0000 cont: 0020
|------------------------------------------------------------------------
local table (size: 2, argc: 1 [opts: 0, rest: -1, post: 0, block: -1] s3)
[ 2] n<Arg>
0000 trace            1                                               (   2)
0002 putself
0003 getdynamic       n, 0
0006 send             :puts, 1, nil, 8, <ic:0>
0012 pop
0013 trace            1                                               (   3)
0015 jump             17
0017 jump             0
0019 putnil
0020 leave
You can see the output “catch type: redo” and “catch type:next” at the start of the block’s YARV code snippet. These indicate where the control should jump to if a redo or next statement is compiled inside the block. Since the “catch type: redo” line ended with “cont: 0000” the jump statement on line 17 is “jump 0”. Curiously, Ruby adds an extra, unnecessary “jump 17” instruction on line 15; this must be due to a minor inefficiency or bug in the compiler.
Finally, if we use break instead of redo:
code = <<END
10.times do |n|
  puts n
  break
end
END
puts RubyVM::InstructionSequence.compile(code).disasm
… then we get this output:
== disasm: <RubyVM::InstructionSequence:<compiled>@<compiled>>==========
== catch table
| catch type: break  st: 0002 ed: 0010 sp: 0000 cont: 0010
|------------------------------------------------------------------------
0000 trace            1                                               (   1)
0002 putobject        10
0004 send             :times, 0, block in <compiled>, 0, <ic:0>
0010 leave
== disasm: <RubyVM::InstructionSequence:block in <compiled>@<compiled>>=
== catch table
| catch type: redo   st: 0000 ed: 0018 sp: 0000 cont: 0000
| catch type: next   st: 0000 ed: 0018 sp: 0000 cont: 0018
|------------------------------------------------------------------------
local table (size: 2, argc: 1 [opts: 0, rest: -1, post: 0, block: -1] s3)
[ 2] n<Arg>
0000 trace            1                                               (   2)
0002 putself
0003 getdynamic       n, 0
0006 send             :puts, 1, nil, 8, <ic:0>
0012 pop
0013 trace            1                                               (   3)
0015 putnil
0016 throw            2
0018 leave
This looks similar, but now Ruby has created a throw instruction at the end of the inner block, which will cause YARV to jump out of the block and back up to the top scope, since that scope contains a “catch type: break” line. Since the line shows “cont: 0010” Ruby will continue from line 0010 after executing the throw statement.
I’ll explain how this works in more detail next in Chapter 2.