
RIFLE MARKSMANSHIP FUNDAMENTALS

Now that we’ve reviewed rifle parts, ammunition, and sights and scopes, let’s learn about how to shoot a rifle.
As previously mentioned, pistol marksmanship fundamentals —aiming, breathing control, trigger control, hold control, and follow-through—are exactly the same as for a rifle.
There is, however, a difference related to eye dominance. With rifles, you shoulder the rifle on your dominant-eye side. If you are right eye-dominant, you’ll shoulder the rifle on your right shoulder, and vice versa. However, notice how this has nothing to do with your dominant hand. You might be right-handed, but left-eye dominant (cross-dominant), so it may seem unnatural for you to do something left-handed. However, I’ve seen numerous shooters’ accuracy improve once they shoulder a rifle on their eye-dominant side. If you’re cross-dominant and at all resistant to trying something with your opposite hand, I encourage you to simply try it and see how you like it. At the end of the day, shoot however feels most comfortable for you.
Cheek weld is one concept that deserves a deeper dive when it comes to long guns. Cheek weld, as already defined above, is the idea of solidly placing your cheek in the optimal place on the comb. This optimal location varies for every person and rifle combination. It can vary depending on whether the rifle has iron sights or a scope, the height of the sights, and personal comfort. A good cheek weld will help you become more accurate because you will have the same sight picture each time. This will help you control the rifle and realign faster for subsequent shots.
A good cheek weld is when you can feel the comb pressing underneath your cheek bone. If you see skin, fat, and muscle bulging over the comb, then that’s another good sign of a solid cheek weld. With regards to pressure, you want to apply as much pressure on your cheek as is comfortable for you and does not tire you out.
With cheek weld and head alignment, your head should be almost straight up, not tilted to either side. If you shoulder your rifle on your right and find yourself turning your head to look through your left eye, your cross-dominance is causing poor cheek weld.
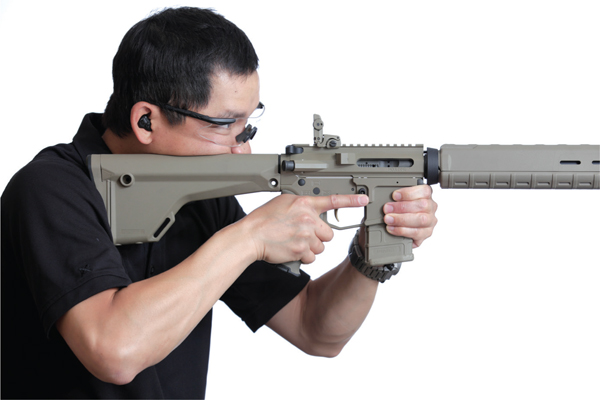
Notice how the head is level.
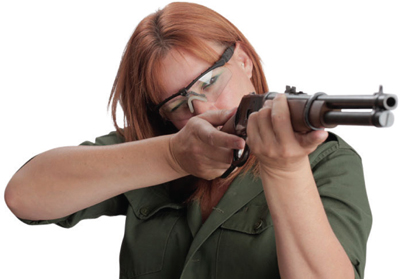
Incorrect head alignment. Here the head is canted and the sight picture will be rotated as well. To correct this, the user should straighten her head and press the comb up to her cheek. Also notice that there is a cross-dominant eye issue. The shooter is aiming with her left eye but has the rifle on her right shoulder. The shooter should either mount the rifle on the her left shoulder, or close her left eye and only aim with her right eye.
Sometimes, you won’t be able to get a good cheek weld. This is a common occurrence, which is why rifle owners often buy different stocks and accessories to optimize their setup for their particular needs and body type. If you have a rifle scope, sometimes lowering or raising the rings can help, but sometimes getting a different stock is part of the solution. The only way you will find out what works best for you is to try different stocks. Or you can spend a good chunk of change on a custom stock that is fit specifically to you. I might suggest a beginner not go down that road, but if you have the money to spend, go for it!
One last note about cheek-weld placement: You will want to experiment with your cheek location by moving it closer and farther away from the rear sight or scope. If you have a scope, I suggest finding the best spot, using your iron sights first, then mounting the scope on the rail in a position where you can see the full view in the glass. If you see a black hazy ring around the sight picture, then you are either too far or too close. Keep moving your cheek back and forth until you find the right spot.
Each time you bring your rifle up to your face (not your face to the rifle), it should come to the same spot on the comb each time. This takes practice, like anything else. With some hands-on experience, you’ll master this skill.
Rifle Stances
Beginners should learn as many of the following stances as they can: benchrest, kneeling, prone, sitting, and standing.
Benchrest
I recommend starting with shooting from a bench, as the rifle will be well supported. Many ranges loan sandbags, wood blocks, and other rifle stands to enhance the shooter’s comfort.
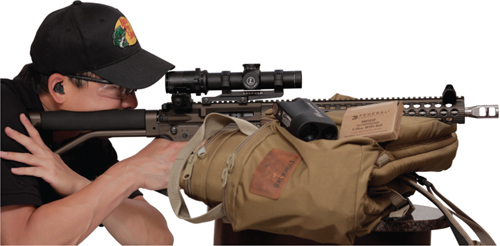
Notice that the shooter is simply using his soft case as a rest. The most important thing to note is whether the muzzle is near any objects. The hot gases leaving the muzzle after each shot can easily destroy or ruin range bags or other objects.
Here are some main points for the benchrest position, which are very similar to the pistol benchrest position:
Kneeling
The main point about kneeling is to have your support-arm elbow on your knee. Some people find it more comfortable to have their elbow on the knee (patella, to be precise) while others like their elbow right above the patella. between the muscle and bone. I believe this is another personal preference area so try different locations. The main idea is that you want your elbow to be stable and comfortable so you can support your rifle.
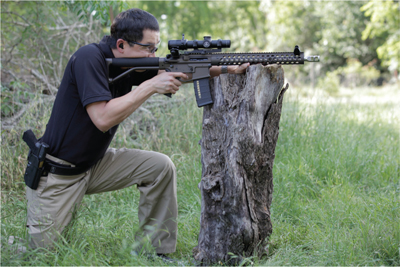
The shooter can kneel without support or use a tree stump or other object to provide stability.
Prone
Prone means lying on your stomach. Many shooters purchase a shooting mat to protect themselves from cold, wet, hot, or dirty conditions. When positioning yourself into the prone position, it is usually best if you place the rifle down on the ground first, and then go down on your stomach. Trying to get on your stomach while holding the rifle can be difficult for beginners. You want to be aware of your muzzle and make sure you aren’t “sweeping” yourself with the muzzle. Sweeping means crossing a part of your body with the muzzle.
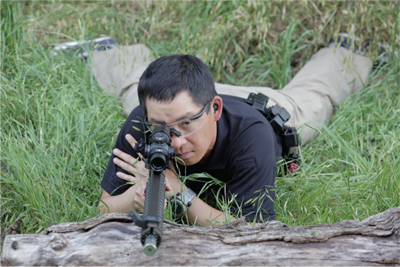
The prone position.
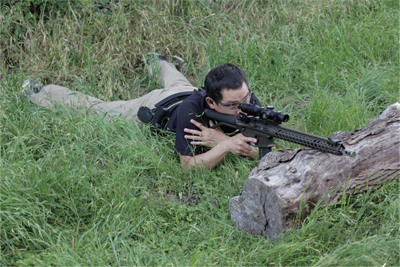
Another view of the prone position. Notice how the shooter is low to the ground, which gives him a low profile.
You want to get as low to the ground as possible. Having your legs spread out a bit will provide a base, and I prefer to keep my toes pointed outward. Notice how my body is directly behind the rifle, and not off to one side. The philosophy here is that, after taking a shot, the rifle will come straight back into my shoulder and back onto the target faster. If my body was off to one side, the rifle may not come straight back onto the target as easily.
There is more than one correct prone position, so you can research other variants if you like.
Sitting
Sitting can either be with legs crossed, or with your knees slightly raised up to support your arm. Some shooters like to sit on a foot, as well. Generally speaking, any position where your butt is on the ground is considered a sitting position. It is helpful to practice the sitting position both with and without a rifle support.
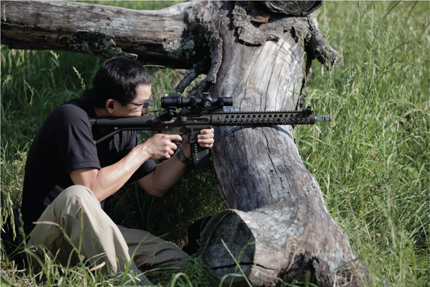
One version of a sitting stance.
Standing
Standing is another stance you should practice. Standing stances can vary depending on the exact type of rifle you are using, but there are a few main things to keep in mind.
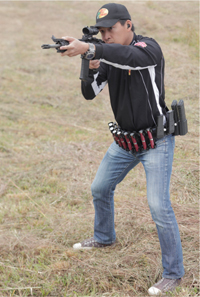
Feet are slightly wider than shoulder width apart and are offset about 45 degrees from the target.
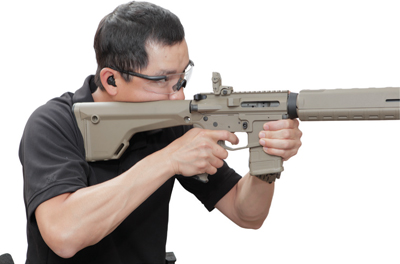
The left hand can also be placed on the magazine.
If you need more support, consider the arm-rest standing position.
Do the following to set yourself up for this position:
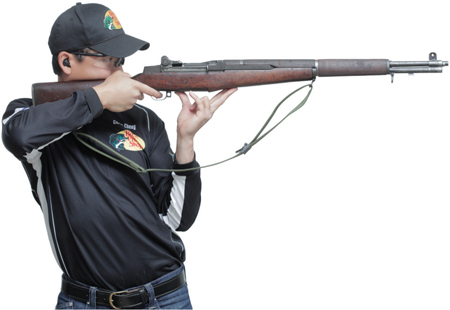
The arm-rest standing position with an M1 Garand .30-06 rifle
To Chicken Wing, or Not to Chicken Wing?
The “chicken wing” is when your shooting arm elbow is raised up high. Other shooters may opt to relax the elbow, or even tuck it in tight. It really depends on your personal preference and style, the characteristics of the rifle, and any idiosyncrasies of a particular shooting discipline you might be training for—such as the military or competitions.
Personally, I tend not to chicken-wing, as the energy you’re expending could be conserved or put towards your focus or other physical needs. However, a chicken wing will create a pocket between your shoulder and pectoral muscle where the buttstock often naturally seats well. Try both ways to figure out what’s most comfortable for you.
Regardless of what position you’re shooting in, you want to be as relaxed and comfortable as possible. If you feel a part of your body is stressed out, see if you can find a better position and tell your body to relax, or you might just need to keep practicing a particular position until your muscles are used to it. I always need to stretch before going prone because my hip and leg muscles just aren’t used to it, and so perhaps stretching or working out certain muscle groups may help.
You might be asking yourself, “Is one of these positions better than the other?” The short answer is “no.” It all depends on the situation you’re in and what is required. If you’re a hunter or a competitive shooter, all of these positions will be helpful. Even if you are just a plinker, changing your position will add variety and keep you interested in new challenges.
Chapter Summary: