
As mentioned in the rifle section, shotguns and rifles are both referred to as “long guns.” They share the same three basic parts: stock, action, and barrel.

A shotgun stock’s parts (butt, comb, grip, forearm) are more or less the same as a rifle.
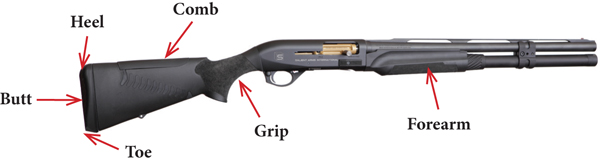
Diagram of a shotgun’s parts: butt, heel, toe, comb, and forearm.
However, there are differences that are of more interest to intermediate and advanced shooters. At a high level, there are unique adjustments for a shotgun comb and butt, all depending on the application (for example, trap, skeet, or sporting clays).
Actions
Let’s review some common shotgun actions.
Break-Action
A break-action shotgun typically has one or two barrels, and the action “breaks” open so you can load one or two shells, one in each barrel. After the rounds have been fired, the user must break open the action to remove the shells.
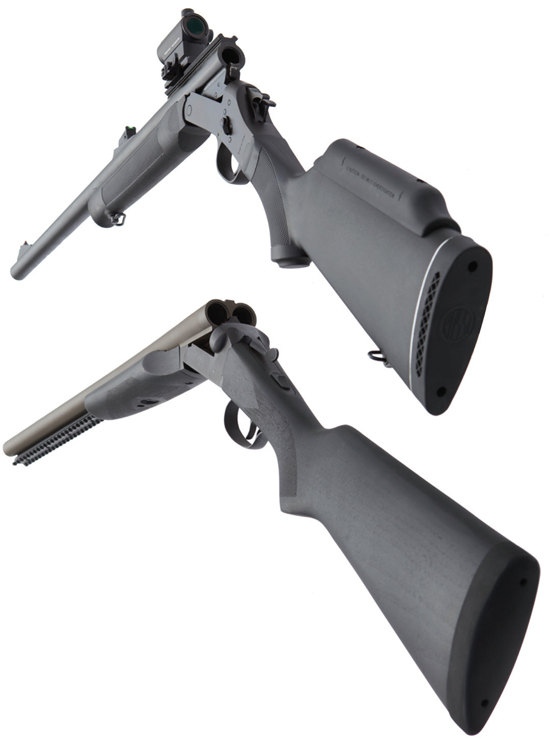
On top, a single-barrel break-action shotgun. On bottom, a double-barrel break-action shotgun.
Break-actions are known for their reliability because they have fewer moving parts that could fail, but capacity is a key limitation.
With double-barreled break-actions, there is “over-under” (O/U) or “side-by-side” which describes the barrel placement.
To load a break action shotgun:
To unload a break-action shotgun:
Pump-Action
A pump-action shotgun has a sliding forearm that manually opens and closes the action after each shot. If the shotgun is loaded, pulling the forearm back will eject the round in the chamber and feed a fresh round from the tubular magazine. Pushing the forearm forward will chamber the new round. The tubular magazine can typically hold anywhere from three to eight rounds. Aftermarket extension options are available for even higher capacity.

A Remington 870 pump-action shotgun. Not only does this shotgun have an aftermarket extension tube, it also has a forearm integrated flashlight, made by SureFire.
Pump-actions are also known for their reliability because their manual action is prone to fewer jams, and they can store more ammunition than a break-action. Many police departments and military units use pump-action shotguns, such as the Remington 870 and Mossberg 500.
These two pump-action shotgun models in particular are a lot of fun because they are customizable. Flashlights, lasers, ammo pouches, pistol grip stocks, and other accessories are available, and you can replace one or multiple parts at a time. You are only limited by your imagination.
To load a pump-action shotgun:
To unload a pump-action shotgun:
Semiautomatic
A semiautomatic shotgun is magazine-fed and fires a single shot each time the trigger is pulled. Each shot propels the bolt to the rear while ejecting the spent cartridge and resetting the trigger. The user can simply keep pulling the trigger until the gun is out of ammunition. The tubular magazine is functionally the same on a semiauto shotgun as one on a pump-action shotgun. The vast majority of magazines are fixed tubes, but there a few detachable magazines.

A Benelli Vinci semiautomatic 12-gauge shotgun. The camouflage design makes it a great hunting shotgun.

A Mossberg 930 semiautomatic 12-gauge shotgun, modified by Salient Arms International.
Salient Arms International
I was first introduced to Salient Arms International while watching Top Shot Season 3. I loved the look of the custom work they did to the Glock 34 pistol, and I knew I really wanted to get a gun done up by them. They also do shotguns, which more than pleased me.
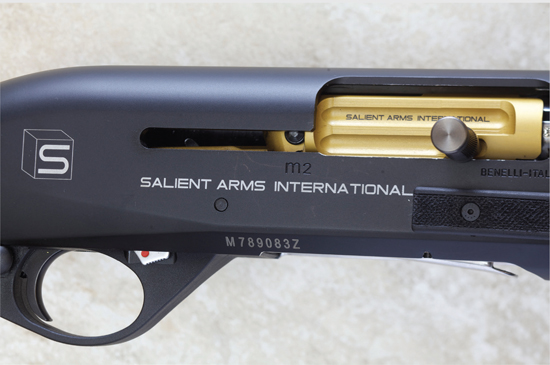
A Benelli M2 semiautomatic 12-gauge shotgun, modified by Salient Arms International.
If you decide to customize your shotgun, or any gun for that matter, there are some purely cosmetic things you can do as well as options that enhance usability. Above is a Benelli M2 shotgun that was modified by Salient in the following ways:
Numerous other internal and external enhancements are available as well, all of which you can pick and choose from.
What has been so cool about my experience is that I went from a Top Shot fan watching the competition on TV and drooling over Salient’s guns, to the Top Shot champion who is now sponsored by Salient. I love the work they do and am proud to be associated with them. It’s been such a fun career shift to go from computers to guns!
Semiautomatic shotguns are known for their shooting speed, as the user does not need to pump the action in between shots. However, these shotguns are more particular about the type of ammunition used in them, so the user will need to test out different types to make sure the bolt will reliably cycle.
To load a semiauto shotgun:

Barrel
The last part of a shotgun is the barrel, and here’s where a shotgun greatly differs from a rifle.
Let’s start off with the equivalent of pistol and rifle caliber, which is called “gauge” or “bore” in the shotgun world. The main gauges are 12 and 20. The smaller the number, the larger the round. Then there’s .410 bore, which is even smaller than 20 gauge. From a recoil perspective, 12 gauge has the most, then 20 gauge, and then .410 bore. If you would like to learn more about how gauge is measured, other books and the Internet have plenty of information.
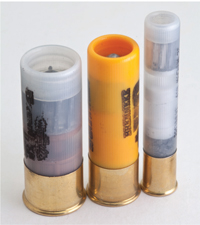
12-gauge, 20-gauge, and .410-bore shells.
We’ll dive more into ammunition in the next section.
Shotgun barrels also have chokes, which are metal tubes that screw into the muzzle end of the shotgun. Chokes constrict the shot coming out of the barrel, and you need different chokes for different applications.

A picture of some chokes and the choke key to screw them in and out of a shotgun muzzle. Chokes are made to fit certain makes and models, so make sure to only buy chokes that properly fit your shotgun.
Here’s a list of choke sizes (from most to least tight) and some common uses:
“Cylinder” or “cylinder bore” means there is no choke in the gun.
Which choke to use for hunting depends on exactly what you’re hunting. There isn’t a hard-and-fast rule that you have to use a particular choke with certain game, and the type of ammunition and the gun you’re shooting must be taken into effect, but there are some things to keep in mind. Smaller game, such as rabbits, should not be shot at with a full choke because the dense shot pattern will most likely destroy the meat. A full choke is more appropriate for waterfowl, such as duck and geese.
Patterning is the process of testing different ammunition, choke, and shotgun combinations. To pattern a shotgun, you set up some sort of target, such as a simple piece of paper, and shoot it from a set distance, often between 25 and 40 yards. You then count the number of shot you see on the paper and compare it against expected results for that gauge with that particular choke.
As a beginner, I recommend just focusing on the mechanics of shooting a shotgun. It is important to be aware of chokes and patterning, and once you’re comfortable with the basics you can consult another resource for more on chokes and patterning. If you are shooting trap, consider starting off with a less-constricted choke, such as improved cylinder, as the shot pattern will be bigger and can make targets easier to hit. However, the more spread out a shot pattern is, the less likely you are to hit the clay target. It is a tradeoff, and so you’ll want to find the best choke, ammo, and shotgun setup for your particular shooting style.
As with pistol and rifle barrels, a shotgun barrel will have its gauge and shell length. (More on shell length on page 188.)

The engraving reads “12 GA. 3”—76mm FOR 2 ½ or 3” SHELLS.”
Some shotgun barrels have a “rib,” which is a piece of metal that runs atop the barrel. Differing rib heights can aid the shooter depending on the particular usage. For example, in Olympic Double Trap competition, many shotguns have a high rib, which gives the shooter more time to acquire the target before taking the shot. Shotguns may have high ribs, all the way down to flat ribs, or somewhere in between.

This shotgun rib is slightly raised.
The last thing to note about the barrel is that it often has a front sight post, as well as a mid-bead. These two reference points are designed to help the shooter aim the shotgun properly. Note that some shooters opt to completely remove both posts (see the discussion on sight picture on p. 196).