Previous sections have focused on identifying types of injuries and describing first aid care. Except for meeting the urgent first aid needs of impaired breathing and severe bleeding, there is no need to treat an injury as soon as it is found. It is better to stop and plan carefully what will be done and in what order. Planning can prevent moving the injured person unnecessarily or getting halfway through a treatment and having to undo it so that another part of the treatment can be done. The plan extends beyond the patient’s immediate first aid needs to include deciding on means of evacuation and roles party members will play. Although the final plan is the leader’s responsibility, information should be obtained from other party members. The leader should discuss with party members specific suggestions for first aid needs of the patients and the utilization of party resources as well as plans for any patient movement.
One of the first decisions to be made is whether to postpone further travel or to end a trip. In many instances it will be clear that a patient cannot continue traveling and the trip must end. In other instances, many party members may be anxious to continue and the need to end the trip will not be clear. A trip should be postponed or ended if any of the following conditions are present in a patient:
• The patient’s condition is deteriorating
• Pain or injury that prevents travel, or a medical condition that compromises the ability to travel
• Serious high altitude illness
• Infections that persist for more than 24 hours
• Unexplained passage of blood
• Severe chest pain
• Psychological changes that impair the safety of the patient
When planning care, a priority list of treatment needs should be established. Answering the following questions can help in determining the order of first aid activities:
• Are some patients more seriously injured than others? Party resources may need to be focused on the most seriously injured in order that they may survive. Less seriously injured patients may get only a small part of the available help because they can survive with less assistance. Alternatively, if the needs of one patient are beyond the capacity of the party, then the party’s resources should be directed toward caring for patients with injuries where they have a chance of success.
• Which injuries will cause the most harm if left unattended? A broken leg may be painful, but it is not as hazardous to the patient’s survival as hypothermia left untreated.
• Can treatment of one problem assist in the treatment of another? For example, when moving onto insulation, the patient can also be placed onto the ties needed for splinting.
Making a priority list will help ensure that all treatment needs are met and that equipment and party members are used to the best advantage.
Once priorities for patient care have been determined, plans for specific treatments to be undertaken need to be discussed. Personnel, equipment, and supplies needed to carry out the treatments should be identified. Some treatments may require that a rescuer is temporarily moved from one patient to another, until the treatment is completed. The equipment and supplies of the rescuers and the injured patients should be included in the plan. Resources that are needed to either stay in place until help arrives or that are required during a self-evacuation of the party must be identified.
If a patient is to be moved, then the sequence of treatments and the expected place where the patient will stay until evacuation is attempted should be carefully thought out so that movement is minimized. Tents or other shelters should be prepared in advance of the movement, and every rescuer should have a clear understanding of how the move is to be accomplished. If possible, the party should rehearse a movement in advance of attempting it with the patient.
Short-distance transfer may be needed to move a patient off the snow, out of the rain, or into a tent. Transferring a patient to another location can improve comfort. More important, moving the patient may be essential to first aid treatment and the patient’s well-being. For the seriously injured patient, the least amount of movement is best. More harm can be done through improper transfer than through any other measure associated with first aid. Transfer of a patient should be done only when absolutely necessary and with a great deal of care and fore-thought. Transfer methods are easily learned, but must be practiced before being used on a patient. The ability to use movement techniques correctly is of particular concern in the mountains because of the possibility of fall-related injuries to the back, head, and neck. All movement should take place only after respiration and circulation have been stabilized, and the initial pain and fear of injury has subsided. Movement, except for emergency rescue, occurs in Step 7.
In moving a patient, the following procedures must be observed:
• Plan moves so that the patient must be moved only once.
• Prepare any insulating materials or shelter before the patient is moved.
• The transfer process should be rehearsed carefully, using a rescuer as practice subject. Directions for the transfer should be practiced.
• The rescuer supporting the head is the leader of the transfer. Other rescuers should precisely follow the movement and direction of the leader.
• Protection of the patient’s entire body must be assured during the move.
• The body of a patient with a suspected neck or back injury should be kept in a straight line, from the top of the head down the spine and through the buttocks.
• A “scout,” a rescuer not holding onto the patient, may be appointed to help the rescuers avoid obstacles and travel over rough terrain.
Directions for several patient moves follow.
1. Preparation. The move has been included in the plan for first aid. Insulation materials, tents, etc. are ready, path of movement has been cleared, and the safety of the rescuers considered.
2. Rescuers assume a position behind the patient facing each other.
3. If the patient is sitting on the ground, the rescuers kneel down on the knee closest to the patient. The rescuer’s arm closest to the patient is placed across the patient’s back and into the patient’s far armpit. The other hand is placed from the front of the patient into the closest armpit.
4. The rescuers stand at the same time, bringing the patient to a vertical position.
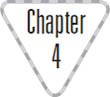
5. The patient’s arms are placed around the rescuers’ necks. The rescuers’ arms closest to the patient support the patient’s back. The rescuers may interlock their arms to form a backrest.
6. The rescuers grasp each other’s arms at the wrists to form a seat for the patient.
7. Crouch so that the patient may sit down on the seat.
8. Once the patient is securely seated, stand.
A patient with a suspected back or neck injury should be evacuated on a rigid backboard or stretcher. A rigid stretcher or board cannot be made from the materials typically at hand in a mountaineering situation, and its use requires training. Until a rigid stretcher can be brought to the scene of the accident, it is better to leave the patient as found, putting a shelter up around the patient rather than attempting to move the patient into shelter.
If the patient must be moved to allow placement of insulation between the patient and the ground, or must be transferred a short distance, the following techniques may be used. At all times during the movement, the patient’s head and back must be kept in straight alignment. Once the move has ended, the head must be supported by a rescuer until it is secured with sandbags. The following techniques can be modified for use with patients found in positions other than lying flat on their backs.
1. Preparation. The move has been included in the plan for first aid. Insulation materials, sandbags, etc. are ready. Four rescuers are needed.
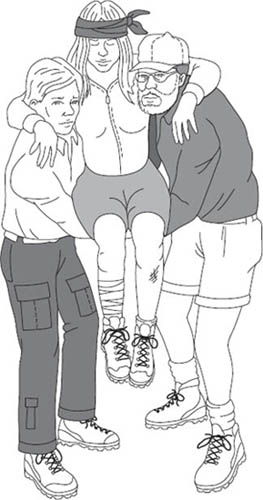
2. The leader of the move assumes a position directly behind the patient’s head. The rescuer’s hands are positioned with fingers placed supporting the back of the head and the jaw, typically with the palms of the hands covering the ears. This may be modified due to the size of the rescuer’s hands compared to the patient’s head or the position of the patient. The intent is to prevent motion of the patient’s head relative to the rest of the body.
3. If necessary, the patient’s head and neck may be moved gently and slowly to form a straight line with the spine. If there is any resistance to the movement, or the patient experiences any pain, the movement must stop immediately, and the head and neck be left in their present position.
4. The other rescuers assume positions on one side of the patient, kneeling on both knees. One rescuer is placed near the shoulders, the second at the hips, and a third at the knees.
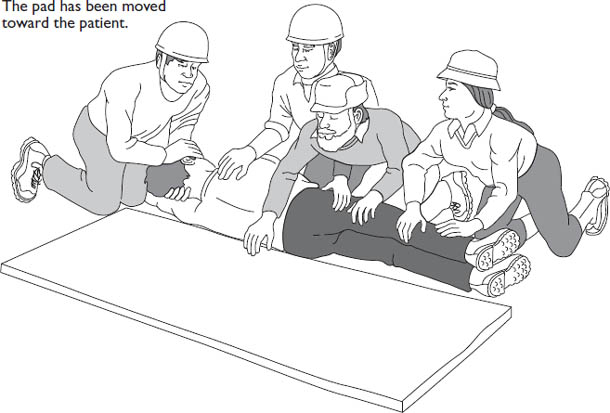
5. The insulation material is placed on the far side of the patient, ready to move under the patient. The pad must be long enough to provide insulation under the head, trunk, buttocks, and upper legs of the patient. Preferably, the pad should extend from the top of the head to the heels. The edge of the material next to the patient may be rolled under itself, so that after the patient has been placed on the insulation the rolled edge may be gently unrolled.
6. The patient’s arm on the same side as the rescuers is lifted up and out of the way of the roll, while the patient’s shoulder is supported by the rescuer’s other arm to reduce movement of the patient’s spine.
7. The rescuer at the shoulders secures the patient’s opposite arm putting the patient’s hand in a pocket or waistband.
8. The rescuer at the shoulder places one hand at the patient’s far shoulder and the second at the hips. The rescuer at the hips places one hand at the top of the hips (in between the first rescuer’s hands) and the second hand at mid-thigh. The third rescuer places one hand at the knees and the other hand at the ankles.
9. The leader calls “Prepare to roll,” and when all are ready, “Roll.” The patient is slowly rolled toward the rescuers’ knees. The patient is moved as a unit, with the leader setting the pace. The patient’s head, neck, and spine are kept in a straight line. The rescuer at the hips moves the insulation next to the patient.
10. The leader calls “Prepare to lower,” and when all are ready, “Lower”: the patient is rolled onto the material.
11. The rescuer at the patient’s head remains in place until the head is secured with sandbags.
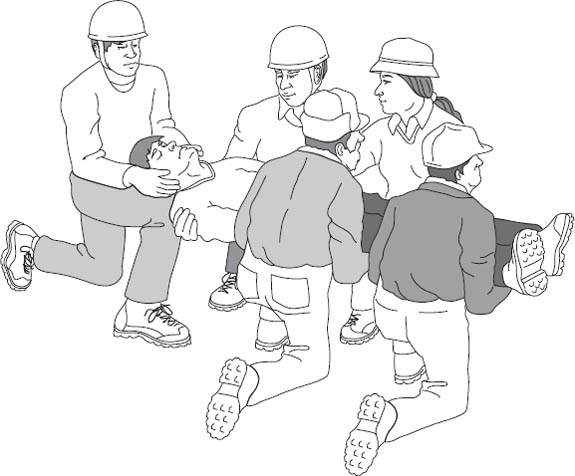
1. Preparation. The move has been included in the plan for first aid. Insulation materials, tents, etc. are ready, the path of movement has been cleared, and the safety of the rescuers considered.
2. The leader of the move assumes a position directly behind the patient’s head. Hands are placed on either side of the head as in Step 1 of the log-roll.
3. If necessary, the patient’s head and neck may be moved gently and slowly to form a straight line with the spine. If there is any resistance to the movement, or the patient experiences any pain, the movement must stop immediately, and the head and neck be left in their present position.
4. Other rescuers assume positions on both sides of the patient at the shoulders, waist, hips, and lower legs. Rescuers at the shoulders and the hips are on the same side of the patient, the rescuers at the waist and lower legs are on the opposite side of the patient. All rescuers kneel on the knee closest to the patient’s head.
5. The patient’s arms are secured by gently tying them at the wrist or placing the hands in the patient’s waistband.
6. The rescuer at the shoulders gently moves one hand under the top of the shoulders (also supporting the lower portion of the neck), and the other hand at the lowest edge of the patient’s ribs. The rescuer at the waist places one hand under the ribs (just above the first rescuer’s hand) and the other hand just below the patient’s waist. The rescuer at the hips places one hand under the patient’s waist and the other hand at mid-thigh. The rescuer at the lower legs places one hand just under the knees and the other hand under the lower legs. One hand of the rescuer at the waist will be between the hands of the rescuer at the shoulder, and the other hand will be between the hands of the rescuer at the hips.
7. The leader calls “Prepare to lift to knees,” and when all are ready, “Lift.” At the second call, the patient is slowly lifted onto the rescuers’ knees. The patient is moved as a unit, with the leader setting the pace.
8. Rescuers’ hands are slid further underneath the patient. The bend of the rescuers’ arms should be directly next to the patient; the rescuers’ upper arms should be in contact with the side of the patient’s body. The rescuers at the shoulder, waist, and hips may grasp the arms of the opposite rescuers.
9. The leader calls “Prepare to stand,” and when all are ready, “Stand.” At the second call, the rescuers stand erect. Any further motion is directed by the leader. When walking, rescuers shuffle their feet side to side. Do not cross over legs to take steps.
Lowering the patient is the reverse of the procedure.
10. The leader calls “Prepare to lower to knees,” and when all are ready, “Lower.” The patient is slowly lowered onto the rescuers’ knees. The rescuers kneel on the knee closest to the patient’s head on the ground.
11. The rescuers move their arms to the position described in Step 6. The leader calls “Prepare to lower to ground,” and when all are ready, “Lower,” and the rescuers lower the patient to the ground.
The exact position of the rescuers’ hands from shoulders to hips will vary with the size of the patient and the rescuers. The intent is to provide good support for the shoulders, back, and hips.
After establishing a priority list for meeting the first aid needs of the patients, the leader must consider what needs to be done to keep the party safe and ensure that the injured get to appropriate treatment. One of the most difficult questions to be answered is how the injured person will get to outside help. Will the party self-evacuate or request outside help? Several conditions must be considered in making this decision:
• What is the extent of the patient’s injuries? A minor injury may slow the party down, but given enough time the patient will be able to walk out. Several relatively minor injuries or a severe injury may require more help than the party can provide.
• What is the terrain that must be crossed? A patient with a broken wrist may be able to walk down a trail easily but have difficulty scrambling across a boulder field.
• What is the weather? Walking across an alpine slope in bright sunshine is much easier than trying to cross the same slope in wind, rain, and fog.
• How far is it to the trailhead? An injured patient may be able to walk a mile or two, but not five or ten.
• What is the party strength? Party strength includes the number of people, their condition, experience, and the equipment they have to use as well as the rescue skills and knowledge that the members possess. A tired, psychologically distraught, or inexperienced party may be unable to accomplish a self-evacuation of even a minor injury.
• What equipment is available? Assemble all equipment, including the patient’s, in one place and take an inventory. Determine what is available, and what additional equipment should be brought in by a rescue party. Plan to use the patient’s equipment first.
• How much outside help is available? How long will it take to reach the accident scene? In the mountains, outside help is usually 6 to 24 hours away. Even a slowly moving patient may be able to get out to help faster than help can arrive.
The decision may not be a simple choice of self-evacuation versus requesting outside help but a combination of the two types of evacuation. A party may move the patient a short distance to a safer or more comfortable location. They may self-evacuate to the point at which technical rescue techniques beyond the party’s capacity are required. The party may move slowly down the trail toward the rescuers, thereby saving time.
ISSUES TO CONSIDER IN EVACUATION PLANS
What is the extent of the patient’s injuries?
What is the terrain that must be crossed?
What is the weather?
How far is it to the trailhead?
What is the party strength?
What equipment is available?
How much outside help is available; how long will it take to reach the accident scene?
Most parties are not sufficiently strong or well equipped to safely evacuate a seriously injured patient. A minimum of eight rescuers is needed to handle a patient in a litter at any one time, and carriers should be rotated off duty every 15 to 20 minutes. Travel over off-trail terrain may require sixty or more rescuers for a trip of any distance more than a few hundred feet. Patients with relatively minor injuries can, with patience and care, be safely evacuated even by a small party. The leader, when deciding if self-evacuation is possible, must consider the extent of the injuries, the type of terrain to be covered, and the strength of other party members. The leader must also consider what will happen if the party starts to self-evacuate and is unable to continue. Will there be a safe place to stop? Several criteria must be met for a successful self-evacuation.
The patient must be willing to help and must understand how to aid in the self-evacuation. All injuries must be treated prior to starting out. One person should accompany the patient at all times. He or she can provide both encouragement and physical assistance when needed. This individual will also need to monitor the patient’s condition and the safety of the evacuation procedures.
Each section of the route should be checked prior to attempting to navigate it with the patient. The other party members will have to travel the route at least two or even three times. Ways around obstacles need to be found prior to the arrival of the patient so that he or she does not have to backtrack or cross unnecessarily difficult areas. An apparently quicker more direct route might require the use of more balance or climbing techniques than the patient is capable of doing. A slight uphill section, barely noticed under normal conditions, may be an insurmountable barrier to the injured patient.
In summary, Step 6 of the Seven Steps is to plan for activities needed to ensure a successful response.