The main aim with the autumn asana practices is to open the side of the rib cage by extending the arms overhead, activating the shoulders, strengthening the legs and stimulating the diaphragm.
Below are some asana’s that achieve this aim. Incorporate these postures into your asana practice during autumn to target the lung and large intestine.
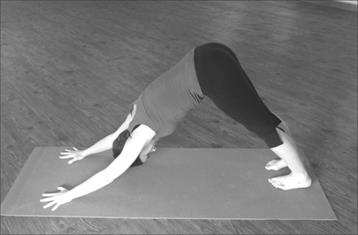
Down Facing Dog – Adho Mukha Svanasana
Main benefit – Strengthens the arms, shoulders and opens the back of legs.
1. Come onto all fours with hands underneath the shoulders and knees under the hips. Spread your fingers wide.
2. Tuck the toes under, start to extend the arms and start bringing the knees off the floor.
3. Come to extend the arms, and start to work the kegs straight. Try to bring the weight back into your legs and not so much into your arms.
4. Look to the floor just under your belly button.
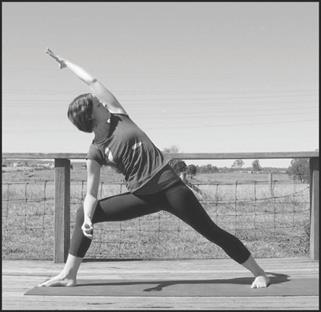
Extended Side Angle Pose – Utthita Parsva Konasana
Main Benefit – Strengthens the legs, opens the lungs and the side of the body.
1. Extend the legs wide apart and bring your right toe to face down the mat and the back toes to turn out to the side at around 45 degrees.
2. Bring your hands to your hips to start with and start to bend into the front right knee. Make sure your knee is either above your ankle or just behind it, don’t let it pass over the ankle as this puts to much stress on the knee joint.
3. Bring your arms up to shoulder height, shoulders relaxed, palms facing down.
4. Now start to reach forward with your right arm, bring your torso forward also, and then place the right elbow onto the knee. Bring the left arms past your ear palm facing down. Look out to the side or up under the arm.
5. Keep your legs strong, draw the belly in, try and relax the upper body.
6. Come out by drawing the arms and torso back to centre, and releasing the legs.
7. Repeat on other side
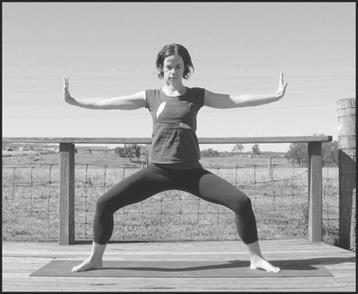
Horse Stance – Arms pushing Qi out to the side
Main Benefit – Strengthens the legs and opens the channels in the arms.
1. Bring your legs comfortable apart, feet at 45 degrees and start to sink into the knees a little. Get the sense that the knees are working outwards and work big toes into the floor.
2. Allow the tailbone to gently move towards the floor yet a low a gentle lower back curve. Basically no jamming into the lower back. Draw the anus in slightly and get a sense that the lower belly is drawn in slightly – you want to feel strong in your lower body, like a tree.
3. The arms, the branches gently push out to the sides, shoulders and elbows soft so the energy can flow easily.
4. Eyes forward, relaxed face. Close down the eyes and breath and hold for a few minutes.
5. Keep lower body strong and upper body light – you will feel the Qi intensify after a minute or two.
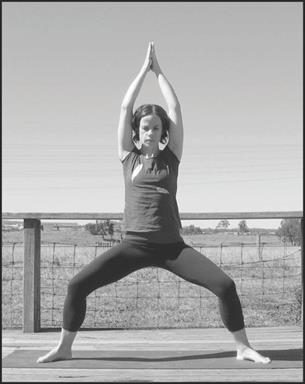
Horse Stance – Arms up in prayer
Main benefit – Strengthens the legs and stimulates Qi around the body.
1. Same stance as before, with feet out at 45 degrees and sinking comfortably into legs.
2. This time raise arms up into prayer, relaxed shoulder and elbows.
3. Breath and hold for a few minutes until string Qi sensation is felt.
4. To come out let the palms face downwards and gently let the arms downwards towards the lower belly while gently straightening the legs.
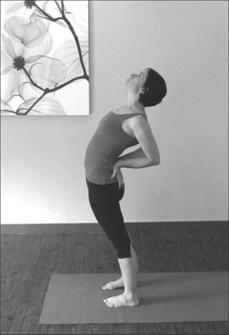
Standing Back Bend
Main Benefit –Strengthens the back of body and opens the front.
1. Place your hands, onto the lower back with finger pointing downwards.
2. Draw the elbows towards each other, such the belly in before gently drifting the hips forward and leaning back.
3. Feel the heart and throat open. Only hold for a breath then come out.
4. Come out by drawing your torso forward and releasing the arms. Feel free to move the hips around in circles to release and then try again.
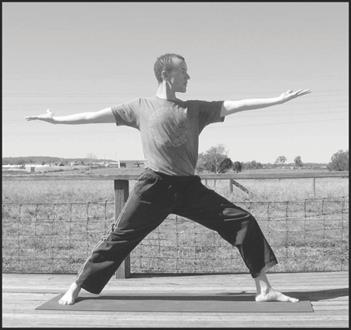
Warrior 2 (palms up version) – Virabhadrasana 2
Main benefit – Strengthens the legs and opens the arm channels.
1. Bring your legs wide apart. Turn your left toes to the front of the mat and your back toes around 45 degrees.
2. Bring your hands onto your hips to start with and sink into your left knee, making sure that the left knee remains either above or just behind the ankle joint.
3. Get solid in the legs, tuck the belly in slightly
4. Then extend the arms out at shoulder height and turn the palms upwards. Soften the shoulder and the elbows so that the Qi can move easily.
5. Gazing down the front arm –extending your Qi through your eyes.
6. Spread the fingers wide to encourage the Qi to move into the hands.
7. You can pull the finger back towards the body to emphasis the Qi in the wrists and hands, and then draw the finger up the other way to open the other side of the wrist.
8. Stay for a few minutes with a steady breath until you can feel the Qi intensify.
9. To come out release the arms and straighten out the legs and release.
10. Repeat on the other side.
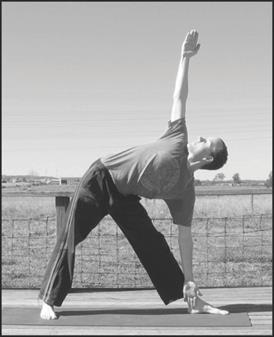
Triangle Pose - Trikonasana
Main Benefit – Opens the side of the body.
1. Bring your feet to about 1 meter apart (not as wide as the warrior 2 pose).
2. Turn the left toes to face the front of the mat and the back toes about 45 to 90 degrees.
3. Bring both arms up to shoulder height, keep your legs straight and then start to bring your arms and torso to the front of the mat as far as you can go.
4. Then simply draw your left arm down onto the left leg, above the ankle a few inches and draw the right arm up to the sky.
5. Keep the chest open. Look to the floor, out to the side or, if the neck is ok try tucking the chin into the right shoulder and look up towards top hand.
6. Keep your legs active by pulling up on the kneecaps. Keep the belly sucked in slightly, steady breathing.
7. Get a sense of pushing the right hip out to the side.
8. Hold for a few breaths and when ready, come out by softening the knees and drawing yourself up.
9. Repeat on the other side.

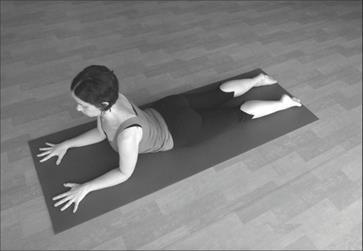
Variation of Wild Thing – Camatkarasana
Main Benefit – Opens the front of the torso, belly, lungs and chest.
Caution - This is an intermediate to advanced pose so only attempt it if you have been doing yoga for some time already.
1. Start in down facing dog.
2. Gently bend the knees and place your left foot underneath you and over the right side about 20cm or so to the side of your other foot.
3. Then keeping the knees bent slightly, allow the feet to pivot and draw the right arm off the floor to roll over into the backbend.
4. Extend the right arm behind you, and keep your hips working upwards.
5. Only hold for a breath or two and then to come out draw the right arm back in, pivot on the feet and then place the left foot back into the down facing dog position also placing the right hand back into down dog position.
6. Repeat to the other side.
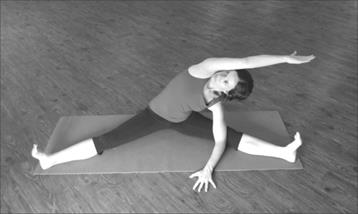
Sitting Side Bend - Parivrttta Janu Sirsasana
Main Benefit – Opens the side of the lungs and torso.
1. Bring the left leg straight out to about 45 degrees and the right knee bent with right foot into inner left thigh.
2. Then bring both arms up above the head, draw the belly in and then start to drift the arms and torso over to left leg slightly twisting the torso.
3. Bring the left arm down to the left eg, or floor, wherever it works for you and continue to let the top right arm drift towards the left leg.
4. You can look out to the side or if the neck is ok and you can keep your chest open, try looking up underneath the top arm.
5. Keep your belly slightly drawn in with this pose.
6. Use your exhalation breath to soften into the pose and the inhalation breath to lengthen.
7. Stay for at least a few good, deep breaths, close your eyes if you like.
8. To come out simply draw your torso back towards centre and rest the arms.
9. Repeat to the other side
Cobra Pose – Bhujangasana
Main Benefit – A gentle back bend that promotes a healthy lower back arch.
1. Start by lying on your belly on your mat. Feet hip width apart, tops of the fleet flat.
2. Arms just underneath the shoulder or just in front of shoulders.
3. Start pushing the hips gently into the floor and raising the chest and head of the floor without any support from hands.
4. Then start to add the extra support from the hands to help you raise the torso up to where it works for you. It’s different for everybody so listen to your body and don’t aim to do the same height as you see in pictures or videos. You don’t have to have your arms straight – the back is the most important, listen to that!
5. Only stay up for a breath and then come back down onto your belly.
6. This pose is good to repeat throughout the class.
7. At the beginning of a class or routine only come up a little, when the body is warmed up then you can go a bit higher.

Heart melting pose- Anahatasana
Main Benefit – Opens the heart, lungs and shoulders.
1. Start on all fours, hands below the shoulders and knees under the hips. Tops of the feet flat.
2. Keep your buttocks above your knees and start to walk your hands out in front and allow your heart to sink towards the floor.
3. Rest your head wherever is comfortable, on the chin, forehead or on side of face.
4. Allow the back to relax and the shoulders to open.
5. Stay for a minute or two and then to come up simply walk your hands back up into all fours.
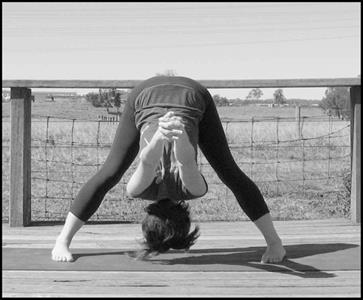
Wide Legged forward Bend (variation) – Prasarita Padottanasana
Main Benefit – Opens the channels in the arms and the
Shoulders.
1. Take a wide legged stance with toes both facing to the side of the room.
2. Interlace your hands behind your back while upright. Then inhale, lengthen your spine upwards and then as you exhale start to stick your buttocks out behind and draw the torso forward and down while letting the arms drift up behind you.
3. Allow a few breaths to settle into this pose – keep breathing and relax your head.
4. When you’re ready to come up, bend your knees slightly, and imagine someone is behind you pulling you up by your arms bringing you upright.
5. Relax the arms and release the legs.
Other techniques that stimulate the Lungs and Large Intestine:
Lion’s Breath
1. Come to sit in a comfortable position with a straight spine (Seiza if comfortable)
2. Take a deep breath in through the nose and lean back slightly.
3. As you begin to exhale, start to bring your torso forward. Open your mouth, stick out your tongue, open your eyes as wide as possible, and breath out through your mouth as you drift your torso forward. Empty out the lungs.
4. Relax the face and repeat about 3 times.
Self massage of the internal organs
1. Start by gently working the fingers into the abdominal cavity, just below the belly button. Then work your way up the right hands side of the abdominal cavity moving slowly.
2. Move around the belly area like a face of a clock returning back to below the belly button.
3. Then relax and have some water. It can make you feel a bit weird for a while afterwards to just sit down or rest and let things return to ‘normal’.
Tapping the arms and chest area with loose fists (a Qi Gong technique)
1. Use one hand at a time to gently pummel the opposite side of the chest.
2. Then slowly move the pummel down the inside of the opposite arm. When you reach the ringer, turn the arm over and pummel up the outside of the arm back up to the shoulder and over to the lungs.
3. Repeat 3 rounds on each side.