CHAPTER 2
Semi-Handmade
If you’re anything like me, you gravitate to the simple crafting projects, ones you can complete in a few hours or less. Not many of us have time for weekend-long crafting, and this semi-handmade section is for you. In this section, you’ll find loads of simple, fun crafts and projects that even the most anti-crafty folk can tackle. Start with an easy project like dipped flatware, and then progress to the pretty wreaths, or even to painted pillows. But rest assured that none of these projects require “crafting from scratch,” fancy supplies, or a ton of work. I promise.
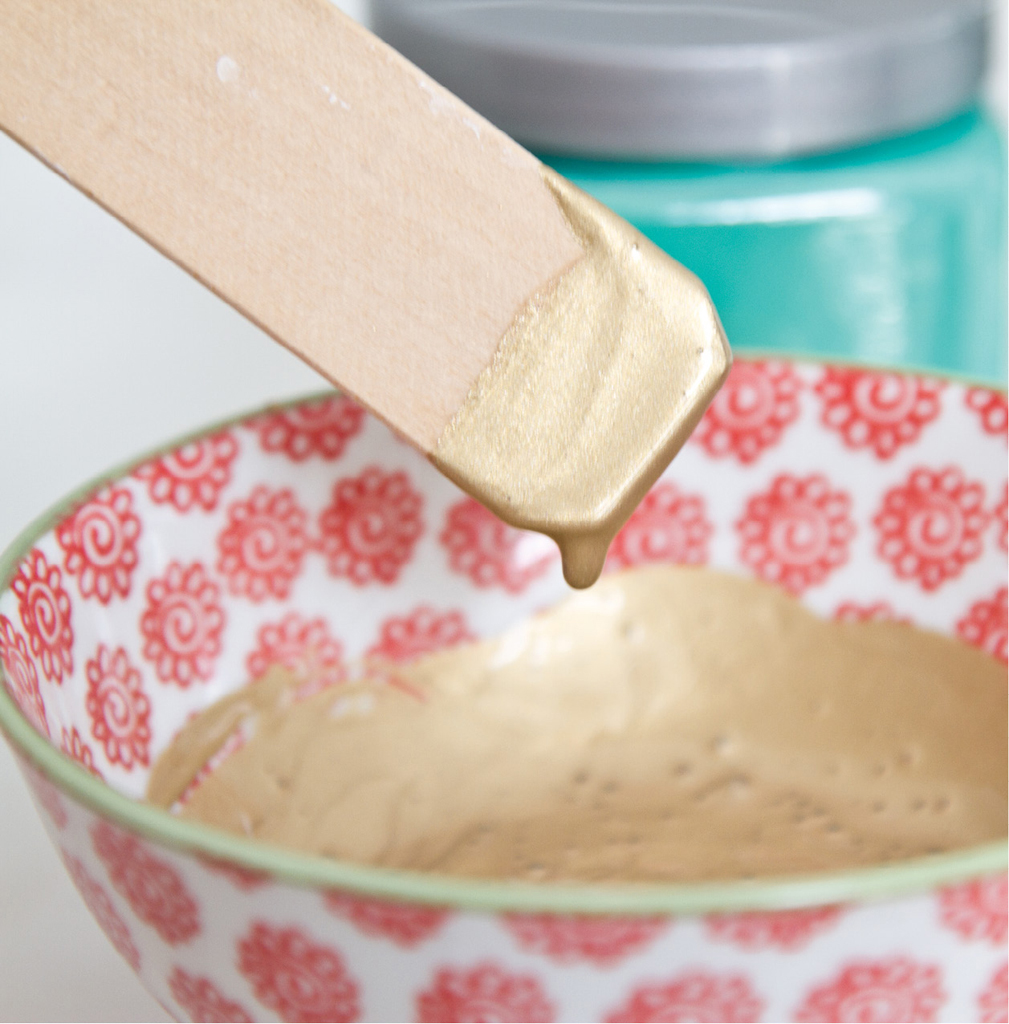
Dip-Dyed Flatware

Dip-dyeing is all the rage in the design world. If you love paint like I do, you’ll be excited to try your hand at a simple paint-dipping project. I love stylish and festive entertaining, and this easy dip-dyed birch flatware was tackled in less than 15 minutes.
DIFFICULTY: 1
TIME: 15 minutes
YOU WILL NEED:
- Waxed paper or parchment paper
- Birch flatware (available online)
- Sample pot of latex paint (color of your choice)
- Small craft brush
- Lay out a sheet of waxed or parchment paper for drying your flatware.
- Dip the handle of each utensil in the paint sample pot, letting excess drip off before laying it onto the wax paper.
- Walk away and take a nap. Seriously, you’re done.
HANDY HOW-TO
Latex paint isn’t food safe, so you won’t want to use this at a kids’ party. If you want something kid-safe, you could always dye the flatware with a fruit and vegetable puree. Or you could just save the dipped flatware for the grown-up parties. These are disposable, so toss them when you’re done!
Simple Reclaimed Wooden Placemat

In any home decor style, adding the warmth and texture of reclaimed or worn wood can make such a difference. As beautiful as white is, it’s nothing without the balance of wood tones and texture. These placemats are perfect for a fall or Thanksgiving table. Pair them with mix-and-match thrift store dishes for a completely unique and warm table setting. But do keep in mind that we’re not dealing with high quality, stain-grade wood for this placemat, and that’s actually perfect. The stain will accept differently on each shim, but that creates depth and variation and mimics reclaimed pieces.
DIFFICULTY: 3
TIME: 1 hour
YOU WILL NEED:
- Table saw or circular saw (optional, see instructions)
- One 2' × 2' sheet of ¼" thick birch plywood (to be cut into 12" × 20" placemats)
- Wood glue
- Package of 12" wood shims
- Clamps, or a couple of heavy stacks of books
- Staining pad
- Stain (such as Minwax Dark Walnut)
- With the table saw, cut the 12" × 20" placemats from the birch plywood. (Alternatively, you can have them cut to size at your home improvement store.)
- Using wood glue, glue the shims to the plywood. For a reclaimed look, alternate laying the wide ends with the narrow ends at the top. Try to line them up just to the edge, but again, it doesn’t have to be perfect. We’re going for a reclaimed look!
- Once you’ve attached the shims with glue, clamp them down or use stacks of books to apply pressure for the glue to set. Leave up to twenty-four hours.
- Dip the staining pad into the can of stain and spread thinly on the placemat. Let it dry. One coat should be enough, but feel free to apply two if necessary.
HANDY HOW-TO
Remember, this placemat isn’t food safe. You can always seal your work with a sealant, such as a Wipe-on Polyurethane, but you still wouldn’t want to place food directly on the placemat to serve.
Spring Wreath

People have been creating beautiful wreaths for centuries, and hey, while you might not have time to string together your own branches from the yard, crafting a simple spring wreath is still appealing. This wreath is so easy and beautiful, and you’ll be able to swap blooms for easy holiday updates. This tutorial will show you just how simple it is to add a few embellishments to a purchased grapevine or foam wreath base to create a one-of-a-kind door statement. My kind of wreath.
DIFFICULTY: 1
TIME: ½ hour
YOU WILL NEED:

- Scissors or pliers
- Artificial blooms
- Store-bought grapevine wreath
- Craft moss
- Hot glue gun
- Hot glue sticks
- Using scissors or pliers (for stubborn wired stems), cut the blooms off of the stems of the flowers.
- To make sure your wreath looks lively and not too tidy, pull apart the moss slightly to loosen it. After you stretch it apart a bit, place it around the wreath before you begin gluing. You will be able to work much more quickly this way.
- Plug in your hot glue gun to warm up the glue for a few minutes. Glue in sections, lifting the moss and lightly pressing back down as you work your way around the wreath. Put hot glue on the base of the moss stems and also on the wreath to make sure it adheres. Leave enough space to attach the pretty blooms.
- Glue the three blooms to the side or center of the wreath.
STYLE FILE
This wreath can easily be changed from season to season. Pop off the blooms and swap them for different colors, fabric flowers, or ornaments during the holidays. See three more simple wreaths you can create later in this section.
Chalkboard Tags

Ever wonder why chalkboard surfaces are everywhere these days? Because there isn’t an easier, more beautiful, and more useful project to tackle! Labeling your storage not only keeps you more organized, it is pretty, too. Organization you can get excited about is organization you can stick to. True story.
DIFFICULTY: 1
TIME: 30 minutes
YOU WILL NEED:
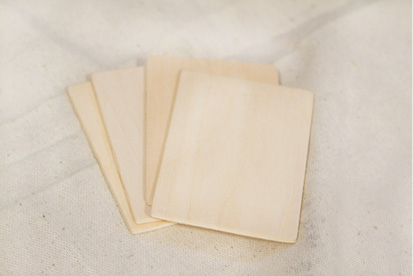
- 4-pack of wooden craft tag
- Paper towels
- Krylon Chalkboard Spray Paint
- Drill and small drill bit
- Baker’s twine or jute
- Okay, get ready. This is going to be intense. Open the package of craft tags and spread them out on a paper towel.
- Spray a thin coat of chalkboard paint in a sweeping motion. Let dry for 30 minutes, then spray and dry two more times, for a total of three coats.
- Using your drill, drill a small hole in the tag.
- Tie some pretty baker’s twine or jute through the tag and use it to label baskets, bins, or boxes throughout your home. Ta-da!
WHERE TO FIND IT
Craft tags, plaques, frames, and boards come in all shapes and sizes at big craft stores. Think outside the box and try this quick project on a multitude of surfaces to keep you more organized.
Simple Chalkboard

Oh, The List. I like to refer to our ever-present calendar of to-dos as The List. Life can become overwhelming if we allow our list to get too long, but it can also become overwhelming if we don’t have a simple way to keep track of it all. We needed such a list-organizer, yet lacked the space for a full command center. But we quickly realized that you don’t need a command center if you have any available flat surface. You can slap some paint on the side of a kitchen cabinet, and voilà! New list maker/wrangler/command center. You can paint a chalkboard on any surface in your home—just pick a wall or a frame or the side of a cabinet. I hope this helps you wrangle your own list!
DIFFICULTY: 1
TIME: 45 minutes
YOU WILL NEED:
- Annie Sloan Chalk Paint in French Linen (Only Annie Sloan Chalk Paint or colored chalkboard paint will work. Other chalk paints won’t create a chalkboard surface.)
- Nylon paintbrush
- Chalk
- Decorative tape for framing (optional)
- Wipe the surface down if it is really dirty or greasy.
- Paint three thin coats of Annie Sloan Chalk Paint, allowing full dry time (approximately 30 minutes) between coats.
- Let the paint set overnight.
- Season the chalkboard by rubbing the side of a piece of chalk completely over the paint. Wipe off excess dust.
- If you like the idea of a finished edge, you can paint a frame along taped lines for a sharper edge, or outline the chalkboard with decorative tape. Or if you love a free-handed edge like ours, leave it simply as is. Relieve your brain of your list!
STYLE FILE
You can always trace a pattern or some chalk art onto your new chalkboard when it isn’t in list mode. If you’d like, we also have some free printables and patterns for you to download on our site at www.perfectlyimperfectblog.com/the50homemakeover!
Painted Apple Baskets

We all know the deal with pretty storage: The bill can add up quickly, especially when we’re talking about twenty bins or baskets. Luckily, large craft stores are perfect for finding affordable storage. There are baskets, bins, crates, and more, all waiting to be painted in the color of your choice. You can find all shapes and sizes, just like these mini apple baskets. They are so inexpensive, and stylish once painted. The possibilities are endless—browse that basket aisle with a new set of eyes!
DIFFICULTY: 1
TIME: 1 hour
YOU WILL NEED:
- Paper or paper towels for work surface
- 2 apple baskets
- Acrylic paint, any two colors
- Craft paintbrush
- Spread out your paper or paper towels to create a paint-friendly work surface.
- Start by painting the body of the basket. You don’t have to be very particular when using acrylics—they’re very forgiving and create such a beautiful finish, usually in one coat.
- As the first color dries, you can begin painting the trim in a different color. Let dry before using.
STYLE FILE
There’s really no need to paint the inside of your baskets unless you love that look. If so, go for it!
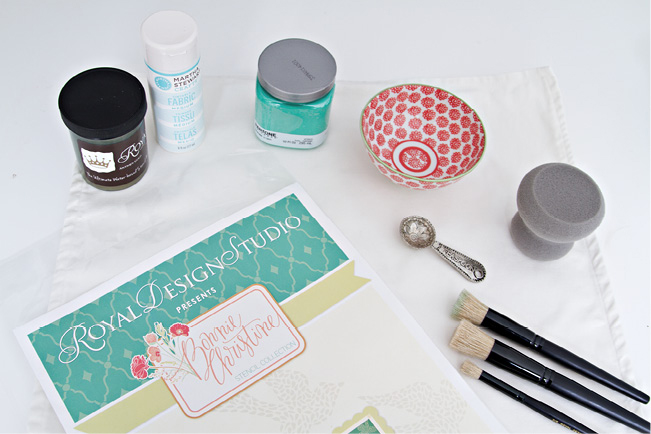
Stenciled Pillow Cover

Stenciling sounds like something our grandmothers would do. For a while, patterns and sizes were limited; now, however, stencils come in all shapes, patterns, and sizes. You can find stencils for entire walls, furniture stencils, and small pattern stencils like this whimsical bird. There are patterns out there that are chic and mimic beautiful wallpaper, but are a much more affordable option. Stencils open the door for all kinds of projects—paint patterns on your curtains, tea towels, pillow covers, anything!
DIFFICULTY: 2
TIME: 30 minutes
YOU WILL NEED:
- White canvas pillow cover (can be found at IKEA)
- Martha Stewart Crafts Fabric Medium
- Acrylic or latex paint (This project uses Pantone Universe for Lowe’s in Emerald latex paint.)
- Measuring spoons
- Stir stick
- Stencil (The one pictured can be found at RoyalDesignStencils.com.)
- FrogTape or artist tape
- Small stencil brush
- Folded paper towels
- Small outlining brush (optional)
- Wash and dry your pillow cover to remove any sizing (manufacturer’s fabric treatment). Iron it if you’d like—or if you’re me, throw it in the dryer long enough that it loses some wrinkles.
- Measure 1 teaspoon fabric medium to 1 teaspoon paint, and mix together with a small stir stick. The paint will be thin, but not runny.
- Place your stencil on the pillow cover, and tape along the top and bottom edges to hold it in place.
- Barely dip your brush in the paint, but evenly cover the brush’s entire round flat surface. Then, using a circular motion, offload extra paint onto a folded paper towel.
- Starting on the plastic part of the stencil, swirl your stencil brush onto the cut-out areas, painting in a circular motion, not in an up-and-down stippling motion. You can fill in that way, but painting in a circular motion helps avoid too much paint seeping under the stencil. Trust me; this is valuable information I wish I’d had a long time ago.
- After you’ve filled in the design, remove the stencil. Peel from the corner, and lift a little at a time to make sure extra paint hasn’t seeped underneath.
- If you feel like your bird needs a little something extra, use a small outlining brush and freehand paint small dashes to look like a wind trail. Simple, but a fun touch. Plus, mixing handpainted lines with the stenciled image embraces an imperfect look, and helps you successfully pull off painted accents like these semi-handmade pillows.
HANDY HOW-TO
Most of the time, painting two thinner coats is much better when painting fabric. But fabric medium really thins the paint and makes it more easily absorbed, so it can help you get great coverage in one coat.
Chalkboard Wooden Placemats
by Edie Wadsworth of Life in Grace

I’m Edie, and I’m a blogger, a homeschooler, a Lutheran, and a self-proclaimed goddess of the domestic arts. You can find my writing and photography at Life of Grace.

These wooden chalkboard placemats will add the perfect touch to your table setting. There’s no end to the creative ways you can use them, and they’re incredibly cheap and easy to make. Just let your hardware store cut the plywood to size for you, paint the placemats, and then let the creativity begin. Write the names of your family or guests on the boards, or write out part of your menu. The kids can entertain themselves for hours, making doodles and art and writing fun notes. Just use a damp cloth to clean them and start all over. Even without using chalk, the black makes a perfect backdrop for even your most elegant table setting, especially when paired with a metallic charger, or even just a simple white plate. They’re also perfect for outdoor dining and will last forever.
DIFFICULTY: 1
TIME: 1 hour
YOU WILL NEED:
- 1 piece of plywood, cut into 12" × 20" rectangles
- Fine or medium-grit sanding blocks
- 1 quart of chalkboard paint
- 6" roller brush
- Chalk
- Sand the plywood with fine/medium-grit sanding blocks to remove any splinters or rough spots.
- Paint two coats of chalkboard paint, allowing 1 hour of dry time between coats.
- Let the chalkboard paint cure for 24 hours, then lay the chalk on its side and rub it all over the board to season it. Wipe away the excess chalk with a soft cloth or paper towel, and enjoy the placemats!
STYLE FILE
Don’t stop at simple rectangles. If you’re a little more ambitious, cut the plywood into any shape with a jigsaw or circular saw. Think leaves for fall, and ornaments for Christmas.
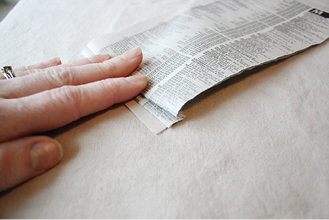
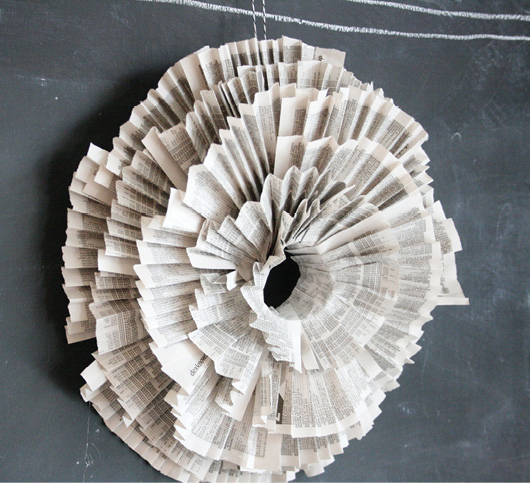
Pleated Paper Wreath
by Emily Jones of Jones Design Company

I’m Emily, and I’m a wife and mom, a blogger, a business owner, a teacher, a self-taught graphic designer, and an artist. I write and photograph the blog Jones Design Company.

Here’s a take on the ever-popular book page wreath with a bit of a twist. This time, we’ve used a phone book (free!) and delicate pleats. This gives the wreath a decidedly feminine feel, and gives you a whole new look to try!
DIFFICULTY: 3
TIME: 1 hour
YOU WILL NEED:
- Hot glue gun
- Styrofoam wreath form
- Long strip (approximately 3 feet) of cotton or canvas fabric
- Hot glue sticks
- Phone book
- Grosgrain or burlap ribbon for hanging loop, cut to desired length
- Warm up your hot glue gun. When it’s ready, wrap the wreath form in your strip of fabric, adhering the ends with hot glue. This will give you a surface to which to attach the pleated pages.
- Tear out a stack of pages from the phone book. You can use a full sheet, or tear each in half vertically for a smaller wreath.
- Starting at one end, fold small pleats into the page and crease to hold. You can stack six to eight sheets and fold them together all at once, to save time.
- Hold one pleated paper in place against the wreath form and fold up a small portion of the bottom (about ½").
- Glue pleat to the outside edge of the wreath form. Continue around the wreath, slightly overlapping each pleat to cover the wreath’s surface.
- Continue adding the pleats in layers.
- Glue a loop of ribbon to the back of the wreath as a hanger.
HANDY HOW-TO
You may want to tear your pages into even smaller pieces as you move towards the center of your wreath. That way, the pleats will not completely cover each other.
Moss Table Runner

This moss table runner is so simple and lovely. Bringing in the outdoors is one way to make your tablescape come alive. Think of this moss table runner as the perfect prop for your next gathering, and an inexpensive way to create a ton of pizzazz. You can create it for a simple spring party, but this idea could translate to any season.
DIFFICULTY: 2
TIME: 20 minutes
YOU WILL NEED:
- 3 small bags of craft moss, mixed styles
- Hot glue gun
- Hot glue sticks
- Wood scrap or a board cut to 1' long
- Make sure to buy a couple of different varieties of craft moss. Some look more artificial and curly, and others look more earthy. Mixing your moss makes the runner look less, well, fake.
- Pull apart your moss to make it messier and less perfect. You want it to look a little wild.
- Warm up your hot glue gun. When it’s ready, starting at one end and working in sections, place glue all over the board. Be sure to apply glue all the way to the edge so your moss will overhang a bit and hide the wooden board. Place on your table!
STYLE FILE
This runner could be made a million ways. Use leaves and bark to create a centerpiece in the fall, or use artificial snow in the winter… the possibilities are endless.
Faux Stitch Napkins

Stitching is back again. You’ll find it filling the catalog pages of Anthropologie, West Elm, Pottery Barn, and other decor giants. Stitched napkins, quilts, and spreads mimic those passed down by grandmothers, and celebrate the meaning behind the item. This project is made with fabric puff paint (yes, I know!) and inexpensive cloth napkins. You can even use a stencil to make the handmade look as simply as possible!
DIFFICULTY: 1
TIME: 15 minutes per napkin
YOU WILL NEED:
- 4 white cloth napkins
- Fabric puff paint
- Stencil (optional)
- Iron
- Begin by washing and pressing your napkins to remove any sizing (manufacturer’s fabric treatment) that would prevent paint from sticking.
- Lay your napkin flat, and choose your stitched design. You could freehand straight intersecting lines, or you could use a stencil to create more intricate patterns. Hold your stencil in place with one hand (or tape it down, if you prefer).
- While holding your stencil firmly, squeeze the bottle of fabric paint to draw small stitch lines within the pattern of the stencil.
- Let your design dry. Press with an iron to set (or follow the instructions on the back of the paint bottle).
HANDY HOW-TO
As you squeeze a small amount out of the bottle’s fine tip, press the tip into the napkin. When you are finished with that line, press the tip down into the napkin again, then lift up to avoid any paint dripping.
Coffee Filter Garland

As the holidays and seasons change, I usually stick to my main decor with a few simple festive additions. I shop discount stores and use 50 percent–off coupons, but sometimes, I like to make just a few decorations myself. I made a coffee filter garland for my daughter’s first birthday party, and it was a completely different design. These little coffee filter garland beauties are versatile and perfect for crafting. If you are like me, you probably don’t want to spend six hours crafting and making decorations when you could be spending time with your family. This garland is for you, then!
DIFFICULTY: 2
TIME: 30 minutes
YOU WILL NEED:
- Baker’s twine
- 2 nails or pushpins
- Unbleached cone-shaped coffee filters
- Hole punch
- Cut the twine as long as you would like the garland to be. Tie one end to a nail. It’s easier to see how many filters you need to make the garland full if the twine is stretched out.
- Work with one coffee filter at a time. Pinch and twist the cone end of the coffee filter while shaping the inside with your hand to create a flower shape. (See the video on our blog at www.perfectlyimperfectblog.com/the50homemakeover.)
- Once you have made your “flowers,” punch a hole at the cone end of the filter and string it along the twine.
- Repeat until your garland is full and fluffy. Twist the filters all the way around the twine so that the garland is full on all sides. This also keeps the filters from sliding around once you are finished, and gives you a chance to shape the garland the way you like.
STYLE FILE
This is great as a fall garland, but you can use it for parties, too. Spray it with glitter or artificial snow for a Christmas decoration, or you can always create it with white filters for a wintery or less-rustic look.
Wood Slice Wreath

It’s always great to have a few semi-handmade wreaths ready to go for when you want to switch up your seasonal decor. This simple Wood Slice Wreath is striking, full of texture, and looks stunning hanging on your front door or inside your home. Hang it with gold or cranberry satin ribbon to add some color, or use burlap ribbon to keep it neutral.
DIFFICULTY: 3
TIME: 1 hour
YOU WILL NEED:
- Wood slices (You can buy these at a craft store or online, or you can cut them yourself from a fallen branch in the yard.)
- Grapevine wreath
- Hot glue gun
- High-temperature glue sticks (You will need high-temperature glue sticks if you plan to hang the wreath outside. The low-temperature glue will melt in direct heat.)
- Wreath door hanger or ribbon
- Place your wood slices around the wreath; layer them and let them overlap.
- Warm up your hot glue gun. Once you have chosen the placement of the wood slices, turn them over one at a time, and attach them with hot glue to the wreath.
- Press firmly to help the glue set. Let the wreath dry for 24 hours before hanging with a door hanger or a ribbon.
STYLE FILE
To add more interest to your wreath, tuck some peacock feathers, book pages cut into leaves, or short cotton stems into one corner.
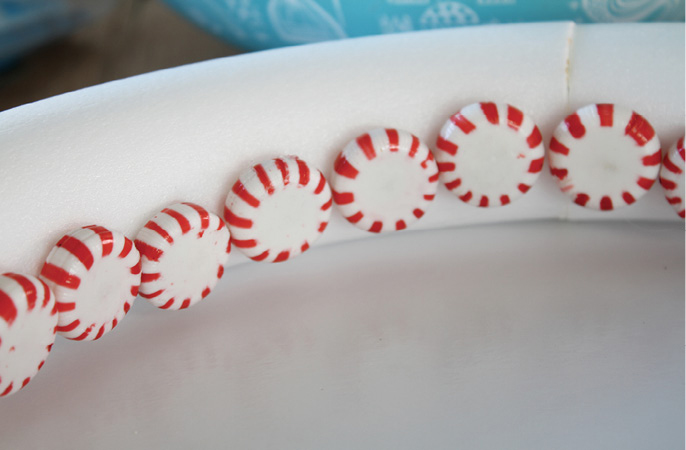
Handmade Peppermint Wreath

Every year that we celebrate the Christmas season, our traditions grow. The moments shared in the month of December are some of our sweetest. We all have our traditions, our ways of sharing the season with our families. You probably have quite a list of your own. Making this peppermint wreath is a new tradition for our family, and I hope you, too, will make it a tradition in the holiday seasons to come.
DIFFICULTY: 1
TIME: 1 hour
YOU WILL NEED:
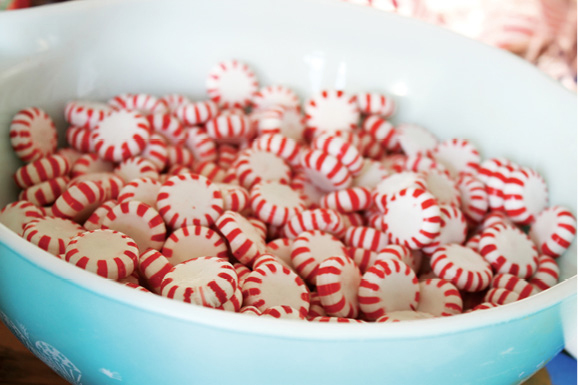
- Peppermints, unwrapped
- White Styrofoam wreath form
- Hot glue gun
- High-temperature glue sticks (You will need high-temperature heat glue sticks if you plan to hang the wreath outside. The low-temperature glue will melt in direct heat.)
- Ribbon or door hanger
- Unwrap all of your peppermints, preferably while watching your favorite show.
- Start anywhere on the inside of the wreath. Place a dab of hot glue on one side of each peppermint and press it onto the wreath form. Work your way around the wreath.
- Once you get to the second row, stagger the peppermints a bit to cover more of the white of the wreath form.
- Repeat until the entire wreath is covered in peppermints. Keep the back empty so it can lay flat against a wall or your door. Hang with ribbon or on a door hanger.
STYLE FILE
If you use a door hanger, attach a pretty ornament to the front of the hanger with a dab of hot glue. This will cover the hanger and add some more personality to your peppermint wreath.
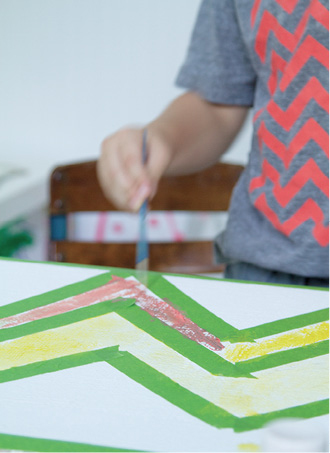
Kid Wall Art Gallery

Working the way we do (which is to say, not much of a nine-to-five day), my husband and I try to be purposeful about the time we spend with the little ones. We work quite a lot, so it has become pretty important to us to include our kids in the work we do, and spend focused and purposeful time with them creating. We know you are the same way… you have to make time for your family in your fast-paced life. This wall canvas project is so simple, and it gives you a chance to structure the project a little and then let your own children create art the entire family can appreciate!
DIFFICULTY: 1
TIME: 1 hour
YOU WILL NEED:
- FrogTape
- Canvas(es)
- Watercolor paints
- Craft paintbrushes
- Cup of water to wash brushes and thin paint
- While your yahoos are running around, begin taping off your canvas. Feel free to play a little. These aren’t going to be perfect, and that’s just fine. Use the FrogTape to create patterns, or place it randomly.
- Choose two or three colors for your kids to use. Blues and greens and a hint of coral or gold are a great starting point.
- Now, fight every urge you have to hover, and let them paint! Be encouraging, and let them create whatever they’d like.
- If anything, gently encourage them to add more water in places where the paint goops up. Adding more water here and there will create a beautiful washed pattern.
- Let your canvas dry. Remove tape gently, and hang the art on the wall!
STYLE FILE
For major impact you and your little ones can be proud of, let them continually add to their body of work, creating a gallery wall as time passes.
Dyed Fabric Napkins
One of the simplest ways to infuse color and personality into your home is with fabrics. Throw pillows take your Plain Jane sofa to spectacular in no time, and patterned curtains dress up your windows in minutes. But sometimes fabric can be expensive, which makes swapping out throw pillows on a whim a little less realistic. Traditional fabric dyes create a highly saturated pigment, but dyeing with Annie Sloan Chalk Paint can give you a more subtle effect. And really, it’s as simple as stirring water. This tutorial helps you transform basic neutrals to any color of the rainbow, while giving you more bang for your buck by using one product for many projects. Try it on affordable cotton napkins, curtains, and pillow covers.
DIFFICULTY: 3
TIME: 30–60 minutes
YOU WILL NEED:
- 6 white cotton napkins
- 2 tablespoons Annie Sloan Chalk Paint in Florence
- Large plastic bowl of water
- Measuring spoons
- Begin by washing your napkins to remove any sizing (manufacturer’s fabric treatment) that might prevent the napkins from accepting the color evenly.
- Mix 2 tablespoons of Florence with approximately ½ gallon of water. You don’t have to be exact with this measurement. If you want more color, add more paint one tablespoon at a time. Stir with a spoon until the paint mixes evenly with the water.
- Place the napkin into the mixture and stir it around until the mixture covers it evenly.
- Leave the napkin to soak in the tinted water, stirring occasionally to prevent any paint from separating and “tie-dyeing” the finished product. The napkin shown soaked for twenty-five minutes.
- Leave the napkin in until desired color saturation is achieved. Wring out excess, throw in the washer for a rinse cycle, and dry it on high. The paint will fade, but the wash of color remains. You can always mix in some fabric medium if you would like a more saturated dyed napkin.
HANDY HOW-TO
Feel free to leave the fabric in as long as you like. The longer it soaks, the more color it will absorb. But be sure to stir the water every thirty minutes or so to keep the paint from settling to the bottom and staining your fabric in an odd pattern.
Twine-Wrapped Bottle

When decorating your home, it’s sometimes easy to change a wall color or paint a piece of furniture. But you, like so many, might get stuck once the big changes are in place. How do you decorate your coffee table? Style your bookshelves? Think of accessorizing as the finishing touch on the style of your home. This twine-wrapped bottle is a simple project, and could be replicated in numerous ways with various textures. Simply wrap an old wine bottle in twine, jute, hemp, ribbon, yarn, or even decorative tape.
DIFFICULTY: 1
TIME: 30 minutes
YOU WILL NEED:
- Old bottle, label removed
- Hot glue gun
- Glue sticks
- Hemp or jute twine
- If your bottle still has a label attached, soak it in warm water for ten to thirty minutes to remove label. Remove label and dry bottle.
- Plug in the glue gun and allow to heat up for a few minutes.
- Place a dab of hot glue in the center of the top of the back of the bottle, about 1" down from the neck. Place one end of your twine in the hot glue and let set for five minutes.
- Hold the starter piece of twine in place while you wrap the twine tightly around and around the bottle, leaving no gaps in between.
- Wrap twine all the way to the bottom of the bottle, leaving just enough room so the bottle can still stand. Snip your twine off so that it ends on the back of the bottle. Place one more dab of hot glue at your stopping point. Attach the twine and let set for a few minutes. Style your bottle with a layered vignette on a tabletop or bookshelf.
STYLE FILE
When styling tabletops and shelves, remember this: A flat table is a boring table. Vary the heights of accessories, place your bottle on a stack of books, or even prop a piece of art behind it. I don’t follow set rules when styling our home, but using odd groupings is usually visually appealing to everyone. Think three objects nestled together on a bookshelf, three piles of books, or three layered pieces of art.