CHAPTER 3
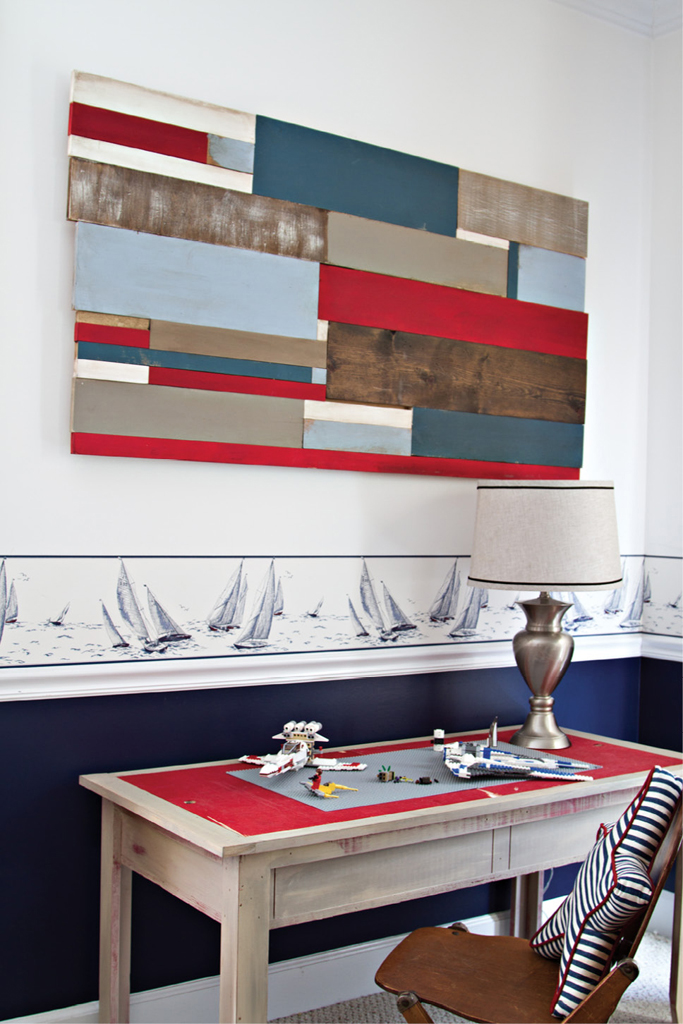
Upcycling
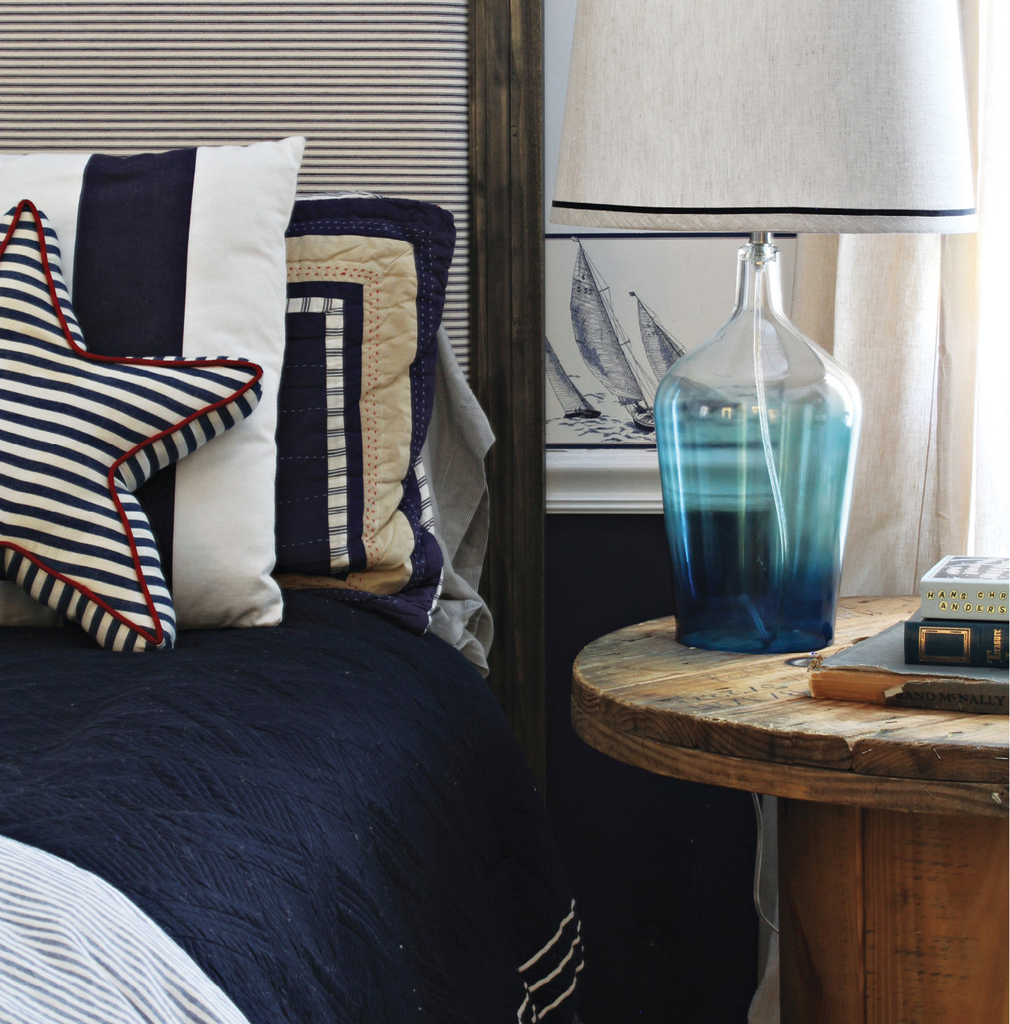
Inspiration and ideas are everywhere. A side effect of feeling freedom in your decor choices is realizing how many materials around you actually work in the home. I remember the first time I brought home a chicken feeder to use as a small floral centerpiece on a farmhouse table. Cue the shocked husband. It takes some practice to look at everything with an unbiased eye, and to view items with a “it could be this color” lens. Once you get the hang of it, though, you’ll be addicted. Oh, and your family and friends? They’ll get used to it.
In this chapter, you’ll see industrial spools turned into tables, fences turned into wall art, and vintage books turned into a lamp. Go ahead: Open your eyes, look around, and see what you can repurpose into the next best thing.
Spool Side Table

Ah, the industrial spool. They’re already table-like, they come in several sizes, and for the most part, they’re free. Keep an eye out at your local electrical company and ask if they ever toss leftovers. You’ll eventually land a free one—or twelve.
YOU WILL NEED:
- Industrial spool
- Orbital sander
- Coarse and fine sandpaper pads, or sanding blocks
- Drill and screwdriver bit
- 3 casters
- 12 screws
- After hauling your free spool home, you’ll want to give it a good sanding to smooth all the rough edges and loose pieces. Using an orbital sander (or sanding blocks), start by sanding with coarse sandpaper.
- Switch to fine sandpaper next to smooth out the finish.
- Using the drill and the screwdriver bit, screw each caster into the base of your spool. Three is enough, if they are spaced apart equally.
- Decorate your new table to your heart’s desire.
HANDY HOW-TO
You can always seal your table with polyurethane, but the one pictured was left alone. Feel free to slap a coat of paint on your spool, too!
Scrap Wood Word Wall Art

Words mean quite a lot to me. I surround myself with them all day: writing, reading, blogging, journaling… I’m a word nut. I believe words heal, inspire, move. So when we put together a playroom for our kids, we set out to create a space that inspired them to create and explore the world. Hence, the simplest word art tutorial ever. You can use this idea exactly, or choose words that inspire your own family. Feel free to play with color and patterns to create one-of-a-kind art.
DIFFICULTY: 1
TIME: 30 minutes
YOU WILL NEED:
- Scrap wood pieces (approximately 12" wide × 18" long)
- Sanding block
- Acrylic/craft paint (colors of your choice)
- Craft paintbrush
- Mod Podge
- Foam brush
- Decorative paper
- Stencils
- Picture-hanging kit
- Buff your piece of scrap wood with a sanding block, if needed. Wipe down.
- Paint the wood in your shade of choice.
- After the paint is totally dry, spread on a thin layer of Mod Podge with a foam brush. Cut the decorative paper to be the same size as your board and place it over the Mod Podge. Let dry.
- Use stencils and the acrylic or craft paint to create your inspiring words.
- After the paint dries, paint on a topcoat of Mod Podge to seal in your work. Let dry.
- Attach a picture-hanging kit, and voilà! Hang on the wall and enjoy.
WHERE TO FIND IT
Have fun with your papers! Layer them for a patchwork look, or spread them out for a cleaner feel. Have fun with color, and don’t be afraid to mix pattern choices. My favorite spots for fun paper are Hobby Lobby, Paper Source, and our online shop, Perfectly Imperfect (shameless plug, sorry!).
Reclaimed Wood Wall Art
There is nothing more special than beautifully colored, aged wood. If you’re looking for a big impact art piece, this is an easy way to go. You can create inexpensive and super-simple wall art using scrap wood you have lying around.
DIFFICULTY: 3
TIME: 1½ hours
YOU WILL NEED:
- Plywood, cut to 3' tall × 4' wide
- Scrap wood pieces
- 3 to 5 colors of any kind of paint in 4-ounce sample pots
- Paintbrush
- Wood glue
- Clamps or heavy items
- Picture-hanging kit and wire
- Have your piece of plywood cut to size at your local home improvement store, and pick up scrap pieces there if you don’t have any lying around at home.
- Lay out your scrap pieces on the plywood first. Be random about it and vary widths and lengths of the wood.
- After placing all of your pieces, pick them up and add a thick coat of paint to them one by one, varying colors. Painting this way will save you cutting paint in around a million edges. Let dry.
- Once the paint is dry, grab your wood glue and flip the pieces over. Put a dab of glue in the center and a little along edges, but try not to overdo. The glue will seep out from the edges if you use too much.
- Turn pieces back over and use wood clamps to set the glue. Or you can be fancy like us, and pile encyclopedias on top.
- Fasten the picture-hanging hardware to the back of the board, and hang your art! To firmly hang the art, secure it to wall studs using wood screws. You can find the wall studs using a stud finder or by knocking on the wall with the back of your hand. The wall will sound hollow where there is no stud.
STYLE FILE
When working with multiple colors, it always looks nice to stick to a palette of three, or a slight variation of those three colors. If you add much more than that, this will still look great, but less reclaimed-inspired.
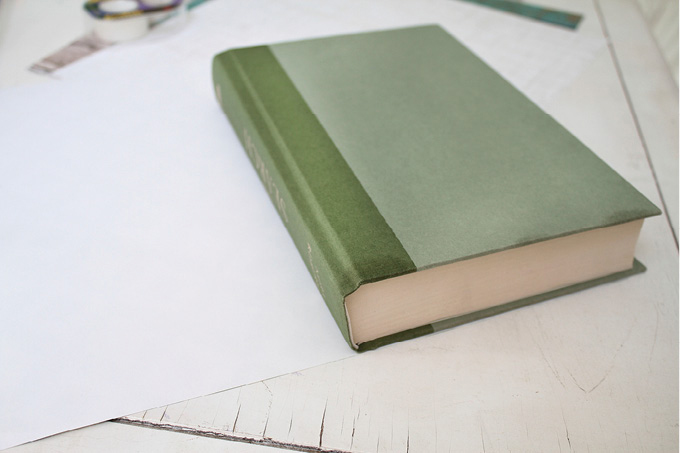
Paper-Covered Vintage Books

I love vintage books. They’re an easy and inexpensive way to infuse personality into a well-styled bookshelf. Having a stash of vintage titles is wonderful, but not all books will look excellent or organized in every space. Unifying your book covers can really identify your style and create major visual impact for little money. Luckily, covering them couldn’t be any easier, and it’s less than permanent if you’re a bibliophile like me.
DIFFICULTY: 2
TIME: 1 hour
YOU WILL NEED:
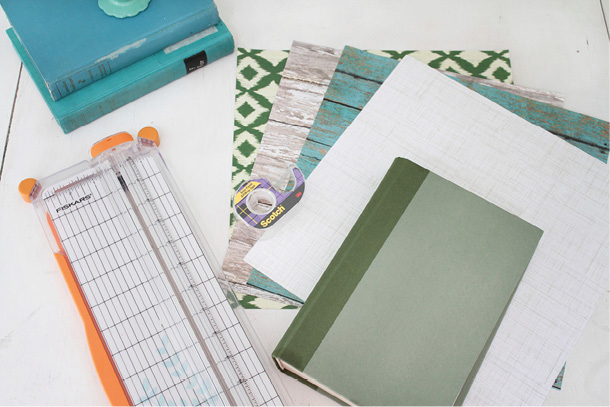
- Old, inexpensive book (Hardbacks work best, but you can use softcovers, too.)
- 12" × 12" scrapbook paper (to cover a hardback)
- X-ACTO knife or scissors
- Scotch tape (Go for the good stuff—it’s got to hold well.)
- Lay your book on top of one sheet of paper, lining up the corners of the paper with the back cover of the book.
- Fold the other half of the paper over the cover of your book. Keep in mind that the paper won’t totally cover the book—we’ll fix that in a minute.
- Keeping the paper wrapped tightly around the book, stand it upright so that the excess paper is coming off the top.
- Making sure your paper is in the correct position, make a crease in your paper at the overhang.
- Now line up your crease with the blade of the cutting tool, and trim the paper to size.
- Start covering the front of the book first. Use Scotch tape to attach the paper to the right side of the front cover first. Work your way around the book, pulling the paper tightly as you go and holding the book as straight as possible. Attach the paper with tape. You can either use double-sided tape or use regular tape by rolling it up to create your own double-sided tape. Continue wrapping paper around the book, attaching it with tape.
- After covering the entire front cover and spine of the book, run something along the spine to create a crease so the paper will hug the book. A rounded end of a craft paintbrush works well, but you can use anything.
HANDY HOW-TO
If you want the book completely covered, trim another piece of paper and apply to the back of your book. You can skip this step if your books are stacked upright or laying face-up. If the tape isn’t holding (which can happen on cloth-covered books), use a small amount of tacky putty instead.
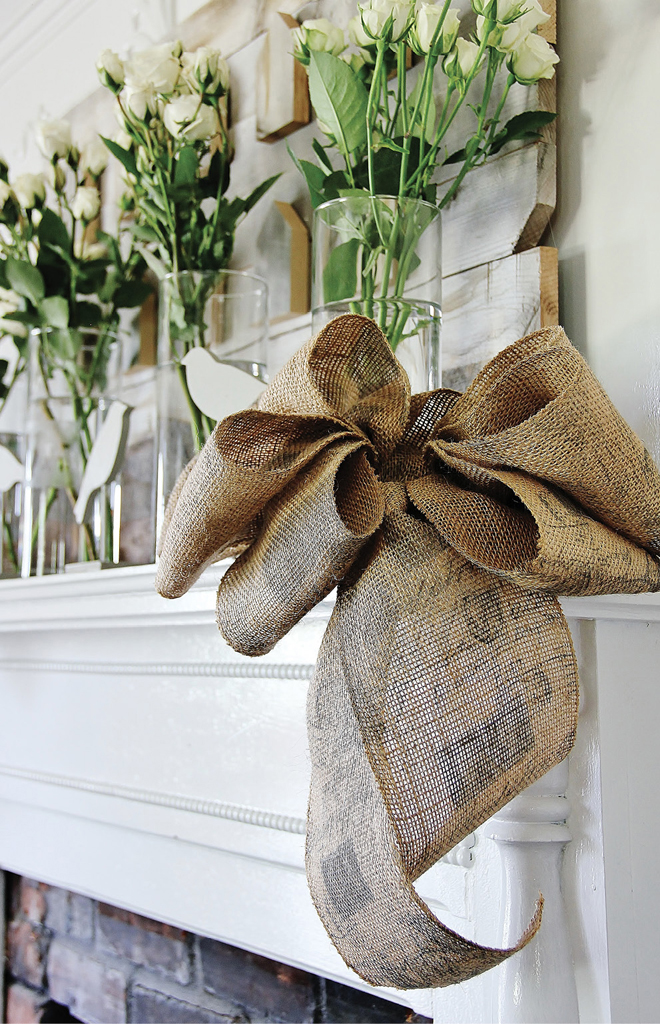
Reclaimed Wood Fence Art
by Karianne Wood of Thistlewood Farms

I’m Karianne, and I’m the writer, designer, and photographer behind Thistlewood Farms. Thistlewood Farms is so much more than the story of a farmhouse. It’s about family and tortoises and burlap and shutters and twirly whirly skirts and pancakes and Lee Press-On-Nails and little pieces of paper. It’s the story of our dream.

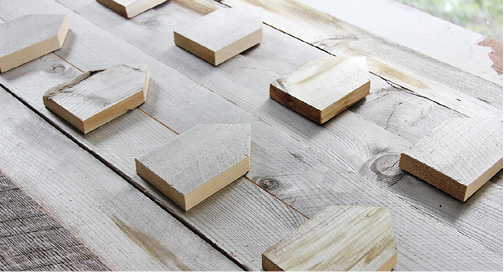
There’s just something about reclaimed wood that gives even the simplest of projects character and personality. You can use reclaimed wood from old barns or fences or storage crates. And if you don’t have any of those sources readily available, your local home improvement store’s fencing department usually has some great resources. Head for the single plank fencing and look for a few pieces that have a little extra weathering. That and about 30 minutes are all you need to create your own reclaimed art piece.
DIFFICULTY: 3
TIME: 30 minutes
YOU WILL NEED:
- 7 to 10 strips of reclaimed wood, 2-4" x 36"
- Hand saw
- Nails or 1" wood screws
- Hot glue gun
- Hot glue sticks
- Cut a fence plank (or board) into a small rectangle 2½" wide by 4" long. Mark a point in the center of the top of the rectangle. From that point, make two diagonal cuts to the lower corners with a hand saw to form the “roof” of the house. Repeat this step to make 9 additional houses.
- Cut another strip of fence to be 36" long and 2½" wide. Repeat to make seven additional strips. Cut two 14" boards to brace the back. Lay the seven fence planks face-down to create a wood rectangle. Use the smaller boards to attach all pieces together. Place the two 14" boards 3" in from each side and attach to each plank using nails or wood screws.
- Flip the board over so the front shows and place the houses approximately 3" apart in three rows. Attach the houses with hot glue. Prop the piece on a mantel or a dresser. This casual piece is perfect for layering with fresh cut flowers and smaller art prints.
STYLE FILE
Natural wood pieces look absolutely gorgeous paired with other elements from the outdoors like greenery and pops of crisp white flowers. Sometimes less can be so much more!
Aged Book Bundles
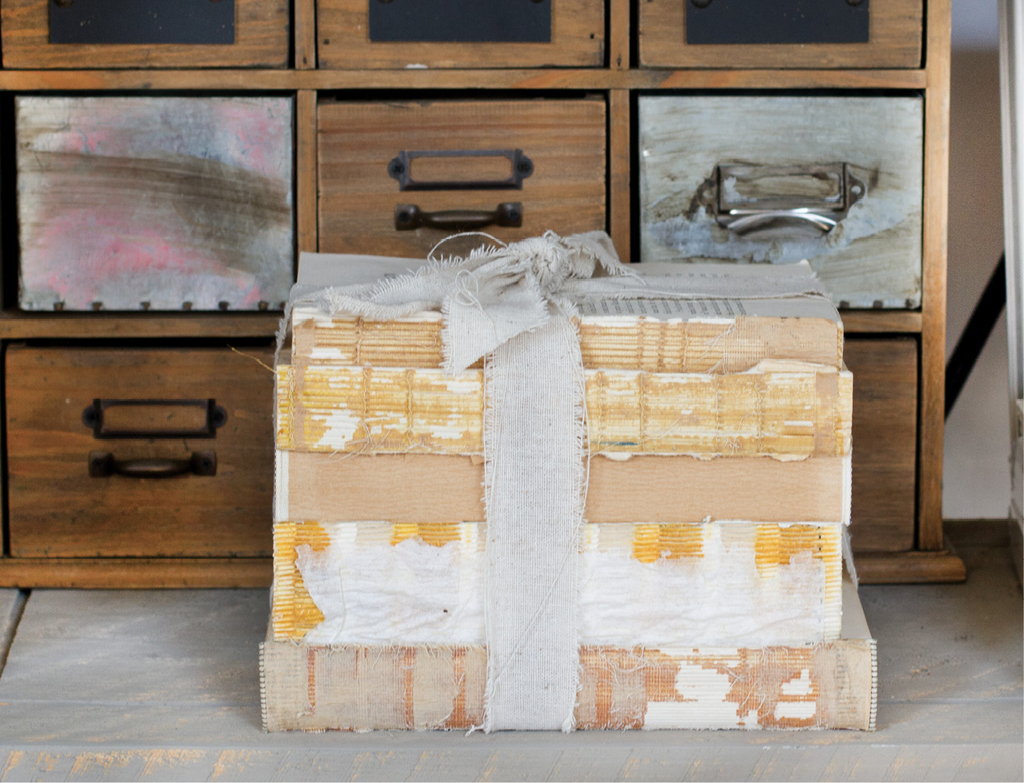
A beautiful space is filled with books. We believe a well-read home is vital to good conversation, racing imaginations, big dreams, and inspiration, but let’s be honest: Pretty books look great stacked on a coffee table. Stacking and leaning different titles is just another way you can add texture and interest to your shelves and flat surfaces. In fact, my mama always said a flat table is a boring table. You could buy vintage-inspired book bundles from your favorite retailer, or you could just make them yourself. Plop those guys on any lackluster surface for instant interest and character.
DIFFICULTY: 1
TIME: 10 minutes
YOU WILL NEED:
- Old hardback books
- Fabric scrap (canvas or burlap works great) or twill ribbon
- Grab the book near the spine and rip the cover off. Yep, that’s it.
- Tie a grouping of three or four glued insides of the books together with a scrap of burlap, twine, or ribbon.
WHERE TO FIND IT
Check thrift stores for old books. That’s where you’ll find them for ten to fifty cents each!
Gold Leaf Botanical Prints

Painting pressed botanicals with liquid brass leaf dresses these prints up and brings a bit of femininity to them without going over the top. If you don’t run across framed prints, you can easily gather your own leaves and press them between two heavy books. Look for leaves that are wide and thick; dried maple leaves work well.
DIFFICULTY: 2
TIME: 30 minutes
YOU WILL NEED:
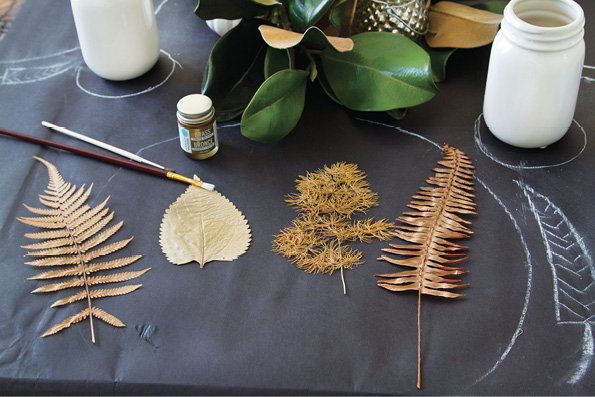
- Pressed leaves
- Sheet of paper
- Small craft paintbrush with soft bristles
- Martha Stewart Crafts Brass Liquid Gilding
- Homestead House Acrylic Paint in eggshell finish
- Burlap or other natural-toned fabric
- Spray adhesive or double-sided tape
- Take the leaves out of the frame and place them on a sheet of paper or board to paint. These will be delicate; handle them gently and keep all children far, far away. I’m pretty sure my two looked at these leaves and they all but disintegrated.
- Using a small craft paintbrush, dip into the liquid gilding. This is a time when excess paint is a good idea. Your leaves will be too delicate for a lot of drag as you paint. Dab on or gently spread the leaf rather than dragging your brush to apply the paint. Let dry overnight.
- Paint your frames with the acrylic. This pale blue-grey creates contrast between the frame and the burlap. Acrylic paint adheres really well, so just dip your brush in and go. This paint also doesn’t require a topcoat and dries with an eggshell satin sheen. Beautiful!
- Cut the burlap to the size of the frame’s cardboard backing. Using spray adhesive or double-sided tape, attach the burlap to the backing. (You may want to iron your fabric first if it is very wrinkled.)
- Lay the leaves on the burlap-covered backing, arranging them as you please. Use spray adhesive if they don’t stick well to the rough surface of the burlap.
- Gently lower the frame over the backing and leaves. Fasten the backing to the frame.
HANDY HOW-TO
This project only works with loose paints like the liquid leaf or spray paint. Don’t try to use a thick paint with a lot of body, as it could rip your leaves.
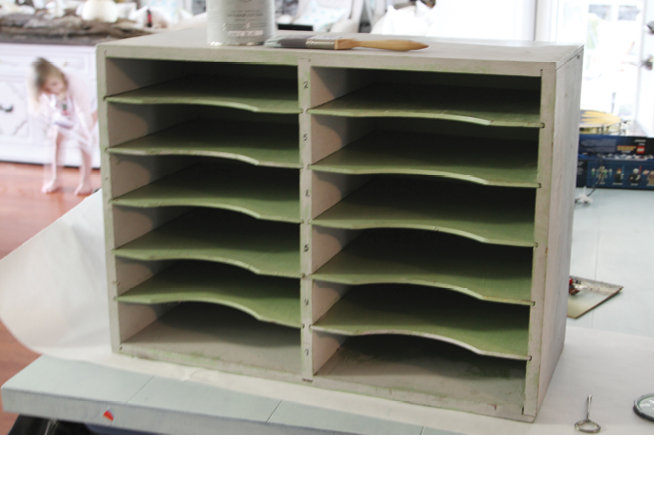
Updated Filing Cabinet

Don’t be afraid to dumpster-dive to find great pieces like this. You can also run across all kinds of card catalogs, filing cabinets, and other office supply pieces at antique and thrift stores. For small pieces like this cabinet, don’t pay too much; you’ll find a great deal somewhere. For rare finds like large card catalogs, feel free to splurge a little. With a bit of cleaning or paint, you can create a one-of-a-kind organizational masterpiece for your home.
DIFFICULTY: 1
TIME: 30 minutes
YOU WILL NEED:
- Filing cabinet or card catalog
- All purpose cleaner or degreaser
- Acrylic paint, such as Homestead House Acrylic in Early Blue
- Paintbrush
- If this treasure was found in a trash pile somewhere, or even in a dusty antique store, you may want to give it a good cleaning first. Old wooden pieces like this can acquire a waxy or dusty buildup over time. Use an all-purpose cleaner or a degreaser to remove any gunk left from years sitting unused.
- Remove any of the pieces you can, like the drawers or filing levels. This will make painting the inside much easier. If they can’t be removed, don’t worry. Paint as far back as you can reach, and chances are that’s as far back as anyone will notice.
- Paint the whole piece in one coat and let dry. Acrylic paint doesn’t require a topcoat, but you can buff with a cloth if needed.
STYLE FILE
Pieces like this filing cabinet are so functional. Use it to store important papers or bills, incoming to-dos, crafting supplies, or giftwrap.
Painted Aged Baskets

Not all baskets are created equal. You’ve got your Pottery Barn variety, which are perfection. But then, there’s the lesser variety—the kind you usually find at a discount or craft store. There is nothing wrong with the shape, but many times, it’s the color that’s off. Hopefully this project will inspire you to look at almost any item with objective eyes; you just might have a couple of dozen projects already waiting in your home.
DIFFICULTY: 2
TIME: 30 minutes
YOU WILL NEED:
- Acrylic paint (such as Homestead House in Gallery Blue)
- Paintbrush
- Basket
- Soft cloth
- Miss Mustard Seed’s Antiquing Wax
- Paint a thin (almost dry-brushed) coat of paint onto your basket, avoiding any hardware or leather straps. Let dry and repeat for one or two more coats. You want to create a weathered look, not a thick painted coat.
- Once you are satisfied with the paint coverage, apply the antiquing wax. This wax is thin enough to work as a glaze, rubbing on and off to tint your paint and age it slightly.
- Allow your wax coat to dry, then put your basket to work!
HANDY HOW-TO
This is a time when any old brush will do. Don’t feel like you have to use a nice brush. In fact, the more bushy or stiff the bristles, the better. This will help create an aged appearance instead of a smooth, glossy coat.
Vintage Book Catch-All
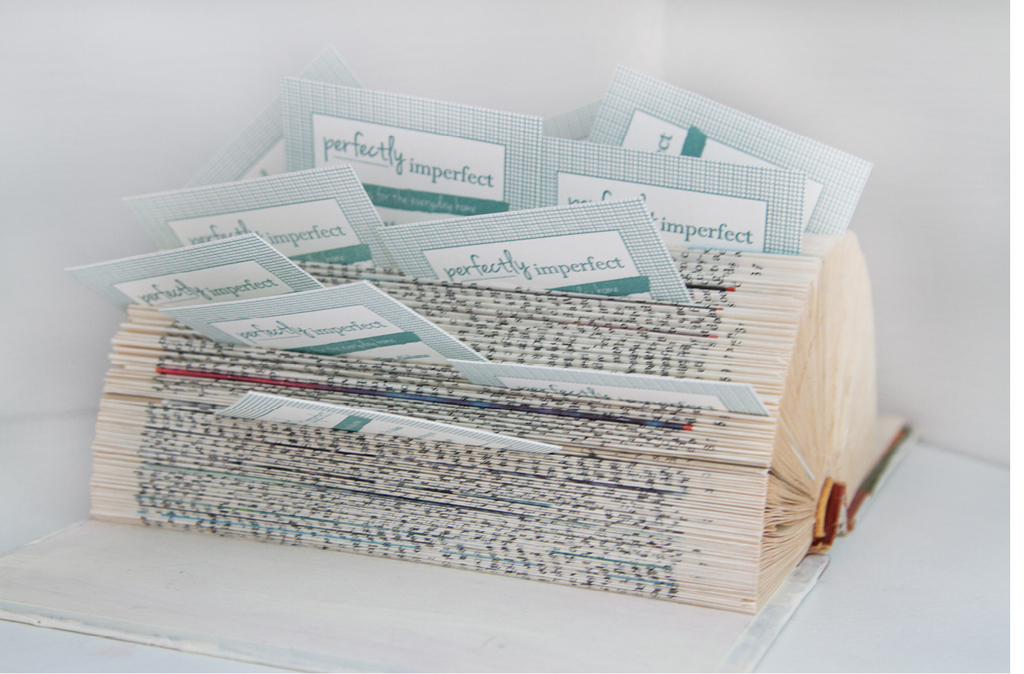
When we opened our home decor shop in November 2012, there was so much to do and create that our business card display was the last thing on my mind. One of our awesome team members and store manager, Natalie, came up with this quick solution. It’s such a fun and creative way to store anything paper-related. Use it on your desk, in the kitchen, or anywhere you need to organize important papers.
DIFFICULTY: 1
TIME: 45 minutes
YOU WILL NEED:
- Open the book. Starting with the front inside cover page, take the outer edge and fold it in half, toward the spine of the book. Run your fingers along the folded edge to crease it firmly.
- For the next page, fold the edge away from the previously folded page, toward the center of the book. Crease the fold again.
- Repeat, alternating the direction in which the pages are folded. This forces the pages to be as tight as possible, and makes the catch-all more full.
- Arrange with your business cards, recipes, or Christmas cards.
STYLE FILE
To make your book extra cute (because let’s be honest, this project is all about the cute factor), paint the cover a pretty color. You can use acrylic paint, flat latex, chalk paint, or milk paint with a bonding agent.
Book Letters
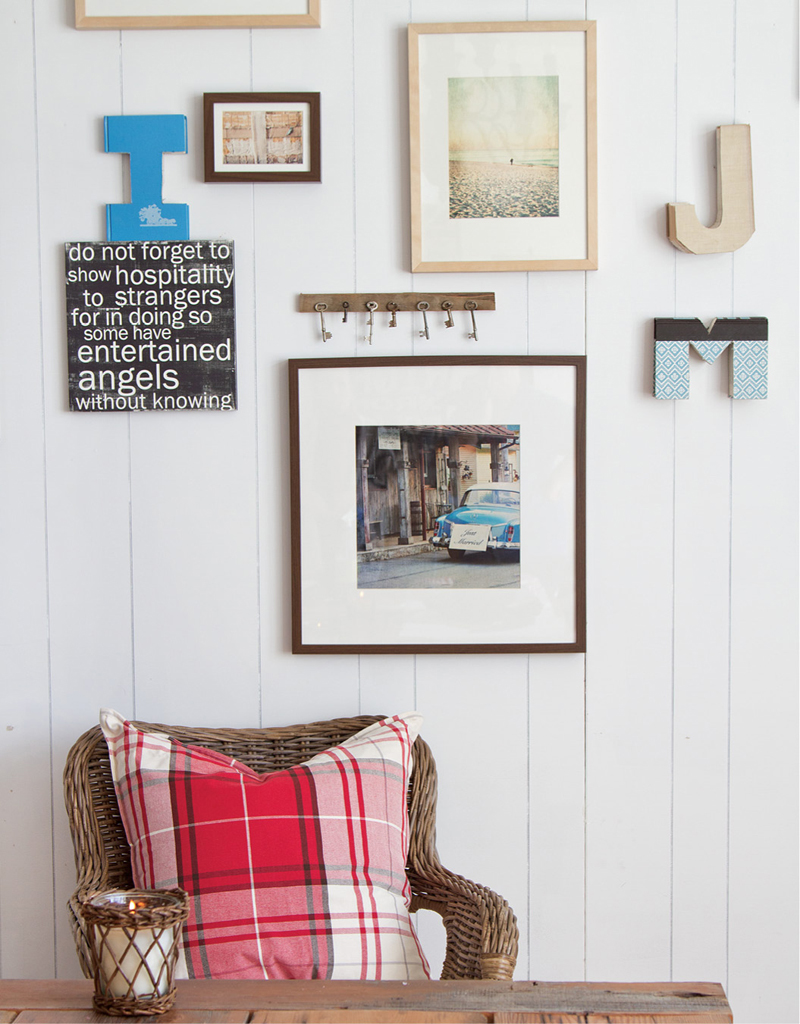
Creating these letters is as simple as tracing and cutting. You could use these letters as bookends, to add style on a tabletop, or hang them on a gallery wall like we did. Cut out initials and give as gifts, or use them in your own home. You could even cut out your house numbers and hang them on the wall, surrounded by an empty frame. The possibilities are endless!
DIFFICULTY: 2
TIME: 30 minutes
YOU WILL NEED:
- Pencil
- Font or tracing pattern (optional)
- Old hardback book
- Clamps
- Jigsaw and metal cutting blade
- Trace a letter onto your book, then clamp the book to a worktable to hold it steady.
- Using your jigsaw and the metal cutting blade, cut along the lines. Make sure you keep the spine intact so that your pages hold together.
- You can glue the pages together on the face of each page to keep the letter from opening, but it isn’t necessary.
STYLE FILE
Use these letters in a child’s room to spell out a name, or use on a mantel or bookshelf to represent the family initial.
Vintage Tray Wall Art

This installation of vintage trays and rattan chargers is an inexpensive and creative way to add texture above our buffet in the living room. Notice how striking the combination of color and texture is.
Hunt for trays, plates, or chargers that speak to you. Mix pattern and color; this is not the project for uniformity. You can hang all the trays in a row, but the asymmetry of this arrangement is what makes it so unique.
DIFFICULTY: 2
TIME: 30 minutes
YOU WILL NEED:
- Trays, chargers, or plates
- Plate hangers for standard sizes, or picture-hanging kits for the large sizes
- Gather your trays or chargers. Vary the size if you are going with an asymmetrical arrangement.
- You can always trace the plates onto paper and play with the arrangement on the floor or by hanging the paper cutouts on the wall first. But if you don’t have time for such precise tray hanging, just start somewhere and go for it.
- Continue hanging trays until you reach your desired look. Try hanging wall art at about 60" off the ground, or 6" to 8" above furniture arrangements. It seems to hug the furniture at that height.
HANDY HOW-TO
Don’t be afraid to make holes in your walls. For most projects, you can use Command strips that leave no damage, but for those that require nails like this one, just use smaller picture hangers, and fill the holes with spackle once you move the wall art. For frames and decor 5 pounds and under, use straight pins gently hammered far into the wall. They are surprisingly strong and leave almost no hole.
Vintage Art Collection

We would all love a home filled with original, meaningful art. While we may not be able to buy original canvases to fill our walls, it’s fairly common to run across beautiful vintage or antique paintings. I found all of these paintings at flea markets, each $7 or less. Keep your eyes open for framed paintings. You can always swap the contents and keep the frame to use for future art.
DIFFICULTY: 1
TIME: 10 minutes
YOU WILL NEED:
- Vintage paintings or prints
- Small hammer
- Command strips or small nails
- Decide on the position of your paintings. It’s best to always hang gallery walls with “the next painting” in mind. Where will it go, and how will the arrangement look then?
- Hammer the nails into the wall, or attach the Command strips to the frame. Hang the paintings for your own original art gallery.
STYLE FILE
To unify your collection, paint all of the frames one or two colors. This will tie together completely different subjects.
Suitcases Side Table

Buying a new piece of furniture is not always an option. For those times, think outside of the box. Side tables are the perfect pieces to create. Look around for objects and materials that will stack and arrange to create the piece you need. Stack vintage suitcases for a bedside table like this project, stack crates like the ones in the Crate Storage project in Chapter 4, or even stack a pile of books. Mixing “furniture” like this with storebought styles creates instant personality in your home.
DIFFICULTY: 1
TIME: 15 minutes
YOU WILL NEED:
- Wait for it… stack the suitcases.
- All joking aside, stack your suitcases. If the stack leans a little, add some Styrofoam or pieces of scrap wood between the suitcases. You could always attach the suitcases together, but I like the flexibility of using them as a table for now, and moving them elsewhere if needed in the future.
STYLE FILE
Look for flat suitcases so that stacking will be easier. Also, keep an eye out for the striped variety. They’ll add a little pizzazz to your vintage “table.”
Stacked Book Lamp
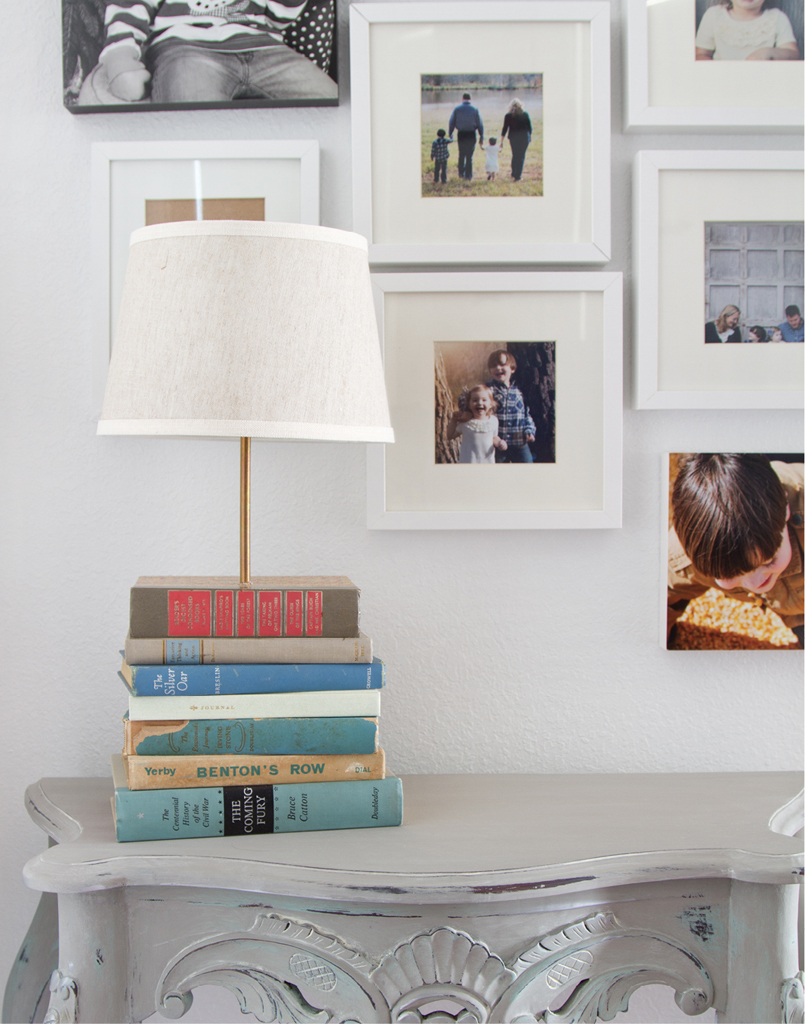
Since I love books, I have collected quite a few in the last ten years. Surrounding yourself with collections is a fantastic way to bring your personality and passions into your space. The display of those collections should be well thought out, and tailored to your daily life. You can arrange the things you love by placing them on bookshelves or in a cabinet, but you can also think outside the box. Create a little whimsy and art with the things you love by making this lamp with favorite vintage books.
DIFFICULTY: 3
TIME: 30 minutes
YOU WILL NEED:
- Stack of vintage books
- Clamps
- Drill
- 3⁄8" drill bit (or whatever size is required to accommodate the lamp rod)
- Threaded lamp rod
- Lamp kit
- Drum lampshade
- Choose your stack of books. You can glue them together, or leave them loose so you can rearrange them a little differently from time to time.
- Clamp the books together while you drill a hole in the center of the stack, all the way to the bottom of the books.
- Drill another small hole from the back in the center of the bottom book.
- Twist the threaded lamp rod into the books until set.
- Starting at the back of the bottom book, thread the electrical cord from the kit into the hole, and push up into the threaded rod all the way to the top.
- Finish the lamp by attaching the electrical cord to the lamp kit bulb base. Cover with a drum shade and plug in.
WHERE TO FIND IT
Shop thrift stores and flea markets for beautiful books whose looks speak to you. You can score them for as little as ten cents each!