 4 4
4 4 Emulsions are just one example of a colloid, a mixture in which one substance is evenly dispersed in another. The particle size of the substance that is dispersed is too large for it to dissolve and too small for it to settle out easily. Generally this means the particles are between 5 and 200 nanometers in diameter.
Fog and clouds are colloids of water in air. Smoke is a colloid of solid particles in air. As you have read, foams are colloids of a gas in water, and emulsions are colloids of one liquid in another. Ink is a colloid of a solid pigment in water. Styrofoam is a colloid of a gas in a solid. Gels are a colloid of a liquid in a solid. There are also colloids of solids in other solids, as in some types of glass.
One class of colloid often encountered in cooking are the hydrocolloids. These are gels (solid) or sols (liquid) made of particles dispersed in water. Gelatin is a sol when hot and a gel when cooled. Other examples are jellies made from pectin, agar, carrageenan, or other gelling agents.
If the particles are too large, instead of a stable colloid it’s a suspension. That’s when particles are temporarily suspended in a fluid but will eventually settle out if left undisturbed. The particle size is generally larger than 1 micrometer. Particles between 0.2 micrometers and 1 micrometer can form colloids or suspensions, or something that behaves somewhat like either one.
In the kitchen, cooks often go to some effort to create colloids, and at other times to prevent them. They add pectin to fruit juice to make jelly, but add flocculating agents to wine to clarify it by removing fine particles. Particles in water often form colloids when they all carry the same electric charge and thus repel one another. Adding salts to a colloid can provide charged ions that surround charged solid particles and neutralize the repulsion. This allows them to bind together into particles too large to remain as colloids, and they settle out.
A gel is formed when chemical bonds cause the particles to cross-link into a three-dimensional network that behaves like a solid, even though it is mostly liquid. Cooked egg white is a gel formed when the proteins in the egg white open from their natural folded shape and then bind to one another in many places.
Proteins are large molecules that, when opened up and spread out, provide lots of opportunities to bind and form links to one another. Other large molecules that form gels include starches and charged polymers.
Starch is a polysaccharide, a word that simply means “many sugars.” It is formed when molecules of the simple sugar glucose are joined together to form long chains and branched trees. The long chain form is called amylose, and the branched form is called amylopectin. In most plants, starch grains are about one-quarter amylose and three-quarters amylopectin. Animals form a more branched type of amylopectin, called glycogen, to store energy.
In the organism creating the starch, there are enzymes that create straight chains (amylose), enzymes that create branched trees (amylopectin), and enzymes that convert branched tree shapes into long chains. All of these starch forms are used for different purposes in the cell. Some are structural and some are related to energy storage.
In a plant, starch is bundled into crystallized packets called starch granules. The long chains align and pack tightly, creating a dense solid. When heated in water, these starch granules absorb water and expand, eventually separating into a loose liquid colloid. If left to cool, the chains in the starch once more align and form a more solid gel, at the same time excluding water in a process known as syneresis.
Amylose molecules are smaller than amylopectin molecules. An amylose molecule might be composed of 250 to 2,000 glucose molecules and have a molecular weight of 40,000 to 340,000. Amylopectin is composed of many branching chains of amylose, and it can have a molecular weight of as much as 80,000,000.
Amylose often forms double helices that form long hollow tubes. In one common test for starch, iodine is added to a starch solution. The iodine fits neatly inside the helical tube, changing the way it interacts with light. The result is a blue-black color in a solution that was once clear.
Agar is a gelling agent that is similar to starch. Instead of using glucose molecules as a base, the simple sugar galactose is used. As with starch, there is a long-chain version, called agarose, and a branched version, called agaropectin. Of the two, agarose is the primary gelling agent; purified agarose is widely used in molecular biology because it has excellent gelling characteristics, and it has large pore sizes, which allow easier transport of molecules through the gel.
Agar has advantages over starch in both cooking and science. It melts at a high temperature (185°F, 85°C), but solidifies at a much lower temperature (90°F, 32°C). Water molecules bind inside the helices of agarose and stabilize the gel, creating a strong gel without losing any water. Bacteria can’t eat agarose like they can starch, so it is used to culture colonies of bacteria on agar plates (which can be incubated at higher temperatures than starch can, due to the higher melting point).
In cooking, agar is used as a vegetarian gelling agent instead of gelatin. Agar is extracted either from red algae or from a type of seaweed. Similarly, another gelling agent, carrageenan, is extracted from certain red seaweeds. Like agar, carrageenan is formed of galactose and curls into helices, making it gel nicely at room temperature. It is viscoelastic like toothpaste, meaning it can liquefy under shear stress and be pumped or extruded easily, and then regains its solid form when the stress is removed.
Pure agarose makes excellent gels. It is used in molecular biology to separate strands of DNA by their sizes. The large, shaggy agaropectin molecules would get in the way, but the pure agarose allows the DNA to flow through the gel under the influence of an electric field.
Pectins are one of the soluble dietary fibers, and as such they have well-known effects on human digestion as well as lesser-known effects, such as reducing the digestibility of some proteins and amino acids. The remedy Kaopectate used to be made of pectins and a fine clay called kaolin.
The big, shaggy pectin molecules are used most in making jams and jellies. Pectins used for making jelly come from citrus fruits and apples, but most plant cell walls contain pectins as structural elements and for lubrication. Pectins hold cell walls together. When fruit ripens, enzymes are released that break down pectin and make the fruit get soft. The pectin in jams and jellies is for the most part indigestible, although some gut bacteria can metabolize it.
Generally, harder fruits such as apples, oranges (the peel), and plums have the most pectin, while softer fruits such as grapes, cherries, and strawberries have much less, since pectin is a structural molecule that binds the cells together. Citrus peels are about 30 percent pectin, and whole oranges are about 2 percent. While whole apples have even less (1 percent), commercial pectin is extracted from the concentrated solids left over after pressing the juice from apples.
Commercial pectin comes in two forms: high-methoxyl pectin (HMP) and low-methoxyl pectin (LMP), and they set into gels in different ways. Traditional pectin is the high-methoxyl type, which gels only when the sugar content is very high (generally more than half sugar by weight) and the acidity is high.
HMP molecules are negatively charged and repel one another. This means they won’t develop bonds between the molecules and form a solid gel. Two things are needed to overcome this. One is acid, which neutralizes the negative charges. The other is a high concentration of sugar, which binds well to water molecules, so that the water binds less to the pectin. This allows the pectin molecules more opportunities to bind together.
LMPs were developed to allow gelling in the absence of sugar. They are usually made by treating HMPs with ammonia, sodium hydroxide, or acids. Instead of requiring sugar and acid, low-methoxyl pectins require a source of calcium to gel. Generally, a slow-dissolving calcium salt is used, such as calcium phosphate, to give the pectins time to fully dissolve before they react with the calcium.
You are already familiar with several protein gels. Scrambled eggs and yogurt are gels formed by proteins. The words gel and gelatin both come from the Latin word for “freeze,” and gelatin is a protein gel.
Water-soluble proteins such as the albumins in egg whites are generally spherical globs, with the hydrophobic (water-avoiding) amino acids tucked away inside. They can form gels and colloids in this state (as the ovomucin does in the firm gelled part of the egg white). But when they are denatured by heat or beating or acids, they unfold and can join together to form firmer gels, or tough plastic sheets.
Gels made from proteins are very common in the kitchen. From scrambled eggs to yogurt, custard to gelatin, proteins form gels when heated or acted upon by acids or enzymes.
When proteins are heated, they open up from their natural folded state and take up more room, impeding the flow of the water they are in, causing it to thicken. With further heating, the proteins bond together, forming a firm solid gel.
The nature of the protein determines features of the gel. Egg protein has many sulfur-containing amino acids, and the sulfur atoms find it easy to link together to form disulfide bonds. This cross-linking firms up the gel, which is the reason why egg proteins are so easy to denature into a gel that they can be cooked on a hot sidewalk in the summer.
Milk proteins are easily denatured by acids. As the bacterium Lactobacillus acidophilus oxidizes the milk sugar lactose into lactic acid, that acid unfolds the protein called casein in the milk. The proteins can then slowly link together to form the soft gel we call yogurt.
Gelatin is a protein extracted from the collagen tissue that connects bones to each other and to muscle. It makes up most of the protein in skin and bones.
Collagen is insoluble, made up of three chains of protein that twist into a rope in what is called a triple helix. When heated in water, usually with added acid or alkali, it hydrolyzes, and the helical rope unwinds, letting the individual chains float free.
When the solution cools, the chains begin to curl back up into helices. However, they are all tangled together, and as they curl, the tangling increases, like a coiled telephone cord. The chains knot together, and some of the ends of the chains form double and triple helices with one another.
All of this tangling forms a kind of gel that is different from what you have read about in other protein gels. Gelatin forms a thermo-reversible gel. Since the chains don’t form a lot of strong cross-linked bonds, the gel can be undone by reheating. This makes it similar to gels made from vegetable gums and starches.
Gelatin melts at body temperature, and this gives it special qualities in foods that melt in your mouth.
 Recipe
Making your own cheese is fun, but since a gallon of milk costs almost as much as a pound of cheap cheese, and almost half as much as a pound of good cheese, the cheese you make has to be pretty good to justify the expense.
This cheese fits the bill perfectly.
Cheese excites the salt sensors on the tongue, as well as the savory, or umami, sensors that respond to glutamate, indicating a rich protein source.
To round out the flavor palate, it’s good to excite the sweet sensors and the sour sensors on the tongue as well. (I’ll let someone else devise a good-tasting recipe that also excites the two bitter sensors—I’d just as soon avoid those myself.)
Dried Bing cherries are just the ticket. Not so sweet as to overpower the cheese, not so tart as to pucker faces, these colorful little nuggets nestle into the cheese as if they belonged there. And they do. This recipe is for about a pound of finished cheese.
Ingredients:
Supplies:
Start out by sterilizing the pot. Put ½ inch of water in a pot and boil it for 10 minutes with the lid on. Then dump the water into the sink, being careful not to scald yourself with the hot steam.
Next, pour a gallon of whole milk into the pot, and warm it to about 80°F (27°C). You can do this on the stove if you have a thermometer; otherwise, just let it sit until it reaches room temperature, which will be warm enough. (You can just let the bacteria work on the milk a little longer.)
Stir in the yogurt. Cultured buttermilk will also work, and the amount is not critical; anything from a few tablespoons to a cup will do. What you are doing in this step is adding Lactobacillus acidophilus bacteria to the milk. These bacteria will grow and reproduce, making the milk acidic enough for the rennet to do its job. A small amount will take a little longer than a larger amount, but you are going to let this sit for 24 hours anyway, so either amount will work fine.
Put the pot (with the cover on!) in a warm place for 24 to 36 hours. You aren’t making yogurt here, so the milk will still be liquid when the time is up, but it will be just the tiniest bit tart, like a weak buttermilk.
Dissolve a ¼ tablet of rennet in a few tablespoons of water. You can use a ½ tablet or a whole tablet instead if you like. Rennet is an enzyme, so it acts like a catalyst, changing the milk but not getting used up in the process. Using more makes the process go a little faster, but you are not in a hurry here—take your time.
On the stove, heat the milk to between 80°F and 86°F (about 30°C). Watch the thermometer carefully while you do this, and stir well, since it will only take a minute; you don’t want to overheat it. If you don’t have a thermometer, or you don’t think you can do this, then don’t heat the milk at all—just use twice as much rennet (½ tablet).
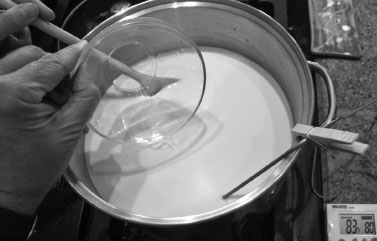
Stir the rennet into the milk.
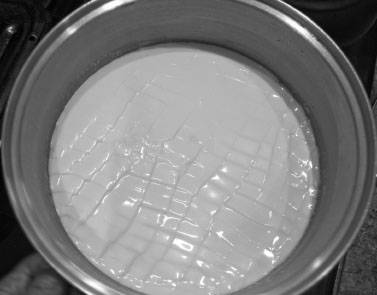
Set the pot (with the lid on) in a warm place and leave it undisturbed for one to two hours. Don’t rush this step. You want the milk to gel into a nice custard, so when you put your finger into it, it breaks cleanly. How long this takes will depend on the acidity of the milk, the temperature, and how much rennet you put in. It is better to just wait than to raise the temperature, increase the acidity, or increase the rennet. This is not fast food.
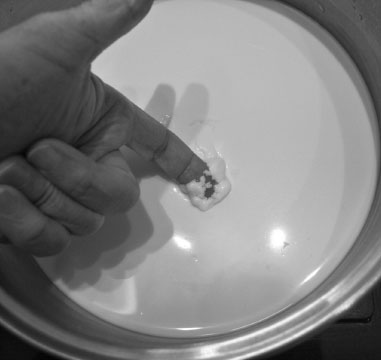
When the rennet has done its job and you have a nice custard consistency, it is time to slice the custard into curds.
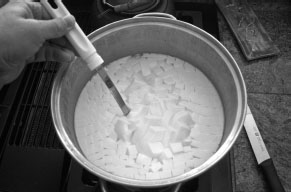
With a knife long enough to reach the bottom of the pot, slice through the custard in ½-inch-wide strips.
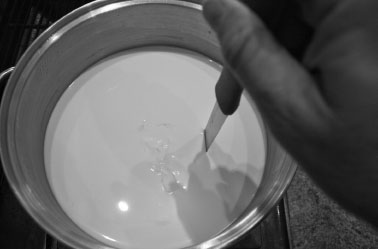
In the photo below I jiggled the pot to make the cuts visible, so they look wavy. When the pot isn’t moving, they are straight.
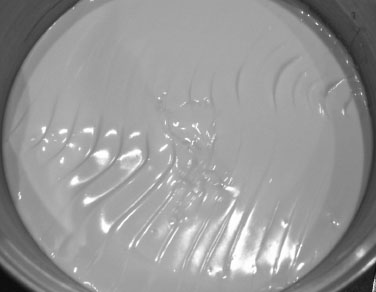
Rotate the pan 90° and repeat the slicing so you have ½-inch-square curds, like a pot full of french fries.
The next step is heating the curds so that they expel the whey. This step determines the final firmness of the cheese. I like very firm cheese, so I heat the curds to 110°F (43°C). For a softer cheese, use a lower temperature, down to as low as 102°F (39°C).
For a cheese that has firm bits of dried cherries in it, you want a nice solid cheese, so that it cuts nicely with a sharp knife and doesn’t fall apart as soon as the knife hits a cherry.
Stir well but gently while heating on a low flame. Watch the temperature carefully, since it is very easy to overheat at these low temperatures. Don’t stir so hard that the curds get too small, but make sure that the curds from the bottom of the pot are well mixed with those from the upper parts.
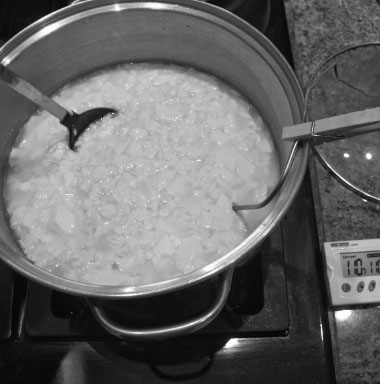
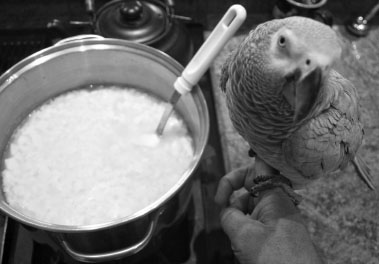
When the proper temperature is reached, turn off the flame or remove the pot from the burner. The curds need to sit at this temperature for 10 to l5 minutes, so that they firm up and lose moisture. You want them to feel like well-cooked scrambled eggs. Your assistant can help pass the time as you wait for the curds to firm up and sink to the bottom of the pot.
When the curds are nice and firm and have sunk to the bottom, strain them in the strainer. If the curds have not sunk to the bottom of the pot, it means that you have grown some gas-producing bacteria along with the acid-loving ones. While it is an indication that you did not sterilize the pot well enough, it is not a problem. It just means you will be making Swiss cheese—the gas-producing bacteria will make bubbles in the final cheese.
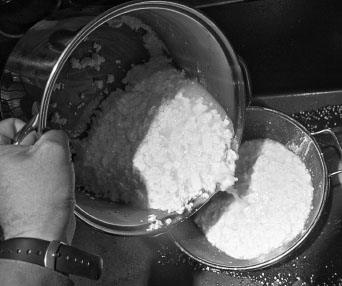
You can rock the strainer a bit to help the whey drain out faster. You want it fairly dry for the next step.
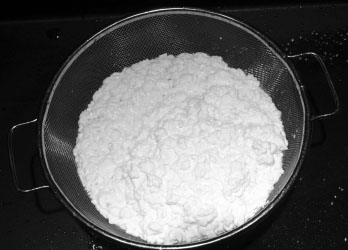
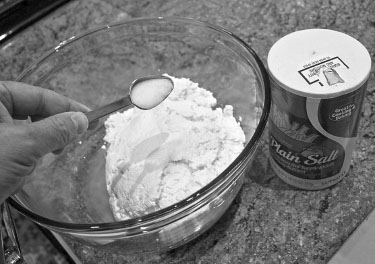
In this step, you add 2 teaspoons of salt and stir it into the curds well. The salt is not just for flavor (although that is important; it shouldn’t taste like bland cottage cheese). You will be letting your cheese ripen in the refrigerator for anything from a couple days to several months, depending on how sharp you want the taste, and the salt will prevent bacteria and molds from spoiling the cheese.
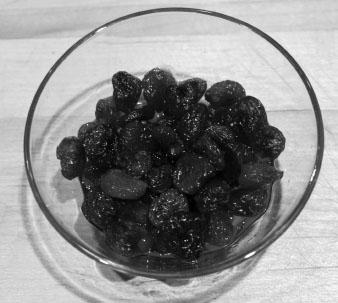
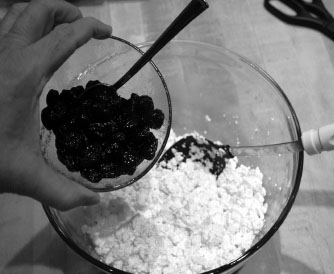
Put ½ cup of dried cherries in a microwaveable bowl, then add 1 tablespoon of sugar and 1 tablespoon of water. Microwave for a minute or two on the highest setting, so the cherries plump a little and the sugar makes a thick cherry syrup.
Let the cherries cool a bit so you don’t burn your fingers, and then stir them into the salted curds. You want each cherry to be surrounded by curds, and evenly spaced though the mix.
Place the ABS pipe in a flat-bottomed bowl, and use your hand to stuff most of the cheesecloth into the pipe, leaving just a bit left out at the top. Use a rubber band to keep it in place while you fill the cheese press with the curds. In the photo you can see the disk I cut out of the plastic lid to act as the top of our makeshift homemade cheese press.
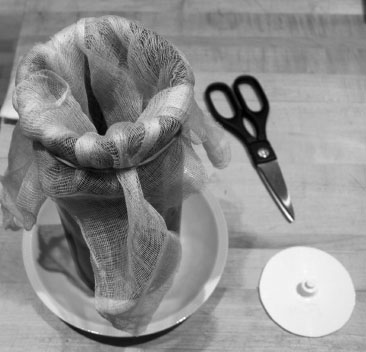
Now spoon the curds into the cheesecloth. When they are all in, remove the rubber band and fold the remaining cloth over the curds. Cover with the plastic lid (or wooden disk, or whatever you found that is stiff and 4 inches in diameter). Follow that with a can or bottle that reaches up to the top of the press, so you can press down on it with weights.

In the photo, I used a tall plastic jar, and then inserted the handle of a dumbbell set made of plastic-coated concrete.
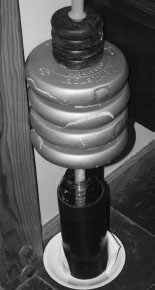
Stack whatever weights you are using on top of the press. You want about 50 pounds. Whey will squeeze out the bottom of the press, and you will want to soak it up in some paper towels so it doesn’t spill out.
After about 36 to 48 hours in the press, the cheese is ready to come out. You may need to run a butter knife between the mold and the cheesecloth to loosen the cheese from the mold, but if the curds were firm enough, you can probably just push it out without any trouble.
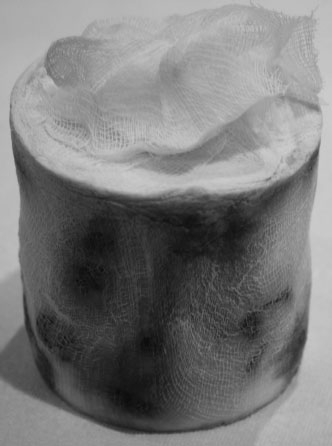
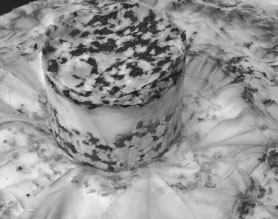
Carefully remove the cheesecloth. Some parts of the cheese cylinder will be fragile, such as the edges and any parts where cherries pressed against the cloth. Be careful on those areas so you don’t pull off any cheese (just to keep it looking good).
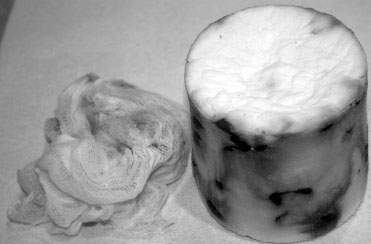
At this point you can slice and eat the cheese. However, if you like a sharper cheese with a nice firm rind, wrap it in a paper towel or two and let it dry and ripen in the refrigerator. Replace the paper towel with a new one every day if there is any dampness on the towel. (It will probably be damp every day for the first week.)
After a couple weeks the cheese will have a nice hard rind. At this point you can wax it and let it further ripen and sharpen for months in the refrigerator.
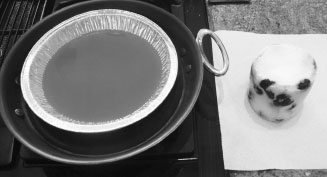
To wax the cheese, melt a crayon and the paraffin in a disposable aluminum pie tin sitting in gently boiling water in a skillet. Stir the liquid wax to evenly distribute the color.
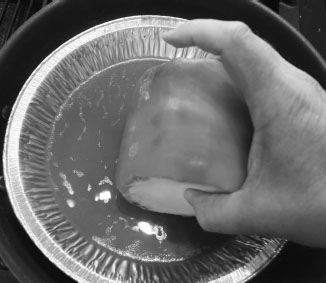
Now hold the cheese in the wax, rotating it until the sides are nicely coated with a thick layer of wax. This may take several dippings. Last, dip the top and the bottom of the cylinder a few times to completely seal the cheese in the wax.
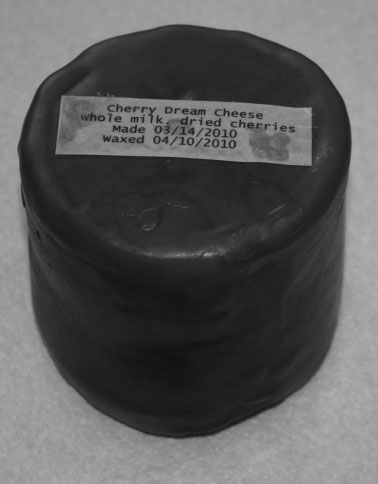
You can label the cheese with your name, the date, and a description of the type of cheese, and the type of milk, and maybe even a suggested date for opening it some months in the future. Print this on a small piece of paper, and use hot wax to seal it onto the top of the waxed cheese.
For the Fourth of July this year, why not create Red, White, and Blue Cheese?
Use the same recipe as the Cherry Dream Cheese, but divide the curds into three parts. In the first part, add dried Bing cherries as before.
Leave the second part alone for the white portion of the cheese.
For the third part, add dried blueberries.
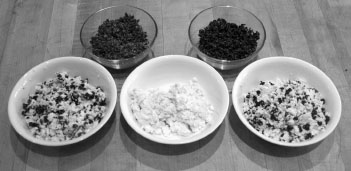
When putting the cheese together in the cheese press, put the cherry cheese on the bottom. Use the disk of the press to squeeze, by hand, as much liquid as you can from the cheese and create a nice flat top.
Next comes the plain white cheese. Again, use the disk of the cheese press to squeeze the moisture out and flatten the top.
Last comes the blueberry cheese. Flatten it as before, then fold over the cheesecloth and set up the press as you did in the original recipe.
I used a 200-thread-count bamboo/cotton cloth as my cheesecloth, and it came out beautifully tie-dyed when I unwrapped the cheese. If you use a clean white T-shirt as your cheesecloth, you can wash it and wear it to the Fourth of July picnic when you serve the cheese. The colors probably won’t survive many launderings, however.
The cheese can be served after a day in the press. This means you will want to start making the cheese on July 1 at the very latest. I planned to wax and age the cheese, so I was making it in mid-April. But I made two batches, one to age in the refrigerator and one to eat right away. I also made a batch on July 1 so that guests at the party could compare the fresh cheese to the aged one.
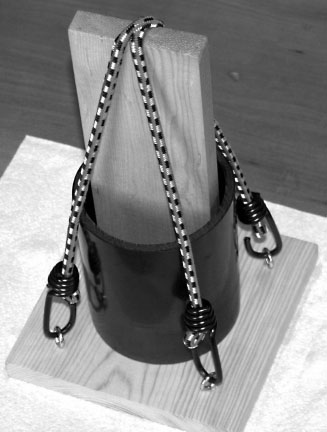
The stack of weights I used in the Cherry Dream Cheese for my makeshift cheese press worked great, but it was not the most convenient or portable cheese press in the world. So I made a new cheese press from some pine boards and bungee cords, and it works great. It also weighs 50 pounds less than the last press.
It is very simple to build. Here’s what you need:
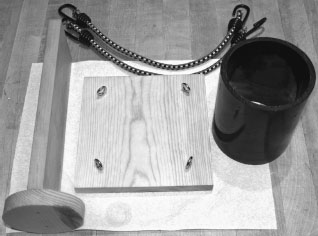
Cut a 4-inch circle of wood using the circle cutter. You can use a jigsaw instead of the circle cutter, but a circle cutter makes a nice, clean, round disk.
Nail the disc to the 9-inch board.
Screw in the four eyelets near the corners of the 7-inch square board.
Use some salad oil—canola, corn, safflower, or sunflower oil will all work fine—to waterproof all of the wood parts. Use plenty of oil, and let it soak into the wood. You can use a paper towel to spread it around, and some more to wipe off the excess.
The press can be used right away. The oil will dry and harden over the next few weeks, but it does not need to be dry to use the press.
To use the press, put the pipe in the center, on top of a pad of folded paper towels (to absorb the whey). Then insert the cheesecloth or a clean piece of an old bedsheet.
Place the curds into the cloth in the pipe, and fold the cloth over the top.
Insert the disk, and pull the bungee cords over the top of the board the disk is attached to. This will not be particularly easy, since you want something between 20 and 60 pounds of force. If you aren’t strong enough to do this, cut a bit off the end of the 9-inch board until it is not too much of a bother. With less pressure, you can just let the cheese press for a longer time.