

What you and your horse wear on the trail is about far more than looks. Picking the correct tack and attire will ensure your horse’s comfort and safety, as well as your own.
The choices in colors, materials, and styles can seem daunting, but the two factors that matter most are fit and function.
Your tack—saddle, bridle, and bit—allows you to communicate with your horse, so it’s imperative to choose the right equipment and make sure it fits properly. Your attire—boots, pants, helmet, gloves, jacket, and such—allow you to comfortably and safely spend a day on the trail. Keep in mind that you’re not restricted by the rules of the show arena while on the trail, so you’ll find trail riders using English equipment and attire, western equipment and attire, or a combination. What matters is that your choice works well for you and your horse.
Finding the right equipment will probably be a process of trial and error. If the horse came with a bridle or a saddle, this can be a good place to start. Keep in mind, however, that the horse may have been at a different training stage, the tack may not fit the horse correctly, or you may find the previous owner’s choices are unsuitable for the way you ride.
If you have a trusted horse trainer or riding instructor, ask this person for recommendations, such as what bit might be best, based on your horse’s training and your riding experience. Perhaps you or your friends already own a variety of saddles, bits, and bridles and can simply try a number of pieces to find out what works and what fits best.
The saddle will most likely be your most expensive piece of tack. Purchase it with care: Your comfort and that of your horse depends on it. Trail saddles include western types designed specifically for trail, endurance saddles, and Australian stock saddles. Which you choose will depend on your personal preference, the type of trail riding you plan to do, and the makes and models that best fit your horse.
Shown here from left to right are an Australian stock saddle, an endurance saddle, and a western saddle, all of which are commonly used on trails.
Whatever type of saddle you choose, proper fit is essential. The importance of a correctly fitting saddle cannot be overemphasized. An ill-fitting saddle can cause your horse pain and result in any number of bad behaviors.
Trail saddles are often lighter in weight than traditional western saddles and may feature built-in perks, such as gel or cushioned seating and added D-ring attachments for fastening saddlebags and other accessories. Some trail saddles also offer rounded or cutaway skirts for heat reduction, and many do not have horns that could get in the way when you lean forward going up a steep hill.
Endurance saddles are the saddle of choice for long-distance riders. Endurance saddles look similar to western saddles, minus the horn, and feature rounded or cutaway skirts to help the horse stay cool on long rides. To allow the rider to post easily when trotting, the seat on an endurance saddle may not be as deep as the one on a western saddle. Australian stock saddles have attributes of English and western saddles and both can also be comfortable for trail riding.
Western saddles are usually heavier than trail saddles and may place the rider farther back on the horse, which can be more tiring for a horse on a long-distance ride. However, for general trail and pleasure riding, western saddles are popular choices. The horn and saddle strings on this type of saddle provide places to attach saddlebags and other equipment. Western saddles come in a variety of styles specialized for different events, including equitation, barrel racing, pleasure, and cutting; there’s nothing wrong with using one of these on trail if you find it comfortable and it fits your horse well. Each of these styles is designed for a different use and discipline, which will affect your position in the saddle.
Although English saddles are not as common among trail riders, some riders choose to use them. They offer riders more freedom of movement but less security than other saddle types do. English saddles also have fewer attachment options for riders wanting to add saddlebags or carry jackets.
You may come across bareback riders on trail. However, given that the trail environment is unpredictable, it’s best to have the added security of a saddle. Bareback trail riding should be left to only the most experienced riders.

This western saddle fits well and is properly placed: It does not tip forward or backward, and the seat is the lowest point.
Most saddles are available in leather and synthetic versions. The choice is up to you. You should consider weight with any type of saddle you buy, and some synthetic saddles are lighter than their leather counterparts. In addition, although leather saddles are long lasting, you will need to maintain, clean, and condition the leather. Synthetic saddles often can be hosed down and are not usually damaged by water.
Cinches, or girths, and saddle pads are available in a number of materials. Choose sizes and styles that work best for you, your horse, and your saddle. Saddle pads must have adequate cushioning, but don’t make the mistake of thinking extra padding will compensate for a poor-fitting saddle. Whatever pad and cinch you choose, make sure to keep it cleans; dirt and debris will irritate your horse’s skin.
The saddle must, of course, fit you as well as your horse, and rider fit is usually easy to determine. Adult seat sizes are measured in inches: 15, 15½, 16, 17, and so on. English and western saddles are measured differently: If you’re comfortable in a 15-inch western seat, you’ll probably need a 17-inch English seat. You can sit in different seat sizes at a tack store. Choose a size that allows you adequate room. A good rule for a western saddle is that you should be able to lay your hand flat between your upper thigh and the pommel, or front rise, of the saddle. For English saddles, you should be able to lay your hand flat in the saddle area in front and behind you. Beyond this basic seat size, the particular saddle you choose must feel comfortable. Some saddles will place your legs farther forward or backward, so always ride in a saddle before deciding whether it’s right for you.

A saddle rack displays a saddle made from synthetic materials rather than leather. This type of saddle is often lighter and easier to maintain.
You’ll find that saddles come in several tree widths to fit varying back sizes. A saddletree is the basic frame of the saddle. On a western saddle, the underside is covered with sheepskin, while an English saddle is covered with leather. You’ll feel the bars (the two long pieces of wood or synthetic material that rest along your horse’s back on either side of his spine) but not see them.
Saddletree widths and the resulting bar angles commonly are available in Quarter Horse or semi–Quarter Horse sizes on western saddles (you may also see Arabian and draft trees). English saddles usually come in narrow, medium or standard, and wide. Unfortunately, the angles are not standardized, so a medium in one saddle brand may fit like a narrow in another. There are also new treeless saddle options. Some horses and riders find them comfortable, whereas others do not. Carefully evaluate any saddle you’re considering purchasing.
If you’re buying a new saddle, bring in pictures of your horse and describe his back and withers so the tack-store employees can help you determine which size to try first. You can buy products to draw and record the shape of your horse’s back to take to a tack store with you. Whether you buy new or used, you’ll need to try the saddle on your horse before you know whether it fits. Most tack stores will let you do this, provided you return the saddle in the same condition. Don’t buy from a store that doesn’t allow you to take the saddle home; return it if it doesn’t fit your horse.
Trained tack-store employees, riding instructors, horse trainers, and veterinarians can help you determine whether your saddle fits correctly. Hiring a professional saddle fitter to come to your stable to evaluate your fit will give you complete peace of mind. However, here are a few obvious points to check yourself:
 From the side, make sure the saddle is not tipping forward or backward like a teeter-totter. The seat should be level, and it should be the deepest (lowest) point of the saddle on the horse’s back.
The gullet (front, arch-shaped part of the saddle) should allow adequate clearance so it doesn’t rest on or touch the horse’s withers.
Set your saddle on your horse without a pad or cinch (you can lay a clean towel down if you don’t want to dirty the saddle). With your hand flat, feel under the bars of the saddle. The bars should be resting smoothly on either side of the horse’s back. Bars that are too wide or too narrow will pinch and won’t distribute weight evenly.
The saddle skirts should not interfere with the horse’s hip (which can happen if your saddle or its skirts are too big).
Watch your horse’s behavior. If he flinches when you set the saddle down or becomes cranky when you tighten it up or mount, he may be telling you that his back hurts or his saddle doesn’t fit. However, some horses are just “cinchy” from the cinch or girth being tightened too quickly or from past negative experiences.
Make sure you place your saddle correctly, as well. Start with it too far forward, then slide it back to where it naturally stops. Pull the pad up into the gullet so it doesn’t restrict the withers when the cinch is tightened. Then feel for the top, back part of your horse’s shoulder bone to make sure his shoulder can move freely forward and backward without the saddle bars interfering. Even though the front leather part of the saddle may cover this part of the shoulder bone, make sure that the bars themselves are not resting on this bone.
Always tighten your horse’s cinch, or girth, slowly. Make it just snug enough to keep the saddle from tipping. Wait a few moments or walk your horse before tightening it another couple of notches or inches. Finally, before you mount, check it again to see if it needs to be re-tightened. Never use all of your strength to pull it tight.
After you’ve ridden a while, you may need to retighten it a tad. You can check if your cinch is too loose by standing in the stirrups and bouncing your weight gently into one stirrup more than the other. If the saddle begins to move that way, you need to check your cinch. However, a saddle will naturally have more side-to-side movement on a horse with a round back and without prominent withers.
A bridle consists of a bit, headstall, and reins. The successful combinations of the three are endless; however, as you choose a bridle, prioritize carefully. Your first priority should be the bridle’s fit: Does the bit fit your horse, and is the headstall adjustable enough to fit correctly? Second, consider function: Will the bridle serve the purpose you need it for? For example, if you want to easily tie your horse, does the bridle have a built-in halter? Last, choose a bridle that is appealing to you, with reins that comfortably fit in your hands and that require a level of care you’re willing to offer.
There are hundreds, if not thousands, of bit variations, and the choices can be overwhelming. However, there are several major groups or types of bits to help you narrow down your search. Finding the right bit for you and your horse may be a process of trial and error. Your horse will most likely need different bits for the various stages of his life and training, as well.

The pad beneath this saddle has been pulled up into the gullet before the cinch is tightened, so the gullet doesn’t put pressure on the withers.
For the most part, bits with thinner mouthpieces or twists (ridges) in the mouthpiece are more severe than bits with smooth, large, round, light, or hollow mouthpieces; however, the shape and size of a horse’s mouth may dictate that he will be more comfortable in a thinner mouthpiece. Some bits include copper, which encourages salivation to keep the horse’s mouth moist and lubricated. Rounded mouthpieces, which curve up toward the top of the horse’s mouth, offer extra room for the tongue.
Snaffle bits: In general, a snaffle features a joint in the middle and a D-shaped or circular ring on either end. Snaffles are direct-pressure bits, meaning pressure goes directly from your hands to the bars of the horse’s mouth, tongue, and lips. Snaffles are popular for English riders and for young horses. Beginning riders also may choose gentle snaffles, as these can be more forgiving of fumbling hands than leverage bits. When riding in a snaffle, you can keep light contact with the bit (meaning you can “feel” the horse’s mouth).
Curb bits: Curb bits feature shanks that drop down from the mouthpiece several inches, making the curb a leverage bit. Reins attach to the end of the shanks, which come back when you pull back, putting pressure on the horse’s chin, his poll (behind his ears), the bars of his mouth, and the roof of his mouth (via the port). Curb bits are used with a chin or curb strap (or chain) that runs from the upper rings on either side of the bit behind the horse’s chin. You should be able to fit two fingers held sideways in between the chin strap and your horse’s chin when no pressure is being exerted on the reins.
What height and width of port you choose will depend on the size and shape of the inside of your horse’s mouth, his training, and your experience as a rider. Generally, high, thin ports should be used only on very well-trained horses for a specific purpose and will take a delicate touch from the rider. The length and angle of the shanks, as well as the purchase (the part of the shank above the bit), also will influence how pressure is applied to the horse’s mouth. Some curb bits include a roller in the port, which can encourage salivation, and some horses with a “busy mouth” enjoy rolling. Young or untrained horses should never be ridden in any curb bit, and inexperienced riders with unsteady hands should avoid them, as well.
Because curb bits are leverage bits, applying pressure to several parts of the horse’s mouth and head, you should not ride with constant pressure on the reins. Instead, keep a slight loop or drape in the reins, holding them at a length where you can close your fingers or move your hand back an inch or two and have light contact.
Tom Thumb bits: Tom Thumbs look like snaffles with shanks, but don’t let this fool you into thinking they’re gentle. The combination of shanks, a jointed mouthpiece, and a chin strap give the Tom Thumb a viselike action that can be very severe. Only experienced riders with gentle hands should consider using Tom Thumbs.
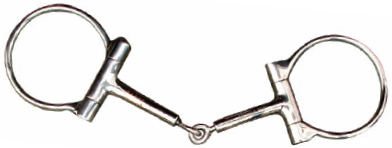
A snaffle is a direct pressure bit.

A Tom Thumb has shanks, making it a leverage bit.

A curb bit, also a leverage bit, has a port mouthpiece and shanks.
Hackamores: Some trail riders choose mechanical hackamores—not to be confused with a traditional hackamore, which features a rawhide noseband sometimes used in the early stages of a western horse’s training. Mechanical hackamores are made with a flat or braided piece of leather that goes over the horse’s nose and attaches to a curb or chin strap (or chain) and long metal shanks. Although you may think they’re a gentler choice than a bit, mechanical hackamores exert pressure on the horse’s nose, poll, and chin and should not be used by beginning riders or those with unsteady hands. As with leverage bits, you should not ride with constant pressure on the reins when using a hackamore.
The bit is the most important part of your bridle, as it will play a major part in communicating with your horse. Before purchasing any bit, you’ll first need to determine what size your horse needs. Bits are measured in inches across, such as 4½ or 5 inches, based on the width of your horse’s mouth. To measure, run a piece of string through your horse’s mouth where the mouthpiece will go, from one outside corner of his lip to the other. Insert the string from the front of his mouth, just as you would a bit, keeping the string taut. Add three-quarters of an inch to the measurement you get. The number you come up with should allow you to buy a bit that is wide enough to not pinch the sides of your horse’s mouth but not so wide that it rattles or wiggles from side to side.

A bit should be adjusted so that you have only one or two “smile lines” at the corner of your horse’s mouth.
In addition to width, how you adjust the bit in the horse’s mouth will influence its effectiveness and your horse’s comfort. Generally, you want one wrinkle or smile line at the corner of your horse’s mouth, where his lips meet the mouthpiece. You don’t want the bit dangling in his mouth (too low) or pinching his lips (too high).
Aside from these bit-fit basics, other factors to consider are your horse’s teeth and his inner mouth. If your horse has problems wearing bits, you’ll want your veterinarian to rule out any health issues with his teeth or mouth (including previous damage to his bars, the area where the bit rests). Next, have your veterinarian or an experienced trainer help you evaluate the inside of your horse’s mouth to determine what shape of bit and mouthpiece may fit him best. Such factors as how large your horse’s tongue is, how shallow or deep his palate (top of his mouth) is, and the amount of space between his top and bottom bars all play into how comfortable a particular bit will be for him. Of course, horses also must be trained to accept the bit and react to pressure as part of their basic training.
After you’ve chosen your bit, you must decide on the best headstall to hold it in place. Western headstalls come in split ear and browband versions. A split-ear headstall features a loop around one or both of the horse’s ears instead of a browband, which goes across the horse’s forehead. Split ear styles generally do not have throatlatches, as browband styles do. A throatlatch goes under your horse’s throat and should be adjusted so you can fit four fingers sideways between the flat, round part of your horse’s cheekbone and the strap. You want your horse to be able to tuck his chin without the throatlatch being too tight, but you don’t want it so loose that it won’t do its job, which is to help secure the headstall.
If you’re using a snaffle, you may want to choose an English headstall, which in addition to a browband and throatlatch features a cavesson—a strap that buckles around your horse’s nose, two to three finger widths below the thin, protruding face bone. You can also ride with a snaffle on a western headstall, but make sure the headstall features a browband, a throatlatch, and a chin strap.
The chin strap on a snaffle should be adjusted loosely, as its only job is to help steady the snaffle and keep it from being pulled through the horse’s mouth in an extreme case. The chin strap has a more important role when used with a curb bit. When adjusting the chin strap on a curb bit, you should only be able to place two fingers held sideways between your horse’s chin and the strap. This will ensure the strap can do its job without being too tight.
Make sure a headstall adjusts to fit your horse’s head without pinching, rubbing, or hanging too loosely. Headstalls come in several sizes, including pony, cob, Arabian, horse, and oversize. A hole punch is always good to have on hand should you need to make additional adjustments.
Halter-bridle combinations are great for trail riders. This type of headstall has a halter built into the bridle. A combination halter-bridle allows you to tie the horse using a halter without carrying one along or changing from bridle to halter. You can also unclip the bit to allow your horse to graze when you stop for a break.
Never tie a horse by the reins. If he gets scared and pulls back with a bit in his mouth, it can cause severe damage to the bars of his mouth.
Most headstalls come in nylon and in leather. Nylon has the advantage of being easy to clean, as you can usually hand wash it or run it through your washing machine’s gentle cycle. Water won’t damage nylon the way it does leather. However, many people prefer the look and feel of leather to that of nylon, and well-kept leather can last many years.
Western reins come in three basic varieties: split, romal, and connected. Split and romal reins are the types used in western rail show classes; the connected or single loop varieties are the type you may see in events such as barrel racing.
Split reins feature two separate reins, one on each side of the bit. If you are riding one-handed, say with your left hand, the right rein would go between your thumb and pointer finger, while the left rein would go between your pointer and middle finger; then the two reins would run together through the palm of your hand where they would dangle on the left side of the horse. Your knuckles should face forward when you ride one-handed.
If you’re riding two-handed with split reins, you would cross the right rein over the left side of your horse’s neck and the left rein over the right side, then pick up the doubled reins, one in each hand. That way, if you drop the reins with one of your hands, you won’t have a single rein hanging down to the ground. Many trail riders choose to tie the ends of their split reins in a knot to prevent one rein from dropping accidentally.

A Hanoverian mare wears an English headstall and a snaffle bit, which work best together because the cavesson around the nose steadies the whole bridle.
Romal reins join together at the top, generally at a metal ring, and a long tail, or romal, attaches to the ring. Romal reins are meant to be used one-handed. If you are holding the reins with your left hand, you would grasp them below the ring where the romal attaches, holding them in a loose fist, with the romal side coming out of the top of your hand, as if you’re holding an ice cream cone in your fist. The tail end, or “romal,” is held in the spare hand, in this case your right hand, on your thigh. Romal reins are not commonly used on trail, but connected or single loop reins are.
Connected western reins are generally one long rein that buckles from one side of the bit to the other. These are handy, as there’s no danger of one rein dropping. One end of the connected rein may have a snap so it can be used as a lead rope. Western connected reins are often adjustable, allowing you to make them longer or shorter depending on your needs. English reins, which buckle in the middle at the horse’s withers, can also be used on trail but do not allow for length adjustment.
As with bridles, you can find reins in nylon and in leather; there are also rubber grip versions. Reins can be thick or thin and vary in length. Choose the size, style, and material that work best for you and your horse.
For general trail riding, training devices—such as tie-downs, draw reins, and martingales—are best left at home. Tie-downs and draw reins have their places in the training pen but not out on trail. Tie-downs are used mainly by speed horses, such as barrel racers, to brace against for fast turns. Don’t try using one to force a horse’s head into position or to keep him from rearing. If your horse has behavioral issues, go back to basics with arena training rather than reaching for a “gadget.” Draw reins are often used to help a horse learn to carry himself in a proper frame but should be used only by experienced hands in the arena. Running martingales, with straps that come up from a horse’s chest and rings to run the reins through, are popular among endurance competitors; however, they aren’t standard equipment for average trail riders and require knowledgeable adjustment and use.
Spurs can help to cue a horse or encourage him to respect your leg, but only if you already have a steady leg. Beginning riders should never use spurs, as they may accidentally jab the horse with the spurs when their legs bounce or move. An experienced rider can use a spur to gently remind a horse if he doesn’t listen to the initial squeeze from the calf. Always accustom your horse to spurs in the arena before using them on trail. Avoid long, sharp spurs on trail, as they could accidentally jam into your horse’s side should he run your leg into a tree or other object.
Additional tack includes saddlebags, seat cushions, safety stirrups, breast collars, cruppers, and leg protection, as well as other equipment.
Saddlebags: Saddlebags come in all shapes and sizes. Some fit behind your seat, others on the front or the horn. Even if you take only short rides, you’ll need at least a small saddle or horn bag for the essentials and possibly a water bottle holder. Insulated bags are available if you choose to pack hot or cold food and beverages.
Seat cushions: If the saddle you purchase doesn’t have a built-in gel or cushioned seat and you plan to take long rides, it’s advisable to purchase an add-on seat cushion. There are gel cushions, as well as sheepskin versions. Some sheepskin covers go all the way down over the western saddle’s fenders (pieces of leather you rest your legs against), while other cover just the seat itself. Additional padding can help prevent you from getting sore and achy on long rides.
Safety stirrups: Safety or specialty stirrups are another add-on to consider. Safety stirrups are designed to release your feet if you fall. With regular stirrups, you can be dragged behind the horse if your foot becomes lodged or stuck during a fall. Safety stirrups are available in a variety of types and styles in western and English versions; however, western safety stirrups are not as common. You can also purchase wider stirrups, padded stirrups, or padded inserts, which may alleviate knee pain.
Breast collars and cruppers: Many trail riders use breast collars (available in nylon and in leather) to help prevent their saddles from slipping back when riding uphill. A breast collar attaches to small metal D-rings on either side of the saddle and runs across the horse’s chest. Some versions also have a strap that goes between the horse’s legs and attaches to the cinch. Choose a breast collar that’s relatively wide for added support and comfort. A breast collar shouldn’t be tight like a cinch or hang down loosely where it will get caught under the point of the horse’s shoulders. A well-fitted breast collar should run just above the horse’s shoulder blades, where it won’t interfere with his movement. Make sure it’s not too high, either, as this could affect your horse’s breathing. The breast collar should lay flat against your horse’s coat all around, without sagging or digging in. Avoid breast collars that run straight across the horse’s chest, as this can restrict his shoulder movement.
If you have a horse with a very round back and withers, you may need a crupper. Cruppers feature a leather or synthetic strap that runs from the back of your saddle and underneath the base of your horse’s tail to prevent the saddle from slipping forward.
Leg protection: Depending on your horse’s needs, you may choose to place protective leg wear on him, such as splint boots, sport boots, or bell boots. If your horse tends to overreach or forge and hit his front heels with his hind feet, bell boots are necessary. Splint boots will be needed if your horse interferes or strikes one front leg with the opposite front hoof. Sport boots can support a horse’s legs, and performance riders often use them, as do many trail riders. Some models have boot covers to keep plants and debris from sticking to them. Avoid riding your horse in wet or dirty boots, as they can cause irritation. Watch out for very sandy soil, as well; sand can get in between the boots and your horse’s leg, causing abrasion.
Safety additions: If you ride during deer-hunting season, you may choose to outfit your horse in bright orange gear, such as a tassel, a halter, a breast collar, or a saddle pad. Although hunters rarely shoot horses accidentally, it has happened. A number of manufacturers sell bright orange tack. Reflective gear is also available if you ride at night, dawn, or dusk.
When it comes to attire, trail riders have a lot more freedom than arena competitors do. To be comfortable and safe while trail riding, however, you will need to put some thought into your wardrobe. Boots with a heel are a must; they keep your feet from sliding too far and possibly becoming lodged in the stirrups. Boots designed for riding—whether they’re western, English, tall, short, lace-up, zip-up, or pull-on—are your best choices. They’ll be the correct size for fitting in stirrups, will have an adequate heel, and will have the right sole. Most riding boots are smooth on the bottom to facilitate easy entry to and exit from the stirrup. However, multipurpose boots, such as those used for stable chores and riding, may have some traction. If you ride in the winter, consider purchasing a second pair of insulated boots.
A wide breast collar stretches across a horse’s upper chest. Adjust breast collar straps carefully so that they don’t cause rubbing.
Although you’ll see some brave trail riders in shorts on a sunny day, rubbing and chafing likely occur when skin meets leather. Jeans are always a great option, especially those with a smooth inner seam for riders. Breeches or riding tights are also good choices. Avoid shirts that are so big, long, or bulky that they could get caught on objects such as passing branches. A well-fitted shirt is your best bet. Specialty fabrics designed to wick, or remove, sweat can help you stay cool and dry in hot weather.
During rainy weather, you’ll want to carry a waterproof jacket or slicker. Those designed for riders often feature vented backs to fit over the saddle’s cantle. You can also purchase lightweight, foldable windbreakers, which can be easily stored in your saddlebag or tied behind your saddle. Gloves are optional, but many trail riders choose soft, well-fitted gloves to protect their hands.
Finally, you’ll need an approved safety helmet. While trail riding may seem like a safe activity, a large percentage of riding accidents occur during leisure or pleasure riding—not while participating in sports such as jumping. Even the best rider on the quietest horse can fall off, and you have little control of external circumstances on the trail. You never know what you’ll encounter, and every horse spooks at something. Wearing a helmet vastly reduces your chances of a serious head injury. Modern helmets are lightweight, affordable, and come in styles especially for trail riders, with features such as longer visors for sun protection. Whatever model you choose, make sure it’s ASTM/SEI approved. (The American Society for Testing and Materials sets safety standards for private industry helmets; the Safety Equipment Institute tests such helmets to ensure that they meet the ASTM standards.) Avoid used helmets that may have been damaged in prior falls and unapproved helmets, which are more for looks than protection.

This rider’s attire—long pants, tucked-in shirt, riding boots, and a riding helmet—provide maximum comfort and safety.
All the choices in tack and attire offer today’s trail rider more options and innovation than ever before. With some careful thought and research, you can find just the right items to keep you and your horse comfortable and safe on trail.

