Top Trails is designed to make identifying the perfect trail easy and enjoyable, and to make every outing a success and a pleasure. With this book you’ll find it’s a snap to find the right trail, whether you’re planning a major hike or just a sociable stroll with friends.
The Region
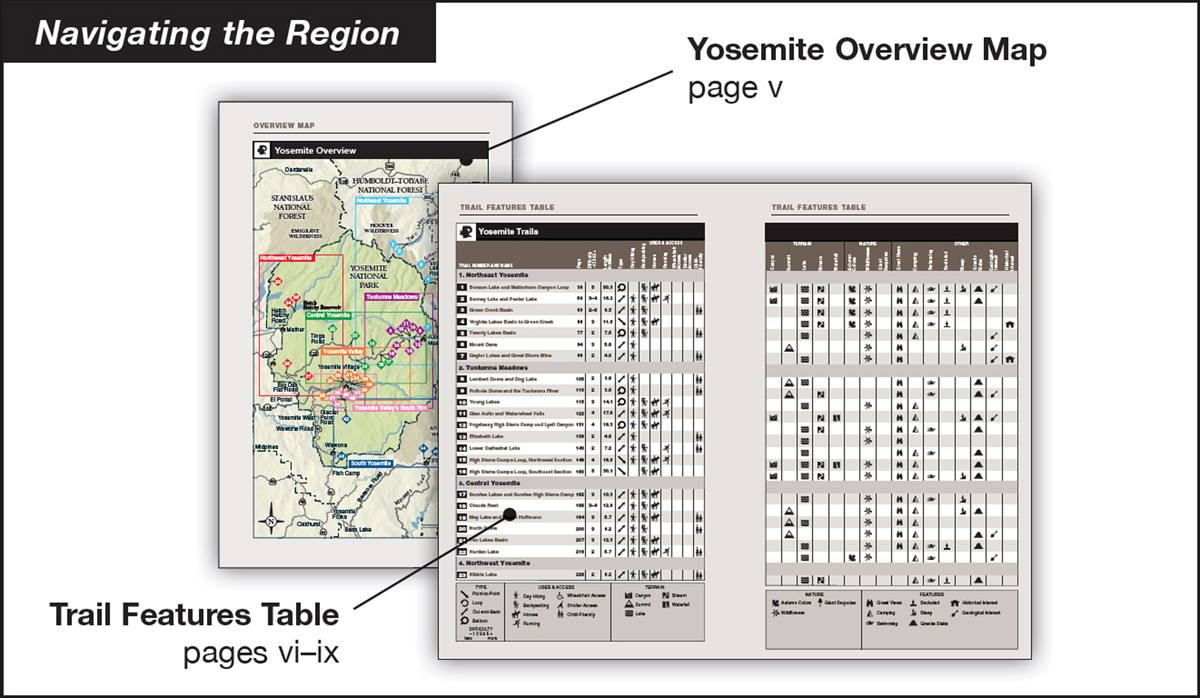
Top Trails begins with the Yosemite overview map, displaying the entire region covered by the guide and providing a geographic overview. The map is clearly marked to show which area is covered by which chapter.
After the overview map comes the trail features table, which is divided by area and lists every trail covered in the guide, along with attributes for each one. A quick reading of the overview map and the trail features table will give you a sense of the highlights afforded by each area within Yosemite National Park.
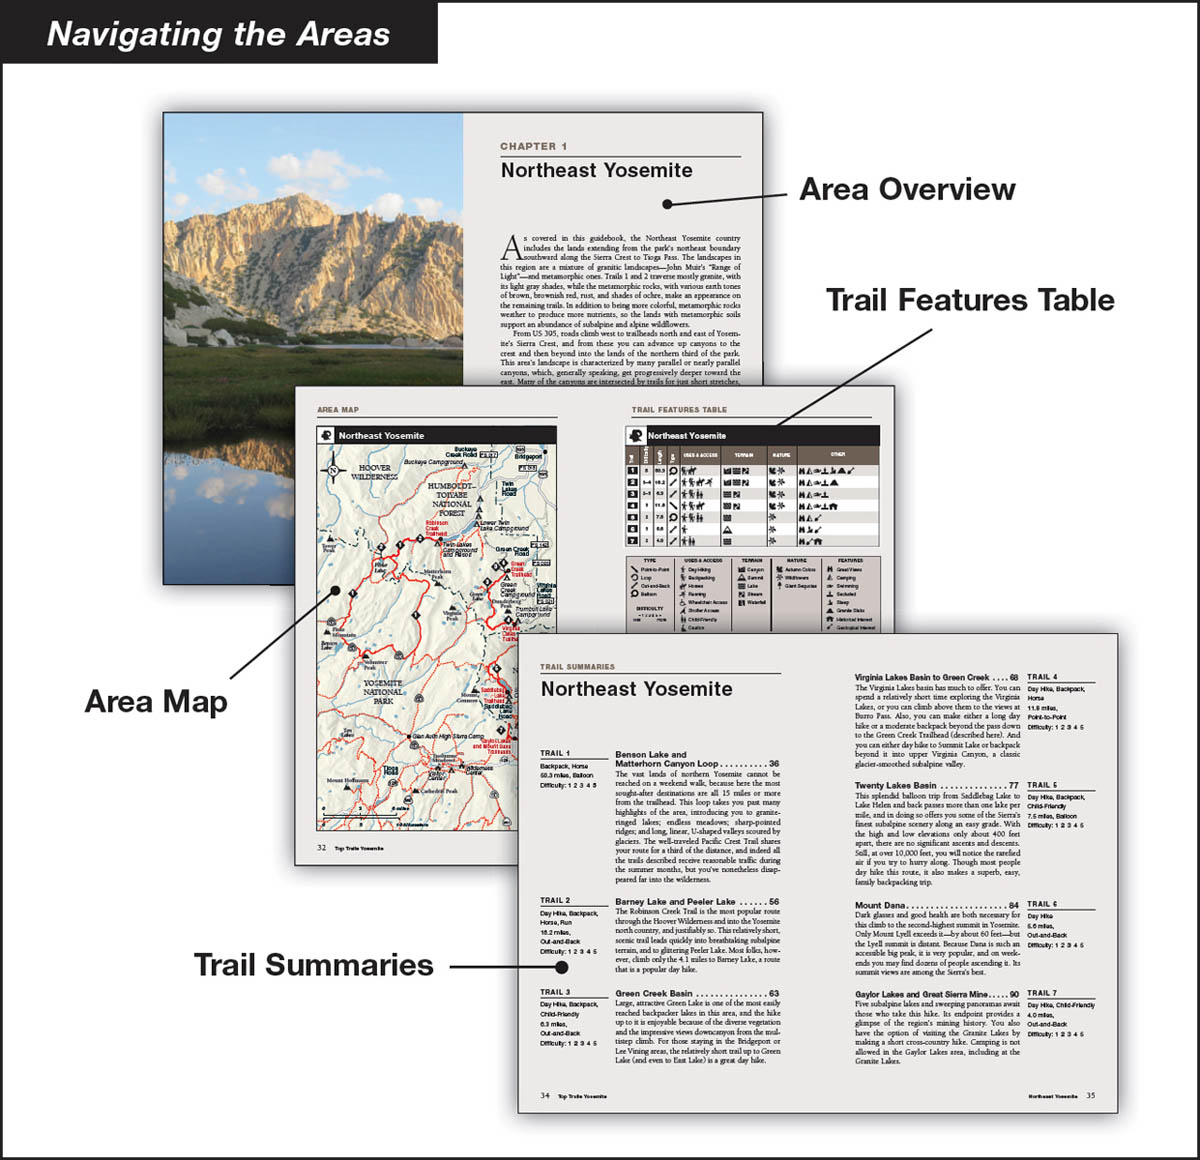
For the purposes of this book, the Yosemite region is divided into seven areas, with each chapter corresponding to one area in the region.
Each area chapter starts with information to help you choose and enjoy a trail well suited to your interests. Use the table of contents or the overview map to identify the area or areas you plan to visit, and then turn to the area chapter to find the following:
• an overview of the area
• an area map with all trailheads clearly marked
• a trail features table providing trail-by-trail details
• trail summaries, written in a lively, accessible style
The Trails
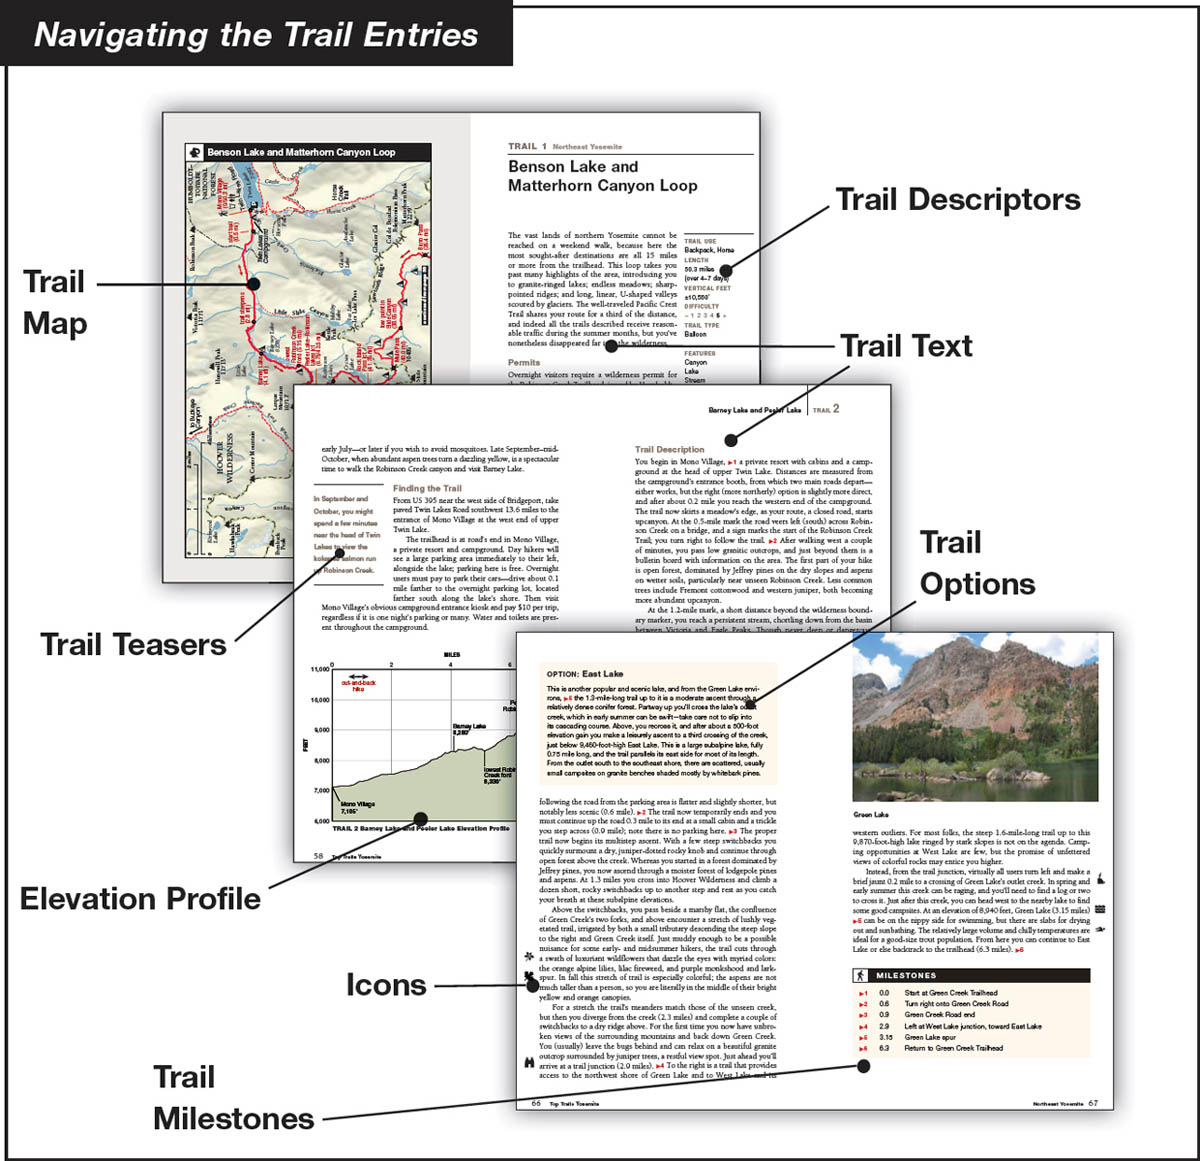
The basic building block of the Top Trails guide is the trail entry. Each one is arranged to make finding and following the trail as simple as possible, with all pertinent information presented in an easy-to-follow format:
• trail descriptors covering difficulty, length, and other essential data
• a written trail description
• trail milestones, providing easy-to-follow, turn-by-turn trail directions
• an elevation profile
Some trail descriptions offer additional information:
• trail options
• trail teasers
In the margins of the trail entries, look for icons that point out notable features at specific points along the trail.
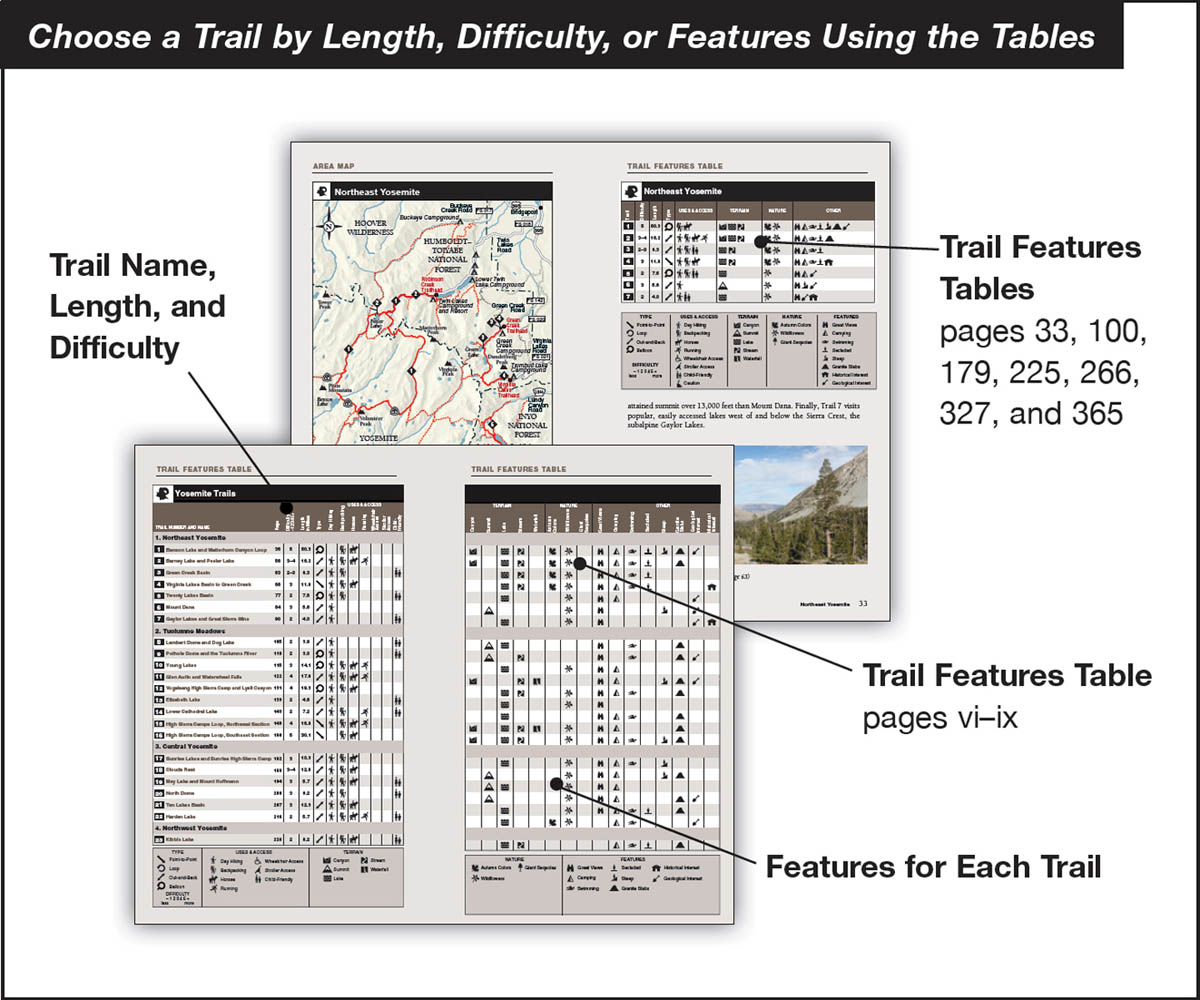
Top Trails provides several different ways of choosing a trail, presented in easy-to-read tables and maps.
If you know in general where you want to go, Top Trails makes it easy to find the right trail in the right place. Each chapter begins with a large-scale map showing the starting point of every described trail in that area.
Features
This guide describes the top trails of Yosemite National Park, and each trail is chosen because it offers one or more features that make it appealing. Using the trail descriptors, summaries, and tables, you can quickly examine all the trails for the features they offer or seek a particular feature among the list of trails.
Author’s note: Every trail described in this book, from the 0.4-mile round-trip to Bridalveil Fall to the 50.3-mile circuit in northern Yosemite, is worth a visit. I did not include the short walks to cater to people who, due to time or circumstance, cannot complete a longer walk. I included them because they are truly beautiful destinations that everyone should visit.
Season and Condition
Time of year and current conditions can be important factors in selecting the best trail. For example, an exposed, low-elevation trail may be a riot of color in early spring but an oven-baked taste of hell in midsummer. Wherever relevant, Top Trails identifies the best times of the day and year for the trails you plan to hike.

Each trail has an overall difficulty rating on a scale of one to five, largely based on total length and total elevation change. Also taken into consideration is elevation, because above 8,000 feet, you are likely to hike more slowly with ever-increasing elevation. Generally, the longer the trail, the more elevation gain and loss. However, some relatively short trails have a lot of elevation change, such as Trail 30 to the top of Upper Yosemite Fall. In contrast, Trail 5 through Twenty Lakes basin is slightly longer but has only about one-third of the elevation gain and loss. Some hikes have more than one destination. In this case, the difficulty rating indicates the difficulty for the full hike as described. If shortened versions or side trip options are described in the text, their ratings are given verbally as part of their description. And of course, some hikes just seem to straddle two difficulty ratings, so both are identified.
The ratings assume you are an able-bodied adult in reasonably good shape, using the trail for hiking. The ratings also assume normal weather conditions—clear and dry.
Readers should make an honest assessment of their own abilities and adjust time estimates accordingly. Also, rain, snow, heat, wind, and poor visibility can all affect the pace on even the easiest of trails.
1. A route usually less than 2 miles, generally level, that can be completed in 1 hour or less. In this book, these are day hikes only.
2. A route of about 2–8 miles, usually with 500–1,500 feet of total elevation gain, that can be completed in 1–6 hours. Many of these are in day-use-only areas, but some make fine family backpacking trips.
3. A route of about 6–12 miles, usually with 1,000–2,500 feet of total elevation gain, that can be completed in 4–10 hours, spread over one to two days.
4. A route of about 12–20 miles, often with more than 2,500 feet of total elevation gain, that most will want to do as a two- to three-day backpack, but some people will choose to complete these hikes in a day.
5. A route longer than 20 miles, with more than 4,500 feet of total elevation gain, that most will want to backpack over two or more days.
Vertical Feet
Every trail description contains the approximate trail length and amount of elevation changes over the course of the trail. It’s important to use all the figures when considering a hike: on average, plan 1 hour for every 2 miles, and add an hour for every 1,000 feet you climb. Formulas vary for extra time requirements for downhill walking. Most people hike a similar speed on flats and downhills excepting particularly steep, rocky downhills or stairs. Elevation change is often underestimated by hikers when looking at a topographic map because they notice the major ascents and tend to ignore the minor ups and downs, which can add up. For example, Trail 25 from O’Shaughnessy Dam east along Hetch Hetchy Reservoir to Rancheria Falls Camp has a net gain of about 700 feet, but because it roller coasters eastward to that camp, you do an extra 1,200 feet of ascending (and descending) in each direction. No wonder a traversing trail that looks like a stroll on a map seems so hard in reality!
The calculation of vertical feet in this Top Trails guide is accomplished by measuring all ups and downs along each route as mapped by the author. For routes that begin and end at the same spot—that is, loops or out-and-backs—the vertical gain exactly matches the vertical descent. With a point-to-point route, the vertical gain and loss will most likely differ because the start and endpoints most likely will be at different elevations.
Note that for simple out-and-back trails, both the one-way elevation gain and loss, that is, hiking in, and the round-trip elevation gain and loss are given. An example of this is Trail 2, Barney Lake and Peeler Lake, with the following numbers: one-way: +2,850', –385'/round-trip: ±3,235'. Hiking up to Peeler Lake, you will climb 2,850 feet and descend 385 feet. Returning to the trailhead, you will descend 2,850 feet and climb 385 feet. Together this leads to a total ascent of 3,235 feet and a total descent of 3,235 feet.
For branching out-and-back trails, the elevation gain and loss are to the farthest destination, including the side trips that are included in the mileages. An example of this is Trail 8, Lembert Dome and Dog Lake, with the following numbers: one-way: +890', –420'/round-trip: ±1,010'. If you visit Lembert Dome en route to Dog Lake, you will first climb a saddle, then climb Lembert Dome, then return to the main trail at the saddle, and finally drop and climb to Dog Lake. The elevation changes for all of this are +890 feet and –420 feet. But when you return, you do so directly, skipping Lembert Dome, and the elevation changes are less, +120 feet and –590 feet. Adding these numbers together gives you the round-trip value, a total gain of 1,010 feet and loss of 1,010 feet.
For loop trails, both the gains and losses continue to accumulate until you arrive back, and only round-trip elevation gain and loss are given. Because you start and end at the same point, the elevation ascent and descent will of course be the same. An example of this is Trail 5, the Twenty Lakes Basin, with the following numbers: round-trip: ±950'.
Likewise, for point-to-point trails, both the gains and losses continue to accumulate until you reach your endpoint, but because it is likely to be a different elevation than your starting point, the vertical gain and loss most likely will differ. An example of this is Trail 4, Virginia Lakes Basin to Green Creek, with the following numbers: one-way: +1,520', –3,370'. What these numbers tell you is that, on this hike, you ascend only about half as much as you descend.
Finally, the trail entries have an elevation profile, an easy means for visualizing the topography of the route. These profiles graphically depict the elevation throughout the length of the trail.