Half Dome
TRAIL USE
Day Hike, Backpack
LENGTH
14.7 miles, 6–12 hours (over 1–3 days)
VERTICAL FEET
One-way: +5,140', –335'
Round-trip: ±5,475'
DIFFICULTY
TRAIL TYPE
Out-and-Back
FEATURES
Canyon
Summit
Stream
Waterfall
Wildflowers
Great Views
Camping
Steep
Granite Slabs
Geological Interest
FACILITIES
Bear Box
Campgrounds
Horse Staging
Lodging
Restrooms
Shuttle Stop
Store
Water
Visitor Center
If I as a first-time visitor were allowed to do only one day hike in the park, I would unquestionably choose this hike—the one that I most associate with Yosemite and on whose summit I’ve sat countless times admiring the surrounding landscape. On a good summer day, 300 hikers attempt this summit, this number dictated by the number of permits made available by the national park, but many turn back, either from exhaustion or from fear. Indeed, Half Dome is not for acrophobes, klutzes, those out of shape, or those who have bad knees. The hike up Half Dome’s shoulder and its cables is exposed and potentially life-threatening, especially when the rock is wet or thunderstorms threaten. Do not attempt to climb the dome’s shoulder and its cables if weather is threatening because the exposed rock becomes very slippery and a lightning strike is possible. Remarkably few people have died on this route—almost all in bad weather—but more fall and are injured. In addition to standard hiking gear, remember to reserve your Half Dome permit and take a pair of gloves with good traction; this makes holding the metal cables much more pleasant—rubber gardening gloves with a sticky grip are excellent.
Most people day hike Half Dome from Yosemite Valley, but some enjoy it as a two- to three-day backpacking trip, spending one to two nights in Little Yosemite Valley. Many a Yosemite backpacker has spent his or her first night in the “wilderness” in Little Yosemite Valley. Indeed, more backpackers camp in it than in any other Yosemite backcountry area. During the summer this area is patrolled by rangers stationed near the backpackers’ camp. If you hike only this far, not continuing to the summit of Half Dome, your route up and down the Mist Trail is 7.8 miles, increasing to 9.3 miles if you follow the John Muir Trail up and down.
Permits
Overnight visitors require a wilderness permit for the Happy Isles to Little Yosemite Valley Trailhead, issued by Yosemite National Park. Both day hike and overnight users require a special permit to climb Half Dome, issued by Yosemite National Park; see for details. Pick up your wilderness permit at the Yosemite Valley Wilderness Center. You will receive your Half Dome day-use permit by email.
Maps
This trail is covered by the Tom Harrison Yosemite Valley map (1:24,000 scale), the National Geographic Trails Illustrated #306 Yosemite SW map (1:40,000 scale), and the USGS 7.5-minute series Half Dome map (1:24,000 scale).
Half Dome’s hiking season is limited to when its cables are in place, which depends a lot on the amount of snowfall and on the presence or absence of stormy weather. Cables may be placed as early as early May or as late as mid-June, and they may be removed anytime in October—typically the park accepts permit requests from Memorial Day weekend until about mid-October, but having a permit does not guarantee the cables will be up. An early start is recommended so you can complete the steep climb from Yosemite Valley with cooler temperatures, and there is less of a chance of a thunderstorm if you summit before 2 p.m. And of course, starting early is a good idea because most people won’t be quite sure how long it will take them to ascend to the summit.
World-class climbers can climb the face of Half Dome in about the same time that the average hiker takes to reach the summit by trail.
Finding the Trail
The trailhead is located at Happy Isles, Yosemite Valley shuttle stop 16, along Happy Isles Loop Road. Because this road is closed to vehicular traffic, except the shuttle buses, take the shuttle bus to reach the trailhead. Note that for those staying in Upper Pines Campground, it is more efficient to walk to this trailhead than to take the shuttle—just cut through the campground to Happy Isles Loop Road. Those staying at Lower Pines and North Pines Campgrounds should walk the short distance to shuttle stop 15 to avoid a long shuttle ride back via Half Dome Village (Curry Village). Other day hikers can park their cars in either the Half Dome Village parking area or the large day-use parking area near Yosemite Village. Overnight hikers must park their cars at the backpackers’ parking area, located a short distance east along Happy Isles Loop Road. From the parking area it is a 0.4-mile walk to the Happy Isles shuttle stop. There are water faucets and toilets at the shuttle stop and just beyond the Vernal Fall bridge, 1 mile into your hike.
Trail Description
From the shuttle stop ▶1 you walk briefly east across a bridge and head south, soon reaching a large wooden sign proclaiming the start of the famous John Muir Trail (JMT) (0.25 mile), which heads about 210 miles southward to the summit of Mount Whitney. After a few minutes walking along the paved track, you reach a small spring-fed cistern, beyond which the climb south steepens. Just before bending east, note the decimated forest at the base of Glacier Point Apron, the aftermath of a massive rockslide in July 1996. The deposit of boulders lies close to the cliff wall, and beyond is a ring of trees, toppled by the air blast that accompanied the slide—the giant, largely intact rock slabs were tumbling at an astonishing 270 miles per hour by the time they reached the valley floor. If you look at the apron, you see a series of oblique-angle cliffs—all of them remarkably similar in orientation because they’ve fractured along the same series of joint planes time and again across geologic history. At the canyon’s south end, Illilouette Fall plunges 370 feet over a vertical, also joint-controlled cliff.


Climbing east, you head up a canyon whose floor in times past was buried by as much as 1,800 feet of glacier ice. Hiking beneath the unstable, highly fractured south wall of Sierra Point, you cross a talus slope—an accumulation of rockfall boulders that is likely to continue growing over time. Entering forest shade once more, you ascend a steep stretch of trail before making a quick drop to the Vernal Fall bridge (1.0 mile). ▶2 From it you see Vernal Fall, a broad curtain of water plunging 320 feet over a vertical cliff before cascading toward you. Looming above the fall are two glacier-resistant masses, Mount Broderick (left) and Liberty Cap (right). Just beyond the bridge are restrooms, a drinking fountain (including a tap for bottles), and an emergency phone.

Climbing under forest cover alongside the river, you soon reach a junction where the Mist Trail continues upriver (left), your route, while the JMT starts a switchbacking ascent to the right (1.2 miles). ▶3 The JMT is the route taken by hikers not keen on the steep steps that comprise the Mist Trail, as well as those with horses or other pack stock; the two routes reintersect at the top of Nevada Fall. Dressed for the upcoming mist, which can really soak you in May or June, start up the Mist Trail, and soon, rounding a bend, receive your first spray as you’re crossing steep rocky slabs; be courteous and safe as you pass people here. If you’re climbing this trail on a sunny day, you may see one, if not two, rainbows come alive in the fall’s spray. The spray increases as you advance up the tall, steep steps toward the fall, with just a brief respite as the trail ducks beneath a large boulder.

Beyond it, complete 300-plus steps, most of them wet, guiding you up through a verdant, spray-drenched garden into a forested gully. The stairs through this passage have been recently reengineered, but they are still steep and tall—work your way up slowly. Then, reaching an alcove beneath an ominous overhang, you scurry left up a last set of stairs. These, protected by a railing, guide one to the top of a vertical cliff. Pausing here you can study your route, the nearby fall, and the river gorge. The railing leads to the brink of Vernal Fall, where peering over, you stare down at the pulsing mass of water. Unfortunately, people venture beyond it and sometimes are swept over the fall; I am fond of the analogies comparing the river’s edge to a cliff face, because both are equally dangerous. At high flow the risk is more obvious, but even when dry the rock is so smooth that people have lost their footing and fallen into the current. Just above it is Emerald Pool, and due to its treacherous current, wading and swimming are forbidden.

Plunging into the upper end of chilly Emerald Pool is churning Silver Apron, and a bridge spanning its narrow gorge is your immediate goal. The trail is a little vague in this area due to use paths, but the correct route leaves the river near the pool’s far (east) end and climbs south (right); outhouses are visible in the forest to the right. Ascending a few tight switchbacks, the trail soon angles east across slabs to a somewhat indistinct junction (1.75 miles). ▶4 From it a view-blessed trail climbs to Clark Point, where it meets the JMT, a possible return route. For now, curve left and traverse across slabs decorated by succulent, yellow stonecrops in spring, and then cross the Silver Apron bridge. Beyond it you have a short, moderate climb to a broad bench.
In an open flat, you will see a collection of use trails heading right toward the river. Follow these just 50 steps for a better view of Nevada Fall than is afforded along the trail. Spurred onward by the sight and sound of plummeting Nevada Fall, you climb eastward, first under forest cover, but soon commence a series of more than two dozen short switchbacks, well decorated with wildflowers in early summer. Near the top, Nevada Fall slips out of view and your attention can focus on the vertical walls of towering Liberty Cap that rise directly beside you. The climb ends at the top of a joint-controlled gully, where, on brushy slopes, you once again meet the JMT and turn left (2.8 miles). ▶5 Outhouses are just a few steps up the trail.

OPTION: Nevada Fall Viewpoint
From the top of the Mist Trail ▶5, you can detour right along the John Muir Trail (where you otherwise head left) to a vista down Nevada Fall—I suspect that this will appeal only to people hiking Half Dome as a multi-day excursion. Climbing briefly, you rapidly emerge on slabs and see a sturdy bridge ahead. Just before reaching the bridge, you can strike northwest to find a short spur trail that drops to a viewpoint beside the fall’s brink. The descent to the railing is quite cryptic—the rock is too steep to descend until you are about 50 steps north of the falls.
From this junction you climb a rocky slope that is densely lined with scrubby huckleberry oaks, narrowing to a gully near its top. Beyond, you quickly descend into forest cover and reach the banks of the Merced River, here broad, deep, and calm enough for a brief swim on your return. Beneath lodgepole and Jeffrey pines, white firs, and incense cedars, you continue northeast along the river’s azalea-lined bank, then quickly encounter a trail fork (3.45 miles). ▶6
Those bound for Half Dome generally take the left fork after first obtaining enough water from the Merced River, your last reliable source. This trail traverses sandy slopes a little inland from the river, soon reaching a junction north of the backpackers’ camp (3.9 miles). ▶7 If you are camping in Little Yosemite Valley, the right fork at ▶6 is the marginally shorter option, continuing nearly dead flat, mostly under conifer cover close to the river’s shore.

From the junction north of the backpackers’ camp, you’ve not yet expended half the energy required to reach Half Dome’s summit, though you have covered half the distance. The trail continues a mostly forested ascent, with the ground bare save a few cryptic orchid species. You continue left, toward Half Dome, at a junction where the JMT bends to the right (5.3 miles). ▶8 The trail bends west just before reaching a saddle, with filtered views north across Tenaya Canyon. Small, flat areas near here make a nice high campsite if you’re game to carry enough water for the night from the Merced River. Much of the year, a nearby spring (shown on the map) provides water but isn’t to be trusted in late summer or drought years. With increasing elevation, you’ve passed an important ecological transition and are now leaving the lower montane zone for the upper montane zone, the domain of red firs and Jeffrey pines instead of white firs and incense cedars. Half Dome’s northeast face comes into view before the trail tops a crest, and soon you also have views backward to Clouds Rest and its satellites, the Quarter Domes. Between them and you, glaciers once spilled into Tenaya Canyon, but the shoulder of Half Dome, west of and above you, never was glaciated. Those on horseback need to end here, if not a bit sooner, under forest cover. On this ridge are the last possible campsites, ideal for those seeking a particularly early-morning or late-evening view from Half Dome—once again, you have had to carry all your water from Little Yosemite Valley.
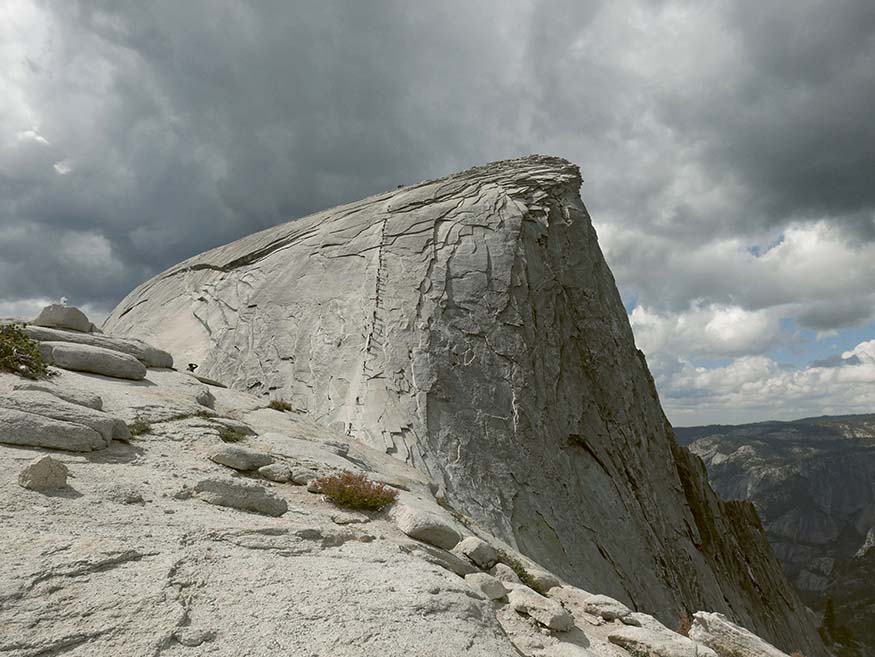
Approaching the top of the subdome, with Half Dome’s cables behind
This flat, relaxing traverse ends all too soon at the base of Half Dome’s intimidating shoulder (6.8 miles). ▶9 Beyond here a permit is required for all people, and rangers indeed patrol throughout the day. This is also where you must stop—for your safety—if thunderstorms threaten or the rock is wet. Almost two dozen very short switchbacks guide you up the view-blessed ridge of the dome’s shoulder. For too long the real danger on this steep section was loose gravel, making it far too easy to lose your footing, but now carefully constructed switchbacks make it safer. Topping the shoulder, you are confronted with the dome’s intimidating pair of cables, which definitely cause some hikers to retreat (7.2 miles). ▶10 If you stare up the cables and decide this is not for you, feel comfortable in your decision and spend a delightful hour basking in the sun on the shoulder, watching the antlike line of people work their way up and down the cables and deciding, quite accurately, that you have already completed a good, tough hike to an excellent viewpoint.

The ascent starts out gently enough, but it too quickly steepens almost to a 45-degree angle. On this stretch, first-timers often slow to a snail’s pace, clenching both cables with sweaty hands—hands hopefully ensconced in gloves with a good grip. Looking down, you can see that you don’t want to fall. Remember that even when thunderstorms are miles away, static electricity can build up here. If your hair starts standing on end, beat a hasty retreat. Assuming it is a bright sunny day, more frightening to me is the continual jockeying of people trying to pass or overtake each other, necessitating holding on to just one of the cables. This is best done courteously and where boards are laid between the cables in front of periodic posts. For me, one of the biggest advantages of a very early start for a day hike or night spent in Little Yosemite Valley is the ability to climb the cables before the crowds arrive.
The rarefied air certainly hinders your progress as you ascend, but eventually an easing gradient gives new incentive, and soon you are scrambling up to the broad summit of Half Dome, an area about the size of 17 football fields (7.35 miles). ▶11 Most hikers proceed to the dome’s high point (8,836'), located at the north end, from where they can cautiously view the dome’s overhanging northwest point. Stouthearted souls peer over the lip of this point for an adrenaline-charged view down the dome’s 2,000-foot-high northwest face, perhaps seeing climbers ascending it. Folks once liked camping on the summit to view the sunrise, but camping here was banned decades ago.
From the broad summit of this monolith, which began to form in the late days of the dinosaurs, you have a 360-degree panorama. You can look down Yosemite Valley to the bald brow of El Capitan and up Tenaya Canyon past Clouds Rest to Cathedral Peak, the Sierra Crest, and Mount Hoffmann. Mount Starr King—a dome that rises only 250 feet above you—dominates the Illilouette Creek basin to the south, while the Clark Range cuts the sky to the southeast. Looking due east across Moraine Dome’s summit, you see Mount Florence, whose broad form hides the park’s highest peak, Mount Lyell, behind it. In this direction you will also see the forest charred in the 2014 Meadow Fire. Though your route has not passed through burned forest, smoke and fear of the fire spreading necessitated helicopter rescues of hikers atop Half Dome’s summit one day. Much as your knees desire a helicopter today, to return you must now retrace your steps down to Happy Isles (14.7 miles). ▶12


Once you are at the top of Nevada Fall, there are alternative routes down. None reduce the total elevation descent, but they provide different views. Following the JMT all the way to the Vernal Fall bridge adds 0.75 mile to your return distance; this trail is more gradual than the Mist Trail and slightly easier on your knees, but my feet tend to hurt after pounding down the cobbled switchbacks that dominate the final mile of this route. It is described as the route for Merced Lake, Trail 35. Continuing along the JMT to the Clark Point vista and then cutting back to the Mist Trail for the descent past Vernal Fall also adds 0.75 mile. This route is outlined in the description of Trail 33.
| ||
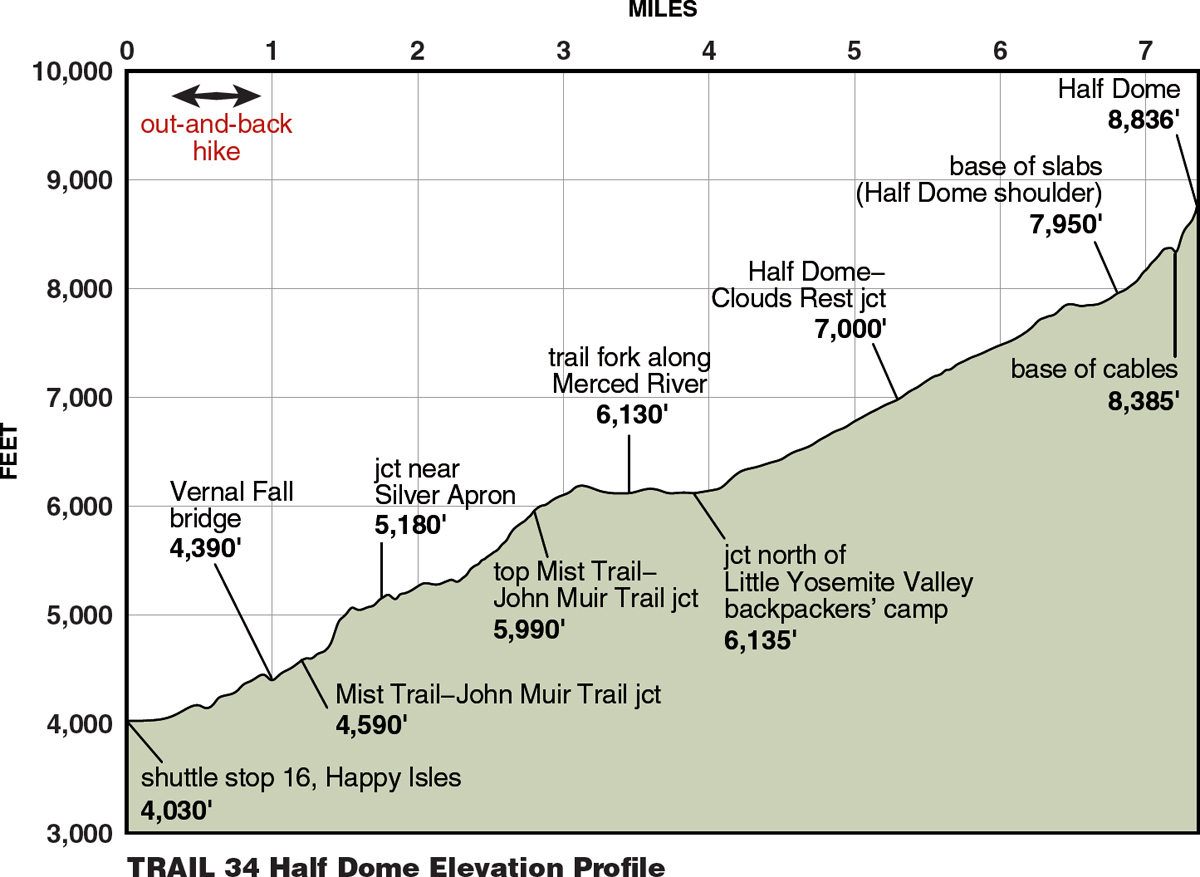
▶1 | 0.0 | Start at shuttle stop 16, Happy Isles |
▶2 | 1.0 | Vernal Fall bridge |
▶3 | 1.2 | Straight onto Mist Trail at the Mist Trail–John Muir Trail junction |
▶4 | 1.75 | Left at junction near the Silver Apron |
▶5 | 2.8 | Left onto John Muir Trail at top of Mist Trail |
▶6 | 3.45 | Left at trail fork along Merced River |
▶7 | 3.9 | Left at junction north of Little Yosemite Valley backpackers’ camp |
▶8 | 5.3 | Left at Half Dome–Clouds Rest junction |
▶9 | 6.8 | Base of slabs (Half Dome shoulder) |
▶10 | 7.2 | Base of cables |
▶11 | 7.35 | Summit of Half Dome |
▶12 | 14.7 | Return to shuttle stop 16, Happy Isles |
 MILESTONES