In 1998, the Swiss company Sen:te developed OCUnit, a testing framework for Objective-C (hence, the OC prefix). OCUnit was a port of SUnit, a testing framework that Kent Beck had written for Smalltalk in 1994.
With Xcode 2.1, Apple added OCUnit to Xcode. One reason for this step was that they used it to develop Core Data at the same time that they developed Tiger, the OS with which Core Data was shipped. Bill Bumgarner, an Apple engineer, wrote this later in a blog post:
"Core Data 1.0 is not perfect, but it is a rock solid product that I'm damned proud of. The quality and performance achieved could not have been done without the use of unit testing. Furthermore, we were able to perform highly disruptive operations to the codebase very late in the development cycle. The end result was a vast increase in performance, a much cleaner codebase, and rock solid release."
Apple realized how valuable unit tests can be when developing complex systems in a changing environment. They wanted third-party developers to benefit from unit tests as well. OCUnit could be (and has been) added to Xcode by hand before version 2.1. But by including it into the IDE, the investment in time that was needed to start unit testing was reduced a lot, and as a result, more people started to write tests.
In 2008, OCUnit was integrated into the iPhone SDK 2.2 to allow unit testing of iPhone apps.
Finally, in 2013, unit testing became a first class citizen in Xcode 5 with the introduction of XCTest. With XCTest, Apple added specific user interface elements to Xcode that helped with testing, which allowed running specific tests, finding failing tests quickly, and getting an overview of all the tests. We will go over the testing user interface in Xcode later in this chapter. But, first, we will take a look at TDD using Xcode in action.
For this TDD example, we are going to use the same project we created at the beginning of this chapter. Open the FirstDemo project in Xcode, and run the tests by hitting command + U. The one existing test should pass.
Let's say we are building an app for a blogging platform. When writing a new post, the user puts in a headline for the post. All the words in the headline should start with an uppercase letter.
To start the TDD workflow, we need a failing test. The following questions need to be considered when writing the test:
- Precondition: What is the state of the system before we invoke the method?
- Invocation: How should the signature of the method look? What are the input parameters (if any) of the method?
- Assertion: What is the expected result of the method invocation?
For the example of our blogging app, here are some possible answers to these questions:
- Precondition: None.
- Invocation: The method should take a string and returns a string. The name could be
makeHeadline. - Assertion: The resulting string should be the same, but all the words should start with an uppercase letter.
This is enough to get us started. Enter the Red step.
Open FirstDemoTests.swift, and add the following code to the FirstDemoTests class:
func test_MakeHeadline_ReturnsStringWithEachWordStartCapital() {
  let viewController = ViewController()


  let string = "this is A test headline"


  let headline = viewController.makeHeadline(from: string)
}
This isn't a complete test method yet because we aren't really testing anything. The assertion is missing. But we have to stop writing the test at this point because the compiler complains that Value of type 'ViewController' has no member 'makeHeadline'.
Following the TDD workflow, we need to add code until the compiler stops printing errors. Remember that code does not compile within a test means the test is failing. And a failing test means we need to write code until the test does not fail anymore:
Open ViewController.swift, and add the following method to the ViewController class:
func makeHeadline(from string: String) {

}
The error still remains. The reason for this is that we need to compile to make the test target aware of this change. Run the tests to check whether this change is enough to make the test green again. We get a warning that the headline constant isn't used, and we should change it to _. So, let's use it. Add the following assert function at the end of the test:
XCTAssertEqual(headline, "This Is A Test Headline")
This results in another compiler error:
Cannot invoke 'XCTAssertEqual' with an argument list of type '((), String)'
The reason for this error is that the makeHeadline(from:) method at the moment returns Void or (). But XCTAssertEqual can only be used if both expressions are of the same type. This makes sense as two expressions of different types can't be equal to each other.
Go back to ViewController, and change makeHeadline(from:) to this:
func makeHeadline(from string: String) -> String {
  return ""
}
Now, the method returns an empty string. This should be enough to make the test compile. Run the test. The test fails. But this time, it's not because the code we've written does not compile, but due to the failed assertion instead. This is not a surprise because an empty string isn't equal to "This Is A Test Headline". Following the TDD workflow, we need to go back to the implementation and add the simplest code that makes the test pass.
In ViewController, change makeHeadline(from:) to read as this:
func makeHeadline(from string: String) -> String {
  return "This Is A Test Headline"
}
This code is stupid and wrong, but it is the simplest code that makes the test pass. Run the tests to make sure that this is actually the case.
Even though the code we just wrote is useless for the feature we are trying to implement, it still has value for us, the developers. It tells us that we need another test.
Before writing more tests, we need to refactor the existing ones. In the production code, there is nothing to refactor. This code couldn't be simpler or more elegant. In the test case, we now have two test methods. Both start by creating an instance of ViewController. This is a repetition of code and a good candidate for refactoring.
Add the following property at the beginning of the FirstDemoTests class:
var viewController: ViewController!
Remember that the setUp() method is called before each test is executed. So, it is the perfect place to initialize the viewController property:
override func setUp() {
  super.setUp()
  viewController = ViewController()
}
Now, we can remove this let viewController = ViewController() line of code from each test.
As mentioned in the preceding section, we need another test because the production code we have written to make the previous test pass only works for one specific headline. But the feature we want to implement has to work for all possible headlines. Add the following test to FirstDemoTests:
func test_MakeHeadline_ReturnsStringWithEachWordStartCapital2() {
  let string = "Here is another Example"


  let headline = viewController.makeHeadline(from: string)


  XCTAssertEqual(headline, "Here Is Another Example")
}
Run the test. This new test obviously fails. Let's make the tests green.
Open ViewController.swift, and replace the implementation of makeHeadline(from:) with the following lines of code:
func makeHeadline(from string: String) -> String {
  let words = string.components(separatedBy: " ")


  var headline = ""
  for var word in words {
    let firstCharacter = word.remove(at: word.startIndex)
    headline += "\(String(firstCharacter).uppercased())\(word) "
  }

  headline.remove(at: headline.index(before: headline.endIndex))
  return headline
}
Let's go through this implementation step by step:
- Split the string into words.
- Iterate over the words, and remove the first character and change it to uppercase. Add the changed character to the beginning of the word. Add this word with a trailing space to the headline string.
- Remove the last space and return the string.
Run the tests. All the tests pass. The next thing to perform in the TDD workflow is refactoring.
Look at the two tests you have for this feature. They are hard to read. The relevant information for the tests is kind of unstructured. We are going to clean it up.
Replace the two tests with the following code:
func test_MakeHeadline_ReturnsStringWithEachWordStartCapital() {
  let input           = "this is A test headline"
  let expectedOutput  = "This Is A Test Headline"


  let headline = viewController.makeHeadline(from: input)


  XCTAssertEqual(headline, expectedOutput)
}

func test_MakeHeadline_ReturnsStringWithEachWordStartCapital2() {
  let input           = "Here is another Example"
  let expectedOutput  = "Here Is Another Example"


  let headline = viewController.makeHeadline(from: input)


  XCTAssertEqual(headline, expectedOutput)
}
Now, the tests are easy to read and understand. They follow a logical structure: precondition, invocation, and assertion.
Run the tests. All the tests should still pass. But how do we know whether the tests still test the same thing as they did earlier? In most cases, the changes we'll make while refactoring the tests don't need to be tested themselves. But, sometimes (such as in this case), it is good to make sure that the tests still work. This means that we need a failing test again. Go to makeHeadline(from:) and comment out (by adding // at the beginning) the line:
headline.remove(at: headline.index(before: headline.endIndex))
Run the tests again. Eureka! Both tests fail.
Remove the comment symbols again to make the test pass again. Now, we need to refactor the implementation code. The implementation we have right now looks like it was translated from Objective-C to Swift (if you haven't used Objective-C yet, you have to trust me on this). But Swift is different and has many concepts that make it possible to write less code that is easier to read. Let's make the implementation more swiftly. Replace makeHeadline(from:) with the following code:
func makeHeadline(from string: String) -> String {
  let words = string.components(separatedBy: " ")


  let headlineWords = words.map { (word) -> String in
    var mutableWord = word
    let first = mutableWord.remove(at: mutableWord.startIndex)

    return String(first).uppercased() + mutableWord
    }


  return headlineWords.joined(separator: " ")
}
In this implementation, we use the function map to iterate the words array and return another array containing the same words but starting with uppercase letters. The result is then transformed into a string by joining the words using a space as the separator.
Run the tests again to make sure we didn't break anything with the refactoring. All the tests should still pass.
In this section, we have added a feature to our project using the TDD workflow. We started with a failing test. We made the test pass. And, finally, we refactored the code to be clean. The steps you have seen here seem so simple and stupid that you may think that you could skip some of the tests and still be good. But then, it's not TDD anymore. The beauty of TDD is that the steps are so easy that you do not have to think about them. You just have to remember what the next step is.
Because the steps and the rules are so easy, you don't have to waste your brainpower thinking about what the steps actually mean. The only thing you have to remember is red, green, and refactor. As a result, you can concentrate on the difficult part: writing tests, making them pass, and improving code.
With Xcode 5 and the introduction of XCTest, unit testing became tightly integrated into Xcode. Apple added many UI elements to navigate to tests, run specific tests, and find information about failing tests. One key element here is the Test Navigator.
To open the Test Navigator, click on the diamond with a minus sign (-) in the navigator panel:
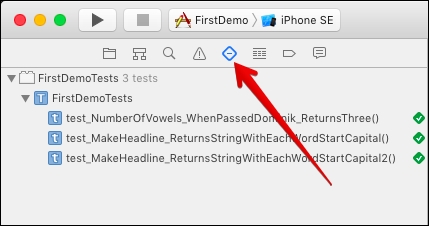
The Test Navigator shows all the tests. In the preceding screenshot, you can see the test navigator for our demo project. In the project, there is one test target. For complex apps, it can be useful to have more than one test target, but this is beyond the scope of this book. The number of tests is shown right behind the name of the test target. In our case, there are three tests in the target.
The demo project has only one test case with three tests.
At the bottom of the navigator is a filter control with which you can filter the shown tests. As soon as you start typing, the shown tests are filtered using fuzzy matching. There's a button in the control showing a diamond with an x:
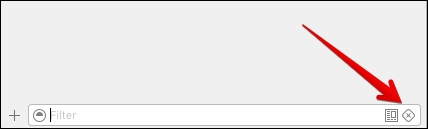
If this button is clicked on, only the failing tests are shown in the list.
Xcode also has a test overview where all the results of the tests are collected in one place. To open it, select the Result Navigator in the navigator panel, and select the last test in the list:
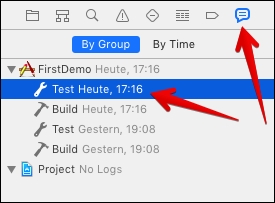
You can also select other tests in the list if you want to compare test runs with each other. In the editor on the right-hand side, an overview of all the tests from the selected test run is shown:
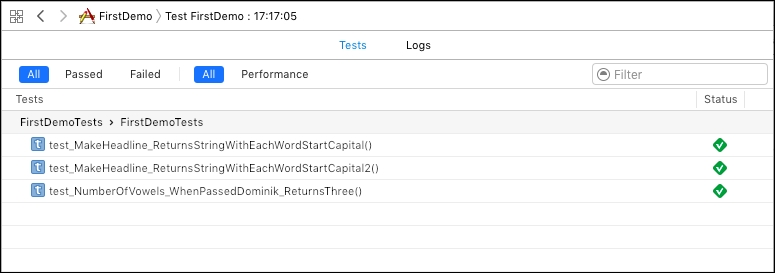
When you hover over one of the tests with the mouse pointer, a circle with an arrow to the right appears. If you click on the arrow, Xcode opens the test in the editor.
In the overview, there is also the Logs tab. It shows all the tests in a tree-like structure. Here is an example of what this looks like for one passing and two failing tests:
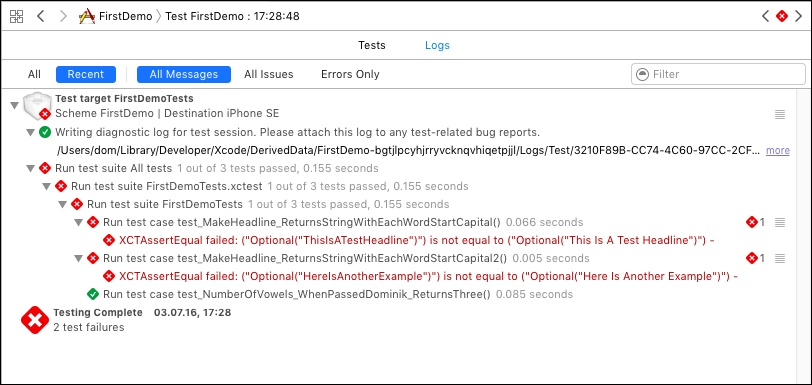
The logs show the test cases (in this example, one test case) and the tests within the test cases (in this example, two failing and one passing test). And in addition to this, the time each test case and even each test needs to execute.
In TDD, it is important for the tests to execute quickly. You want to be able to execute the whole test suite in less than a second. Otherwise, the whole workflow is dominated by test execution and testing can distract your focus and concentration. You should never be tempted to switch to another application (such as Safari) because the tests will take half a minute.
If you notice that the test suite takes too long to be practical, open the logs and search for the tests that slow down testing, and try to make the tests faster.
Xcode provides many different ways to execute tests. You have already seen two ways to execute all the tests in the test suite—go to the Project | Test menu item and use the command + U keyboard shortcut.
In TDD, you normally want to run all the tests as often as possible. Running the tests gives you confidence that the code does what you intended when you wrote the tests. In addition to this, you want immediate feedback (that is, a failing test) whenever new code breaks a seemingly unrelated feature. Immediate feedback means that your memory of the changes that broke the feature is fresh, and the fix is made quickly.
Nevertheless, sometimes, you need to run one specific test, but don't let it become a habit.
To run one specific test, you can click on the diamond visible next to the test method:
When you click on it, the production code is compiled and launched in the simulator or on the device, and the test is executed.
There is another way to execute exactly one specific test. When you open the Test Navigator and hover over one test, a circle with a play icon is shown next to the test method name:

Again, if you click on this test, it is run exclusively.
The test framework identifies tests by the prefix of the method name. If you want to run all tests but one, remove the test prefix from the beginning of this test method name.
In the same way as running one specific test, you can run all the tests of a specific test case. Click on the diamond next to the definition of the test case, or click on the Play button that appears when you hover over the test case name in the Test Navigator.
You can choose to run a group of tests by editing the build scheme. To edit the build scheme, click on Scheme in the toolbar in Xcode, and then click on Edit Scheme...:
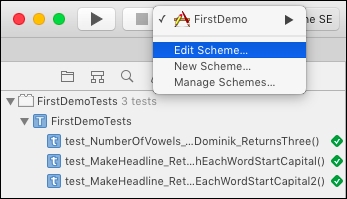
Then, select Test, and expand the test suite by clicking on the small triangle. On the right-hand side, there is a column called Test:

The selected scheme only runs the tests that are checked. By default, all the tests are checked, but you can uncheck some tests if you need to. But don't forget to check all the tests again when you are finished.
As an alternative, you can add a build scheme for a group of tests that you want to run regularly without running all tests.
But as mentioned earlier, you should run the complete test suite as often as possible.
We have already seen the setUp() and tearDown() instance methods earlier in this chapter. The code in the setUp()instance method is run before each test invocation. In our example, we used setUp() to initialize the View Controller that we wanted to test. As it was run before each test invocation, each test used its own instance of ViewController. The changes we made to this particular instance in one test didn't affect the other test. The tests executed independently of each other.
The tearDown()instance method is run after each test invocation. Use tearDown() to perform the necessary cleanup.
In addition to the instance methods, there are also the setUp() and tearDown()class methods. These are run before and after all the tests of a test case, respectively.
Sometimes, but usually rarely, you may need to debug your tests. As with normal code, you can set breakpoints in test code. The debugger then stops the execution of the code at a breakpoint. You can also set breakpoints in the code that will be tested to check whether you have missed something or whether the code you'd like to test is actually executed.
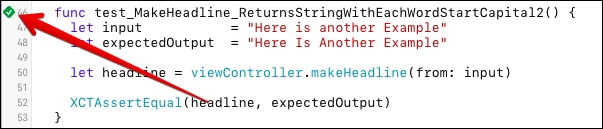
To get a feeling of how this works, let's add an error to a test in the preceding example and debug it. Open FirstDemoTests.swift, and replace the test_MakeHeadline_ReturnsStringWithEachWordStartCapital2() test method with this code:
func test_MakeHeadline_ReturnsStringWithEachWordStartCapital2() {
  let input           = "Here is another Example"
  let expectedOutput  = "Here iS Another Example"


  let headline = viewController.makeHeadline(from: input)


  XCTAssertEqual(headline, expectedOutput)
}
Have you seen the error that we have introduced? The value of the string expectedOutput has a typo. The letter s in iS is an uppercase letter, and the letter i is a lowercase letter. Run the tests. The test fails and Xcode tells you what the problem is. But for the sake of this exercise, let's set a breakpoint in the line with the XCTAssertEqual() function. Click on the area on the left-hand side of the line where you want to set a breakpoint. You have to click on the area next to the red diamond. As a result, your editor will look similar to what is shown here:
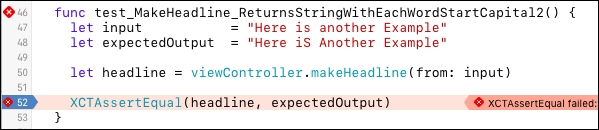
Run the tests again. The execution of the tests stops at the breakpoint. Open the debug console if it is not already open (go to View | Debug Area | Activate Console). In the console, some test output is visible. The last line starts with (lldb) and a blinking cursor. Put in po expectedOutput and hit return. The term po in the code indicates the print object. The console prints the value of expectedOutput:
(lldb) po expectedOutput
"Here iS Another Example"
Now, print the value of the result:
(lldb) po headline
"Here Is Another Example"
So, with the help of the debugger, you can find out what is happening.
For now, keep the typo in expectedOutput as it is, but remove the breakpoint by dragging it with the mouse from the area to the left of the editor.
Xcode has a built-in breakpoint on test failures. When this breakpoint is set, the execution of the tests is stopped, and a debug session is started whenever a test fails.
Usually, this is not what you want in TDD because failing tests are normal in TDD, and you don't need a debugger to find out what's going on. You explicitly wrote the test to fail at the beginning of the TDD workflow cycle.
But in case you need to debug one or more failing tests, it's good to know how this breakpoint is activated. Open the Debug Navigator:
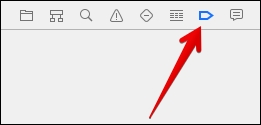
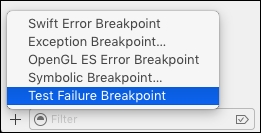
At the bottom of the navigator view is a button with a plus sign (+). Click on it, and select Test Failure Breakpoint:
As the name suggests, this breakpoint stops the execution of the tests whenever a test fails. We still have a failing test in our example. Run the tests to see the breakpoint in action.
The debugger stops at the line with the assertion because the tests fail. Like in the preceding example, you get a debug session so that you can put in LLDB commands to find out why the test failed.
Remove the breakpoint again because it's not very practical while performing TDD.
Now, let's fix the error in the tests and learn how to run the previous test again. Open FirstDemoTests.swift, and run only the failing test by clicking on the diamond symbol next to the test method. The test still fails. Fix it by changing iS to Is in expectedOutput. Then, go to Product | Perform Action | Run and run the test_MakeHeadline_ReturnsStringWithEachWordStartCapital2()file Again, or use the shortcut control + option + command + G to run just the previous test again. The shortcut is especially useful when you are working on one specific feature, and you need to test whether the implementation is already enough.