In the previous section, we created a class to act as the data source and delegate for the item list table view. In this section, we will implement its properties and methods. But we first need a test case class for ItemListDataProvider.
Open Project Navigator and select the ToDoTests group. Add a new Unit Test Case Class, call it ItemListDataProviderTests, and choose the Controller folder as the location to store the file. Add the @testable import ToDo import statement and remove the two test template methods.
The table view should have two sections—one for unchecked to-do items and the other for checked items. Add the following test to ItemListDataProviderTests:
func test_NumberOfSections_IsTwo() {
  let sut = ItemListDataProvider()
  let tableView = UITableView()
  tableView.dataSource = sut


  let numberOfSections = tableView.numberOfSections
  XCTAssertEqual(numberOfSections, 2)
}
First, we create an instance of ItemListDataProvider, set up the table view, and then we check whether the table view has the expected number of sections. This test fails because the default number of sections for a table view is one. Open ItemListDataProvider and add the following code:
func numberOfSections(in tableView: UITableView) -> Int {
  return 2
}
This is enough to make all the tests pass again.
The number of rows in the first section should be the same as the number of to-do items. But where do we get the to-do items from? ItemListDataProvider needs a property of the ItemManager type to ask it for the items to present in the table view. Add the following code to ItemListDataProviderTests:
func test_NumberOfRows_InFirstSection_IsToDoCount() {
  let sut = ItemListDataProvider()
  let tableView = UITableView()
  tableView.dataSource = sut


  sut.itemManager?.add(ToDoItem(title: "Foo"))
}
At this point, we have to stop writing this test because the static analyzer complains 'ItemListDataProvider' has no member 'itemManager'. Open ItemListDataProvider and add the property var itemManager: ItemManager?. This makes the test compilable again. Add the following code at the end of test_NumberOfRows_InFirstSection_IsToDoCount():
XCTAssertEqual(tableView.numberOfRows(inSection: 0), 1)

sut.itemManager?.add(ToDoItem(title: "Bar"))

XCTAssertEqual(tableView.numberOfRows(inSection: 0), 2)
First, we check whether the number of rows in the first section is equal to one after we have added an item to the item manager. Then, we add another item and check whether the number of rows is equal to two. Run the test. This test fails because the number of rows in the table view is always zero, as we have not implemented the corresponding data source method to return the correct values. Open ItemListDataProvider and replace tableView(_:numberOfRowsInSection:) with the following code:
func tableView(_ tableView: UITableView,
               numberOfRowsInSection section: Int) -> Int {


  return itemManager?.toDoCount ?? 0
}
This implementation returns the number of to-do items from itemManager if itemManager is not nil; otherwise, it returns zero. Run the tests. Oh, they still fail because the number of rows in the first section is always zero.
The reason for this is that the property required to hold a reference to the item manager is optional, and we never set a value for this property. Therefore, the value of itemManager is always nil, and the number of rows returned from the data source method is always zero.
At this point, it is not clear who is going to set the item manager to itemManager. We will decide this in a later chapter, when we put all the modules together to form a complete app. For the tests, we will set itemManager in them. Add the following line right below let sut = ItemListDataProvider() in test_NumberOfRows_InFirstSection_IsToDoCount():
sut.itemManager = ItemManager()
Run the tests. Now, the first assertion passes but the second one, asserting that the number of rows is two after we have added another item, fails. The reason for this is that table views seem to cache the values returned from tableView(_:numberOfRowsInSection:). This is one of the many performance optimizations that are built into table views. We, as developers, need to tell the table view that the data source has changed by calling reloadData(). Add the following code right after the line where the second to-do item is added to the item manager:
tableView.reloadData()
Run the tests. All the tests pass. Before we move on, let's check whether there is something to refactor. The implementation code looks nice and clean now. But the tests show some duplication. To refactor, let's first add two properties to ItemListDataProviderTests:
var sut: ItemListDataProvider!
var tableView: UITableView!
Then, add the following setup code to setUp():
sut = ItemListDataProvider()
sut.itemManager = ItemManager()


tableView = UITableView()
tableView.dataSource = sut
Finally, remove the following code from the test methods because it is no longer needed:
let sut = ItemListDataProvider()
sut.itemManager = ItemManager()

let tableView = UITableView()
tableView.dataSource = sut
Run the tests again to make sure that everything still works.
If the user checks an item in the first section, it should appear in the second section. Add the following test to make sure the number of rows in the second section is the same as the number of completed items in the item manager:
func test_NumberOfRows_InSecondSection_IsToDoneCount() {
  sut.itemManager?.add(ToDoItem(title: "Foo"))
  sut.itemManager?.add(ToDoItem(title: "Bar"))
  sut.itemManager?.checkItem(at: 0)


  XCTAssertEqual(tableView.numberOfRows(inSection: 1), 1)


  sut.itemManager?.checkItem(at: 0)
  tableView.reloadData()


  XCTAssertEqual(tableView.numberOfRows(inSection: 1), 2)
}
This test is similar to the earlier test. First, we add items to the item manager, and then we check an item and see whether the number of rows in the second section matches our expectations. Run the test. The test fails. But look closely. The first assertion passes. This is because the implementation of tableView(_:numberOfRowsInSection:) returns the number of to-do items, and when the first assertion is called, this is the same as the expected number of done items. This example shows that it is important to start from a failing test. Otherwise, we cannot be sure if we are testing the real thing. So, remove the second assertion and make the test red by replacing tableView(_:numberOfRowsInSection:) with the following code:
func tableView(_ tableView: UITableView,
               numberOfRowsInSection section: Int) -> Int {


  let numberOfRows: Int
  switch section {
  case 0:
    numberOfRows = itemManager?.toDoCount ?? 0
  case 1:
    numberOfRows = 0
  default:
    numberOfRows = 0
  }
  return numberOfRows
}
Run the tests. Now, the assertion fails because the number of rows in the second section is always zero. To make the test pass, replace the assignment in case 1 with this line of code:
numberOfRows = 1
Run the tests again. The tests pass. Now, add the XCTAssertEqual(tableView.numberOfRows(inSection: 1), 2) assertion at the end of test_NumberOfRows_InSecondSection_IsToDoneCount() again.The test fails again. This is a good thing because it means that we are actually testing whether the number of rows represents the number of items in the item manager. Replace the assignment in case 1 one more time with this line of code:
numberOfRows = itemManager?.doneCount ?? 0
Run the tests again. All the tests pass. Let's check whether there is something to refactor. Indeed, there is. The implementation does not look good. There is a question mark at the end of itemManager; and in the switch statement, we need to implement the default case even though we know that there will never be more than two sections.
To improve the code, we start by adding an enum for the sections. Add the following code in ItemListDataProvider.swift but outside the ItemListDataProvider class:
enum Section: Int {
  case toDo
  case done
}
Now, replace the implementation of tableView(_:numberOfRowsInSection:) with the following code:
func tableView(_ tableView: UITableView,
               numberOfRowsInSection section: Int) -> Int {


  guard let itemManager = itemManager else { return 0 }
  guard let itemSection = Section(rawValue: section) else {
    fatalError()
  }


  let numberOfRows: Int


  switch itemSection {
  case .toDo:
    numberOfRows = itemManager.toDoCount
  case .done:
    numberOfRows = itemManager.doneCount
  }
  return numberOfRows
}
This looks much better. We first check in the beginning whether itemManager is nil using guard and return zero if this is the case. Then, we create itemSection from the argument section. The guard statement makes it clear that a value for the section argument can only be 0 or 1 because the Section enum only has two cases.
Run the tests to make sure that everything still works.
The to-do items should be presented in the table view using a custom table view cell, because the cells provided by UIKit can only show an image and two text strings. But we need to show three text strings because we want to show the title, location, and the due date.
Add the following test to make sure that tableView(_:cellForRowAt:) returns our custom cell:
func test_CellForRow_ReturnsItemCell() {
  sut.itemManager?.add(ToDoItem(title: "Foo"))
  tableView.reloadData()


  let cell = tableView.cellForRow(at: IndexPath(row: 0,
                                                section: 0))


  XCTAssertTrue(cell is ItemCell)
}
Xcode complains that ItemCell is an undeclared type. Open Project Navigator, add an iOS | Source | Cocoa Touch Class, and call it ItemCell. Make it a subclass of UITableViewCell. Store it in the Controller folder, and ensure that it is added to the ToDo target and not to the ToDoTests target. Remove all the template code, such that the file looks like this:
import UIKit


class ItemCell: UITableViewCell {
}
Now, the test compiles but still fails. Replace the return statement in tableView(_:cellForRowAt:) with the following line of code:
return ItemCell()
This change is enough to make the tests pass. But it is clearly not enough for the feature that we want to implement. For performance reasons, table view cells need to be dequeued. Before we can write a test that makes sure that the cell is dequeued, we need to introduce a very important concept in unit testing—fake objects.
Ideally, a unit test should test one microfeature and nothing else. But in object-oriented programming (OOP), objects talk to each other, exchange data, and react to the changes of their neighbors. As a result, when writing a test, it is often difficult to isolate one specific module from another. But without isolation, a test does not test just one microfeature, but many.
To isolate modules from each other, we can use a concept called fake objects. Fake objects act as placeholders for real objects or modules, but they are controlled by test code. This means a test sets up fake objects, controls their behavior, and tests whether the system under the test reacts as expected.
The most important fake objects are mocks, stubs, and fakes. These are explained as follows:
- Mocks act as recorders. They register whether the system under a test calls the expected methods of another instance with expected arguments. For example, if we have class
Athat should call methodb()of classB, when something happens, we would create a mock forBthat sets a Boolean value totruein caseb()is called. In the test, we use this Boolean value to assert whetherb()has been called. - Stubs are used when we need defined return values from a method. In a test, it is often useful to have a fixed hardcoded return value for a method that the system under the test calls. The test then asserts that the system under test reacts in the expected way to the defined return value. This makes it easy to test many different scenarios without complicated setups.
- Fakes act as stand-ins for real objects that a system under test communicates with. They are needed to make code compile, but they are not needed to assert that something expected has happened. Fakes are often used when they are easier to set up than the real objects, or when we need to make sure that the test is independent of the implementation of the real object.
For the next test, we will need a table view mock.
As mentioned in the previous section, table view cells should be dequeued. To make sure that this happens, we need a test. The dequeuing is done by calling the dequeueReusableCell(withIdentifier:for:) method on the table view. The table view then checks whether there is a cell that can be reused. If not, it creates a new cell and returns it. We are going to use a table view mock to register when the method is called.
In Swift, classes can be defined within other classes. In the case of mocks, this is useful because this way, the mocks are only visible and accessible at the point where they are needed.
Add the following code to ItemListDataProviderTests.swift, outside of the ItemListDataProviderTests class:
extension ItemListDataProviderTests {

  class MockTableView: UITableView {
    var cellGotDequeued = false


    override func dequeueReusableCell(
      withIdentifier identifier: String,
      for indexPath: IndexPath) -> UITableViewCell {


      cellGotDequeued = true


      return super.dequeueReusableCell(withIdentifier: identifier,
                                       for: indexPath)
    }
  }
}
We have used an extension of ItemListDataProviderTests to define a mock of UITableView. Our mock uses a Boolean property to register when dequeueReusableCell(withIdentifier:for:) is called.
Add the following test to ItemListDataProviderTests:
func test_CellForRow_DequeuesCellFromTableView() {
  let mockTableView = MockTableView()
  mockTableView.dataSource = sut
  mockTableView.register(ItemCell.self,
                         forCellReuseIdentifier: "ItemCell")


  sut.itemManager?.add(ToDoItem(title: "Foo"))
  mockTableView.reloadData()


  _ = mockTableView.cellForRow(at: IndexPath(row: 0, section: 0))


  XCTAssertTrue(mockTableView.cellGotDequeued)
}
In the test, we first create an instance and set up our table view mock. Then, we add an item to the item manager of sut. Next, we call cellForRow(at:) to trigger the method call that we want to test. Finally, we assert that the table view cell is dequeued.
Run this test. It fails , because right now, the cell is not dequeued. Replace the implementation of tableView(_:cellForRowAt:) with the following code:
func tableView(_ tableView: UITableView,
               cellForRowAt indexPath: IndexPath) -> UITableViewCell {


  let cell = tableView.dequeueReusableCell(
    withIdentifier: "ItemCell",
    for: indexPath)


  return cell
}
Run the tests. Now, the last added test succeeds. But test_CellForRow_ReturnsItemCell() fails. The reason for this is that we need to register a cell when we want to make use of the automatic dequeeing of cells in UITableView. There are three ways to register a cell. Firstly, we can do this in code, just like we did in test_CellForRow_DequeuesCellFromTableView(). Secondly, we can do this by registering a nib for the cell. Thirdly, it can be done by adding a cell with the used reuse identifier to the storyboard. We will implement the third way because we are already using a storyboard for the app.
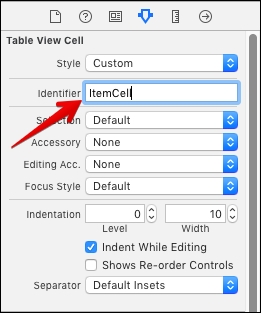
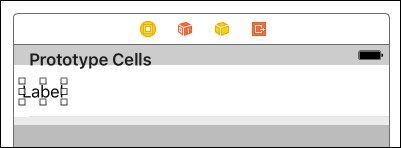
Open Main.storyboard in the editor, and add a Table View Cell to the Table View:

In the Identity Inspector, change the class of the cell to ItemCell:
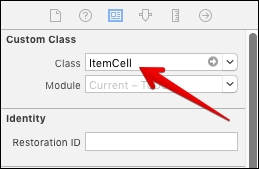
In the Attribute Inspector, set Identifier to ItemCell:
Next, we need to set up the test case such that it uses the storyboard to create the table view. First, add the following property to ItemListDataProviderTests:
var controller: ItemListViewController!
Then, replace setUp() with the following code:
override func setUp() {
  super.setUp()


  sut = ItemListDataProvider()
  sut.itemManager = ItemManager()


  let storyboard = UIStoryboard(name: "Main", bundle: nil)
  controller = storyboard.instantiateViewController(
    withIdentifier: "ItemListViewController") as! ItemListViewController


  _ = controller.view


  tableView = controller.tableView
  tableView.dataSource = sut
}
Instead of creating a table view using an UITableView initializer, we instantiate an instance of ItemListViewController from the storyboard and use its table view. The _ = controller.view call is needed because otherwise, the table view is nil.
Run the tests. All the tests pass and there is nothing to refactor.
After the cell is dequeued, the name, location, and due date should be set to labels in the cell. A common pattern in the implementation of table view cells in iOS is to implement a configCell(with:) method in the cell class. The table view data source then just needs to call this method in tableView(_:cellForRowAt:). There is one drawback of this pattern—the table view cell, which belongs to the view layer, needs to have information on the structure of the model layer. This is not a big problem because the table view cell is already specific to the data it has to present. Nevertheless, if you prefer, you can use a protocol to decouple the item cell from the item object.
To make sure that configCell(with:) is called after the cell is dequeued, we will write a test that uses a table view cell mock. Add the following mock class after the table view mock:
class MockItemCell : ItemCell {
  var configCellGotCalled = false


  func configCell(with item: ToDoItem) {
    configCellGotCalled = true
  }
}
The mock registers when configCell(with:) is called by setting configCellGotCalled to true. Add the following test to ItemListDataProviderTests:
func test_CellForRow_CallsConfigCell() {
  let mockTableView = MockTableView()
  mockTableView.dataSource = sut
  mockTableView.register(MockItemCell.self,
                         forCellReuseIdentifier: "ItemCell")


  let item = ToDoItem(title: "Foo")
  sut.itemManager?.add(item)
  mockTableView.reloadData()


  let cell = mockTableView
    .cellForRow(at: IndexPath(row: 0, section: 0)) as! MockItemCell


  XCTAssertTrue(cell.configCellGotCalled)
}
In this test, we use a mock for the table view and for the table view cell. After setting up the table view, we add an item to the item manager. Then, we get the first cell of the table view. This triggers the call of tableView(_:cellForRowAt:). Finally, we assert that configCellGotCalled of our table view cell mock is true.
Run the tests to make sure that this test fails. A failing test means that we need to write the implementation code.
Add the following line to tableView(_:cellForRowAt:) before the cell is returned:
cell.configCell(with: ToDoItem(title: ""))
The static analyzer will complain 'UITableViewCell' has no member 'configCell'. Obviously, we have forgotten to cast the cell to ItemCell. Add the cast at the end of the line where the cell is dequeued:
let cell = tableView.dequeueReusableCell(
  withIdentifier: "ItemCell",
  for: indexPath) as! ItemCell
Now, the static analyzer complains 'ItemCell' has no member 'configCell'. Open ItemCell.swift and add the following empty method definition to ItemCell:
func configCell(with item: ToDoItem) {
}
Run the tests. Xcode complains in MockItemCell that configCell(with:) needs the override keyword. In Swift, whenever you override a method of the superclass, you need to add this keyword. This is a safety feature. In Objective-C, it could happen that you accidentally overrode a method because you didn't know that the method was defined in the superclass. This is not possible in Swift.
Add the keyword to the method definition, such that it looks like this:
override func configCell(with item: ToDoItem) {
  configCellGotCalled = true
}
Now run the tests. All the tests are green again.
Let's check whether there is something to refactor. The test_CellForRow_CallsConfigCell() test, right now, just asserts that the method is called. But we can do better. The configCell(with:) method gets called with an item as a parameter. This item should be used to fill the label of the cell. We'll extend the test to also test whether the method is called with the expected item.
Replace the table view cell mock with the following code:
class MockItemCell : ItemCell {
  var catchedItem: ToDoItem?


  override func configCell(with item: ToDoItem) {
    catchedItem = item
  }
}
Then, replace the assertion in test_CellForRow_CallsConfigCell() with this line of code:
XCTAssertEqual(cell.catchedItem, item)
The test now fails because we do not use the item from the item manager yet. Replace tableView(_:cellForRowAt:) with the following code:
func tableView(_ tableView: UITableView,
               cellForRowAt indexPath: IndexPath) -> UITableViewCell {


  let cell = tableView.dequeueReusableCell(
    withIdentifier: "ItemCell",
    for: indexPath) as! ItemCell


  if let item = itemManager?.item(at: indexPath.row) {
    cell.configCell(with: item)
  }


  return cell
}
After dequeuing the cell, we get toDoItem from the item manager; call configCell(with:) if it succeeds.
Run the tests. All the tests pass. We are now confident that the cell is called with the right to-do item to configure its labels.
Earlier in this chapter, we tested that the number of rows in the first section corresponds to the number of unchecked to-do items, and the number of rows in the second section to the number of checked to-do items. Now, we need to test that the configuration of the cell in the second section passes a checked item to the configuration method.
Add the following test to ItemListDataProviderTests:
func test_CellForRow_InSectionTwo_CallsConfigCellWithDoneItem() {
  let mockTableView = MockTableView()
  mockTableView.dataSource = sut
  mockTableView.register(MockItemCell.self,
                         forCellReuseIdentifier: "ItemCell")


  sut.itemManager?.add(ToDoItem(title: "Foo"))


  let second = ToDoItem(title: "Bar")
  sut.itemManager?.add(second)
  sut.itemManager?.checkItem(at: 1)
  mockTableView.reloadData()


  let cell = mockTableView
    .cellForRow(at: IndexPath(row: 0, section: 1)) as! MockItemCell


  XCTAssertEqual(cell.catchedItem, second)
}
The test is similar to the earlier one. The main difference is that we add two to-do items to the item manager and check the second to populate the second section of the table view.
Run the test. The test crashes because the runtime unexpectedly found nil while unwrapping an Optional value. This is strange, because similar code worked before this. The reason for this crash is that UIKit optimizes the second section because the table view has a frame of CGRect.zero. As a result, cellForRow(at:) returns nil, and the as! forced unwrapping lets the runtime crash.
Replace the definition of the table view mock in the test with the following code:
let mockTableView = MockTableView(
  frame: CGRect(x: 0, y:0, width: 320, height: 480),
  style: .plain)
Run the tests again. It doesn't crash anymore but the test fails. We need to write some implementation code.
In the implementation of tableView(_:numberOfRowsInSection:), we introduced an enum for the table view sections, which has improved the code a lot. We will take advantage of the enum in the implementation of tableView(_:cellForRowAt:). Replace the code of tableView(_:cellForRowAt:) with the following code:
func tableView(_ tableView: UITableView,
               cellForRowAt indexPath: IndexPath) -> UITableViewCell {


  let cell = tableView.dequeueReusableCell(
    withIdentifier: "ItemCell",
    for: indexPath) as! ItemCell


  guard let itemManager = itemManager else { fatalError() }
  guard let section = Section(rawValue: indexPath.section) else
  {
    fatalError()
  }


  let item: ToDoItem
  switch section {
  case .toDo:
    item = itemManager.item(at: indexPath.row)
  case .done:
    item = itemManager.doneItem(at: indexPath.row)
  }


  cell.configCell(with: item)


  return cell
}
After dequeuing the cell, we use guard to make sure that the item manager is present and the index path section has a supported value. Then, we switch on the section and assign a to-do item to a constant that is used to configure the cell. Finally, the cell is returned.
Run the tests. All the tests pass.
Look at the previous tests that you have written. They have duplicated code. Let's clean it up a bit. Add the following code to MockTableView:
class func mockTableView(
  withDataSource dataSource: UITableViewDataSource)
  -> MockTableView {


  let mockTableView = MockTableView(
    frame: CGRect(x: 0, y: 0, width: 320, height: 480),
    style: .plain)


  mockTableView.dataSource = dataSource
  mockTableView.register(MockItemCell.self,
                         forCellReuseIdentifier: "ItemCell")


  return mockTableView
}
This class method creates a mock table view, sets the data source, and registers the mock table view cell.
Now, we can replace the initialization and setup of the mock table view in test_CellForRow_DequeuesCellFromTableView(), test_CellForRow_CallsConfigCell(), and test_CellForRow_InSectionTwo_CallsConfigCellWithDoneItem() with this:
let mockTableView = MockTableView.mockTableView(withDataSource: sut)
Run the tests to make sure that everything still works.
When a table view allows the deletion of cells and a user swipes on a cell to the left, then on the right-hand side, a red button will appear with the Delete title. In our application, we want to use this button to check and uncheck items. The button title should show the actions that the button is going to perform. Let's write a test to make sure that this is the case for the first section:
func test_DeleteButton_InFirstSection_ShowsTitleCheck() {
  let deleteButtonTitle = tableView.delegate?.tableView?(
    tableView,
    titleForDeleteConfirmationButtonForRowAt: IndexPath(row: 0,
                                                        section: 0))


  XCTAssertEqual(deleteButtonTitle, "Check")
}
This method is defined in the UITableViewDelegate protocol. Add the following line to setUp() right after tableView.dataSource = sut:
tableView.delegate = sut
The static analyzer complains, ItemListDataProvider does not conform to UITableViewDelegate. Add the conformance to it like this:
class ItemListDataProvider: NSObject, UITableViewDataSource, UITableViewDelegate {
  // ...
}
Run the tests. The tests fail. In ItemListDataProvider, add the method as follows:
func tableView(
  _ tableView: UITableView,
  titleForDeleteConfirmationButtonForRowAt indexPath:
  IndexPath) -> String? {


  return "Check"
}
Now, the tests pass.
In the second section, the title of the Delete button should be "Uncheck". Add the following test to ItemListDataProviderTests:
func test_DeleteButton_InSecondSection_ShowsTitleUncheck() {
  let deleteButtonTitle = tableView.delegate?.tableView?(
    tableView,
    titleForDeleteConfirmationButtonForRowAt: IndexPath(row: 0,
                                                        section: 1))


  XCTAssertEqual(deleteButtonTitle, "Uncheck")
}
Run the tests. The last test fails because of a missing implementation. Replace tableView(_:titleForDeleteConfirmationButtonForRowAt:) with this:
func tableView(
  _ tableView: UITableView,
  titleForDeleteConfirmationButtonForRowAt indexPath:
  IndexPath) -> String? {


  guard let section = Section(rawValue: indexPath.section) else
  {
    fatalError()
  }


  let buttonTitle: String
  switch section {
  case .toDo:
    buttonTitle = "Check"
  case .done:
    buttonTitle = "Uncheck"
  }


  return buttonTitle
}
Here, we used guard again, as well as the Section enum to make the code clean and easy to read.
Run the tests. All the tests pass.
The last thing we need to make sure in ItemListDataProvider is that we can check and uncheck items, and that they then change sections. Unfortunately, like in the last test, we need to invoke the responsible data source method directly in the test. We would like to have some kind of high-level methods to call to simulate the user tapping the Check and Uncheck buttons, such as in numberOfRows(inSection:)., but UIKit does not provide these. We will see how to use UI tests to simulate the taps of the user later in the book. Here, we will use the data source method to do this. Add the following test to ItemListDataProviderTests:
func test_CheckingAnItem_ChecksItInTheItemManager() {
  sut.itemManager?.add(ToDoItem(title: "Foo"))


  tableView.dataSource?.tableView?(tableView,
                                   commit: .delete,
                                   forRowAt: IndexPath(row: 0,
                                                       section: 0))


  XCTAssertEqual(sut.itemManager?.toDoCount, 0)
  XCTAssertEqual(sut.itemManager?.doneCount, 1)
  XCTAssertEqual(tableView.numberOfRows(inSection: 0), 0)
  XCTAssertEqual(tableView.numberOfRows(inSection: 1), 1)
}
This test fails because we have not implemented tableView(_:commit:forRowAt:) yet. Add the following code to ItemListDataProvider:
func tableView(_ tableView: UITableView,
               commit editingStyle: UITableViewCellEditingStyle,
               forRowAt indexPath: IndexPath) {


  itemManager?.checkItem(at: indexPath.row)
  tableView.reloadData()
}
Run the tests. All the tests pass and there is nothing to refactor.
Next, we need to write a test for the unchecking of a to-do item. Add the following test to ItemListDataProviderTests:
func test_UncheckingAnItem_UnchecksItInTheItemManager() {


  sut.itemManager?.add(ToDoItem(title: "First"))
  sut.itemManager?.checkItem(at: 0)
  tableView.reloadData()
  tableView.dataSource?.tableView?(tableView,
                                   commit: .delete,
                                   forRowAt: IndexPath(row: 0,
                                                       section: 1))


  XCTAssertEqual(sut.itemManager?.toDoCount, 1)
  XCTAssertEqual(sut.itemManager?.doneCount, 0)
  XCTAssertEqual(tableView.numberOfRows(inSection: 0), 1)
  XCTAssertEqual(tableView.numberOfRows(inSection: 1), 0)
}
This test results in a crash because the code in tableView(_:commit:forRowAt:) tries to remove an item for the unchecked items, but the corresponding array in the item manager is already empty. Replace the implementation of tableView(_:commit:forRowAt:) with the following code:
func tableView(_ tableView: UITableView,
               commit editingStyle: UITableViewCellEditingStyle,
               forRowAt indexPath: IndexPath) {


  guard let itemManager = itemManager else { fatalError() }
  guard let section = Section(rawValue: indexPath.section) else
  {
    fatalError()
  }


  switch section {
  case .toDo:
    itemManager.checkItem(at: indexPath.row)
  case .done:
    itemManager.uncheckItem(at: indexPath.row)
  }
  tableView.reloadData()
}
This implementation code results in a message from the static analyzer-'ItemManager' has no member 'uncheckItemAtIndex'. Uh, looks like we forgot to add it in the previous chapter. Let's add it now. Add the following method to ItemManager:
func uncheckItem(at index: Int) {
  let item = doneItems.remove(at: index)
  toDoItems.append(item)
}
Run the tests. All the tests pass and there is nothing to refactor.
We have tests that make sure that configCell(with:) gets called when the cell is prepared. Now, we need tests to make sure that the information is set to the label of ItemCell. You may ask, "What label?", Yes, you are correct, we also need tests to make sure that ItemCell has labels in order to present the information.
Select the ToDoTests group in the Project Navigator, and add a new test case. Call it ItemCellTests, and put it in the Controller folder. Add the import @testable import ToDo statement, and remove the two template test methods.
To be able to present the data on screen, ItemCell needs labels. We will add the labels in Interface Builder (IB). This means that to test whether the label is set up when the table view cell is loaded, we need to set up the loading similar to how it will be in the app. The table view needs a data source, but we don't want to set up the real data source, because then, we will also need an item manager. Instead, we will use a fake object to act as the data source.
Add the following code to ItemCellTests.swift but outside of the ItemCellTests class:
extension ItemCellTests {
  class FakeDataSource: NSObject, UITableViewDataSource {


    func tableView(_ tableView: UITableView,
                   numberOfRowsInSection section: Int) -> Int {


      return 1
    }


    func tableView(_ tableView: UITableView,
                   cellForRowAt indexPath: IndexPath)
      -> UITableViewCell {


      return UITableViewCell()
    }
  }
}
This is the minimal implementation a table-view data source needs. Note that we are returning a plain UITableViewCell. We will see in a minute why this does not matter. Add the following test to ItemCellTests:
func test_HasNameLabel() {
  let storyboard = UIStoryboard(name: "Main", bundle: nil)
  let controller = storyboard
    .instantiateViewController(withIdentifier: "ItemListViewController")
    as! ItemListViewController


  _ = controller.view


  let tableView = controller.tableView
  let dataSource = FakeDataSource()
  tableView?.dataSource = dataSource


  let cell = tableView?.dequeueReusableCell(
    withIdentifier: "ItemCell",
    for: IndexPath(row: 0, section: 0)) as! ItemCell


  XCTAssertNotNil(cell.titleLabel)
}
This code creates an instance of the View Controller from the storyboard, and it sets an instance of FakeDataSource to its table-view data source. Then, it dequeues a cell from the table view and asserts that this cell has titleLabel. This code does not compile because of the 'ItemCell' has no member 'titleLabel'. Open ItemCell.swift in Assistant Editor, and add the property declaration @IBOutlet var titleLabel: UILabel!.
Run the tests. The last test fails because the property is not connected to the storyboard yet. Open Main.storyboard and add a label to ItemCell:
Open ItemCell.swift in Assistant Editor, and hold down the Ctrl key while you drag from the label to the property to connect the two.
Run the tests. Now, all the tests pass.
The item cell also needs to show the location if one is set. Add the following test to ItemCellTests:
func test_HasLocationLabel() {
  let storyboard = UIStoryboard(name: "Main", bundle: nil)
  let controller = storyboard
    .instantiateViewController(
      withIdentifier:" ItemListViewController")
    as! ItemListViewController


  _ = controller.view


  let tableView = controller.tableView
  let dataSource = FakeDataSource()
  tableView?.dataSource = dataSource


  let cell = tableView?.dequeueReusableCell(
    withIdentifier: "ItemCell",
    for: IndexPath(row: 0, section: 0)) as! ItemCell


  XCTAssertNotNil(cell.locationLabel)
}
To make this test pass, we need to perform the same steps as we did for the Title label. Add the @IBOutlet var locationLabel: UILabel! property to ItemCell, add UILabel to the cell in Main.storyboard, and connect the two by control-dragging from IB to the property.
Run the tests. All the tests pass. There is a lot of duplication in the last two tests. We need to refactor them. First, add the following properties to ItemCellTests:
var tableView: UITableView!
let dataSource = FakeDataSource()
var cell: ItemCell!
Then, add the following code to the end of setUp():
let storyboard = UIStoryboard(name: "Main", bundle: nil)
let controller = storyboard
  .instantiateViewController(
    withIdentifier: "ItemListViewController")
  as! ItemListViewController


_ = controller.view


tableView = controller.tableView
tableView?.dataSource = dataSource


cell = tableView?.dequeueReusableCell(
  withIdentifier: "ItemCell",
  for: IndexPath(row: 0, section: 0)) as! ItemCell
Remove the following code from the two test methods:
let storyboard = UIStoryboard(name: "Main", bundle: nil)
let controller = storyboard
  .instantiateViewController(
    withIdentifier: "ItemListViewController")
  as! ItemListViewController


_ = controller.view


let tableView = controller.tableView
let dataSource = FakeDataSource()
tableView?.dataSource = dataSource


let cell = tableView?.dequeueReusableCell(
    withIdentifier: "ItemCell",
    for: IndexPath(row: 0, section: 0)) as! ItemCell
Run the tests to make sure that everything still works.
We need a third label. The steps are exactly the same as those in the last tests. Make the changes yourself (don't forget the test) and call the label dateLabel.
Now that we have the labels in the item cell, we need to fill them with information when the cell is configured. Add the following test to ItemCellTests:
func test_ConfigCell_SetsTitle() {
  cell.configCell(with: ToDoItem(title: "Foo"))


  XCTAssertEqual(cell.titleLabel.text, "Foo")
}
We call configCell(with:) on the dequeued cell from the setUp() method. Run the tests. The last test fails.
To make the test pass, add the following line to configCell(with:):
titleLabel.text = item.title
Now, all the tests pass again and there is nothing to refactor.
Instead of writing two more tests for the other labels, we will add the assertions to the existing tests. Rename the test method to test_ConfigCell_SetsLabelTexts(), and replace it with the following code:
func test_ConfigCell_SetsLabelTexts() {
  let location = Location(name: "Bar")
  let item = ToDoItem(title: "Foo",
                      itemDescription: nil,
                      timestamp: 1456150025,
                      location: location)


  cell.configCell(with: item)


  XCTAssertEqual(cell.titleLabel.text, "Foo")
  XCTAssertEqual(cell.locationLabel.text, "Bar")
  XCTAssertEqual(cell.dateLabel.text, "02/22/2016")
}
To make this test pass, replace configCell(with:) with the following code:
func configCell(with item: ToDoItem) {
  titleLabel.text = item.title
  locationLabel.text = item.location?.name


  if let timestamp = item.timestamp {
    let date = Date(timeIntervalSince1970: timestamp)
    let dateFormatter = DateFormatter()
    dateFormatter.dateFormat = "MM/dd/yyyy"


    dateLabel.text = dateFormatter.string(from: date)
  }
}
Run the tests. All the tests pass, but we need to refactor them. It is not a good idea to create a date formatter every time configCell(with:) gets called, because the date formatter is the same for all the cells. To improve the code, add the following property to ItemCell:
lazy var dateFormatter: DateFormatter = {
  let dateFormatter = DateFormatter()
  dateFormatter.dateFormat = "MM/dd/yyyy"
  return dateFormatter
}()
The lazy keyword indicates that this property is set the first time it is accessed. Now, you can delete the local definition of the date formatter:
let dateFormatter = DateFormatter()
dateFormatter.dateFormat = "MM/dd/yyyy"
Run the tests. Everything still works.
From the screenshots seen in Chapter 2, Planning and Structuring Your Test-Driven iOS App, we know that the title labels of the cells with the checked items were struck through. An item itself doesn't know that it is checked. The state of an item is managed by the item manager. This means that we need a way to put the state of the item into the configCell(with:) method.
Add the following test to check whether the title of the label has been struck through and the other labels are empty:
func test_Title_WhenItemIsChecked_IsStrokeThrough() {
  let location = Location(name: "Bar")
  let item = ToDoItem(title: "Foo",
                      itemDescription: nil,
                      timestamp: 1456150025,
                      location: location)


  cell.configCell(with: item, checked: true)


  let attributedString = NSAttributedString(
    string: "Foo",
    attributes: [NSStrikethroughStyleAttributeName:
      NSUnderlineStyle.styleSingle.rawValue])


  XCTAssertEqual(cell.titleLabel.attributedText, attributedString)
  XCTAssertNil(cell.locationLabel.text)
  XCTAssertNil(cell.dateLabel.text)
}
This test looks a bit like the previous one. The main difference between them is that we call configCell(with:checked:) with an additional argument, and we assert that the attributedText of titleLabel is set to the expected attributed string.
This test does not compile. Replace the method signature of configCell with the following:
func configCell(with item: ToDoItem, checked: Bool = false) {
  // ...
}
Open ItemListDataProviderTests.swift, and also change the signature of the overridden method in MockItemCell. Run the tests. The last test added fails. To make it pass, replace configCell(with:checked:) with the following code:
func configCell(with item: ToDoItem, checked: Bool = false) {


  if checked {
    let attributedString = NSAttributedString(
      string: item.title,
      attributes: [NSStrikethroughStyleAttributeName:
        NSUnderlineStyle.styleSingle.rawValue])


    titleLabel.attributedText = attributedString
    locationLabel.text = nil
    dateLabel.text = nil
  } else {
    titleLabel.text = item.title
    locationLabel.text = item.location?.name


    if let timestamp = item.timestamp {
      let date = Date(timeIntervalSince1970: timestamp)


      dateLabel.text = dateFormatter.string(from: date)
    }
  }
}
In case checked is true, we set the attributed text to the Title label. Otherwise, we use the code that we had earlier. Run the tests. Everything works and there is nothing to refactor.
For now, we are finished with the to-do item list. In Chapter 6, Putting It All Together, we will connect the list View Controller and the data source with the rest of the application.
In the remaining sections of this chapter, we will implement the other two view controllers. But we won't go into as much detail as we have until now because the tests and the implementation are similar to the ones we have already written.