CHAPTER 3
Guided Somatic Imagery in the Classroom and Clinic
GUIDED IMAGERY AND TRAUMA
Guided imagery is a tool I have used successfully with clients such as autistic young adults, trauma clients, and adults with panic attacks. I have also used guided imagery to help people with grieving, relaxation and caregiver burnout. Clients will share that they have felt totally rejuvenated or have experienced the reserves of universal consciousness.
A SELF-EXPLORATION ABOUT PHYSICAL PAIN USING GUIDED IMAGERY
Guided imagery has given me pertinent mind body information about myself through colors and images. Once I did an exploration about my hip which was feeling uncomfortable. During a self-guided imagery I saw an image arise that looked like broken scattered rocks. When I contemplated this, I realized I was experiencing enormous stress, because I had taken on too many projects and felt very scattered about my life. Only in a state of deep relaxation was I able to have that image surface for me to examine. Upon making some life changes, I was able to alleviate the stress and ultimately the physical discomfort.
SIMPLE IMAGERY CAN ASSIST US TO PROCESS FEELINGS.
I was walking the dog in the woods in my yard, expressing gratitude for the grace in my life and a passage that my daughter and I had moved through. I was also thinking about my book and a section I was re-writing about trauma. Nonchalantly, I threw my apple core into the woods. To my dismay my treasured bracelet of valuable stones flew off my hand at the same time. I witnessed and heard it land on the ground 10 feet away in the brush. It had been a beloved gift and I was shocked and disappointed and could barely process the loss. I attempted to find it but couldn’t see the brown stones amongst the brown leaves and ground. But as I looked, my awareness shifted to go get a rake and as I did, I was also flooded with feelings about my house and a consideration I had about selling it. All of this increased awareness was coming from this incident. As I raked the ground and leaves searching I was able to accept I might not find the bracelet. It also felt okay that it had been released from me, as if I had arrived at a new passage in life and no longer needed it. The image of the rake also resonated with raking through what was important to me as if to gain clarity in preparation for my future transition. Although I felt sad about losing the bracelet and the feelings were still there, I saw and experienced the incident in a more transcendent way.
In her book, Invisible Heroes: Survivors of Trauma and How They Heal, psychologist Belleruth Naparstek, explains how guided imagery has an impact on the brain: Trauma produces changes in the brain that impede a person’s ability to think and talk about the event, but that actually accentuate their capacity for imaging and emotional-sensory experiencing around it. Imagery uses what’s most accessible in the traumatized brain to help with the healing (p. 13). When we do a guided somatization into the physical body systems we can help a traumatized client to connect the brain and body. We can then tune into what is accessible in the brain instead of disassociation. Just by merely exploring the physical body in this way and being fully present physically while tuning into feelings is a step towards healing.
Breathing with the Body Systems
The Body Mind Centering principle of layering through the body systems is utilized here.
• Give cues to breathe into the abdomen and organs
• Bring awareness to the three-part breath
• Notice how the breath moves through all three areas of the lower abdomen, lower lungs and chest as you inhale and exhale
• Notice the skin and the layers under the skin
• Notice the muscle and fascia
• Notice the bones and the fluids flowing within the body as you breathe gently
• Notice all the cells that make up the body
• While lying supine, notice your spine and the relationship of your head and tail or the sacrum down to the coccyx bone
• Notice the pelvic halves on each side
• Place your hands on your hips and feel the large bones
• Feel the ribcage and notice it is the outer container for the lungs and organs
SOMATIC EXERCISES FOR TRAUMA
When working with a client with trauma, the activities below may be explored to prepare the client for a somatic oriented experience when combined with deep breathing.
Find these activities in the book to explore this work further:
• Guided imagery
• Slow seated chair Vinyasa
• Savasana (Sponge pose)
• Restorative poses (legs on wall)
• Hip Rotation Clock Face
Guided imagery is a right brain technique that engages the emotions, senses and imagination. Some people use the terms guided visualization and guided imagery interchangeably. The main point is that the exercise is guided. This means another person is speaking and suggesting images that are meant to engage all of the participant’s senses: typically feeling, hearing, seeing, smelling and sometimes taste. Another element is that there is a beginning, middle and end in the imagery. Guided imagery has been proven to have health benefits and create relaxation. In this next section, I will be describing a guided imagery sequence and moving warm-ups that I used in a multi-handicapped classroom. The activities below can be used for any client’s goal to achieve relaxation, a sense of safety, connection to self and to provide deep rest. Although I refer to children in the activity it applies to any age group. Below I describe using guided imagery with autistic young adults at a school yoga session.
This simple sequence with breathing and guided imagery had a huge impact. We used moving warm-ups of raising and lowering contralateral arms and legs movements in supine. Instructions were given to the group to inhale and exhale which helped the group to relax and cease making noises and rocking.
Here is an activity that was successfully used for this population in a classroom on Halloween after all the festivities in a class at a school. In the morning, all the kids and staff had dressed in costume, and each class had prepared a unique activity. We went around putting hands into mushy goo, throwing apples, playing smart board games and getting tattoos. There was a lot of sensory overload, screaming and stimulation. Everyone’s energy plummeted after this, and the day slowed to a snail’s pace. When it was time for yoga, we realized the DVD wouldn’t be available. I offered to teach the yoga class to all the students and the staff. Everyone was so exhausted. I decided to do relaxation instead of poses. I started my guided imagery exercise, which evolved into an embodied meditation. The kids really embraced the activity and became completely still. Within 15 minutes of the guided imagery, everyone had relaxed on his or her mat in supine. The result was that we couldn’t hear a peep, or any movement, just stillness in the room.
Depending on the group and their movement ability, I might start with moving warm-ups to relax the physical body and prepare for the imagery exercise.
Moving Warm–Ups
Moving Warm–Ups
The Embodyoga principle of moving warm-ups is utilized here.
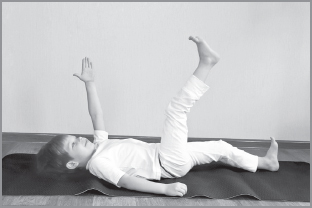
1. Extend both arms overhead while in supine with an inhale.
2. Exhale as you return the arms to the sides of the body.
3. Repeat moving the arms several times with an inhale and exhale.
4. Raise the arms and legs the right arm and right leg, left arm, left leg.
5. Incorporate connecting the body from the fingertips to the toes.
6. Imagine a ray of light passing from fingertips down to the toes and through the spine. Let the ray of light extend out of all the limbs.
7. The blue light starts at the right fingers and travels all the way to the left toes. Stretch as you are imagining the light.
8. Repeat this with the other side.
Guided Imagery: The Floating Raft
• Invite the children to imagine they are floating on a raft.
• Describe the color of the water, the gentle rocking movements, the sun on the face, the smells and the wind.
• Use evocative and sensory rich language, words such as yielding, floating, and melting into the earth.
• Suggest that they let the back of the body yield into the floor as they lie on their mat. Yielding is like a melting sensation; letting the weight of their body go.
• Suggest they imagine the wind blowing against them as they travel in the raft.
• Ask them to explore the beautiful scenery, such as green covered mountains and blue sky, and enjoy the gentle rocking of the raft as they float.
• Suggest that the raft returns to the edge of the land and it is time to get out and start walking home.
Guided Imagery: The Steps
This is not an exact script, but a sequence with guidelines, and may work as a script for you. Make the words your own when instructing a group, but first read through to the end before using it.
• Imagine walking through a field.
• Suggest sensing all the flowers, colors, smells, the sun and feeling the grass.
• See a staircase that goes up.
• We are walking up 20 steps. Take an inhale on a step and an exhale on the next step until the 20 steps are finished.
• Describe the scene with sounds and colors. For example, say: “At the top of the steps, listen to the waterfall. See lush green-covered mountains, trees with new green leaves of spring, and a flowing river below.”
• Walk slowly down the concrete steps closer to the river and listen to the waterfall.
• Walk down 20 steps with an inhale and exhale on each step.
• Describe the scene at the bottom of the steps, the trees, landscape, smells, and colors. For example: “At the bottom of the steps the clear river flows and on it, a boat passes by. Palm trees, giant ferns and cows graze in the high grass in the distance. Sit on a bench to rest.”
Guided Imagery: Seeing an Old Friend
In this guided meditation we meet an old friend. It may be used with adults, adolescents and for children. It offers the experience of reconnecting to relationships that may have been interrupted due to trauma. We might feel the loss of a loved one due to relocation, illness, loss of a friendship or family member, divorce, violence, and death. The opportunity to have a positive experience with a loved one in a guided imagery is very soothing and can bring a joyful satisfaction to the client.
• Imagine seeing an old friend sitting on a bench along the river.
• Meet and greet your old friend.
• Reach for your friend’s hand.
• Join the friend at the bench and sit together.
• Remind the group how good it feels to see an old friend.
• Drop into the heart as you sit with your friend. Feel the feelings that come up.
• Look lovingly into your friend’s eyes and face.
• Ask a question or share your feelings with your friend.
• Pause for a moment for your friend’s answer to reveal itself
• Savor the quiet moment with your friend.
• It is now time to say goodbye to your friend and start the journey home.
• Get up from the bench, hug your friend goodbye, and walk away contentedly.
• Emphasize we are just leaving “for now.”
• Remind everyone that we can come back to visit this place again.
The Journey Home
When it is time to transition back to the classroom, here are some tips for ending the guided imagery:
• Introduce an ending to the guided meditation: “Walk back to the field, find the raft, float back and get out.”
• Invite everyone to slowly open their eyes and come back to the room.
• Allow time for transition after such a deep meditative state. Plan for the meditation directions to close 5 minutes before the end of the session to allow for ample transition time, so that people don’t have to pop up, but can linger and enjoy the fruits of this restful experience.
• Some participants may be sleeping and need gentle cues to wake up or you might want to let them rest and have planned ahead for that response.
NOTES TO REMEMBER:
• Do yoga at the same time every week or every day.
• Roll out the mats and ask for the students to participate.
• Remove children from the wheelchairs to the mat.
• Give support with a prop to position the child in a comfortable position.
• Instruct staff to sit next to the students.
• Invite staff to use a soothing touch that is therapeutic and appropriate to the setting you are in to calm the children if they wish.
• Offer a therapeutic touch on a student’s hand, arm, leg, back or stomach.
• Encourage staff and students to lie down on the mats.
• Invite everyone to “find a place in the body to be comfortable.”
• It is preferable to do a set of moving warm-ups in the beginning only and not after you have started the guided imagery as it can counter the meditation.
• Speak in a gentle quiet voice.
• Invite all the participants to inhale to a count of 4 and exhale for a count of 4.
• Encourage students to lie supine, side lie or sit.
• Encourage staff to participate 100 % for the full yoga and guided imagery.
TIPS AND TAKE AWAYS
Trauma Sensitive Yoga Precautions
The somatic guided imagery exercises described in this chapter may be used for any age or classroom and adapted to special populations or trauma. In being sensitive to trauma, it is important to not hold any restorative pose for an extended time with a trauma client. This can cause discomfort to a trauma client. If you use the pose only hold it for a minute or two.
This can be adjusted as you check for feedback with your clients. An extended restorative pose for 15-20 minutes that is used in yoga restorative class is not appropriate in this context for a trauma client as it might tend to bring up too many feelings that are overwhelming for the client and they are left for too long unattended in a stationary pose.
I have used it with adults in my workshops and it has brought a deeply satisfying experience of rest and rejuvenation. These exercises have also been used successfully in a multi-handicapped, autistic, non-verbal young adult classroom ages 14-21, with good receptive language skills. For children who don’t have good receptive language skills, just use very simple images.
Encoding tissue memories with timing and staff participation
Keeping a scheduled time for yoga is beneficial. This helps the students to know what to expect and for the body to encode the memories on the somatic and cellular levels from week to week. The body will store the memory of the relaxation as it clears out more and more tension. The experience can have a cumulative impact as the child begins to learn to breathe from the belly, to follow the cues of the group leader, and to allow and trust the relaxation to occur.
In a special needs classroom, when staff participated in the relaxation, I found that the children had a deeper relaxation experience.
• Invite the staff to close their eyes and participate if permitted.
• If you are in a special needs setting and if it’s appropriate, and meets the students’ needs, I suggest encouraging the staff to lie down, and to calmly place one hand on the student in a therapeutically acceptable way to give tactile input.
• Follow all safety regulations and school protocol as needed.
• As you lead the group in the guided imagery, dim the lights and use a soft voice.
• Low gentle music can be played in the background.
I found this to be a successful template for young adult special needs students with good receptive language, even if they were non-verbal. They were able to follow the breathing directions and became very quiet and relaxed.
• When we offer a guided imagery, it may be short or long depending on the participants’ tolerance.
• It can be simple such as swimming with Nemo® and seeing fish and sea life.
• Engage the mind with as many images such as visual, embodied cues, temperature, nature, auditory, gustatory and olfactory images.
• This allows us to have an emotional and somatic response.
Meet the relaxation state of the group
Guided imagery offers so many rich opportunities to help students relax into meditation and reconnect to their somatic self. Whether it is simple or more complex, imagery can root and route us through the senses back to an awareness of our source. There might be a tendency to underestimate the impact of a guided imagery session. As you practice instructing guided imagery, you will gain confidence as you see participants relax, slow their breathing and the room become still. Be aware of the energy in the room changing from the guided meditation. I have sensed a palpable stillness that signals to me that the participants are engaged and have shifted into a relaxation state. I then check in with my own breathing and meet the relaxation state of the group’s experience. Then, I can be deeply sensitive to the experience that the group is having and lead what is needed to end the session.