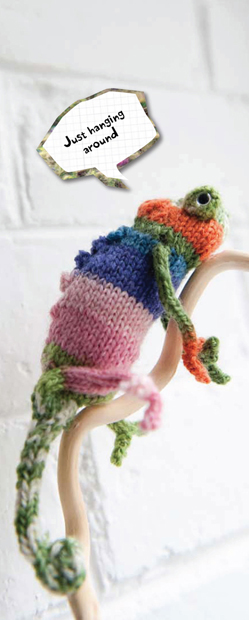
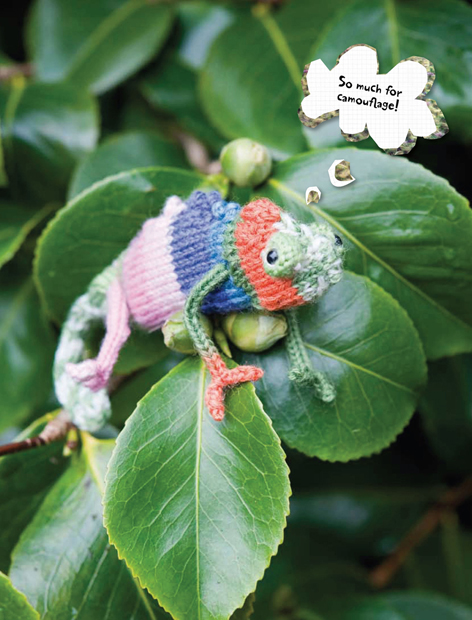
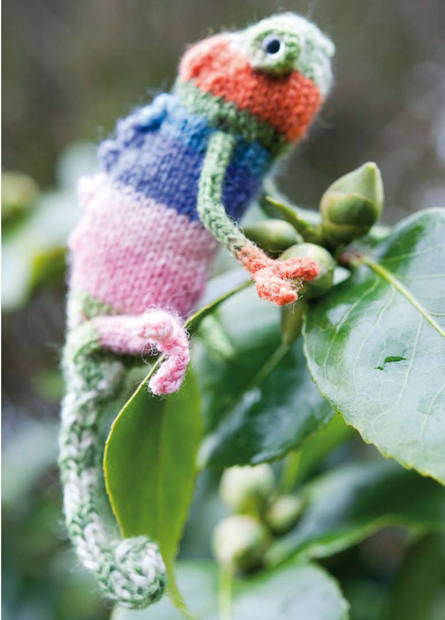
charlie the chameleon
Despite his delicate legs and bug eyes, Charlie is created with i-cord and working in the round – no more difficult than the other pets.
RATING

yarn
Lightweight (DK) yarn
 1 × 1¾oz (50g) ball of sock/self-striping yarn (MC)
needles
2 × size 2 (2.5mm) double-pointed knitting needles
4 × size 0 (2mm) double-pointed knitting needles
notions
2 × ¼in- (6mm) diameter toy safety eyes (or black yarn)
gauge
15 sts and 19 rows to 2in (5cm) of st st, using MC and size 2 (2.5mm) needles
Don't worry if the gauge is not exact – it doesn't matter if the chameleon is a little bigger or smaller than shown.
finished size
Approx. 4in (10cm) long (with the tail curled up) × 2in (5cm) tall
I've often wondered – as chameleons change colour to blend with their surroundings – what would happen if one sat on a bright piece of Fair Isle? Well, this is Charlie and he certainly is a bright little chap. If you make him your pet, make sure there are plenty of bugs for his supper packed away in your freezer…
Charlie's psychedelic colours are easy to create using self-striping yarn.
knitting note
The main part is worked in one piece from the tail to the head.
The chameleon is worked on double-pointed knitting needles using the techniques i-cord and working in the round.
If you are knitting for a very young child, embroider the eyes with thread instead of using toy eyes. Even safety eyes can be a choking hazard.
You can knit any yarn with needles one size smaller than the size recommended on the ball band to give a tight fabric that doesn't allow the stuffing to show through.
CHAMELEON PATTERN
TAIL, LEGS, BODY AND HEAD
Cast on 4 sts using MC and size 2 (2.5mm) needles.
Work as i-cord, until the tail measures 3in (8cm). Slide sts to other end of needle without turning. Keeping gauge tight, pull working yarn across the back of i-cord. (Row numbers start from 1 now, although the tail is already started.)
Row 1 K2, M1, M2. 5 sts.
Work as i-cord for a further 3 rows. Don't turn.
Shape tail
Row 5 K2, M1, k1, M1, k2. 7 sts.
Row 6 K7.
Row 7 Kfb, k2, M1, k1, M1, k2, kfb. 11 sts.
Row 8 K11.
Row 9 [Kfb, K4] twice, kfb, turn. 14 sts.
Row 10 (WS) P.
Row 11 Divide sts: K4 sts on n1, 6 sts on n2, 4 sts on n3.
With RS facing, keeping gauge fairly tight on first rnd, work in the rnd as follows:
Rnd 12 Kfb, k6, M1, k6, kfb. 17 sts.
Rnd 13 K.
Rnd 14 [Kfb, k7] twice, kfb. 20 sts.
Divide for back legs
Rnd 15 [K1, M1] twice, sl next 5 sts onto a safety pin, [kfb] 6 times, sl next 5 sts onto a safety pin, [M1, k1] twice. 20 sts. (Keep gauge tight as you knit under the sts held on safety pins.)
Rnd 16 K.
Shape back
Rnd 17 Kfb, k9, M1, k9, kfb. 23 sts.
Rnd 18 K.
Rnd 19 K11, picot 1, k11.
Rnd 20 K.
Rnd 21 K11, M1, k1, M1, k11. 25 sts.
Rnd 22 K.
Rnd 23 K12, picot 2, k12.
Rnd 24 K.
Rnd 25 K12, M1, k1, M1, k12. 27 sts.
Rnd 26 K.
Rnd 27 K13, picot 2, k13.
Rnd 28 K.
Rnd 29 K13, M1, k1, M1, k13. 29 sts.
Rnd 30 K.
Rnd 31 K14, picot 2, k14.
Rnd 32 K.
Rnd 33 K13, k3tog, k13. 27 sts.
Rnd 34 K.
Rnd 35 K13, picot 2, k13.
Rnd 36 K.
Rnd 37 K12, k3tog, k12. 25 sts.
Rnd 38 K12, picot 2, k12.
Rnd 39 K11, k3tog, k11. 23 sts.
Rnd 40 K11, picot 2, k11.
Rnd 41 K10, k3tog, k10. 21 sts.
Rnd 42 K10, picot 2, k10.
Rnd 43 K2, kfb twice, k13, kfb twice, k2. 25 sts.
Divide for front legs
Rnd 44 Kfb twice, k2, sl next 3 sts onto a safety pin, k5, M1, k1, M1, k5, sl next 3 sts onto a safety pin, k2, kfb twice. 23 sts.
(Keep gauge tight as you knit under the sts held on safety pins.)
Rnd 45 K.
Rnd 46 K.
Stuff the body lightly.
Shape head
Rnd 47 K10, [M1, k1] 4 times, k19. 27 sts.
Rnd 48 K13, kfb, k13. 28 sts.
Rnd 49 K7, skpo, k10, k2tog, k7. 26 sts.
Rnd 50 K8, skpo, k6, k2tog, k8. 24 sts.
Rnd 51 K9, skpo, k2, k2tog, k9. 22 sts.
Rnd 52 K10, k2tog, k10. 21 sts.
Rnd 53 K9, k3tog, k9. 19 sts.
Rnd 54 K.
Rnd 55 Skpo, k6, k3tog, k6, k2tog. 15 sts.
Rnd 56 Skpo, k4, k3tog, k4, k2tog. 13 sts.
Rnd 57 K5, k3tog, k5. 10 sts.
Bind off.
Stuff the head.
Mattress stitch the bind-off edge closed.
Back legs (make 2)
With RS facing, sl one set of 5 sts off the safety pin and onto size 0 (2mm) needle. Rejoin MC.
Work as i-cord until the leg measures 1½in (4cm).
Next row K2, skpo, k1. 4 sts.
Divide for toes
K2, then using n3, work i-cord on these 2 sts for 3 rows.
Bind off.
Rejoin yarn to rem 2 sts and work to match the first toe.
Front legs (make 2)
With RS facing, sl one set of 3 sts off the safety pin onto size 0 (2mm) needles. Rejoin MC.
Work as i-cord until the leg measures 1½in (4cm).
Next row K1, skpo. 2 sts.
Divide for toes
Kfb in next st, then using 3rd needle, work i-cord on these 2 sts for 2 rows.
Bind off.
Rejoin yarn to rem 1 st and work to match the first toe.
EYES (MAKE 2)
Cast on 4 sts using MC and size 0 (2mm) needles.
Row 1 (RS) *Kfb, rep from * to end. 8 sts.
Row 2 (WS) P.
Rows 3–5 st st.
Row 6 (WS) *P2 tog, rep from * to end. 4 sts.
Cut yarn and thread end through rem sts. Pull up tight and secure.
Following the manufacturer's instructions, snap one toy eye into the centre of the work with wrong side facing or alternately embroider the eye using black yarn.
Run gathering stitch around the edges of the knitting. Pull up the stitches to gather, enclosing the back of the toy eye. Stuff the eye with spare yarn and stitch the opening closed.
MAKING UP
Weave the yarn end into the tail.
Following the manufacturer's instructions, snap the eyes in the centre of the eye pieces. Alternatively, embroider the eyes with yarn.
With a couple of stitches, sew the legs to the side of the body to bend the knees slightly.
Curl the tips of the feet under a little to give the impression of tiny fists and sew them in place with a couple of stitches.
Sew up any gaps left under the arms and legs.
Curl the end of the tail slightly and stitch in place.