The Postural Exercises
Proper posture is a way of blending with gravity. Proper attitude is a way of blending with life.
—Dan Millman, The Way of the Peaceful Warrior
Elsie’s Story
Elsie is a statuesque eighty-something-year-old woman who appears to be sixty, maybe even younger. A life of pampering and wealth? No. She grew up during the Depression, the third oldest child in a poverty-stricken family of six girls raised by her mother as her father labored in the mines. The family survived on the food they grew themselves, and Elsie’s early mornings were spent hauling firewood and feeding the goat and chickens. Like many who grew up poor, Elsie endured numerous disappointments. She was a talented basketball player, but when her unimaginable dream came true and her local team, the Edmonton Grads, qualified for the 1936 Olympics in Berlin, Germany, Elsie could not accompany them. Her family couldn’t afford the uniforms or travel expenses, and Elsie watched from afar as, without her, her team won the gold medal. Life threw many other curveballs in her path, including a very difficult marriage that pulled her in a thousand directions in her role as mother and wife. There were times when she was hurting and times when she sent blessings into the world. Through it all she kept her head up.
When I first met Elsie I was immediately struck by her youthfulness even though she was my oldest student. She had the air of a socialite and the walk of a dancer. She did not let her aging body hang like a tired sack over her long bones. Her excellent posture sculpted decades from her appearance and put many of my twenty-one-year-old students to shame. Her face was lined, but her carriage was regal. Elsie’s posture was her beauty secret.
Poor posture does more than diminish the appearance of self-confidence and dignity: it hampers proper breathing, strains muscles and ligaments, and can adversely affect the joints of the back, which are prone to arthritis, sciatica, and generalized pain. The vulture-shaped neckline of a kyphotic posture—head projected forward and scooped shoulders—chronically pulls on the muscles in the neck. Sometimes accompanying kyphosis is a lordosis posture, an exaggerated curve in the lower back that can cause the lower vertebral disks to be squeezed or pinched, causing pain. Swayback posture, another common alignment problem, is caused by a pelvis that has moved forward of where it should be, resulting in a slumped appearance.
Compared to these examples, you may imagine your postural problems are small, yet intelligible. Perhaps you have felt how a hip or a knee can lock in one position so that standing is painful or tiring. Or maybe you have noticed signs of wear-and-tear on one side of your shoes, an indication of faulty weight shift in your gait. Perhaps a health care practitioner has told you that you have a C- or S-shape spine. A lateral curvature of the spine is called scoliosis and is more common than you might think.
Poor posture may be a result of structural problems, muscular imbalances, or simply bad habits. We have inherited different body shapes and tendencies and these cannot be changed overnight. However, the Pilates Method is known to be highly effective in realigning the body and addressing postural weaknesses by targeting the small postural muscles on both sides of the spine. The ball exercises in this chapter live up to this claim. Depending on the severity of the scoliosis, Pilates on the Ball will help most mild cases by creating mobility and space in the back, often softening the curves in the spine by strengthening and lengthening the small muscles on the inside or outside of the curve. Nonstrenuous rotation exercises performed while sitting on the ball promote all the benefits of rotation while facilitating the actual act of sitting tall, which is difficult, even impossible, for many to do while sitting on a mat. The ball is unequaled in bringing the body back into balance before postural problems become neck, back, or hip problems that can be agonizing and costly.
What Is Ideal Posture?
What is ideal posture, or the optimal body alignment that we aspire to for health and attractiveness? First, cultivate an awareness of the three natural curves of the spine: the slightly concave curve of the cervical spine, or the neck; the slightly convex curve of the upper back; and the concave curve of the lower back. These curves are essential: in conjunction with the gel-filled disks, they act as shock absorbers. When we retrain postural habits we are not trying to eliminate these natural curves. The goal is to avoid exaggerating them. We strive to maintain a neutral position of the pelvis where the front bones of the pelvis—the pubic bone and the front of the two hipbones—are in the same plane, again preserving the natural curve of the lumbar spine. The head, which weighs twelve to sixteen pounds, should balance squarely and with minimal effort on top of the spine. Remember: the skull extends into back space as well as front space.
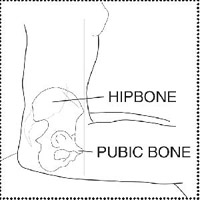
neutral spine
The goal of Pilates is not to try to flatten the back or create an exaggerated curve in the lower back, upper back, or neck. The goal is to preserve the natural curves of the spine without overtilting or tucking the pelvis. The neutral pelvis position, in which the pubic bone and the two hipbones are in the same plane, stabilizes the back so that the disks are in a safe position and are not compressed.
Place your hands on your pelvis or use a mirror as you do the pelvic-tilt exercise in “Sitting” (see page 33). Notice that you are moving the pelvis in and out of neutral.
Ideally there should be two opposing forces that work constantly through the body. When we ground the body while standing, or anchor the sitz bones while sitting, the upper body naturally lengthens and releases upward and outward. Even when we are lying on a mat these two opposing forces are at work. This feeling of opposition through the body is important for good body placement and posture.
Inside Out: The Postural Muscles
Strengthening the postural muscles—the small, deep muscles that run alongside the spine—will help support the larger muscles and bring the spine and body into balance. The superficial rectus abdominis and the long thoracolumbar extensors are similar to guy wires that balance the pole from the outside. Yet it is the deep muscles that provide the support in the links between each segment of the pole. If the small deep muscles do not work effectively to link each section of the pole, the flagpole will become unstable.
Engaging the Postural Muscles
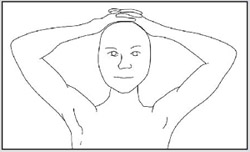
try the following simple exercise. Lock your hands over your head. While extending the head upward gently resist the movement with your hands. This small movement helps activate the deep muscles, which are close to the vertebral column. These small, deep, postural muscles maintain an erect spine.
The principle of working from the inside out is essential to Pilates, and the ball is an excellent tool to help you implement this principle. Just sitting on the ball recruits deep muscles crucial to the stabilization of your joints and your spine. The stronger the small deep muscles, the more forcefully the large superficial muscles, such as the “traps,” the “lats,” and the “glutes,” will work while helping you kick, leap, and throw. If the deep muscle system does not supply inner support for outer muscles, the larger superficial muscles may be activated to take over the work of the small muscles. This can cause pain, among other problems, since these large muscles are not intended, for example, to hold the spine erect for prolonged periods of time.
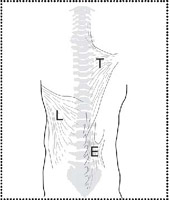
anatomy on the ball: spine muscles
The erector spinae are bands of muscles that run alongside your spine. These deep muscles are designed to work constantly to keep the spine erect. They take turns contracting so that their action is constant for sustained periods of time.
Latissimus dorsi is a large muscle that originates on the lower and midback, wraps around the trunk, and fastens onto the upper arm. Trapezius, another superficial back muscle, is a long diamond-shaped muscle of the neck and upper and midback. These large muscles are designed for powerful actions of brief duration.
Many of the exercises presented here contribute directly to postural improvements. Abdominal exercises (chapter 4) strengthen the core of the body; restorative exercises (chapter 7) stretch and strengthen the hip flexors, hamstrings, and muscles that run down the sides and backs of the legs; and the extension exercises (chapter 5) extend the space between each vertebra and strengthen the back muscles. In this chapter, however, I have chosen specific exercises and named them “postural” because they not only work the small postural muscles close to the spine, but they foster an awareness of spinal mobility through elongation, rotation, and sidebending.
The Postural Exercises
The following postural exercises are practiced while sitting on the ball. Sitting tall on the ball aligns the body naturally and safely and places the least strain on the body. The first exercise helps us to locate neutral pelvis; a mirror may be helpful in practicing this exercise, to make sure your pelvis is not tilted forward or backward. While performing Pelvic Tilts you will be moving the pelvis out of neutral. Sometimes moving the pelvis forward or backward out of neutral helps many students to locate neutral pelvis.
Take care with rib cage placement with these exercises. Is the rib cage full and unrestricted, to permit proper breathing? Try not to allow the rib cage to lift upward or collapse downward. One final point: ideal posture, whether lying on a mat or sitting on the ball, is assisted by the abdominal connection. We are not just activating the superficial rectus abdominis, but the deep transversus abdominus as well. (More on the abdominals follows in the next chapter.)
Sitting
Sitting on a ball is active work, and therefore better for your posture and general back health than collapsing into a chair. When sitting on the ball, hips and knees should be bent at 90-degree angles. Do not let your feet get too close to the ball. Feet should be just wider than hip-distance apart to create a strong base of support. Yes, you can slump on the ball, but you will be aware of it because slumping increases the ball’s instability.
Purpose To find optimal posture. To learn mobility through the spine and to become familiar with neutral pelvis.
Watchpoints • In ordinary sitting (movement 1), avoid overarching the back and popping out the rib cage. • Unassisted sitting is an endurance activity, so do not overdo it. • Keep the chin horizontal, eyes level. • Do not force movement 2. Stop if there is any pain.
reach through the tops of the ears
We want a long neck but not a forced or strained neck. When you read “lengthen through the tops of the ears,” think of opening disks in the cervical spine (the neck) but keeping the chin horizontal at the same time. Imagine you are in a theater and attempting to read the subtitles above a tall person in front of you. Eye gaze is straight ahead.
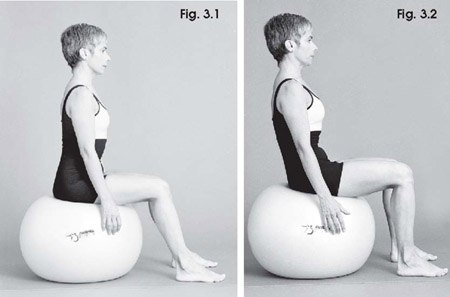
starting position
Sit on the center of your ball, knees aligned with ankles, legs just wider than hip-distance apart and parallel. Feet are firmly planted, toes long and relaxed. Chin is level (fig. 3.1). Think of pulling the navel up and into the back of the spine.
movement 1: sitting
1. Relax the shoulders.
2. As fingertips relax toward the floor, let the weight of the body drop into the ball.
3. Lengthen through the tops of the ears (see sidebar).
4. Check your posture in a mirror or with your fingers. Notice if the three natural curves of the spine are in place, or whether you are flattening or exaggerating any of them.
5. Sit for a number of minutes, breathing slowly and deeply. Add time as you get stronger.
movement 2: pelvic tilt
1. Sit on the center of your ball, knees aligned with ankles, legs just wider than hip-distance apart and parallel. Feet are firmly planted, toes long and relaxed. Chin is level.
2. Keeping your feet firmly planted, curl the tailbone forward and let the ball roll slightly forward under you (fig. 3.2). Return to neutral pelvis.
3. Push your tailbone back and roll the ball backward.
4. Repeat this movement four to six times. Notice how you are moving the pelvis in and out of neutral.
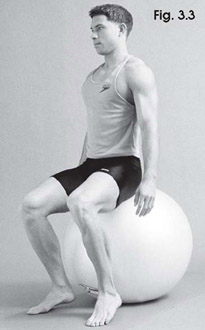
A bounce can be added to the sitting position. Place a chair nearby to steady yourself if you are afraid of losing your balance. Bounce as vigorously as is comfortable. Bouncing aligns the spine in its most efficient position and improves the endurance of the postural muscles. Never bend, twist, or rotate the spine while bouncing. Jumping jacks, shoulder shrugs, and many arm and leg movements seen in an aerobics class can be transferred to your ball. See chapter 9 for ideas for a low-impact cardiovascular workout.
Purpose To train and improve the endurance of postural muscles.
Watchpoints • Never combine rotation or bending of the spine with bouncing. • You should always be able to carry on a conversation. If not, slow the bounce.
starting position
Sit on the center of your ball, knees aligned with ankles, legs just wider than hip-distance apart and parallel. Feet are firmly planted, toes long and relaxed. Chin is level. Think of pulling the navel up and into the back of the spine.
movement
1. Press your feet to the floor, activate the thigh muscles, and bounce as vigorously as is comfortable (fig. 3.3). Relax and breathe as you bounce.
2. When you stop bouncing, sit tall and check your feet and ankles. Use a mirror or your fingers to be sure that you are in neutral spine. There is a curve in the lower back but not an exaggerated curve. The neck is long but not tense. The ears are aligned over the shoulders.
Where Are My Sitz Bones?
the sitz bones are the bones you sit on. To find the sitz bones, or ischial tuberosities, sit on your ball or the ground, place your hand under one buttock, and move the fleshly part to one side. Palpate the little rocker on the bottom of that pelvic half. The sitz bones are not a part of the thigh, as some think. Your weight should be distributed evenly on these rockers. These are your feet when you are not on your feet!
Now that you have found optimal posture here are some more exercises to help you maintain it.
Spine Stretch Forward
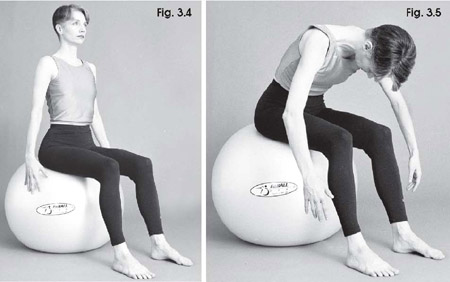
This is a highly controlled release of the spine with maximum abdominal connection: we are not collapsing. The head moves first—it slowly rolls away from the top joint. Then you sequence through the rest of the spine. Spine Stretch Forward is also a breathing exercise. Allow all the air to leave the lungs on the exhale. Breathe back into the rib cage on the inhale. Try not to let the ball roll.
In coming up and going down, roll your spine like a wheel. Vertebra by vertebra, try to roll and unroll.
—Joseph H. Pilates
Purpose To stretch the spine. To coordinate breath with movement.
Watchpoints • Keep navel-to-spine connection throughout the move. • Maintain a C curve at the bottom; don’t collapse down. • Keep the chin from digging into the chest.
starting position
Sit erect on your ball (neutral pelvis) (fig. 3.4). Think of pulling your belly button up and into the back of the spine.
movement
1. Inhale to lengthen through the tops of the ears.
2. Exhale to drop the chin, sink the sternum back, and roll down one vertebra at a time (fig. 3.5).
3. Inhale at the bottom to fill the back rib cage.
4. Exhale to curl back up, stacking the vertebrae; the head will float on top like a balloon.
5. Do five Spine Stretches, connecting movement with breath.
This is a wonderful postural exercise that utilizes rotation to activate the small postural muscles of the spine. When the Saw is done on a ball it’s even more effective, because if you slouch or relax your abdominals the ball will drift.
Purpose To restore and maintain good posture.
Watchpoints • Hipbones should remain centered on the ball. • Keep both sitz bones firmly anchored on the ball. • Don’t let your arms drift behind your torso. • Keep both shoulders down.
starting position
1. Sit erect on your sitz bones. Position your legs just wider than hip-distance apart, feet parallel and in line with the knees.
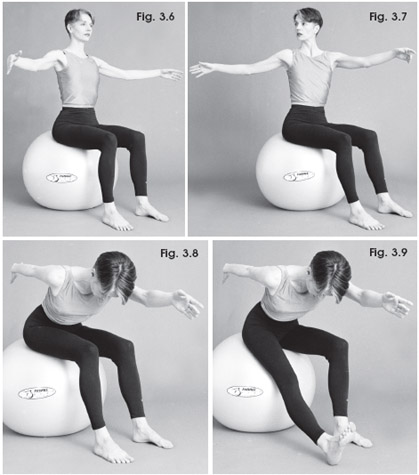
2. Open your arms to the sides (fig. 3.6).
movement 1: the saw
1. Inhale and rotate to the right as you get taller (fig. 3.7).
2. Exhale and stretch your left arm diagonally over your right leg, aiming your left hand about two feet above and in line with your right baby toe. Let your head follow your arm. The head should stay aligned on the spine (fig. 3.8).
3. Inhale and slowly roll up one vertebra at a time to a rotated position (fig. 3.7).
4. Exhale as you rotate very tall back to the center (fig. 3.6).
5. Repeat three times on each side.
movement 2: the saw with hamstring stretch
1. Inhale and rotate to the right (fig. 3.7) as you get taller.
2. Exhale and straighten the leg, pressing the heel into the floor and lifting the toes as you stretch diagonally over your right baby toe (fig. 3.9). You will feel the hamstrings stretch.
3. Inhale to slowly roll up to a rotated position. Plant the foot back into place.
4. Exhale as you rotate very tall back to the center (fig. 3.6).
5. Repeat three times on each side.
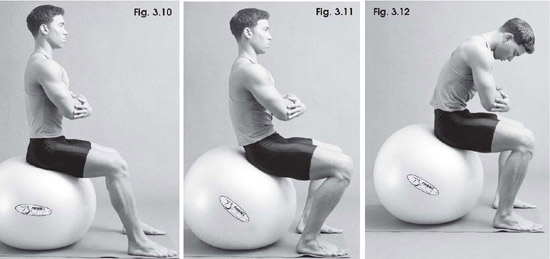
Here we are using abdominal strength to stabilize and roll through the spine. Remember you are not rolling back very far. Simply roll slightly back off your sitz bones, maintaining a strong C curve of the abdominals. The ball rolls a little forward with this exercise.
Purpose To roll through the back keeping the abdominals connected.
Watchpoints • Be sure that you roll through the spine and do not hyperextend or arch through the lower back. • Keep shoulders sliding down the back.
starting position
1. Sit tall on your sitz bones on the center of the ball (neutral pelvis), feet just wider than hip-distance apart and firmly planted.
2. Grasp your elbows, positioning arms just below the rib cage (fig. 3.10).
movement
1. Inhale to lengthen through the tops of the ears.
2. Exhale to roll the sitz bones slightly under you. Inhale and stay (fig. 3.11).
3. Exhale to increase the curve in the abdominals as you roll the top of the body over the legs (fig. 3.12).
4. Inhale to roll up to a tall sitting position (neutral pelvis).
5. Repeat four times.
BodySpheres—Seated Lateral Shift
mari Naumovski has been exploring movement with balls since 1988 when she first discovered them during the course of her movement training in New York City. The Seated Lateral Shift is initiated in the pelvic area, specifically from the sitz bones. Move slowly, especially as you rotate to guide the ball beneath you. Mari says that this exercise shows how the pelvic area is the weight center around which the rest of the body organizes to support a well-executed movement.
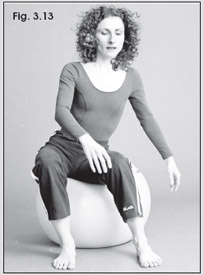
Sit tall on your sitz bones on the center of the ball (neutral pelvis). Inhale to prepare. Exhale to shift your pelvis directly to the right (fig. 3.13). Inhale to shift to the center. Exhale to shift the pelvis directly to the left.
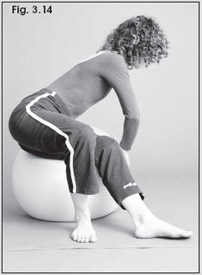
Now we go further: this time shift the pelvis farther to the right until your pelvis rolls on to your left outer hip. Your feet will swivel and your whole body will now roll to the left. To catch yourself from rolling off the ball place both hands on the ball, just outside your left thigh (fig. 3.14). Inhale and stay, then exhale to shift your hips directly sideways to the left to return your whole body to the center. Repeat on the opposite side.
Mari Naumovski notes: Notice that you can only move sideways so far until your pelvis rotates in the opposite direction, causing your body as a whole to respond to this spiral orientation.
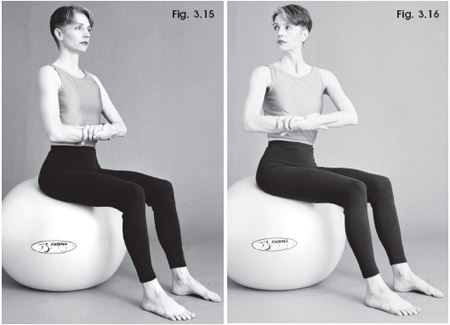
This twist is done in a tall position. Try and keep the hips directly centered on the ball during the rotation; if your knees have moved so have your hips, and you have gone too far in rotation. Start with your arms crossed and low to keep the shoulders down and to be sure that the rotation is happening in the spine, not in the arms or head. Think tall, taller, tallest!
rotation: nutrition for your disks
Let your spine come alive and be energized with gentle twists! When you rotate the body in a horizontal plane the vertebral disks naturally compress, which means there is a reduction in the overall height of the disk. Some areas of the spine are built more for rotation than other sections, so it is important to keep rotations controlled and to think about elongating through the spine rather than twisting the spine. If you have lower back pain or disk problems rotate with caution.
Purpose To rotate while trying to keep length through the spine.
Watchpoints • Keep the rotation very small if you have any lower back pain. • Notice whether your degree of rotation is the same on both sides.
starting position
Sit on your sitz bones on the center of the ball (neutral pelvis), feet parallel and just wider than hip-distance apart. Arms are crossed and low (fig. 3.15).
movement 1
1. Inhale to prepare.
2. Exhale to rotate as you get taller (fig. 3.16).
3. Inhale to return to the center.
4. Repeat on the other side. Do three sets.
movement 2
1. Open your arms, palms down, and repeat movement 1.
2. Do three sets.
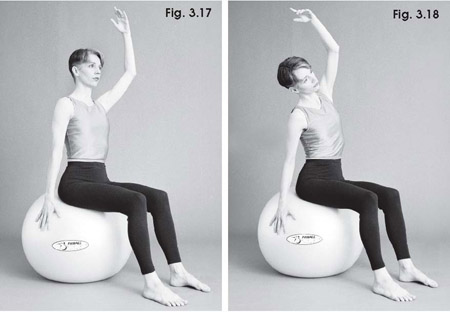
Sidebending is a necessary part of any workout. Think more of elongation than bending. Do this stretch slowly and cautiously so that you maintain height through the spine and do not roll off the ball.
Purpose To bend the spine laterally.
Watchpoints • Do not arch the back; keep the hips and ribs in one line. Elongate the spine; do not simply bend or crunch sideways. • Keep the head in line with the spine.
starting position
Sit tall on the center of your ball (neutral pelvis), one hand on the side of the ball, the other out to the side.
movement
1. Inhale to float the left arm up; the left shoulder remains down (fig. 3.17).
2. Exhale to elongate to the right (fig. 3.18).
3. Inhale to return to the center by reaching through the tops of the ears.
4. Exhale as the left arm drops down.
5. Inhale to lift the right arm up; the right shoulder slides down the back.
6. Exhale to elongate to the left.
7. Inhale to return to the center.
8. Repeat three times on each side.
Did you notice if bending to one side felt easier than the other side? The key to good posture is overall body fitness and awareness. In the next chapter the Pilates on the Ball abdominal exercises will complement the postural exercises by providing crucial support for the spine. The abdominal exercises are specially designed to firm the abdomen and build a strong core. A strong core not only maintains good posture, but it helps heal and prevent lower back pain and problems.