Restoration and Rebuilding
A light shines on my ball in the morning. I can see it glowing. It’s always there, beckoning me, inviting me. I’m sure it’s the reason my spine feels stronger.
—Susan
Susan’s Story
When I first met sixty-seven-year-old Susan she had such pain she could barely get out of bed. She had lost almost two inches of height to disintegrating vertebrae and had constant pain from degenerative disk disease. Her rheumatologist told her she was in such bad shape that she wasn’t even ready for physiotherapy.
Susan had recently retired from a career as a bookmaker and, in addition to her back pain, had suffered shoulder pain. She could not lift her arm much higher than the horizontal position. There was pain in the front and back of the shoulder joint. In fact, even Susan’s chest muscles hurt: the pectorals were chronically contracted and pulled her shoulders forward into a rounded posture.
We began the session very carefully; I was unsure of what she would be able to do. We did gentle Pelvic Tilts, Abdominal Curls, and Half Rollups using the ball. I encouraged her to go gently so that tension was not created in the neck or other parts of the body. Rolling the ball along the body helped Susan scan her body to see where she was holding discomfort or pain. Also the shape and feel of the ball aided her in visualizing the wheel image used in many of the Pilates exercises—exercises she thought she would never in a million years be able to attempt.
I wasn’t so sure. Her technique was excellent. Back breathing, which she picked up easily, helped relax her and focus her mind. It was true that she felt defeated by her body and that her problems were overwhelming. However, the grace and care she took with each exercise encouraged me greatly. Her body, in spite of being racked with pain and grossly deconditioned, knew a lot! Also, the modifications we attempted did not add to her pain. At the end of the session she declared exuberantly that she had not felt better in a long time.
On the second visit I added armwork. Because of the shoulder pain we began without weights to be sure that her body stayed properly aligned. In the next session I added one-pound weights. All the time I was watching Susan like a hawk—she had more restrictions, pain, and limitations than any student I had taken on. Yet she surprised me with each session.
The wonderful thing about the ball is that it helps people sit in good posture while performing the exercises. Susan sat tall on her ball and even did gentle bouncing, which she felt was pleasant, not painful. Gentle rotation and small side bends, usually discouraged with lower back pain and disk problems, did not seem to affect her—except positively. I reminded her never to combine bouncing with rotation or twisting of the spine and gave her a series of home exercises.
The ball is known to encourage people who might not be bothered to practice their home rehabilitation exercises. The comfort, shape, and pleasant associations of the ball inspire people of all ages to workout on their own, and Susan was no exception. “The ball feels like an extension of my own body,” she told me. The more she practiced the exercises on her own, the stronger her body became. She was well on her way to being able to join a basic-level group class and did so three months later.
Muscles Do Remember
Many people believe that as physical beings we have lived many lives and each has left an indelible mark. Recalling injuries dredges up painful memories. But as any bodywork practitioner will tell you, each injury tells a story: a pattern of one’s physical compulsions, imbalances, and obsessions. Injury is a gift for learning—if we choose to see it in that manner. Recurring pain forces us to examine how our bodies are really working and what our true limitations and strengths are. This knowledge is crucial in rebuilding our bodies and preventing injuries from repeating themselves.
According to somatics pioneer Thomas Hanna, many pains, restrictions, and injuries are caused by the body’s response to stress and trauma. Our sensory-motor systems respond to daily strains and demands with specific muscular reflexes. It is not within our control to relax these reflexes once they are triggered. Muscular contractions are involuntary and unconscious. Without proper exercise we eventually forget how to move about freely. The result is stiffness, soreness, and a restricted range of motion. Hanna calls it sensory-motor amnesia.
Many practitioners and somatic educators believe that the body can remember how to move properly again. The ill effects of sensory-motor amnesia can be reversed. Muscles do remember previous incarnations—a time before the shoulder injury, the arthritis, and the back pain.
For example, in her youth Susan had been physically active. She had developed heart and muscle strength from aerobic classes and had a dancer’s grace and flexibility. I could detect this within minutes of working with her. Even though we were working with very small movements, and even if there were times she didn’t believe that she could exercise again, her body did. Week by week we sorted through her muscle history like sifting through deposits of sediment, gently digging deeper into her muscle past, unearthing a time when mobility was free and boundless. The Pilates on the Ball exercises we did together, and those Susan did on her own, were a major part of this excavation. It was the act of movement that helped her muscles remember.
The body is a mystery; even with painstaking effort to understand it, one can be fooled. It is better not to try to self-diagnose; if you have chronic pain, or when the simple remedies presented in this book do not appear to offer relief, seek medical advice. Then take that advice and totally commit to participating in your own rebuilding program.
Pain Reduction
It is important to remember that most pain is not simply situated in one area but radiates into other parts of the body. A practitioner can help you decipher where the pain is really coming from and what is causing the problem. Is the pain the result of an imbalance between muscle groups, or a chronic holding pattern of tension in a particular part of the body? Is there something in the way you hold your body in exercise and normal activities that is contributing to the problem?
Restoration of good posture is essential to addressing pain. Poor alignment problems can be transferred directly to the fitness class or the swimming pool. Look in a mirror when performing exercises or have a few sessions with a trainer to see what the problem is and how to avoid it in the future. Ask yourself after each session if you feel better or worse. Follow Thomas Hanna’s refrain: “Always move slowly, gently, and without forcing the movement.”
With modest lower back pain, lie on your back with your calf muscles up on the ball. This is a safe way to let the back settle. Take care not to force down the tailbone and exaggerate the lower back curve. Breathe deeply and allow at least fifteen minutes for the body’s weight to release into the mat.
If you have a mild neck strain, place your hands behind your neck and gently lift your head using your hands and not your neck muscles. Hold your head up, drop your chin, and give the back of the neck a small stretch. Carefully place the head back on the mat and repeat. The neck, shoulders, and lower back store daily tension. If your neck tension is more severe, or you have chronic pain or tension, it is best to see a doctor, physical therapist, or chiropractor.
Sitting on the ball is sometimes all you can do if you are in pain. Gentle bouncing mobilizes the spine and can release pain. Stop immediately if it adds discomfort. Use a mirror to be sure that you are not exaggerating the lower back curve into a pain-enhancing lordotic arch.
A small extension and the resistance of gravity can gently lengthen tight segments of the back. If you have worked with your ball a bit and have already mastered the Arch, try a smaller version of it called the Tabletop (both exercises are detailed in the next chapter). The Tabletop, like the Arch, can reduce compression in the lower back and create separation between pelvis and ribs while at the same time working the small back muscles. Be sure that you support the buttocks from below and use your abdominals. Both of these moves also release the neck while totally supporting it at the same time. The Arch is a very powerful stretch, and I would avoid it if you have lower back pain. If you are not warmed up or if you hold this particular stretch for too long you may feel your back tense up to protect itself from the unaccustomed feeling of space in the body. To come out of the Tabletop put the hands behind the head to lift the head, chin to chest.
Take care as you roll in and out of these recuperative positions. Afterward ask yourself what you feel. Do you feel better than before or worse?
The Role of Abdominals in Back Care
As discussed in chapter 4, it is widely believed that abdominal strength will help heal and prevent lower back pain. Pay attention to how abdominal exercises are performed. Vigorous, swift crunches work the abdominals but cause them to become short and contracted. Often these crunches are performed with too much movement; consequently the action recruits the powerful hip flexors, which may also become tight. In Pilates on the Ball we are attempting not only to strengthen the abdominals but also to lengthen them.
We need to be able to activate the deep transversus abdominals and not simply suck in the belly. If the abdominal muscles protrude while performing the exercises it is a sure sign that the connection has been lost. I encourage students to press a finger just below the navel to make sure that the abdominal wall is drawn in. Take care when lying on the abdomen or with the belly on the ball to be sure that the navel is lifted up and off the mat or the ball. This contraction must be held while movements are added and must not interfere with the breathing pattern. To help maintain the navel-to-spine connection and protect the small of the back, breath is directed into the rib cage and not into the abdominals.
Shoulder and Neck Problems
The first thing you must do with shoulder and neck pain is to diligently examine the ins and outs of your day to learn what is contributing to your condition. For example, a job that requires you to work frequently on one side and in one position, such as a dental hygienist or violinist, could cause problems early in life. Maybe the solution to your neck pain is to use a headset instead of crunching the phone between your shoulder and ear. Do you spend your days slumped forward over a computer with your shoulders up around your ears? Changing to an ergonomically designed kneeling chair, or using a ball for your desk chair, would greatly aid in supporting better posture at your desk.
The responsibilities of our lives cause us to move through our days “head first,” causing imbalances in the body. Thomas Hanna referred to this as the “green light reflex.” It is a reflex of activity and urgency that is triggered constantly by the demands of a busy lifestyle. According to Hanna, the other reflex, which we wear around our body like a cloak, is the “red light reflex,” or withdrawal response. It is a protective response to fear or distressing events. This reflex triggers tension in the neck muscles and can result in a forward-projected head. It also manifests in the shoulders, causing them to lift and round forward.
Good alignment of the shoulder girdle is important. The shoulders should be down and stabilized before you do any movement. Cultivate an awareness of easing the shoulder blades down the back without forcing the latissimus dorsi down and causing lack of mobility in the arm joint. Because the head is heavy, we need to ensure that the head is aligned and not held forward on the body.
When exercising with neck and shoulder tension, leave the head on the mat when indicated. You may want to avoid using the ball during the abdominal exercises, as it adds one or two pounds of resistance that may aggravate neck pain. Take care at all times with the placement of the head on the mat as well as when sitting upright on the ball.
The Ball as Therapeutic Partner
While she was crossing the street on a green light, Eve was knocked down in the crosswalk by a car. A vertebra in her lower back was fractured, and she spent two and half weeks in the hospital numb from the waist down. Eve, a fifty-two-year-old former dancer, was a physical fitness and yoga instructor and feared that she would never teach movement again.
Most physicians approach exercise after an injury by focusing on starting rehabilitation as soon as possible. Eve’s doctor was no exception. He considered the nature of the injury as well as Eve’s kinesthetic awareness as a yoga teacher and believed she would be a good candidate for a slow but steady recovery. She was used to working hard as a dancer and did everything she could to contribute to her own rehabilitation.
When Eve came to my ball class she was teaching again, but her body had not recovered fully. She could not even do a small Bridge and feared that the Wheel or Cakrasana, the big extension of yoga, was a pose of the past. “The ball was a big surprise,” she told me after her first class. “The ball stabilized me so I could try things I never thought I could do.”
Eve’s spine craved the dynamic extension of the arch and the exercise ball brought this extension within her reach by two and a half months. In the final class of a ten-week course she lay backward over the ball, stretching her hands in one direction and her feet in the other. She had brought her camera to class. She asked me to snap a photo of her in extension to show her doctor.
The ball has a long history of use with orthopedic patients. It is used in testing and assessing patients and then used directly by the patient to restrengthen the trunk and increase the range of motion of the trunk, legs, and arms. The ball can also save the therapist’s back by taking the weight of a weak or paralyzed leg. Physical therapists and those using the ball for rehabilitation should read Beate Carrière’s excellent book, The Swiss Ball: Theory, Basic Exercises and Clinical Application. Carrière explains that one of the many rewards of the ball is that it can be used to control the amount of weight-bearing on the hand or leg. This is beneficial in rehabilitating a shoulder or knee after injury or surgery. In a push-up, for example, the trunk is fully supported by the ball. Taking care not to lower the body past elbow level, the shoulder will not be stressed as it would in a full weight-bearing situation. With wrist problems you can control how much weight is taken on the wrist by how far you walk out on the ball. For frozen shoulder and other injuries, the ball can be used by the patient to mobilize the arm and to increase the range of movement in the shoulder without having to lift the arm.
For the same reason, the ball is an excellent therapeutic partner after knee ligament reconstruction and hip or knee replacements. Using a ball elevates the leg and allows the affected leg to rest on the ball while moving it. The patient is challenged to keep the leg aligned while moving the knee in flexion and extension. Most important, he or she is in control of the movement.
The Rebuilding Exercises
The key to injury prevention is utilizing all of the body, balancing all of its parts. The exercises in this chapter focus on core stabilization and test core strength. This is one way of revealing where there may be a muscle imbalance and setting out from there. As you work through the exercises pay close attention to which ones can be done with pain and which cannot. Some of these exercises are only to be attempted when your pain is gone and you are ready to rebuild or strengthen your healthy body. Do not push yourself too hard; only progress when you are pain-free and you have mastered the basic work. If you are in doubt about an exercise, leave it out.
This chapter presents some of the most advanced work in the entire book. Some of you, including myself, do not need to do advanced work and will never miss it in our bodies. For others, especially elite athletes and dancers, the challenge and novelty of doing advanced Pilates on the Ball will greatly enhance their performance. The advanced work often involves taking away the base of support and working with the body as a longer lever. For this reason, the farther the ball is off-center, the more resistance is added and the greater the demand for core stability. Take care to notice that the advanced work is clearly marked, so if you are a beginner you will not stumble into it by accident. Quite often a modification is shown, and you can attempt a smaller version of a more advanced exercise.
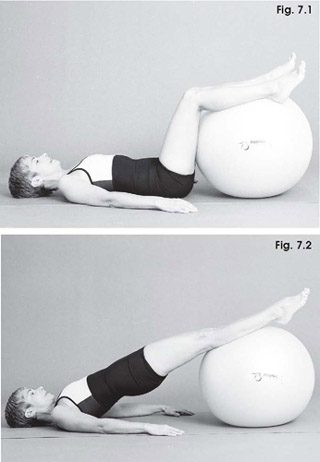
Small Hip Rolls can be done with modest lower back pain; a small sequencing movement is usually good to release the muscles in the lower back and create mobility in the spine. Take care when you return the pelvis to the mat not to exaggerate the curve in the lower back by forcing down the tailbone and making a larger space in the lower back than is beneficial. Try to feel the vertebrae move individually, separately, not in a block. Remember: the farther the ball is away from your torso, the more difficult the exercise.
Purpose To sequence through the body and create mobility in the spine.
Watchpoints • Do not overarch at the top; lift the pelvis only a couple of inches if you have lower back pain. • Connect through the inner thighs; try not to let the legs separate on the ball. • The neck should be relaxed, shoulders melting and widening.
starting position
Lie on your back with your calf muscles resting on the ball and your hands by the side of your thighs (fig. 7.1). Connect through the inner thighs. Be sure that the shoulders are sliding down away from your ears.
movement
1. Inhale to lengthen the tailbone away from the pelvis.
2. Exhale to continue to lengthen and curl the tailbone up one vertebra at a time until your body is in a straight line, shoulders in line with toes (fig. 7.2).
3. Inhale at the top.
4. Exhale to soften through the chest and sequence down one vertebra at a time.
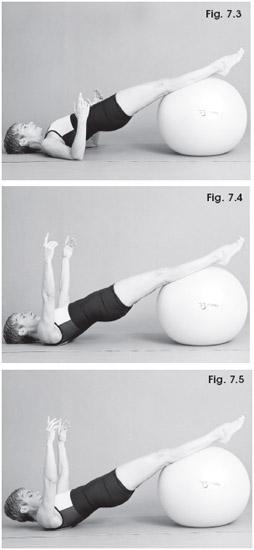
Attempt this balancing movement only when your body is feeling strong and pain-free. In this exercise we are testing the core strength of the body by decreasing the solid base of support. The whole body must work together here or you may roll off the ball completely.
Purpose To strengthen the torso and test core balance.
Watchpoints • Do not overarch at the top by lifting the pelvis too high. • Connect through the inner thighs. • Be sure your neck is relaxed.
starting position
Lie on your back with your calf muscles resting on the ball and your hands by the side of your thighs. Connect through the inner thighs. Be sure that the shoulders are sliding down away from your ears.
movement 1
1. Inhale to lengthen the tailbone away from the pelvis.
2. Exhale to continue to lengthen and curl the tailbone up one vertebra at a time until your body is in a straight line, shoulders in line with toes.
3. Hold this position, breathing normally and connecting through the buttocks, inner thighs, and abdominals.
4. Leaving elbows on the mat, slowly lift wrists and hands off the mat (fig. 7.3). Breathe naturally and hold for a few counts.
5. Exhale to soften through the chest and sequence down one vertebra at a time.
movement 2—intermediate
1. Same movement as above except this time raise the hands to the ceiling, lifting the tips of the shoulder blades off the mat (fig. 7.4) and further reducing your support from stable ground. Breathe naturally and hold for a few counts.
2. Exhale to soften through the chest and sequence down one vertebra at a time.
movement 3—advanced
1. Same movement as above except lift the head off the mat as well (fig. 7.5). Breathe naturally and hold for a few counts.
2. Exhale to soften through the chest and sequence down one vertebra at a time.
Avoid this movement if you have lower back pain. In addition to strengthening the abdominals, Shoulder Bridges work the backs of the legs, the buttocks, and the hamstrings. Do not overextend the spine by lifting the pelvis too high; instead focus on a deep abdominal connection and keeping the spine in neutral. When you lift one leg off the ball you are decreasing the base of support much more than on a mat because the ball is unstable, and there is only one leg on it. Deep muscles should hold their contraction throughout, with abdominals flat and pelvis steady, while you change legs. If you have recently had knee surgery and can’t fully extend the knee, keep to movement 1.
Do not rush these bridges. There is a slow breath for each movement.
Purpose To work the torso and strengthen the backs of the legs, hamstrings, and buttocks.
Watchpoints • Keep your kneecaps facing toward the ceiling throughout the movement. • Use the abdominal obliques to close the ribs so you don’t overextend in the chest area. • Be sure that the buttocks are working to keep the hips up and in place. • If you cannot fully straighten the moving leg, make the motion smaller. • Keep motions small to gain control.

starting position
Lie on your back with your calf muscles resting on the ball and your hands by the side of your thighs. Connect through the inner thighs. Be sure that the shoulders are sliding down away from your ears.
movement 1: preparation for shoulder bridge
1. Inhale to prepare.
2. Exhale to lift the hips using the buttock muscles (fig. 7.6).
3. Inhale to bend the right leg, bringing the toes to the left ankle (fig. 7.7).
4. Exhale to extend the right leg two inches above the ball (fig. 7.8).
5. Inhale and stay.
6. Exhale to return a straight leg to the ball. Squeeze buttocks and inner thighs and remain in place.
7. Inhale to bend left leg and bring toe to right ankle.
8. Exhale to extend left leg two inches above the ball.
9. Inhale stay.
10. Exhale to return a straight leg to the ball and roll hips down to the mat.
11. Repeat twice on each side.
movement 2: full shoulder bridge—advanced
1. Inhale to prepare.
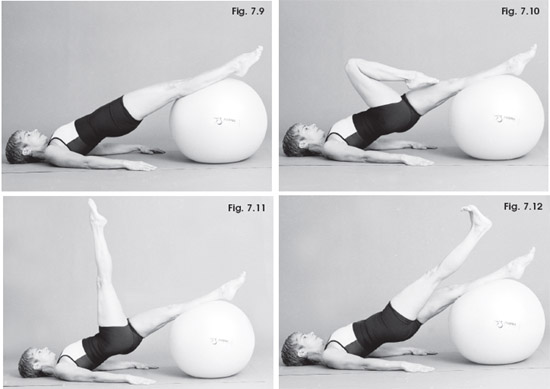
2. Exhale to lift the hips using the buttock muscles (fig. 7.9).
3. Inhale to bend the right leg, bringing the toes to the side of the left knee (fig. 7.10).
4. Exhale to extend the right leg straight in the air, toes pointed, leg as straight as possible (fig. 7.11).
5. Inhale to flex the foot, pushing out with the heel as you lower the right leg (fig. 7.12).
6. Exhale to lift the right leg, keeping the leg straight and pointing the foot.
7. Inhale to flex the foot and reach the heel away from you as you lower the right leg.
8. Exhale to lift the right leg, pointing the foot.
9. Repeat the lowering and lifting of the leg three times and then gently squeeze the buttocks before switching to the other side. Repeat twice on both sides.
You will feel this exercise in the backs of the legs and in the hamstrings and calf muscles. If you have had knee surgery or lower back pain, perform only movement 1. Also be aware of the luxurious, air-filled quality of the ball as it rubs the bottoms of the feet and the heels.
Purpose To tone and strengthen the buttocks and hamstrings.
Watchpoint • Try to keep tension out of other parts of the body.
starting position
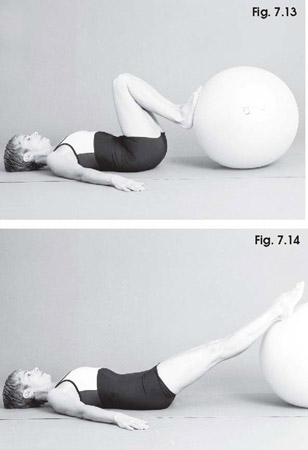
Lie on your back with the bottoms of your feet on the ball, knees bent, hands beside your thighs and slightly extended, shoulders down and relaxed (fig. 7.13).
movement 1: without hip lift
1. Keeping your pelvis on the mat, inhale to roll the ball out using the bottoms of the feet (fig. 7.14).
2. Exhale to pull the ball back in with the heels.
3. Inhale out.
4. Exhale in.
5. Roll the ball in and out six to eight times.
anatomy on the ball: hamstrings
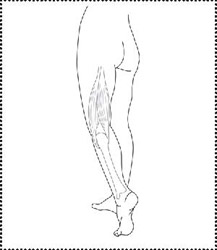
Short hamstrings are known to hamper mobility in the body; they cause not only bad posture but lower back pain. This is due to the attachment points of this group of three muscles to the body.
The hamstring muscles originate on the sitz bones at the bottom of the pelvis and span across the back of the legs to attach on the inside and the outside of the back of the knee near the top of the calf muscle. Pass your hand down the body where these long muscles are and think of the implications of shortness on the rest of the body, especially the pelvis. Hamstring stretches are shown in the next chapter.
movement 2: hip lift—intermediate
1. Place your feet on the ball. Inhale to prepare.
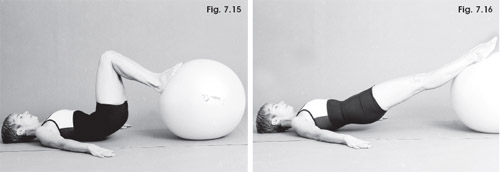
2. Exhale to squeeze the buttocks and lift the pelvis two or three inches, staying in neutral pelvis (fig. 7.15).
3. Inhale to roll the ball out (fig. 7.16) and exhale to pull the ball back in.
4. Repeat six to eight times.
movement 3: one leg hip lift—advanced
1. Inhale to prepare.
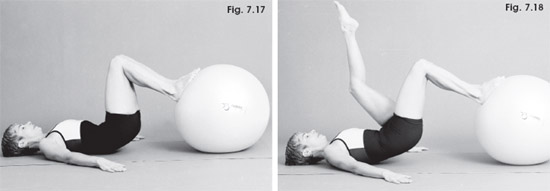
2. Exhale to squeeze the buttocks and lift the pelvis two or three inches (fig. 7.17).
3. Inhale to lift the left leg in the air (fig. 7.18).
4. Exhale and stay.
5. Inhale to roll the ball out. Exhale to pull the ball in.
6. Repeat five times. Lower your pelvis to the mat before changing to the right leg.
The abdominals work hard in this exercise. On the exhale sink them into the back of the spine as you extend the legs. If you have lower back pain, keep the legs very high in the air and perform only movement 1.
Purpose To tone the abdominals, legs, hip adductor muscles, and inner thighs.
Watchpoints • Try not to let the body sink between the shoulders. • Maintain stability in the abdominals.
starting position
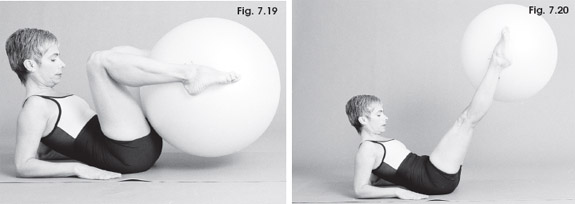
1. Lie on your back with knees bent. Pick up the ball between your ankles and squeeze. Bend the knees in.
2. Sit up and rest the upper body on your elbows (fig. 7.19).
movement 1: bend and stretch
1. Inhale to prepare.
2. Exhale to extend the legs 45 degrees or higher from the floor (fig. 7.20).
3. Inhale to draw the ball into you and exhale to extend the legs.
4. Perform this exercise six to eight times.
movement 2: ball twist—intermediate
1. Extend legs 45 degrees or higher from the floor.
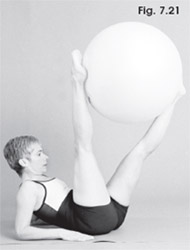
2. Keeping the legs straight, swivel the ball from side to side (fig. 7.21) and breathe naturally.
The sidework isolates the muscles of the leg and gives us the opportunity to work the front and the back of the body together. The abdominals are critical here for keeping the torso very stable while you are moving your legs. You do not need to lift the ball higher than two inches; if you feel any discomfort in the side of the waist then you are probably working the ball too high. If you have lower back pain focus on gently squeezing the ball between the feet and do not lift.
Purpose To strengthen the inner and outer thighs and the buttocks. To tone the inner thighs as you squeeze the ball.
Watchpoints • Be careful not to take the ball behind the body. • Use a small piece of foam if your hips are bony and you find it uncomfortable to lie on your side. • Think of stretching the ball away from you rather than bringing the legs up high. • Maintain abdominal connection throughout.

starting position
1. Lie on your side, one hipbone on top of the other, with the ball between your ankles.
2. One hand can rest behind your head, elbows folded (fig. 7.22), or relax the head down on the mat. Place the other hand on the mat to retain balance.
movement
Inhale to lengthen the heels as far away from the pelvis as possible, and squeeze the ball.
2. Exhale to lift the ball two or three inches (fig. 7.23).
3. Inhale to lower the ball. Exhale to lift.
4. Repeat five times on both sides.
Everything in the Pilates Method is done with precision, focus, and concentration, and this move puts all these principles to the test. Concentrate and have patience; your legs may shake as you try to find the moment of calm in the middle of this tricky balance. If there is tightness in the hips or hamstrings, getting the ball in place will be challenging, even impossible for some. Instead, try the movement against the wall.
Purpose To challenge your sense of balance and work the back of the legs and abdominals.
Watchpoints • Do not rush in or out of the balance. • Be sure that your feet are sitz-bone distance apart.
starting position
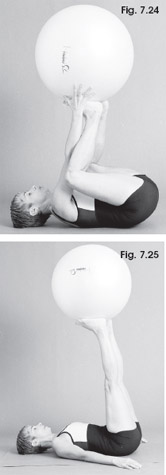
Lie on your back with the ball in your hands. Bend the knees into your chest and slowly attempt to rest the ball on the soles, not the sides, of your feet. Feet should be sitz-bone-distance apart (fig. 7.24).
movement 1
1. Slowly straighten your legs, keeping the ball balanced on the bottoms of your feet (fig. 7.25).
2. Breathe naturally.
3. When the legs are completely straight, hold the balance for as long as you like.
4. Slowly bend the legs, eventually taking the ball into your hands.
movement 2
1. Scoot your buttocks to four to six inches away from a wall.
2. Place the ball against the wall and slowly roll it up the wall with your feet. Balance the ball as much as you can on the soles, not the sides, of your feet. Your feet should be sitz-bone distance apart.
3. Stay in this position for a few moments, taking some deep breaths.
In this exercise the entire body, not just the arms or shoulders, works as a strong unit. With the legs resting on the ball there is time and support for pulling the abdominals up, checking hand-shoulder alignment, and adjusting head placement and lower body alignment. Movement 1 is fine to use with modest lower back pain but be doubly sure that the abdominals are engaged so that the lower back is protected. Whatever you do, do not slump down and sink in the middle. By far the biggest weakness people have with the Push-up is in the gluteals, the muscles of the buttocks. They do not think about the fact that the buttocks and inner thighs need to squeeze together.
You do not have to lower the body very far to be effective; start with a very small bend and stretch of the arms. As in most ball exercises the farther the ball is away from the torso the more difficult the move.
Purpose To work the chest and shoulder muscles and the entire torso.
Watchpoints • In order to maintain good stability in the shoulder girdle you may not want to lower the body too far. • Keep your shoulder blades open across the back and not pinching together as you perform the Push-up. • Do not let your elbows jar into place when you straighten the arms. • Avoid swayback. Keep the abdominals connected. • Squeeze the inner thighs and buttocks. • Do not let the head drop: keep it in line with the spine.
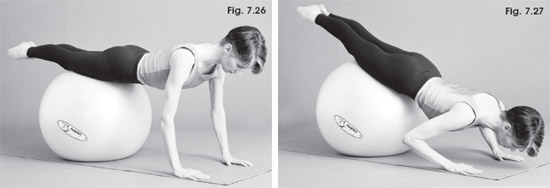
starting position
Kneel in front of the ball.
movement 1—basic
1. Place hands palm-down on the floor. Walk out, keeping hands just wider than the shoulders until the ball is right in front of the knees (on the thighs). Fingertips should be parallel to the body (fig. 7.26).
2. Inhale to bend the arms (fig. 7.27). Keep the movement small at first.
3. Exhale to straighten the arms.
4. Repeat six to eight times.
movement 2—intermediate
1. Begin this movement in the same way as movement 1, except walk out until the ball is on the other side of the knees (at the top of the shins).
2. Inhale to bend the arms.
3. Exhale to straighten the arms.
4. Repeat six to eight times.
movement 3: advanced push-up
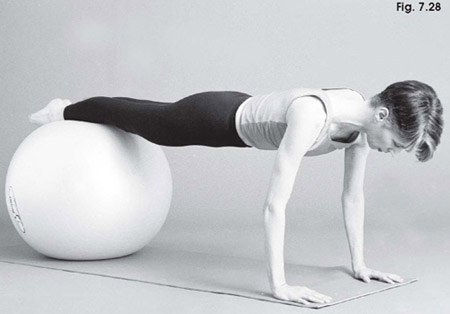
1. Begin this movement in the same way as movement 1, except walk out until the ball is on the ankles (fig. 7.28).
2. Inhale to bend the arms.
3. Exhale to straighten the arms.
4. Repeat six to eight times.
5. To further intensify the move try lifting one leg two inches from the ball, then attempt a small push-up. Keep both legs very straight.
The Pike
The Pike is an advanced move intended to challenge an already strong body. Movements 1 and 2 are supreme abdominal exercises that work the upper body. Try to keep the legs absolutely straight and connected as you attempt to lift the pelvis with the abdominals. Be sure that the area around you is clear in case you lose your balance.
Purpose To strengthen the arms and abdominals.
Watchpoints • The legs must remain very straight during this advanced move. • Imagine that you are suspended from the abdominals by a strong spring attached to the ceiling. • Keep the body steady while in the Pike, shoulders down and in place.
starting position
Place your hands palm-down on the floor. Walk out keeping the hands just wider than shoulder-distance apart until the ball is on the shins. Hands should be in place on the floor shoulder-distance apart or wider. Fingertips are parallel to the body.
movement 1—intermediate
1. Keeping your legs very straight, inhale to prepare.
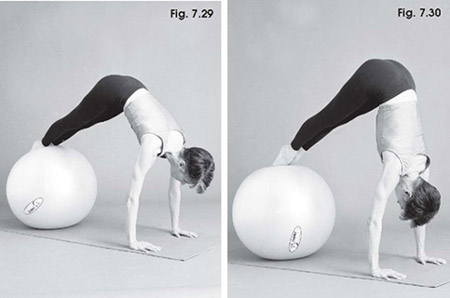
2. Exhale to lift the pelvis a few inches using the abdominals (fig. 7.29).
3. Inhale to the plank position.
4. Exhale to lift the pelvis.
5. Repeat the movement three to five times.
movement 2—advanced
1. Roll the ball down to the shins or ankles. Be sure that the entire torso is in place: buttocks and inner thighs connected, head aligned on spine and not dropped. Inhale to prepare.
2. Exhale to lift the pelvis as high as possible. Use your abdominals. Do not let the legs bend (fig. 7.30).
3. Inhale to lower to the plank position.
4. Exhale to lift into a Pike. Go as high as you can without losing control.
5. Hold the Pike for a few counts, breathing naturally.
6. Repeat this movement three to five times.
You worked very hard in this section and are now in for a luxurious treat. In the next chapter you will learn how to use the ball to stretch and elongate the body safely. Many studies reveal the power of stretching for preventing injury and reviving tight, tired muscles. The ball is one of the most unique and pleasurable aids for stretching available. The spherical shape of the ball and its relaxing, air-filled support will inspire you, as it has so many others, to make stretching an everyday activity.
