CHAPTER 6
Document Sets Feature
In the previous chapter, we discussed how to configure document ID Service and how it works. In this chapter, we will discuss all the document sets feature. The document set is an advanced version of a folder that holds a specific set of common documents that will be available to all newly created document sets. Means once you create a new document set, there are few default contents which will be created which are common to all document set. The document set is a content type that share metadata and metadata columns, provides options to manage content in the document set by applying workflow. Let’s proceed to discuss in detail about document set.
Structure
In this chapter, we will discuss the following:
- Introduction to the document set
- Activate dependent feature
- Creating a site content type
- Adding content type to the library
- Creating a modern document set
Objective
During the end of the chapter, you will get a clear understanding of:
- Document set overview
- Dependent feature for the document set
- Creating site content type, content type columns, edit document set settings
- Creating library, views, and adding content type to the library
- Creating a modern document set and how it is different from the classic document set
Activate feature first
To apply document set service, we need to activate one dependent site collection feature first that will enable this service. Let’s perform the following steps to activate the site collection feature:
- Navigate to Site Settings (
<_layouts/15/settings.aspx>) as seen in the following screenshot:
Figure 6.1: Site Settings
- Click on Site Collection Features (
<_layouts/15/ManageFeatures.aspx?Scope =Site>) present under Site Collection Administration as seen in the following screenshot: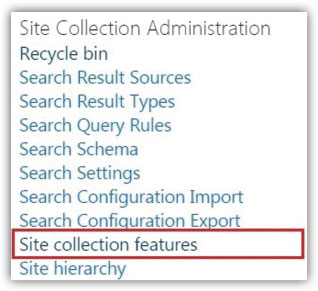
Figure 6.2: Site Collection Feature
- Identify the feature Document Sets at the bottom and click on
Activateas seen in the following screenshot:
Figure 6.3: Document Sets Site Collection Feature
Creating a new content type of type document set
Let’s perform the following steps to create a new site content-type:
- Navigate to Site Settings (
<_layouts/15/settings.aspx>). - Click on
Site Content Types(<_layouts/15/mngctype.aspx>) present under Web Designer Galleries as seen in the following screenshot:
Figure 6.4: Site Content Types
- Under Site Content Types click on Create (
<_layouts/15/ctypenew.aspx>) to create a new content type as seen in the following screenshot:
Figure 6.5: Create Site Content Types
- Enter details like Name (
BPB Publication) of content type, Description. - Select Document Set Content Types from the dropdown option Select Parent Content Type From. Option Parent Content Type will be selected as Document Set by default automatically as seen in the following screenshot:

Figure 6.6: Fill Details for New Site Content Type
- Next, under the option Group select checkbox New Group and enter group name
BPB Publication Group. Keep rest options as default as it is and click on OK. The new content type will be created as seen in the following screenshot, and you can see in Site Content Types:
Figure 6.7: Content Type Settings
Creating site columns
The next step is to create site columns in the content type. Let’s perform the following steps to create the document set content column:
- Click on Add from new site column from the content type settings page that we created just.
- Select the column type as Choice, enter Column Name as seen in the following screenshot:
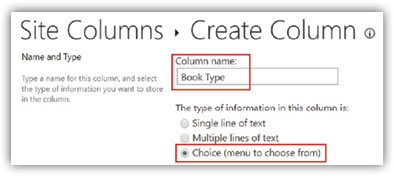
Figure 6.8: Enter Column Name during Creating Column
- Enter column Description.
- Select Yes from the option Require that this column contains information, which will make the column to fill details mandatory and cannot be left blank.
- Enter choice details (
PDF Book,Kindle Book,Paper Book) under the option Type each choice on a separate line. - From option Display choice using, select Checkboxes (allow multiple selections).
- From Allow ‘Fill-in’ choices, select No. Selecting Yes will allow you to enter your custom details apart from choices, you entered, which we don’t need here.
- From the option Default Value, select one choice value (
Paper Book) that we created and finally click on OK to create the column as seen in the following screenshot:
Figure 6.9: Fill Details for creating the column
- You see column Book Type added to content type columns. Similarly, add more columns Book Category to content type with choice details Computer Science, Information Technology, Computing, Application Development, Big Data and Business Intelligence, Business, Networking and Servers, Virtualization and Cloud, Web Development as seen screenshot below:

Figure 6.10: Create another column
- Now you see both columns Book Type and Book Category are added to content type columns as seen in the following screenshot:

Figure 6.11: Document set columns crated
The next step is to change settings in the document set content type.
Document set settings
Let’s perform the following steps to change a few settings under Document Set Settings:
- Navigate to option Content Types present under Library Settings and click on content type BPB Publication.
- From manage content type page, under Content Type Settings click on Document Set settings.
- Identify the option Default Content and upload a few common content templates that would be available in all document sets by clicking Choose File as seen in the following screenshot:

Figure 6.12: Default Contents in Document Set
- Identify the option Shared Columns and click on checkbox Shared for the columns Book Type and Book Category that we created as seen in the following screenshot:
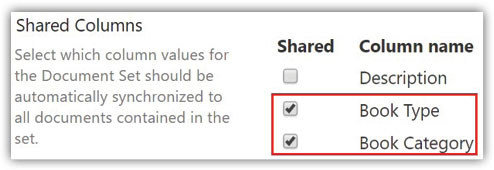
Figure 6.13: Shared Column
- Under the option Select View, keep the default view All Documents for the moment. But when you created a new view Document Set which is mentioned next section, you need to update that view here latter as seen in the following screenshot:

Figure 6.14: Document Set View
- Once all changes are done then click on OK to apply changes.
Create a document library
Let’s perform the following steps to create one document library:
- Navigate to Site Contents (
<_layouts/15/viewlsts.aspx?view=14>) in the site and click on New command bar and select App from the dropdown as seen in the following screenshot:
Figure 6.15: Add App to Site
- You will be redirected to the Add Apps page where you can select any app that you want to add. Click on the app Document Library, another dialog box will open.
- Enter document library Name (
BPB Project) from option Pick a name and click on Create as seen in the following screenshot:
Figure 6.16: Create a Document Library App
Document library BPB Project is created now. The next step is to add document set content type BPB Publication in this document library.
Allow management of content types
Before adding document set content type BPB Publication in the library, you need to enable Allow management of content types. Let’s perform the following steps to enable Allow management of content types:
- Navigate to Library Settings and click on Advanced Settings under the category General Settings as seen in the following screenshot:

Figure 6.17: Advanced Settings in the document library
- Enable Content Types by selecting checkbox Allow management of content types and apply changes as seen in the following screenshot:

Figure 6.18: Allow Management of Content Types
- You will see Document as default content type added to Library Settings with added new category Content Types. Now we can proceed for adding content type
BPB Publicationin the libraryBPB Project.
Adding content type to the library
Let’s follow step by step procedure to add content type BPB Publication in the library BPB Project:
- Navigate to option Content Types present under Library Settings and click on Add from existing site content types (
https://<site url>/_layouts/15/AddContentTypeToList.aspx?List=**) as seen in the following screenshot:
Figure 6.19: Add from existing site content types
- From the Add Content Types page, under dropdown option Select site content types from select the group BPB Publication Group that we created while creating content type.
- Content-type
BPB Publicationrelated to that group BPB Publication Group will appear in the next box. Select the content type and click on Add present side to that box. Content-typeBPB Publicationwill be added to another box Content types to add then click on OK finally to apply changes as seen in the following screenshot:
Figure 6.20: Add Content Types
- Now content type
BPB Publicationis added to the library, but this content type is not the default content type.
Change the default content type
We need to make content type BPB Publication as default content type. Let’s follow step by step procedure to change the default content-type:
- Navigate to option Content Types present under Library Settings and click on Change new button order and default content type (
https://<site url>/_layouts/15/ChangeContentTypeOrder.aspx?List=**) as seen in the following screenshot:
Figure 6.21: Change new button order and default content type
- From change content type order page, uncheck Document content type Visible checkbox and click on OK to apply the change as seen in the following screenshot:

Figure 6.22: Change the Default Content Type
- You see in the Content Type category, content type
BPB Publicationis set as default content type as seen in the following screenshot:
Figure 6.23: Content Type Added
- We can delete the library content type Document now from the Content Type category since we need the only document set content type
BPB Publication.
Delete content type from the library
Let’s follow the step-by-step procedure to delete the content type from the library:
- Navigate to option
Content Typespresent underLibrary Settingsand click on content typeDocument. - From manage content type page, under
Content Type Settingsclick onDelete this content typeas seen in the following screenshot: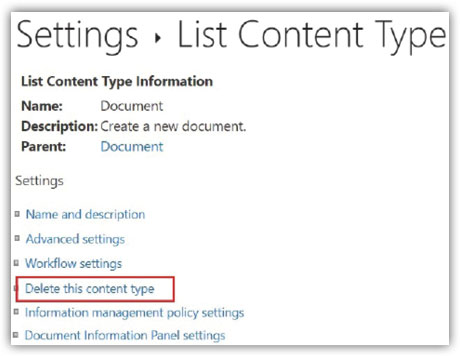
Figure 6.24: Delete Content Type
- This change will remove the Document content type from the library, and we can proceed with default content type
BPB Publicationnow.
Creating a document set view
In this section we will create a view for the document set. Let’s follow the step-by-step procedure to create a document library view:
- Navigate to option Views present under Library Settings, you see the view All Documents as the default view. Click on Create View as seen in the following screenshot:

Figure 6.25: Create View
- There are 4 types of view template Standard View, Datasheet View, Calendar View, Gantt View present from which we can select. Click on Standard View as seen in the following screenshot:

Figure 6.26: View Templates
- Enter View Name (
Document Set) and select the checkbox Make this the default view as seen in the following screenshot:
Figure 6.27: Enter View Name
- Select the checkbox under column Display for the columns Book Type, and Book Category to display the columns in the library as seen in the following screenshot:

Figure 6.28: Display Column Name in View
- Scroll down and identify the category Folders and select In folders of content type and select content type
BPB Publicationfrom the dropdown. - Expand the category Mobile and select the checkboxes Enable this view for mobile access and Make this view the default view for mobile access and click on OK to apply as seen in the following screenshot:

Figure 6.29: In folders of the content type
- New view Document Set created as seen in the following screenshot:

Figure 6.30: View Created
Create a modern document set
Let’s follow the step-by-step procedure to create a modern document set:
- Now open the library
BPB Projectand click on New from the command bar. - You will see the content type
BPB Publicationis added to this menu - Click on Edit New Menu from the dropdown.
- Uncheck the box Folder and click on Save. Now only document set content type
BPB Publicationis present under the option New in the command bar. - Click on the document set content type
BPB Publicationas seen in the following screenshot:
Figure 6.31: Edit New Menu
- You will find all content type columns which you need to fill. Enter details Name (
Project 1904), Description (Project 1904: SharePoint Online Power User Playbook), Book Type (PDF Book, Kindle Book, Paper Book), Book Category (Information Technology) and click on Save as seen in the following screenshot:
Figure 6.32: Create a Document Set
- The document set
Project 1904is created and you will see the default contents, which we have uploaded before, present in the document set created. Users can start uploading their content in this document set now. - You see the default view inside the document set is set as a Document set view. Also, columns Book Type and Book Category inheriting details as seen in the following screenshot:

Figure 6.33: Document Set Default Contents
- Open the document library
BPB Projectand can see the document setProject 1904. Click on the view All Documents, select the view Document Set. - Click again the view Document Set and select Set current view as default from the dropdown which will make this view as default for the library as seen in the following screenshot:

Figure 6.34: Document Set View
- Select document set
Project 1904again and click on Details Pane from the command bar. You can see all properties of the documents set. This is how the Modern Document Set looks like same as the new modern library as seen in the following screenshot:
Figure 6.35: Document Set Properties
- If we want to see the Classic Document Set, click on the option Return to classic SharePoint present at the bottom of the left navigation menu as seen in the following screenshot:
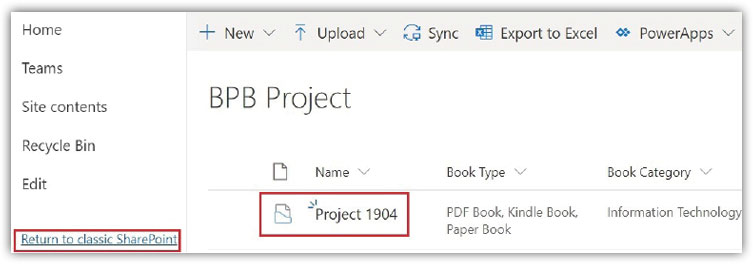
Figure 6.36: Return to classic SharePoint Document Set
- You will be redirected to the classic document library with the document set
Project 1904. Click on the documents set, you will be redirected to another page which is called the document set Welcome Page: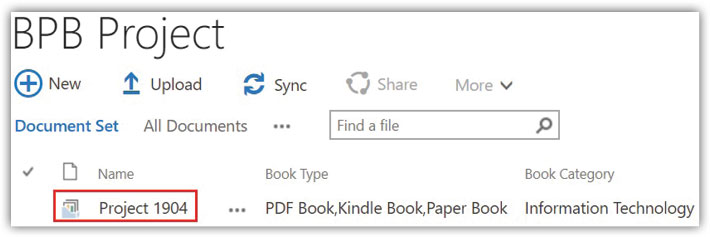
Figure 6.37: Classic Document Set in Library
- This is the Welcome Page of the document set, which shows document set properties at the top and contents below as seen in the following screenshot below. Click on View All Properties to see the document set properties:
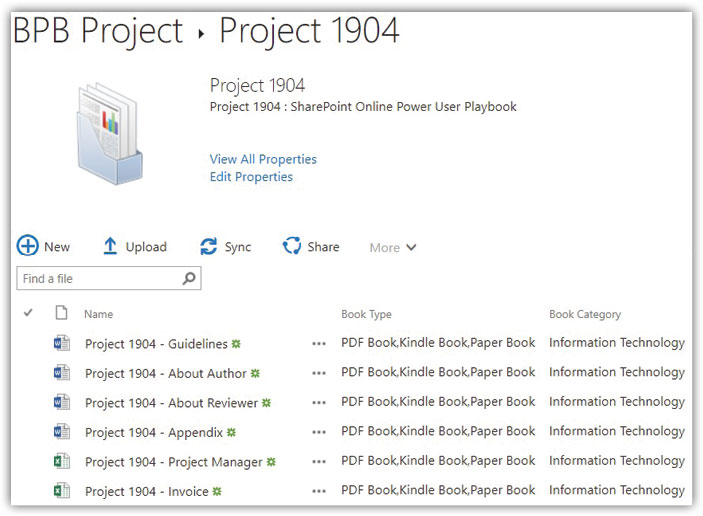
Figure 6.38: Classic Site Document Set Welcome Page
- This is the document set properties which you will find in classic site document set as seen in the following screenshot:
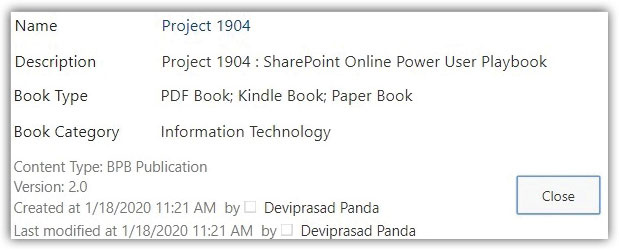
Figure 6.39: Classic site Document Set Properties
We created one document set for publication project related to the book SharePoint Online Power User Playbook that has specific documents which are common to all book project and required for book publication. Similarly, we can create a separate document set for each project for each book for better organization of book publication project. This is just an example to show how it works, you can categorize your own to get its benefit of the document set and its use as seen in the following screenshot:

Figure 6.40: Multiple Document Sets for Different Book Project
If you have Document ID feature active you see, each document set has its document ID assigned as seen in the following screenshot:

Figure 6.41: Document ID Assigned to Each Document Set
If you search document ID, you will get the document set as a result as seen in the following screenshot:

Figure 6.42: Search Document Set
Conclusion
In this chapter we had a glance on the document set all about, what is the purpose of using this. Understood the dependent features for the document set. Discussed step by step to create site content type, adding columns to the content type. How to configure document set settings. How to add document library from the app, how to create library view, add the content type to library. The created modern document set and discussed how it’s different from the classic site document set. Next in Chapter 7: Content Organizer Feature will discuss how content organizer feature works.
Points to remember
- The document sets site collection feature activation is a must.
- The modern document set interface is similar to the modern library. You will not see the document set on the welcome page that you were getting in the classic site document set.
- In this chapter wherever its mentioned like this format
_layouts/15/****.aspx, means this section is added after the site URLhttp://<site url>/_layouts /15/****.aspx. - Regular changes are applied in Office 365 and SharePoint Online by which there may be changes happen in the template or some other features.