CHAPTER 8
Manage Permission
Introduction
In the previous chapter, we discussed all the content organization features. In this chapter, we will discuss SharePoint permission management. We know SharePoint provides a collaborative platform for content management. Users upload documents in the library, access content to work collaboratively. Since all contents present and accessed through the SharePoint site, managing the security of the content is very important so as to make sure that only users authorized to those contents should access. SharePoint Permission management comes into picture which plays the most critical role so as to manage content security. We need to control who can access the content and who should be restricted. We need to control what action users can take based on their roles. So, SharePoint provides options to control permission for the contents stored in sites and manage security.
Structure
In this chapter, we will discuss the following:
- Introduction to permission in SharePoint
- SharePoint groups by default
- Permission levels in SharePoint
- Different settings in permission management
- Permission management modern experience
Objective
During the end of the chapter, you will get a clear understanding of the following:
- Permission overview
- Default groups in SharePoint
- Groups dependent on features
- Different permission levels
- Different settings available for permission management
- Modern experiences in permission management
SharePoint groups by default
Till now we discussed site collection, sites, subsites, list, library, how to upload documents in the library, store information in the list but how can we restrict the access of these contents based on user roles so that only authorized people can access the content in site or library or list, is not discussed yet. In this chapter we are going to discuss how to manage the security of SharePoint content.
Once a site is created, there are some default groups created on the site. Let’s perform the following steps to check the default groups in SharePoint:
- Click on Settings (gear icon)
 from site. Click on Site permissions from the dropdown as seen in the following screenshot:
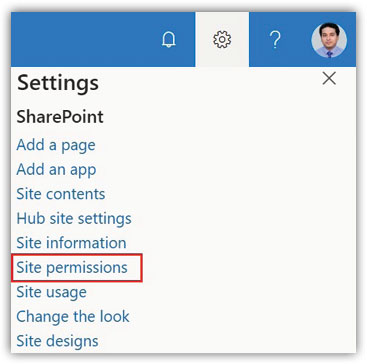
Figure 8.1: Site Permissions
- You will get another window with information like Invite people, Site owners, Site members, Site visitors, Change sharing settings, Advanced permissions settings. Click on Advanced permissions settings (
<_layouts/15/user.aspx>) as seen in the following screenshot:
Figure 8.2: Advanced Permissions Settings
- You will be redirected to the User page where you can find three SharePoint groups
BPB-ModernTeamSite Members,BPB-ModernTeamSite Owners,BPB-ModernTeamSite Visitorsby default as seen in the following screenshot. Group name is in format <Site Name> Owner, <Site Name> Members, <Site Name> Visitors:
Figure 8.3: Default SharePoint Groups
- You see each group is assigned to a permission level. The user needs to be added to a particular group to manage the task as per the role. We will discuss this in detail later sections.
- Activating site collection features will create a few SharePoint groups. Activating SharePoint Server Publishing Infrastructure feature will create groups Translation Managers, Restricted Readers, Hierarchy Managers, Approvers, Designers as seen in the below screenshot.
- Activating SharePoint Server Enterprise Site Collection features will create group Excel Services Viewers as seen in the below screenshot.
- When we will create record center, another group Records Center Web Service Submitters will be created as seen in the below screenshot:

Figure 8.4: Groups Created After Activating Features
Permission levels
There are specific actions in the site that can be taken by specific group of people assigned with specific permission level. As per the roles and responsibility, users are assigned permission to that group so as to manage specific tasks.
You see every SharePoint group is assigned with a permission level. Different permission level in SharePoint are View Only, Read, Edit, Full Control, Approve, Design, Manage Hierarchy, Restricted Read, Records Center Web Service Submitters, Restricted Interfaces for Translation, Limited Access as seen in the following screenshot:
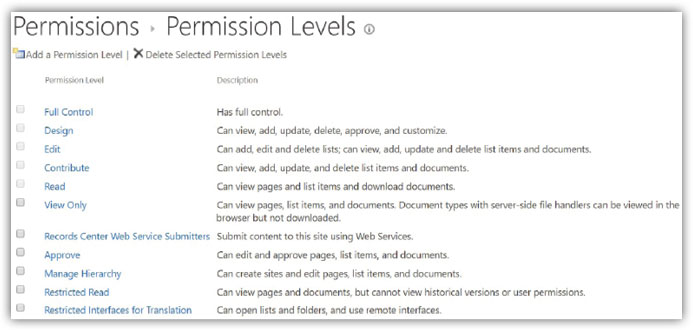
Figure 8.5: Permission Levels
Click on Permission Levels (https://<site url>/_layouts/15/role.aspx) from ribbon present under PERMISSIONS tab as seen in the following screenshot to see all permission levels:
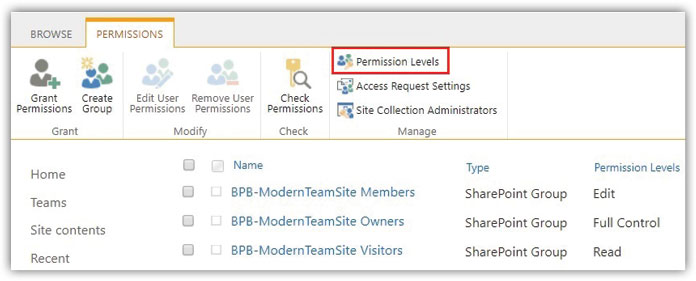
Figure 8.6: Permission Level Settings
Read permission level
Click on any one of the permission levels, let’s say Read as seen in the following screenshot. You will see the type of actions that users with read permission can take:

Figure 8.7: Read Permission Level
Users having Read permission can open, read list items, documents present in library. They can view application pages and document versions as well as seen in the following screenshot:

Figure 8.8: List Permissions Read Permission Level
At site level user can open site, access all lists, libraries, folders, pages, and can browse user information as seen in the following screenshot:
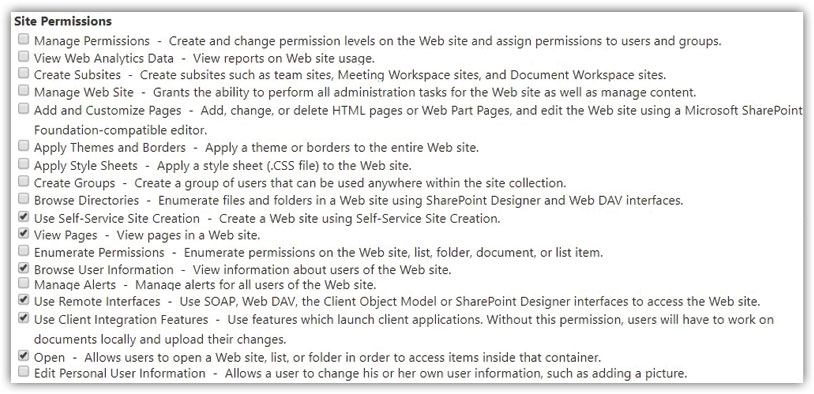
Figure 8.9: Site Permissions Read Permission Level
There is no action that can be taken by user at Personal Permissions as seen in the following screenshot:

Figure 8.10: Personal Permissions Read Permission Level
View only permission level
Click on the permission level View Only, you will see the actions that can be taken by user having view only permission. Users can view site pages and content in site but cannot download the files as seen in the following screenshot:

Figure 8.11: View Only Permission Level
User can view items, list item and document versions, application pages. User can create alerts as well as seen in the following screenshot:

Figure 8.12: List Permissions View Only Permission Level
At site level permissions user can view pages, list, libraries, user information as seen in the following screenshot:

Figure 8.13: Site Permissions View Only Permission Level
There is no action that can be taken by user at Personal Permissions. This permission level is applicable for the group Excel Services Viewers. This permission level has lower permission then Read permission level.
Edit permission level
Click on the permission level Edit as seen in the following screenshot which is superior permission to Read permission:

Figure 8.14: Edit Permission Level
User can create list, delete list, add list columns, and views in list. User can view list or document versions and delete versions as well as seen in the following screenshot:

Figure 8.15: List Permissions Edit Permission Level
User can browse directories, files, folders using designer, also can view user information and can edit own information. User can edit the document and can upload in the library as seen in the following screenshot:

Figure 8.16: Site Permissions Edit Permission Level
User can manage their personal view, add or remove webparts, can update to show personalized information as seen in the following screenshot:

Figure 8.17: Personal Permissions Edit Permission Level
Contribute permission level
Click on the permission level Contribute as seen in the following screenshot:

Figure 8.18: Contribute Permission Level
If you compare Contribute permission with Edit permission, then you see contribute has same level of permission except Manage Lists permission means user cannot create and delete list, cannot add or remove columns, cannot add or remove views. User can view pages, list or document items, item versions and delete items from list or library as well as seen in the following screenshot:

Figure 8.19: List Permissions Contribute Permission Level
User can browse directories, files, folders using designer. User can browse user information and can edit own information. User can edit the document and can upload in the library which is same as of Edit permission level as seen in the following screenshot:

Figure 8.20: Site Permissions Contribute Permission Level
User can manage their personal view, add or remove webparts, can update to show personalized information as seen in the following screenshot:

Figure 8.21: Personal Permissions Contribute Permission Level
Full control permission level
Full control is the highest level permission in site. Users with full control permission level are authorized to do all activities in the site and subsite level. Click on the permission level Full Control. You see under category List Permissions all options are enabled. User can Manage Lists, Override List Behaviors, Add Items, Edit Items, Delete Items, View Items, Approve Items, Open Items, View Versions, Delete Versions, Create Alert, View Application Pages as seen in the following screenshot:

Figure 8.22: List Permissions Full Control Permission Level
At site permission level user can Manage Permissions, View Web Analytics Data, Create Subsites, Manage Web Site, Add and Customize Pages, Apply Themes and Borders, Apply Style Sheets, Create Groups, Browse Directories, Use Self-Service Site Creation, View Pages, Enumerate Permissions, Browse User Information, Manage Alerts, Use Remote Interfaces, Use Client Integration Features, Open, Edit Personal User Information as seen in the following screenshot:
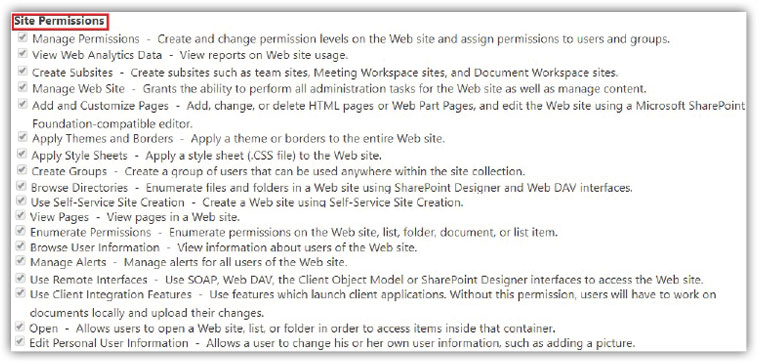
Figure 8.23: Site Permissions Full Control Permission Level
User can manage their personal view, add or remove webparts, can update to show personalized information as seen in the following screenshot:

Figure 8.24: Personal Permissions Full Control Permission Level
Design permission level
User with Design permission are mainly responsible to add, delete, customize pages, apply themes and borders, apply style sheets, add and remove webparts as seen in the following screenshot:

Figure 8.25: Design Permission Level
User having Design permission, all options are enabled at list permissions level similar to user having Full Control. User can Manage Lists, Override List Behaviors, Add Items, Edit Items, Delete Items, View Items, Approve Items, Open Items, View Versions, Delete Versions, Create Alert, View Application Pages as seen in the following screenshot:

Figure 8.26: List Permissions Design Permission Level
At site permission level user can Add and Customize Pages, Apply Themes and Borders, Apply Style Sheets, Browse Directories, Use Self-Service Site Creation, View Pages, Browse User Information, Use Remote Interfaces, Use Client Integration Features, Open, Edit Personal User Information as seen in the following screenshot:
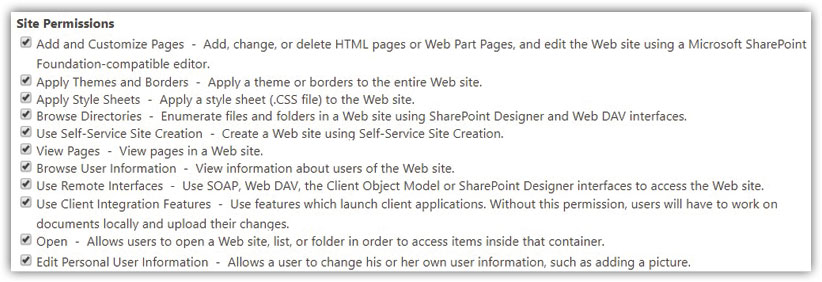
Figure 8.27: Site Permissions Design Permission Level
User can manage their personal view, add or remove webparts, can update to show personalized information as seen in the following screenshot:

Figure 8.28: Personal Permissions Design Permission Level
Approve permission level
Permission level Approve is mainly assigned to users who are primarily responsible for review the contents and can do the needful by approving or rejecting or sending back to owner of the content for review and submit again for approval as seen in the following screenshot. The approval is done by the authorized persons, so a dedicated group creation might be required as per business requirement:

Figure 8.29: Approve Permission Level
User can Override List Behaviors, Add Items, Edit Items, Delete Items, View Items, Approve Items, Open Items, View Versions, Delete Versions, Create Alert, View Application Pages as seen in the following screenshot:

Figure 8.30: List Permissions Approve Permission Level
At site permission level user can Browse Directories, Use Self-Service Site Creation, View Pages, Browse User Information, Use Remote Interfaces, Use Client Integration Features, Open, Edit Personal User Information as seen in the following screenshot:

Figure 8.31: Site Permissions Approve Permission Level
User can manage their personal view, add or remove webparts, can update to show personalized information as seen in the following screenshot:

Figure 8.32: Personal Permissions Approve Permission Level
Manage hierarchy permission level
User with Manage Hierarchy permission can create sites, edit site pages including items in list and library as seen in the following screenshot:

Figure 8.33: Manage Hierarchy Permission Level
User can Manage Lists, Override List Behaviors, Add Items, Edit Items, Delete Items, View Items, Open Items, View Versions, Delete Versions, Create Alert, View Application Pages as seen in the following screenshot:

Figure 8.34: List Permissions Manage Hierarchy Permission Level
At site permission level user can Manage Permissions, View Web Analytics Data, Create Subsites, Manage Web Site, Add and Customize Pages, Browse Directories, Use Self-Service Site Creation, View Pages, Enumerate Permissions, Browse User Information, Manage Alerts, Use Remote Interfaces, Use Client Integration Features, Open, Edit Personal User Information as seen in the following screenshot:

Figure 8.35: Site Permissions Manage Hierarchy Permission Level
User can manage their personal view, add or remove webparts, can update to show personalized information as seen in the following screenshot:

Figure 8.36: Personal Permissions Manage Hierarchy Permission Level
Restricted read permission level
User with Restricted Read permission is restricted primarily with list item or document versions, user permissions as seen in the following screenshot:

Figure 8.37: Restricted Read Permission Level
At list permissions level, user can view list items, documents, open items as well as seen in the following screenshot:

Figure 8.38: List Permissions Restricted Read Permission Level
At site permissions level user can view pages, open list, library, and folders to view items as seen in the following screenshot:

Figure 8.39: Site Permissions Restricted Read Permission Level
Restricted interfaces for translation permission level
The permission Restricted Interfaces for Translation is mostly applicable for SharePoint developers. Open Restricted Interfaces for Translation permission level as seen in the following screenshot:

Figure 8.40: Restricted Interfaces for Translation Permission Level
User can User Remote Interfaces and Open site, list, library, folder. User having Contribute permission only in library will not allow to open the item. User must have minimum Restricted Interfaces for Translation permission at site level and Contribute at library or list level will allow users to open items. This allows to view list or library properties using remote interfaces like REST API, Web Services, Client Object Model, and SharePoint Designer as seen in the following screenshot:

Figure 8.41: Site Permissions Restricted Interfaces for Translation Permission Level
Records center web service submitters permission level
The permission Records Center Web Service Submitters allows users to submit content to site using web services as seen in the following screenshot:

Figure 8.42: Records Center Web Service Submitters Permission Level
User can User Remote Interfaces and Open site, list, library, folder to access items as seen in the following screenshot:

Figure 8.43: Site Permissions Records Center Web Service Submitters
Custom permission level
We discussed about different permission level that are created by default or by activating any feature. We can create a custom permission level as per business requirement by which we can allow or restrict any specific permission to a dedicated group of people.
Let’s say I want to create custom permission level (contribute without delete) where users will have contribute permission but want to restrict users from deleting items from list or library. Let’s perform the following steps to create custom permission level:
- Click on Contribute (
<_layouts/15/editrole.aspx?role=Contribute >) from permission level. - Scroll down to bottom of the page and click on Copy Permission Level as seen in the following screenshot:

Figure 8.44: Copy Permission
- You will be redirected to copy role page (
<_layouts/15/copyrole.aspx?role=Contribute >) where you need to enter Name (Contribute Without Delete) of the permission level that you want to create and Description of the page. - You will see same permissions List Permissions, Site Permissions, Personal Permissions are checked in. Identify Delete Items from List Permissions and Uncheck that option as seen in the following screenshot:

Figure 8.45: Copy Permission Level
- Click on Create button present at the bottom of page.
- Custom permission level Contribute Without Delete created now to apply.
Access request settings
Access Request Settings provides sharing option in site. Let’s perform the following steps to see different settings available and will see how it works:
- Click on Access Request Settings from ribbon under user page as seen in the following screenshot:

Figure 8.46: Access Request Swttings
- Another dialog box will open where you will find options Allow members to share the site and individual files and folders, Allow members to invite others to the site members group, BPB-ModernTeamSite Members. This setting must be enabled to let members share the site which allows to share site, files, folders are enabled by default as seen in the below screenshot:
- Next option Allow access requests where you can configure who will receive access requests for the site. By default, all members of the group BPB-ModernTeamSite Admins will receive approval request for access request as seen in the below screenshot.
- If you need to dedicate one user who is responsible for providing and handling access request for better management and additional security, select next radio button and enter e-mail address of that person as seen in below screenshot:

Figure 8.47: Allow Access Request
- Navigate to Settings (gear icon) from home page of modern site. Click on Site Permissions from drop down.
- Click on Change sharing settings then you see the sharing option is same as we discussed with a new look as seen in the following screenshot:
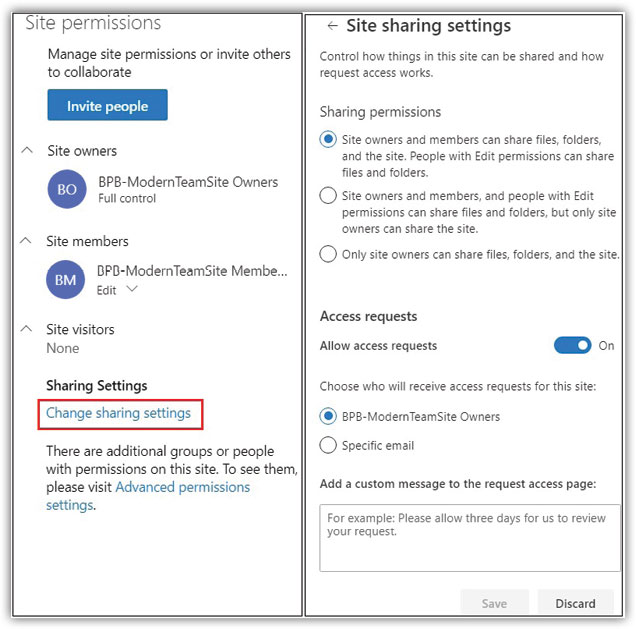
Figure 8.48: Sharing Settings
First option in new sharing option allows site owner and member can share files, folder, and site. People with edit permission can share files and folders:
- Second option allows site owner and member, people with edit permission can share files and folders. Site owner only can share site.
- Third option allows only site owner can share file, folders, site.
Site collection administrators
Next setting under Permissions tab is Site Collection Administrators who has admin level permission over the site collection to handle all actions in site collection as well as sites present under that site collection. Click on Site Collection Administrators from ribbon, you see owner group BPB-ModernTeamSite Owners is added as site collection administrator by default as seen in the following screenshot. You can modify this and can add dedicated users or groups here:
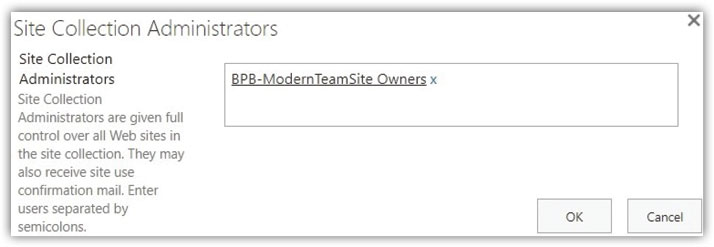
Figure 8.49: Site Collection Administrator
Check user permission
When we need to check, which user is having what type of permission in the site then we can click on Check Permission from ribbon under permission tab. Enter Name or Mail Address in the people picker box and click on Check Now. You will see the user permission level and part of the group related to that permission level as seen in the following screenshot. If you will not find anything after search means, user or group has no permission. User or group need to raise request to get access in the site or library or list or item:

Figure 8.50: Check User Permission
Remove user permission
If any user or group is no more part of authorized group, then we need to follow this option Remove User Permissions present in ribbon under the tab PERMISSIONS to remove permission from site. Select the User or Group and click on Remove User Permissions. You will get one message which you need to confirm by clicking OK as seen in the following screenshot. Permission will be removed:

Figure 8.51: Remove User Permission
Edit user permissions
If you want to change the permission of an existing user already having permission level assigned and part of one SharePoint group, then we need to follow Edit User Permissions. Let’s perform the following steps to edit user permission:
- Select any user or group that you want to edit permission.
- Click on Edit User Permissions from ribbon.
- Select permission level you want to assign by selecting checkbox and click OK as seen in the following screenshot:
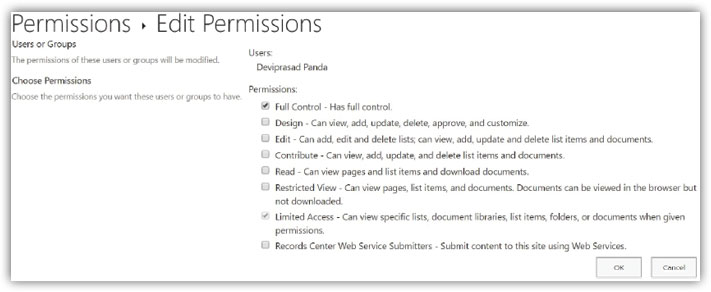
Figure 8.52: Edit User Permission
Grant permissions
When users’ need access to site or list of libraries, they need to contact the authorized person (site owners having full control or any dedicated user responsible to assign permission) responsible for this and create a request for access with type of permission level. Authorized person responsible for providing access need to follow these below steps to assign permission:
- Click on Grant Permissions from the ribbon.
- Enter Name or Mail ID of the user whom you are going to give permission.
- Click on Show Options.
- Choose one permission level from the dropdown option Select a permission level. Select a group having a permission level which will add the user into that group else you can add the user directly to a permission level with no groups linked (Read, Contribute, Full Control, and so on) as seen in the following screenshot. As per the best practice its always recommended to create a group and assign users to that user instead of adding directly to the user:
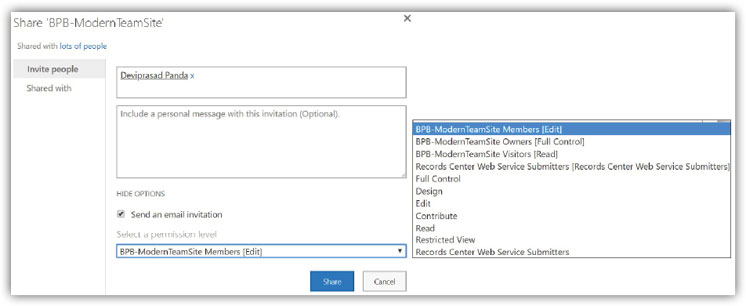
Figure 8.53: Grant Permission
Create a group
As per the best practice its always recommended to create a group if you want to assign permission to users apart from default permission. As an example, we have created a custom permission level Contribute Without Delete by making a small change in the permission level Contribute that is restricted the delete permission for items in the library or list. If you want to assign Contribute Without Delete permission to any user then better you create a group, assign Contribute Without Delete permission level to the group and add users to the custom group. Let’s perform the following steps to create a group:
- Click on Create Group from ribbon as seen in the following screenshot:

Figure 8.54: Create Group
- Enter Name (
BPB-ModernTeamSite Custom) and About Me of the group. - There should be an owner of the group. Enter owner Name or Mail ID in the box Group Owner.
- From the next option Group Settings, select Who can view the membership of the group as Group Members by which only members of this group can see all members present in this group. There is another option Who can edit the membership of the group which you need to select as Group Owner as seen in the following screenshot:
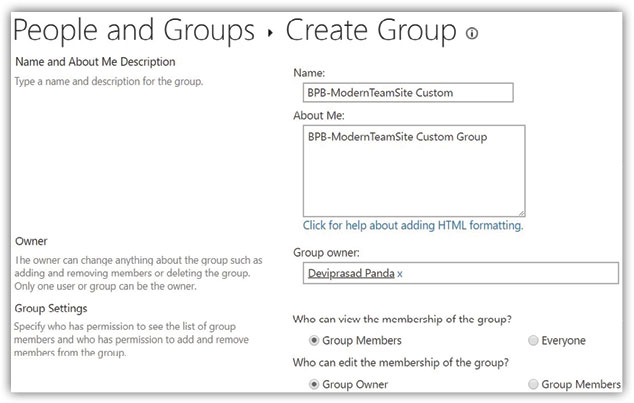
Figure 8.55: Custom Group Name, Owner, Group Settings
- From next option Membership Requests, select Allow requests to join/leave this group as Yes and in the field Send membership requests to the following e-mail address, enter the e-mail address of the person who will receive a mail when any user want to be added into his group. The reason for this setting like adding users into this group needs to be done by a specific user for additional security.
- Select the type of permission level that needs to be assigned to the group. Select the custom permission level Contribute Without Delete that we created before as seen in the following screenshot. From next time onwards whenever any user needs to be assigned to Contribute Without Delete permission then add users to this custom group
BPB-ModernTeamSite Custom.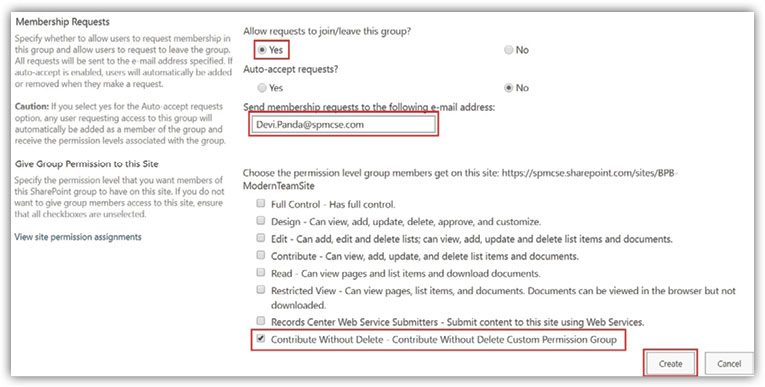
Figure 8.56: Membership Requests and Group Permission Details For Custom Group
- You see the custom group
BPB-ModernTeamSite Customis added as seen in the following screenshot: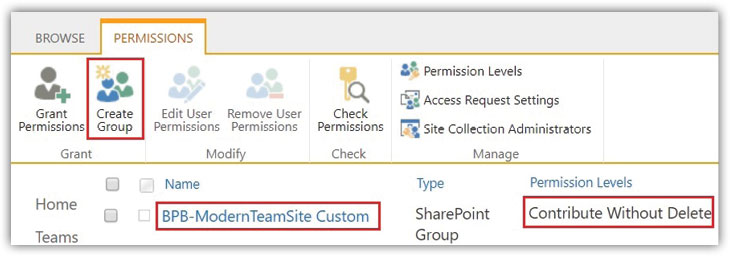
Figure 8.57: Custom Group Created
Permission inheritance
If we see the hierarchy in SharePoint from lower to a higher level it comes like list or library items present in list or library, respectively. Library or list present in a subsite. Subsite is under the next higher-level site or site collection. If we assign permission (Contribute) to the user at site collection, by default all subsite present under that site collection inherit the same permission (Contribute) as of site collection. All lists, libraries present under that subsite inherit the same permission (Contribute) as of subsite. All items present under list or library inherit the same permission (Contribute) as of the list or library respectively. So, we can control permission at any level from site collection to list or library item level. Let’s perform the following steps to achieve this:
- If you want to restrict users for access at any level (site, list/library, and item) and assign permission to specific users as per business requirement then we need to break inheritance by selecting Stop Inheriting Permissions from the ribbon. We call it as unique permission means subsite has its permission management and not inheriting permission from the higher-level site. Next, you will get a message for confirmation to proceed, click on OK as seen in the following screenshot:

Figure 8.58: Stop Inheriting Permission
- You will be redirected to the permission set up a page where you have options to create new groups for the site you want to set unique permission. You can create a new group by clicking Create a new group or can proceed with the same group clicking on OK as seen in the following screenshot. Permission inheritance is broken and now you can assign permission to the user for that site manually by following the normal process.
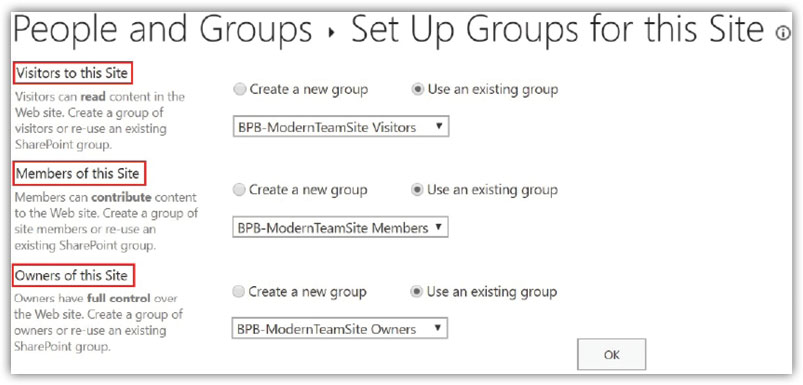
Figure 8.59: Set Up Group
- This is very critical to Stop Inheriting Permissions because all users including owners will also lose permission. So, while creating a site or site owner should plan for this option for permission management, else everything needs to be set up manually which might be very difficult for large sites.
- Similarly, we can stop permission at the library or list level or item level following the same steps discussed. If you want to inherit the next higher-level site permission again, you need to select the option Delete Unique Permissions from the ribbon. You will get a confirmation message of losing permission, once confirmed by clicking OK as seen in the following screenshot, inheritance is established again:

Figure 8.60: Delete Unique Permissions
Permission management modern experience
There are new experiences in which permission is introduced that makes sharing, assigning permission simple. Users can be added to certain groups like owners, members by option Invite People. Easy to add a user to SharePoint groups by the option by Share Site Only. New Experience in sharing introduced. Let’s discuss each option in detail.
Invite people
Option Invite People to allow to add users in groups like Owner, Member. Navigate to Settings (gear icon) from the home page of the modern site. Click on Site Permissions from the dropdown. You will find an option Invite People button, just click on Invite People button. You will notice two options Add members to group and Share site only as a dropdown. Let’s discuss on Add members to group and Share site only in details.
Add members to the group
When you will click Invite People button, you will get an option Add members to group. Let’s perform the following steps to see the options available to add members to the group:
- Click on Add members to group.
- From the next option under Group Membership click on Add members.
- Enter Name or email address in the box and click on Save as seen in the following screenshot:
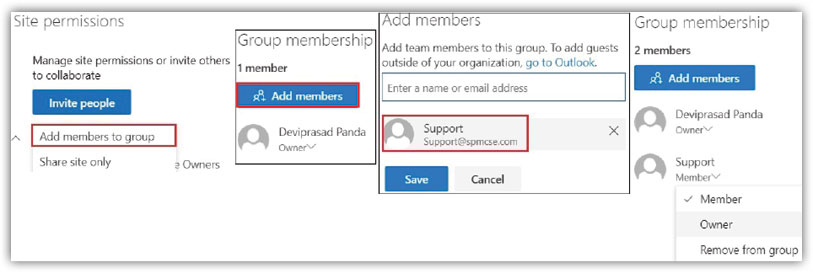
Figure 8.61: Add Members to Group
- Users will be added as Member by default and the number of members is updated.
- We can further change the permission level. Click on the expand option by clicking Member or Owner present below the username, select the type of membership. Membership will be updated.
- If you want to remove from the group, then click on Remove from group.
- By Add members to group option we can change the membership between Owner and Member only not with other permission levels.
- When any user is added by Add members to group option these users are added to the Office 365 Group/Microsoft Teams (BPB-ModernTeamSite) as seen in the following screenshot:
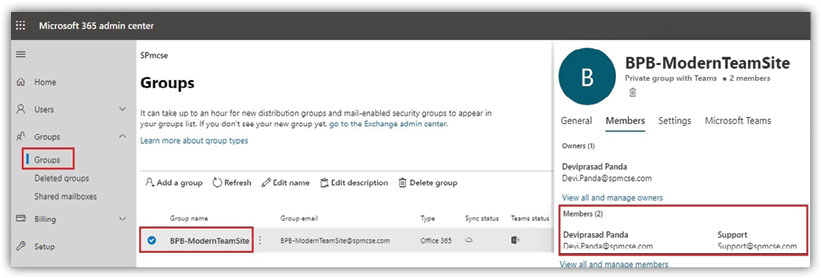
Figure 8.62: Office 365 Group Members Added
Share site only
Let’s perform the following steps to see how Share Site Only works:
- Click on Share site only option from the dropdown under Invite People.
- Enter Name or email ID of the user, you see by default user will be showing Edit permission.
- Click on button Add, the user will be added to the group BPB-ModernTeamSite Members.
- If you click on the Edit permission level, you will see the dropdown option to change to different permission level Read or Full Control. If you select Read, the user will be added to the group Site Visitors as seen in the following screenshot:
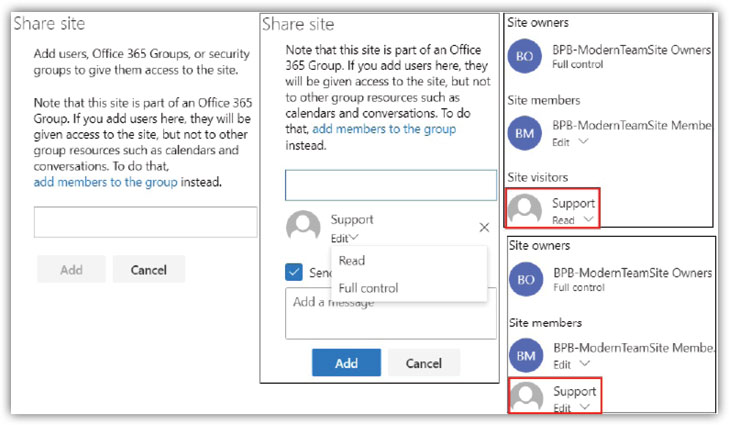
Figure 8.63: Share Site Only
- When any user is added by Share site only, these users are added to the SharePoint groups (Owners, Members, and Visitors) present in the site, not in office 365 group.
Sharing options
Sharing options provides a link to users by which they can access a specific file or folder directly. Let’s perform the following steps to check how sharing options work exactly:
- Click on the file or folder that you want to share.
- Click on Share from the command bar.
- Another way you can get the Share
 option side to the file or folder name or by clicking Show Action
  button as seen in the following screenshot:
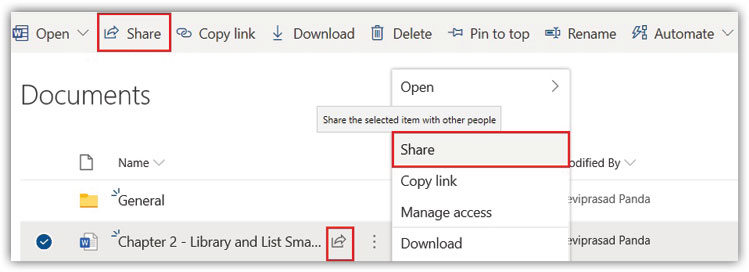
Figure 8.64: Share
- On clicking Share, another dialog box will open where you need to enter the email ID of the user to which file needs to be shared.
- Click on the option People in SPmcse with the link can view the present above user.
- There will be 4 types of options under link settings as seen in the below screenshot. You need to select any one and click on Send.
- Anyone with the link: Anyone who has the link can access the file. There is no requirement of authentication and access is not audited for this type of link. This is used for sharing external users outside the organization.
- People in the organization with the link: People in your organization only can access the file if they have the link.
- People with existing access: People having access already are shared with the link. This has no impact on the type of permission that users already have.
- Specific people: Specific people are shared with the link. By default, the user will have view permission. We can select the checkbox Allow Editing to give edit permission to a specific user as per the mail ID entered.
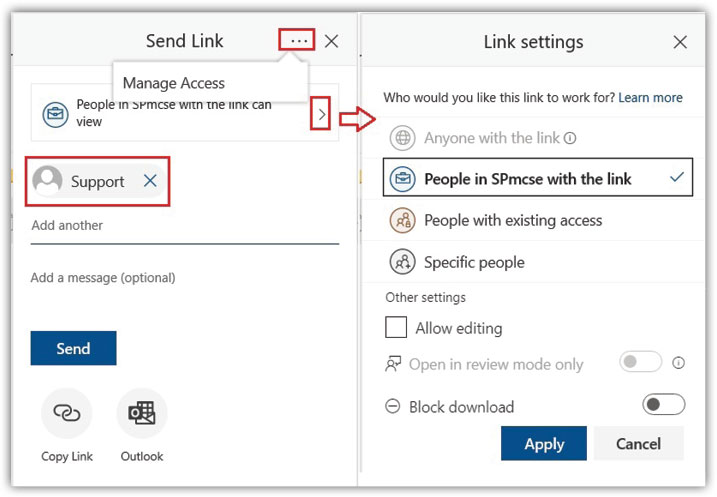
Figure 8.65: Send Link
- There is an option Manage Access in the dialog box Send Link. If you click on that you will get another dialog where you see manage access window in for of categories like Stop Sharing, Links Giving Access, Direct Access.
- Direct Access category showing users, groups having access to sites. Click on Plussign
 will open one dialog box to grant permission. Enter user you want to grant access in people picker field. Below that you will find the option to choose the type of access like Can Edit or Can View. Select one option and click on grant access to apply changes. Permission will be assigned to the user.
 - If you click on the Share
 present side to Links Giving Access, you will get the same Send Link dialog box to share the link. Select the checkbox Allow editing will give edit permission to the user receiving the link. You can enable the option Block Download to restrict the user from downloading as seen in the following screenshot:

Figure 8.66: Manage Access
- Click on Stop Sharing to stop inheriting permission and configure unique permission. You will get a message as dialog box, that all user permissions will be removed except Owner group, for confirmation, click on Stop Sharing will apply changes. If you click on Advanced option present at the bottom will redirect you to permission page (
https://<site url>/_layouts/15/user.aspx) and you will notice the owner group present.
Conclusion
In this chapter we had a glance at permission all about, what is permission management. Understood default groups available in SharePoint, different permission levels. Understood the dependent features on group creation. Discussed how to create group, permission levels. Discussed in detail different settings available for managing permission in SharePoint. Discussed permission inheritance. Also discussed the modern experiences in permission management and sharing. Next in Chapter 9, Managed Metadata Concept will discuss all managed metadata.
Points to remember
- Activating SharePoint Server Publishing Infrastructure, SharePoint Server Enterprise Site Collection features feature and during the creation of record center few dependent groups will be created.
- By Add members to group option we can change the membership between Owner and Member only.
- When any user is added by Add members to group option, actually these users are added to the Office 365 Group/Microsoft Teams.
- When any user is added by Share site only, these users are added to the SharePoint groups (Owners, Members, and Visitors) present in the site not in the office 365 group.