
Want a figure with some bulk? Building the figure in Styrofoam, which is very inexpensive, saves the cost of extra clay.
STEP ONE: Trace the designs of the different parts on the foam and cut them out.

STEP TWO: Glue the pieces together with white glue and let it dry fully.

STEP THREE: This piece was finished with powdered clay (ClayShay) that was stamped. Then it was painted and embellishments added.
The beauty of Styrofoam is that you can stick wire or skewers into it to add adornments. Applying a layer of paper clay over the foam makes it easy to embellish the surface with texture and stamping.

STEP ONE: Draw your design in Styrofoam and cut it out.

STEP TWO: Cover the front and sides of the Styrofoam with paperclay, stamp and let it dry. Repeat on the other and let it dry.
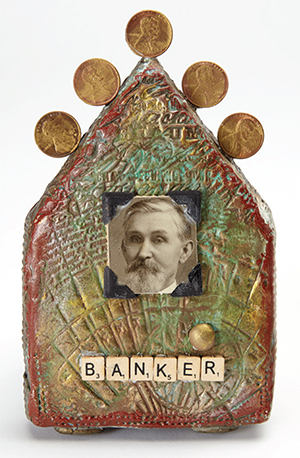
STEP THREE: Paint, glaze (to give the texture depth) and add a gold rub (to pick up the highlights). Add the image and letter tiles, and glue coins to wires using resin clay. Insert the wired coins into the foam, adding a little hot glue or E6000 glue for stability.