Traditional
Pinwheel Envelopes
This marvelous fold is sometimes called the “Thread Case” and it has been used in China and elsewhere to hold small objects such as threads and needles. Handy items tuck beneath the interlocking flaps on top, but the lower chamber is its secret compartment, reserved for precious or dangerous items such as needles. This becomes an extra surprise when you use it to present a gift. You can even include layers of messages and surprises! Use any paper, or even fabric. The tricky part of this model is in the equal division of the paper into thirds. If you trim your square to measure a length that is divisible by three, you will have no trouble making guide marks. You can also roll over each side to estimate a third, and then adjust the flaps to meet the folds, resolving the discrepancy before committing the folds with creases.

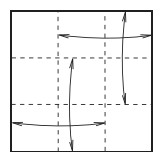
1. Begin with the inside surface facing up. Valley-fold into equal thirds, both horizontally and vertically, forming a nine-square grid.
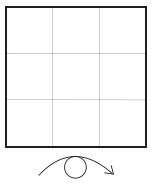
2. Turn over.
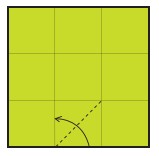
3. Valley-fold a diagonal crease in the center square in the bottom row, by folding the bottom edge to the vertical crease on the left-side.
4. Unfold.
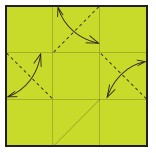
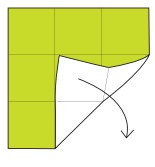
5. Repeat with each of the other three center squares around the outside. Be sure to pay close attention to the correct direction of each crease.
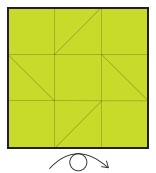
6. Turn over.
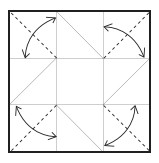
7. Valley-fold each of the corner squares diagonally in half.

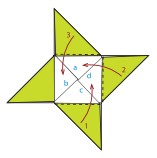
8. Notice the four highlighted mountain creases, indicated in red. Make these bend first, then the valley-folded corners and the center square to form a pinwheel-shaped dish. Look ahead to see the shape.
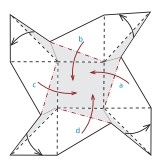
9. Close and flatten the envelope’s secret compartment by weaving triangular panels a, b, c, and d, twisting the paper into the shape of a pinwheel.
10. Weave the first three corners together, beginning at the bottom and proceeding counter clockwise.
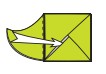
11. Tuck in the remaining flap.

12. The finished Pinwheel Envelope!