BREADS
Hearing Heaven in the Chimney
Bread and fire are inseparable. Bologna folklorist Piero Camporesi speaks of fire being at the heart of all food traditions. In peasant houses it rarely went out. Fire was too precious. The light beat back dark, and with it the evil associated with darkness. Darkness brought fear. Darkness was winter, when little grew, and winter meant cold. Fire was the warmth that kept life and nourished it. The hearth was the heart of the house, with its tall chimney linking the house and those who lived within it to the sky and to heaven.
Even embers were important. They gave nourishment. Chestnuts, beets, onions, potatoes, and field corn all cooked in the dying fire. Covered pots of food were buried to bake in the hot coals. Embers heated tiles for Tigelle bread, pans for Borlengo, and griddles for Piadina. Old people read fortunes in the embers and cinders. And people speak of the old peasant women who heard messages from heaven as winds moaned through the chimney.
For peasants the oven was a magical place, because it was here that food went from raw to cooked. They believed the same spirits that made bread rise so mysteriously also coagulated milk and fermented wine. Camporesi says those elfin spirits are part of Emilia-Romagna’s Celtic heritage, buried deep in her civilization from long before the invasion of the ancient Romans.
What mystery bread must have been. In a pretechnological world, the rising of round loaves was associated with the sun rising in the sky, Christ rising to heaven, a woman’s belly growing with child, with the oven becoming the womb. Going into the oven was passage. Bread dough passed through the entrance into the oven and changed forever.
Today the oven is still set apart, singled out. In the towns and villages of Emilia-Romagna, the sign marking bread shops reads “forno” (“oven”). There is no sign announcing “bakery.” And while pastry and pasta makers take their titles from what they produce, often the man who bakes bread is not called a baker. He is il forno, “the oven.” It is almost as though he is a part of the bread instead of its master.
The oven was the center of village life. Until the 1950s, many homes lacked ovens. The village baker made many people’s bread, and they used his oven for their lasagne, savory pies, and sweet tarts.
Although most of Emilia-Romagna’s breads are baked in ovens, some of her most unusual ones come from home hearths. In Romagna the crisp flatbread, Piadina, is still baked on griddles over hot coals.
Modena’s hills have Borlengo—brittle and semi-transparent, cooked in shallow sauté pans over embers. Little round Tigelle bake between hot terra-cotta discs set on hearthstones. Twenty miles away these breads are unknown.
The region’s different breads are usually highly localized. Bread itself, or merely its name, changes from place to place. Throughout Emilia bread doughs are fried into fritters. In the mountains chestnut flour becomes part of the fritter dough, while on the plain sometimes ricotta is added.
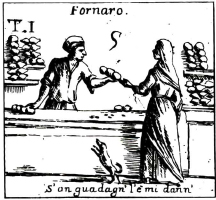
The bread baker or fornaro selling his wares in Bologna during the late 17th century, by Giuseppe Maria Mitelli
Casa di Risparmio, Bologna
Romagna’s hill bread, Spianata is oven-baked or cooked atop a griddle in the fireplace. The name of this bread also changes as it gains toppings and fillings from Bologna to Ferrara.
During the Renaissance Ferrara’s ducal court produced the region’s most intricately sculpted bread, the Couple, or Coppia. Baked in an oven, it was made of expensive white flour, enriched with oil or lard and rolled into fanciful shapes. Throughout the region shapes change and the dough alters, but today this former bread of nobility is eaten by everyone.
In old documents, bread was either constantly praised or damned. Laws regulated its production, writers judged it, and peasants rioted for it. For rich and poor, it was the single most important food. Lauded for its purity, Parma’s white bread of the 16th century was saluted with a saying considered old even then, “A good meal has the bread of Parma and the wine of Correggio.”
Camporesi talks of how shapes were symbols of the forces of nature. Crescent-shaped breads were eaten at funerals, symbolizing the moon and rebirth. Round breads like Spianata and so many others originated as pre-Christian sun symbols, rising again to bring warmth and growth.
Seeds, nuts and fruits in breads signify potency and fruitfulness. The long Penza breads of Bologna swell with diced candied fruits like a penis swells with seed. There is the maleness of the long baguette, a shape common to so many places. The bread grows before entering the oven. Raisins in breads that rise were seen as seeds in the mother’s swelling belly. How female is the bread oven itself, with its small opening and domed interior. It is the place of warmth, where bread is transformed before emerging as a completed being, like a child. Bread not only supported life; it was life.
When the elderly Guatelli brothers in Parma’s farm country make their weekly bread, they continue the ritual of every baker in the area. They bless the flour by tracing into it a cross enclosed in a circle. Historian Guglielmo Capacchi explains that the making of the symbol may be Christian today, but it originated as old magic and a pagan rite long before Christ.
In Modena, food historian Renato Bergonzini remembers how his grandmother saved a piece of dough from one day’s baking for leavening the next. As she put the dough in a bowl, she cut a cross into it and blessed herself. Renato was forbidden to touch it. But of course he did. He was fascinated by the living thing, and would lift the towel to take a peek. He said it was fantastical to a little boy, because the cross grew into a flower.
The Guatelli still mix, knead, and raise bread in their family’s bread cupboard, or madia. Throughout the region, even the poorest of homes had this chest of drawers or cupboard topped with a covered trough. Here the bread was mixed, left to rise, and after baking, was stored.
Bergonzini recalls the time when his mother first added yeast to the bread. Before that the only leavening was dough saved from the last baking. After the advent of commercial yeast, the bread was never the same again. This sentiment is echoed by many home and professional bakers today. And many still use the old method.
The dough taken from one loaf to raise another keeps bread alive, continuously joining new loaves to those that came before. Flour, of course, is another constant. Since before the time of Christ, white flour, sifted free of bran and coarse fiber, has been highly prized. Sophocles praised Italy’s wheat: “Favored Italy grows white with hoary wheat.” Pliny, writing 2,000 years ago, called Italian wheat among the best in the world, the whitest and the heaviest in weight.
White flour was potent with meaning. Whiteness was God, pure, genuine—and expensive. Ferrara’s white flour gained fame for its silky texture and purity of color. But poor crops and famine often made white flour an elusive commodity. In 15th-century Ferrara, even when harvests were plentiful, only the wealthy used white flour. The populace’s bread was made from one third ground fava beans and two thirds coarse-ground wheat. Or they baked a blend of barley, rye, millet, spelt, and sorghum. And when famine struck, the aristocracy usurped the bread of the people as their own, leaving the populace to loaves made from ground acorns and even tree bark.
For the people of the plain, dark bread was for the less affluent. In the mountains, where little wheat grew, dark bread was even more prevalent. As little as a generation ago, mountain people made bread with home-ground flour, still flecked with bran and germ. For many today, those dark and fragrant breads are fond memories far more nurturing to both body and spirit than the elegant white loaves now available to all.

Harvesting Grain, 17th-century copper engraving from a work by Luigi Doria Romano
Il Collectionista, Milan
The recipes in this chapter express the range and variety of Emilia-Romagna’s breads. Although not every one of the region’s loaves is included, each type is represented: hearth cakes, pan breads, fritters and flatbreads, the elegant Couple bread, and a dark wheaten loaf created from the childhood memories of women who grew up in Modena’s mountains. Most of these breads are best eaten with other foods. Ferrara’s Couple bread could accompany any savory dish in this book. It is typical of the crusty, neutral-flavored white breads served throughout the region with antipasti, first dishes, and second courses. Its blandness is purposeful. Many in Emilia-Romagna believe that a bread of big or assertive flavors fights with the complex and often robust tastes of their savory dishes.
Tigelle, Spianata, and Piadina, on the other hand, are snack breads, usually eaten with toppings or fillings. Although Tigelle and Spianata often appear also as antipasti, I always think of these three, along with the unusual Borlengo, as Emilia-Romagna’s Sunday-night breads. These are the snacks that become suppers for family and friends after a day of visiting and feasting on a big afternoon meal.
In this country, we might serve them at informal gatherings. Invite everyone into the kitchen, where they can scoop up the breads hot from baking, then help themselves to fillings and toppings. Each recipe offers menu suggestions and specific recommendations for accompaniments. Those suggestions also guide the cook in serving Emilia’s favorite street food, her fritters of batter or bread dough.
These snack breads can become the heart and soul of a meal. Bring out a few vegetables, slices of salami, or a little cheese—and know that served exactly this way, these breads often sustained and nourished much of Emilia-Romagna.
Making Bread: Some Guidelines
Feeling bread come alive under our hands is such pleasure. It relaxes and comforts, while linking us to those basic forces that have touched bread bakers for centuries. Bread is the most forgiving of foods. As long as the yeast is alive, the bread will survive. Use these guidelines to ensure success every time:
 Build bread around your life, not your life around your bread. Slow risings fit easily into busy schedules and are the key to breads with full, mellow flavor.
I often make the sponge in the evening. (Usually a blend of all the yeast, liquid, and a part of the flour, the sponge ripens before being kneaded into the final bread dough.) The next morning I knead the sponge together with the rest of the ingredients and then leave it to rise for the rest of the day.
Even if a recipe instructs to “let rise 2 hours, or until doubled,” leaving the dough for a few extra hours only deepens the bread’s flavor. In the evening I shape the loaf, let it rise again, and bake it. The last rise is crucial. If the loaf overrises, the bread will be heavy. Deal with overrising by simply punching down the dough and letting it rise again, until it does not spring back when poked with a finger.
Always check the date on the yeast package to make sure it is active. I prefer granulated yeast from the health food store, and I always store it in the freezer. Do not expose yeast to temperatures over about 110°F. And do not use fast-rising yeasts in these recipes. They may offer speed, but they sacrifice the mature flavor vital to most of these breads.
Do use organic stone-ground flours. Their vitality adds much to breads. Store them in the refrigerator.
Weighing ingredients gives the easiest and most accurate measure. Just pour the flour onto a scale, and there you are. One measuring cup of flour can vary from 3 to 6 ounces, depending upon how the cup is filled. My 4-ounce cup, called for in all these recipes, comes from spooning flour into a measuring cup and leveling it, without tamping or tapping. But even this method is not foolproof. If your flour is packed down in the sack, if the weather is humid, or if you spoon down deeper than I do, the measurement might be off. Weighing is the surest method. When working in very damp conditions, weigh out an additional ounce for every 8 ounces of flour.
The sponge is traditional for most yeast breads. Sponges deepen flavors and come from the days when dough from the previous baking was the leavening agent. If you bake regularly, you might want to try the yeastless baking of long ago:
Take about 1½ cups of the dough from a yeast bread, such as Spianata or Modena Mountain Bread. Blend in ½ cup water, cover the bowl, and store it in a cool place or in the refrigerator. Within a week, use a cup as the sponge for your next loaf, saving a piece of that finished dough for leavening the next baking. Beat the piece of dough into the leftover chilled dough and keep cool. Do not use this technique with doughs high in butter, eggs, or sugar.
Coppia
No other Ferrara food is as striking as her famous Couple bread. These single-serving breads are fashioned as long, leggy crosses, their four twirled “legs” resembling slender unicorn horns. Baking turns the Couple golden and creates a white bread of almost all crust. You break off pieces and eat them as you would a breadstick, with dishes from antipasto through the second course. The bread’s flavor is neutral, some even say bland, making it the ideal partner for Ferrara’s savory dishes. Translating as “the Couple” (ciupeta in Ferrara dialect; coppia in Italian), the bread and its unique shape spread to Modena and Bologna. Breads almost identical in flavor but shaped differently are eaten throughout Emilia-Romagna.
This recipe combines one from Ferrarese Luisa Picchietti and one from the Perdonati bakery in Ferrara. Luisa now bakes the Couple in her Highwood, Illinois, home. Perdonati makes some of Ferrara’s most admired bread, and was one of the town’s last bake shops to work with a wood-fired oven.
[Makes 6 breads, serving 6]
Sponge
¾ cup (3 ounces) all-purpose unbleached flour (organic stone-ground preferred)
1/8 teaspoon granulated yeast
3½ tablespoons warm water (110°F)
¼ cup water
1 teaspoon extra-virgin olive oil
¼ teaspoon salt
Dough
3 cups (12 ounces) all-purpose unbleached flour (organic stone-ground preferred)
1 teaspoon granulated yeast
1 cup warm water (110°F)
1 cup (4 ounces) cake flour
1 teaspoon salt
2 tablespoons extra-virgin olive oil
2 tablespoons lard or unsalted butter, at room temperature
2 tablespoons butter for greasing the pan
Method Working Ahead: Except for the shaping, this bread takes little actual effort. The long risings mean that life can go on as usual with just an occasional pause to take the bread to its next stage. The sponge matures over 18 to 24 hours. The finished dough takes 4 hours to rise before shaping and another 50 minutes to rise before baking. Baked breads freeze well 3 months.
Making the Sponge: Start the sponge 18 to 24 hours before baking the bread. In a mixing bowl or food processor bowl, stir together 1 tablespoon of the flour, the yeast, and the 3½ tablespoons warm water. Allow 5 minutes for the yeast to bubble. Next, blend in the ¼ cup water (cold water if you are using a food processor, at 110°F if you are using an electric mixer or hand beating), olive oil, salt, and the rest of the ¾ cup of flour. Process or beat 30 seconds to 1 minute, or until the moist dough is very elastic. Turn into a large bowl, and seal the top with plastic wrap. Set aside at room temperature 18 to 24 hours. It will rise, looking blistered and bubbly.
Mixing the Dough: Put a spoonful of the flour in a bowl large enough for mixing the dough. Blend in the yeast and ¼ cup of the warm water. Let the mixture stand 5 minutes, or until the yeast is bubbly. Meanwhile, mix the flours and salt together in another bowl. Stir in the sponge, the rest of the water, the oil, lard or butter, and half the flour/salt mixture. Blend, using a heavy-duty electric mixer (about 3 minutes) or a food processor (about 30 seconds), until the dough is very elastic.
Work in the remaining flour mixture, switching to the dough hook if you are using an electric mixer. The dough should be lumpy and somewhat sticky. Knead the dough 5 minutes. If the dough is still sticky, work in another 1 to 2 tablespoons all-purpose flour. Resume kneading another 5 minutes. The dough will smooth out, lose some of its stickiness, and become elastic.
First Rising: Place the dough in an oiled bowl and seal the top with plastic wrap. Let it rise 4 hours, or until doubled in bulk, at room temperature.
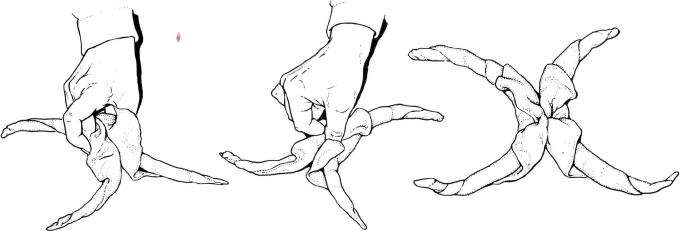
Shaping: Divide the dough into six balls. Roll each one out to form a thin 8-inch square. Cut each square diagonally, forming two triangles. Use a rolling pin to elongate the top of each triangle. Then thin and extend the two side points. Starting at the wide base of each triangle, roll it up tightly, leaving about 2½ inches of the tip unrolled. They will look like long, thin, tightly twirled crescent rolls.
Make the Couple shape by turning the crescents so the two long flaps are facing away from each other, and the crescents arch away from each other starting at their centers. Pinch the unrolled tips together at their bases, along the line where they join the crescents. Then fold the tips away from each other, tucking their ends under to make two side-by-side hollow cylinders between the joined crescents. Push two fingers down into the center where the two cylinders meet. Pinch the cylinders together so they resemble two number 8’s sitting side by side.
Second Rising: Grease two large or three standard baking sheets with the 2 tablespoons of butter, and arrange the breads on them. Cover with a kitchen towel, and let rest at room temperature 50 minutes. The breads will not rise perceptibly.
Baking and Serving: Preheat the oven to 325°F. Bake 10 minutes. Raise the heat to 350°F, and bake 30 minutes. Raise the temperature again to 375°F, and bake 5 to 10 minutes, or until light golden brown and very crisp. Cool the breads on a rack. The Couple is always served at room temperature.
Suggestions Menu: This bread, in this or simpler forms, is traditionally served with all the region’s savory dishes. Ferrara specialties are Domed Maccheroni Pie, Spaghetti with Anchovies and Melting Onions, Cappellacci with Sweet Squash, Rice of the Princes, Riccardo Rimondi’s Chicken Cacciatora, and Rabbit Roasted with Sweet Fennel.
Cook’s Notes Flours: The use of cake flour may be surprising to bread bakers. But by tradition, this bread is made with the soft flour that made Ferrara famous. Mixing some cake flour into American all-purpose unbleached flour achieves a similar quality.
Bread of Life
It is impossible to resist speculating how the Couple came to have this singular shape. Some say it is the cross of Christianity. For others, the form is both male and female, depicting the anatomy of both sexes. Few in Ferrara can pinpoint its beginnings. Until the 13th century, breads there were either long or round. A document from 1287 mentions a decorative loaf, but gives no details of its shape. In the mid-1500s Christaforo di Messisbugo described each place setting at the banquets he arranged for the Cardinal d’Este in Ferrara as having a pane intorto, or twisted or bent bread. This sounds closer to the Couple’s present-day shape. Perhaps no single baker invented the Couple. It may be a combination of symbols, some pre-Christian, and possibly coming from sources far from Ferrara. Many cultures depict bread as part of elemental life forces. Yeast comes to life; dough rises, falls, and rises again. The oven’s nurturing warmth transforms the dough into food. It is easy to imagine the link with male/female, pregnancy, birth, and life. The Couple’s strong visual statement is unmistakable.
Spianata
Much like an oversized focaccia, this big wheel of a bread is showered with leaves of dark green rosemary and browned to pale gold. Spianata is tender and chewy at the same time, and thoroughly satisfying whether eaten on its own or with meals. Throughout Romagna, bakers improvise with toppings and fillings for Spianata, making it a favorite snack bread and antipasto. In the tiny mountain town of Savignano di Rigo, Ristorante Ottavio presents a hot antipasto Spianata stuffed with browned onions. In Ferrara garlic, artichokes, and cheese are baked on the bread, turning it into a light lunch. At snack bars, a topping of sautéed spinach and cheese makes it a tasty hand-held meal.
Serve Spianata plain or stuffed as an antipasto before country-style dishes. Make it a main dish by adding any of the toppings that follow the basic recipe. Present it plain, sprinkled only with rosemary and coarse salt, as a dinner bread to accompany antipasti, first courses, and second dishes.
While greatly reducing the amount of fat called for in old Spianata recipes, this rendition still maintains the tender quality that sets the bread apart. Starting the bread with a sponge that ripens over 8 hours gives depth of flavor.
[Makes 1 large round loaf, serving 8 to 12]
Sponge
1 teaspoon granulated yeast
1 cup (4 ounces) all-purpose unbleached flour (organic stone-ground preferred)
1 cup warm water (about 110°F)
Dough
2 cups (8 ounces) all-purpose unbleached flour (organic stone-ground preferred), plus 2 tablespoons as needed
1½ teaspoons salt
2 tablespoons extra-virgin olive oil
2 tablespoons high-quality lard or unsalted butter, at room temperature
Topping
1½ tablespoons extra-virgin olive oil
About ¼ teaspoon coarse salt
1½ teaspoons chopped fresh rosemary leaves
Method Working Ahead: Although Spianata is made over a long time period, there is little actual effort. Arrange your schedule so you can spend a few moments at each of its stages. The sponge must be started 7 to 11 hours before mixing the bread dough, and could be done the night before serving the bread. After the sponge is mixed with the rest of the ingredients, the dough’s first rising takes about 3 hours, but it can be left for as long as 10 hours at this point. After shaping, count on another 2 to 3 hours of rising before baking. The finished bread holds, well wrapped, at room temperature or in the refrigerator several days. It freezes 3 months.
Making the Sponge: Start the sponge about 11 hours before baking the bread. Blend the yeast, 2 tablespoons of the flour, and ¼ cup of the warm water in a mixing bowl or a food processor bowl. Let stand 5 minutes, or until the yeast makes small bubbles. Beat in the rest of the flour and water, using an electric mixer, food processor, or wooden spoon. The batter should be very elastic. Scrape down the sides of the bowl, and seal it with plastic wrap. Let it stand at room temperature 7 to 8 hours. It could go as long as 12 hours without changing the character of the bread.
Making the Dough by Hand: Blend the 2 cups flour and the salt. Add half the mixture to the sponge, along with the olive oil and the lard or butter. Beat about 5 minutes, making a very elastic dough. Gradually beat in the rest of the flour mixture. Knead it by hand into a soft, but not sticky, dough. Add extra flour if necessary. Knead 10 minutes.
Making the Dough with a Heavy-Duty Mixer: Blend the 2 cups flour and the salt. Add half the mixture to the sponge, along with the olive oil and the lard or butter. Beat with the paddle attachment 5 minutes at lowest speed to develop the gluten. Then add the remainder of the flour and beat 1 minute. The dough should be soft but not sticky. If necessary, beat in the additional flour, keeping the dough soft. Switch to the dough hook and knead 10 minutes, or until very satiny and elastic. The dough will clean the sides and bottom of the bowl.
Making the Dough with a Food Processor: Process the sponge, oil, lard or butter, salt, and 2 cups flour with the plastic blade 30 seconds. Add the remaining flour and process 30 seconds. Let the dough rest 30 seconds. It should be soft but not sticky. Sprinkle with the additional 2 tablespoons flour if necessary. Then process 30 seconds.
First Rising: Place the dough in an oiled bowl, and seal the top with plastic wrap. Let it rise at room temperature 3 hours, or until 2½ times its original size.
Shaping the Dough: Lightly grease a 14- to 16-inch pizza pan. Punch the dough down. Thin and stretch the dough to fit the pan (a rolling pin helps). It should be between ¼ and ½ inch thick, and stretched all the way to the pan’s edge.
Second Rising: Cover the pan with a kitchen towel, and let the dough rise 2½ to 3 hours. The dough should double in volume, and should not spring back when poked with a finger.
Baking and Serving: Preheat the oven to 400°F. Dimple the top of the loaf by poking it with your fingers. Spread the 1½ tablespoons olive oil over the top, and sprinkle with the salt and rosemary. Bake 10 minutes. Then lower the heat to 350°F and bake another 25 minutes. The bread is done when the bottom of the loaf sounds hollow when tapped. Serve hot, warm, or at room temperature, sliced into wedges.
Suggestions Wine: Filled or topped, Spianata takes well to a young red Merlot, or to a white Pinot Grigio from Friuli’s Aquilea area. Even simpler wines are a pleasure here, like a good California jug wine. Plain Spianata accompanies other foods, which will dictate the wine choice.
Menu: All of Romagna’s dishes take to Spianata—for instance, Mardi Gras Chicken, Lamb with Black Olives, Seafood Stew Romagna, Summer Clams with Balsamic Vinegar. Filled or topped Spianata is delicious in small portions as an antipasto, or as a lunch or snack.
A Bread by Any Other Name
With only subtle variations, this flatbread takes on new flavorings and names from one area to the next throughout Emilia-Romagna. Kneading bits of chopped pancetta or salt pork into the dough makes Bologna’s la crescentina. Enriching the dough with eggs, crackling, and the cooking broth of zampone sausage creates the gnoccho al forno, or baked dumpling, a favorite snack bread of Emilia. A very similar bread in Romagna becomes piadone. The torta salata (or savory bread) of Modena, Ferrara, and Bologna is created when spianata is brushed with melted lard and sprinkled with coarse salt before baking.
Fillings and Toppings forSpianata
Onion Filling
1½ tablespoons extra-virgin olive oil
2 medium onions, thinly sliced into strips
Salt and freshly ground black pepper to taste
1 loaf Spianata, baked
Making the Filling: Heat the oil in a 12-inch skillet over medium-high heat. Quickly brown the onions, 4 to 5 minutes, stirring frequently. Season to taste. (The onions can be cooked ahead and rewarmed.)
Serving: Cut the loaf into eight to ten wedges, splitting each wedge horizontally into two pieces. Rewarm the bread, wrapped in foil, in a 350°F oven about 10 minutes. Stuff each wedge with a few spoonfuls of the warm onion filling, and serve.
½ recipe Spiced Spinach with Almonds
1 cup fresh whole-milk ricotta cheese
2 tablespoons minced Italian parsley
2 tablespoons minced fresh basil leaves, or 1½ teaspoons dried basil
1 small clove garlic, minced
1 tablespoon minced onion
Salt and freshly ground black pepper to taste
1 recipe Spianata dough, shaped, risen, and ready to bake
2 tablespoons extra-virgin olive oil
Making the Topping: Mix together the cooked spinach, ricotta, herbs, garlic, and onion. Season with salt and pepper.
Baking: Preheat the oven to 400°F. Do not coat the dough with the basic topping (oil, rosemary, and salt). Bake the loaf 10 minutes. Reduce the temperature to 375°F, and bake another 10 minutes. Remove the loaf from the oven, and raise the heat to 400°F. Spread the spinach mixture over the partially baked loaf, and sprinkle with the 2 tablespoons olive oil. Bake 13 to 15 minutes, or until the bottom of the bread is crisp.
Serving: Serve hot from the oven, or cool on a rack and then rewarm about 10 minutes in a 350°F oven. The bread holds well, tightly wrapped, in the refrigerator about 2 days.
Fresh Artichoke and Cheese Topping
This topping can be made 1 day ahead, and it is worth every moment of the preparation. Serve the bread in small slivers as an antipasto, or in more generous portions as a supper or lunch main dish. I have adapted the bread from one tasted at Ferrara’s Perdonati bakery.
2 large lemons
5 to 6 large artichokes
1½ tablespoons extra-virgin olive oil
¼ cup finely chopped onion
Salt and freshly ground black pepper to taste
1 small clove garlic, minced
3 tablespoons dry white wine
1½ cups fresh whole-milk ricotta cheese
¼ cup freshly grated Italian Parmigiano-Reggiano cheese
2 tablespoons minced Italian parsley
2 tablespoons minced fresh basil leaves, or 1½ teaspoons dried basil
1 small clove garlic, minced
1 tablespoon minced onion
1 recipe Spianata dough, shaped, risen, and ready to bake
2 tablespoons extra-virgin olive oil
Making the Topping: Squeeze the lemons into a medium-size bowl of water. Peel the artichoke stems and slice them into ¼-inch-thick rounds. Add the cut pieces of artichoke to the bowl as you work. Cut away the leaves from around the bottom and sides of the artichokes. Then cut off the top two thirds of the leaves. Divide the artichoke hearts into eighths, and cut away their furry chokes. Heat the oil over medium heat in a 10-inch skillet. Add the artichokes (drained), ¼ cup onions, and salt and pepper. Brown slowly about 5 minutes. Stir often, turning the pieces of artichoke so they sear on all sides. Sprinkle with the first quantity of garlic and cook a few seconds longer.
Stir in the wine and bring to a simmer, scraping up any brown glaze on the bottom of the skillet. Cover and cook 3 to 5 minutes, or until the artichokes have softened. They should still have some firmness when pierced with a knife. Uncover the skillet, raise the heat, and cook off any liquid. Set the skillet aside.
Baking: Preheat the oven to 400°F. Do not coat the dough with the basic topping (oil, rosemary, and salt). Bake 10 minutes. Reduce the heat to 375°F, and bake another 10 minutes. Remove the bread from the oven, and raise the heat to 400°F. Blend together the ricotta, Parmigiano, parsley, basil, garlic, and onion. Spread the ricotta mixture over the partially baked loaf. Top with the artichoke sauté, including any of its pan juices. Sprinkle with the 2 tablespoons olive oil, and bake 13 to 15 minutes, or until the bottom of the bread is crisp.
Serving: Eat hot or warm from the oven, or cool on a rack. The bread will keep, well wrapped, 2 days in the refrigerator. Rewarm it about 10 minutes in a 350°F oven.
Spianata for the Madonna of August
A traditional Romagna bread made in honor of the Madonna of the August harvest. In Romagna’s countryside this ancient bread still celebrates the first wine grapes.
2 cups wine or seedless red grapes
1½ tablespoons extra-virgin olive oil
2 tablespoons sugar
1 recipe Spianata dough, shaped, risen, and ready to bake
Preheat the oven to 400°F. Push the grapes into the top of the dough. Sprinkle with the oil and sugar. Bake 10 minutes. Then lower the heat to 350°F and bake another 25 minutes. The bread is done when the bottom of the loaf sounds hollow when tapped. Serve the bread warm or at room temperature as an antipasto, or with first and second courses.
Gnocco Fritto
A simple bread dough—in itself a rare treat for most of us these days—becomes irresistible when turned into golden fritters. For many in Emilia-Romagna bread fritters stretched precious dough (often watered down to make it go even further in the frying pan), satisfying hunger at little expense. A version of this fritter, fried and then soaked in a bowl of milk, was the dinner of Romagna’s peasants until several decades ago.
During an autumn polenta festival, I noticed that the fritter stand was even more popular than the table where mounds of golden polenta were being spooned out with a generous hand. As the local women rolled out their tender bread dough, they cut a small hole in the center of each round. The cooks called it the belly button (ombelico in Italian, umbreghel in local dialect), and insisted that it produced puffier fritters. After much testing I had to agree, and their trick is shared here.
[Makes 18 to 20 pieces]
4 cups (1 pound) all-purpose unbleached flour (organic stone-ground preferred)
2½ teaspoons (1 envelope) granulated yeast
½ cup warm milk (110°F)
3 tablespoons unsalted butter, at room temperature
1¼ teaspoons salt
½ cup plus 3 tablespoons milk
2 quarts vegetable oil for deep-frying
Method Working Ahead: The fritters are best fried and eaten as soon as possible, but the rising of the dough can be slowed down by putting it in the refrigerator overnight. Let it come to room temperature before rolling and cutting.
Making the Dough by Hand: Pour the flour into a large mixing bowl. Transfer 1 tablespoon of the flour to a small bowl and blend it with the yeast. Add the warm milk and let it stand 10 minutes, or until the yeast is bubbly. While the yeast is proofing, add the butter and salt to the flour. Work the butter into the flour with your fingers or a pastry cutter. Using a wooden spoon, stir the yeast and the additional milk into the flour. Knead the rough dough in the bowl, or on a work surface, 10 minutes or until it is elastic. The dough starts out sticky, but kneading makes it smooth.
Making the Dough in a Food Processor: Place the flour in a food processor fitted with the steel blade. Transfer 1 tablespoon to a small bowl, and blend it with the yeast and the warm milk. Set aside 10 minutes, or until the yeast is bubbly. While the yeast is proofing, add the butter and salt to the flour, and process 30 seconds. Turn the yeast and the additional milk into the food processor. Process 30 seconds, stop a few seconds, and then process again 45 seconds. The dough should be smooth and elastic.
Rising: Place dough in a lightly oiled medium-size bowl. Cover with plastic wrap, and let stand at room temperature 2 to 2½ hours, or until doubled in bulk.
Shaping and Frying the Fritters: Divide the dough into eighteen to twenty balls. Roll them out as thin as possible, forming 7- or 8-inch circles (cut into 2- or 3-inch circles if serving as finger food with drinks). Cut out a ½-inch round from the center of each disc (the “belly button”). Let the dough relax 10 to 15 minutes. (Relaxing ensures a crisp and tender fritter, rather than a tough, chewy one.) Meanwhile, heat the oil in a deep-fryer or wok to 375°F. Spread a triple thickness of paper towels on a large baking sheet for draining the fritters. Heat the oven to 200°F. Fry one or two pieces at a time, turning and cooking them in the oil until golden brown on both sides (2 to 3 minutes total cooking time). Lift the fritters from the oil with a slotted spoon, and drain well on paper towels. Slip the fritters into the oven on a platter to keep warm while you continue frying the rest.
Serving: Serve hot, wrapped in a napkin-lined basket.
Suggestions Wine: A crisp white such as a Sauvignon Blanc from Parma or Friuli, or a simple red Bardolino from the Veneto.
Menu: Serve as part of Antipasto Castelvetro, accompanied by a Platter of Cured Meats and Marinated Baby Onions. Although often a first course in Emilia-Romagna, for modern appetites this trio is a complete supper. When serving as an antipasto, follow with Ferrara’s Soup of the Monastery, Balsamic Roast Chicken, or Seafood Stew Romagna.
Lumpheads, or What’s in a Name?
Although a fritter is delicious to eat, you do not want to be called one. Gnocco affectionately describes someone who is a little thick in the head—literally a lumphead. But gnocco, meaning bread fritter, is a perfect example of food names that change from one place to another. In Modena and Reggio’s hills these are gnocco fritto. Rolled thicker and cut into haphazard rectangles, they become cherseina in those same hills. Minor variations in the dough make them Parma’s torta fritta. In Castelfranco Emilia, the fritters are crescentine fritte. Go 20 miles down the road to Bologna, and crescentine is also a baked flatbread. In Ferrara fritters are pinzino. Romagna’s piadina fritta of leavened bread dough are not to be confused with the flatbread called piadina.
Little Tile-Baked Hearth Breads
Tigelle
Tigelle are the size of an English muffin with a biscuitlike center and a crisp crust. They are best split open and brushed with olive oil and garlic, or slathered with a blend of minced salt pork, garlic, and rosemary called a condimento. Tigelle can be lunch, Sunday-night supper, a snack, or a first course. At mountain weddings and christenings, where trencherman dining still reigns, Tigelle and their condimento are served before a progression of pasta dishes.
In the Modena hills Tigelle are baked not in ovens but on hearthstones, with the bread sandwiched between hot terra-cotta discs (tigelle) the size of hockey pucks. Terra-cotta Tigelle tiles are unavailable in America, but the little breads bake successfully on top of the stove, on a griddle or even in a heavy skillet. The best way to bake them is on the type of baking stone normally used in the oven.
[Makes about 20 breads]
1½ teaspoons granulated yeast
½ cup warm water (110°F)
3¼ cups (13 ounces) all-purpose unbleached flour (organic stone-ground preferred), plus 2 tablespoons as needed
Condimento (optional)
8 ounces pancetta, minced very fine, or ½ cup extra-virgin olive oil
1 large clove garlic, minced
1 tablespoon unsalted butter, at room temperature
2 teaspoons salt
½ cup plus 2 tablespoons water
About 3 tablespoons extra-virgin olive oil (for griddle)
1 teaspoon fresh rosemary leaves, minced
½ cup (2 ounces) freshly grated Italian Parmigiano-Reggiano cheese (optional)
Method Working Ahead: The dough should be started about 4 hours before you intend to eat. Baked Tigelle hold well for several hours, wrapped in plastic wrap, and freeze successfully. Wrap them in a single layer of aluminum foil before freezing. Reheat them, defrosted, at 300°F, 20 to 30 minutes, or until hot to the center. If they are at all soggy, unwrap them and crisp them by baking another 5 to 10 minutes.
Making the Dough by Hand: Combine the yeast and the warm water in a large mixing bowl. Stir in 1 tablespoon of the flour and let the mixture stand 5 minutes, or until the yeast is bubbly. Add the butter to the yeast mixture. Stir in the salt with a wooden spoon. Then blend in the rest of the water alternately with the remaining flour. You will have a lumpy, sticky dough. Knead the rough dough in the bowl or on a work surface 10 minutes, or until it is elastic. The dough starts out sticky, but kneading turns it smooth, soft, and elastic. If necessary knead in another 2 tablespoons flour.
Making the Dough in a Food Processor: Pour the yeast and the warm water into the bowl of a food processor fitted with the steel blade. Add about 1 tablespoon of the flour, and blend it into the yeast mixture. Let it stand 5 minutes, or until the yeast is bubbly. Add the butter, the rest of the flour, the remaining water, and the salt. Process 10 seconds, stop a few seconds, and process again 10 seconds. The dough should be smooth, soft, and elastic. If it is still sticky, blend in another 2 tablespoons flour.
Rising and Shaping: Lightly oil a medium bowl with olive oil. Place the kneaded dough in the bowl, cover it with plastic wrap, and let it stand at room temperature 2½ hours, or until almost tripled in bulk. Do not be concerned if the dough overrises at this point. Punch down the dough and shape it into twenty balls about 1½ inches in diameter. Roll them out into discs about 3½ inches in diameter and a little over ¼ inch thick. Cover them with a kitchen towel and let rest 40 minutes.
Making the Condimento: Blend together the pancetta or olive oil, garlic, rosemary, and cheese. Set aside at room temperature.
Baking the Tigelle: Heat the oven to 200°F. Heat a baking stone, metal griddle, or heavy sauté pan over a burner at the lowest heat, and gradually, over about 10 minutes, raise the heat to medium-low. Once the baking surface is hot, rub a little oil over it with a paper towel. Place three or four Tigelle on it so they are not crowded. Bake until speckled golden brown on both sides, about 6 minutes per side. Wrap them, several at a time, in foil and keep them in the warm oven. Continue baking batches until they are all in the warm oven.
Serving: Serve hot, wrapped in a napkin-lined basket, accompanied by minced garlic and olive oil or the condimento.
Suggestions Wine: A fresh simple red with Tigelle, such as a young Sangiovese di Romagna or one from Umbria. The Piemonte’s Campo Romano or a young Chianti Montalbano would be excellent too.
Menu: Have Tigelle as a casual meal, with or without their condimento, with coppa, salami, and Balsamic Vegetables. If desired, add nontraditional accompaniments of sliced radishes, tomatoes, scallions, cucumbers, celery, mozzarella, and fresh ricotta cheese. Serve the breads, along with the condimento and Balsamic Vegetables, as an antipasto before Giovanna’s Wine-Basted Rabbit or Erminia’s Pan-Crisped Chicken.
Cook’s Notes Italian Salt Pork and Pancetta: In Italy salt pork is used in the condimento. Italian salt pork is particularly satiny, not overly salty, and safe as well as delicious when eaten raw. It closest equivalent in the United States is not salt pork but pancetta. See A guide to Ingredients for information on buying and using pancetta.
Borlengo alla Guiglia
What a delicious curiosity Borlengo is—a huge pan bread so thin it seems transparent, so crisp you expect it to shatter. Instead, Borlengo bends and folds, and tastes chewy and crisp at the same time. If its appearance is fascinating, its topping, called a condimento, is even more so. A liquid version of Tigelle’s traditional filling, good pancetta or lard is melted with garlic and rosemary, then dabbed on the hot Borlengo. Just before folding it into quarters, the bread is showered with a handful of Parmigiano-Reggiano cheese. No wonder Borlengo is a favorite Sunday-night supper.
Ethnic food authority Cara De Silva not only shares my passion for Emilia-Romagna but also patiently perfected this recipe. I owe her a great debt. Borlengo is a prime example of how the simpler the dish, the more difficult the translation into another culture becomes. But do not be intimidated—Cara has made Borlengo easy for the home cook. It takes time but no special skill. Note, too, that olive oil can be substituted for the condimento’s pancetta or lard. Although not traditionally used, it is a delicious low-cholesterol alternative.
[Makes 6 to 8 large discs]
Condimento
½ cup high-quality lard, or 8 ounces pancetta trimmed of meat, or ½ cup extra-virgin olive oil
2 tablespoons minced garlic
Two 3-inch sprigs fresh rosemary, or 2 teaspoons dried rosemary leaves
Salt and freshly ground black pepper to taste
Batter
1¼ cups plus 2 tablespoons (5½ ounces) all-purpose unbleached flour (organic stone-ground preferred)
½ cup plus 2 tablespoons (2½ ounces) cake flour
¾ teaspoon salt
2 tablespoons beaten egg
6 cups water
Topping
6 ounces Italian Parmigiano-Reggiano cheese, grated fine
Method Working Ahead: The condimento will hold, covered, in the refrigerator 2 days. Grate the cheese shortly before serving. The Borlengo can be made several hours ahead, kept at room temperature, and then quickly reheated in the pan before topping with the condimento and cheese. Rewarm the condimento before using.
Making the Condimento: Melt the lard or pancetta in a small saucepan over low heat. Keeping the heat very low, stir in the garlic, rosemary, and seasonings. Cook gently 15 minutes, or until the garlic is poached and soft. (Olive oil needs no melting; simply warm it with the flavorings.) Set aside.
Making the Batter: Blend the two flours, salt, and egg in a large bowl. Add 1½ cups of the water, and beat with an electric mixer 4 minutes, or by hand about 6 minutes. Stir in the remaining water. The batter should resemble slightly thickened milk. Add a little more water or flour if necessary. Let the batter stand 20 minutes.
Cooking the Borlengo: Heat two 10- to 12-inch nonstick or very well seasoned skillets over low heat. They are at the proper temperature when a few drops of water sprinkled on them hiss but do not skitter. Brush the skillets lightly with a little of the condimento. Film the skillets with batter, pouring off any extra and swirling to cover the bottoms completely. (This will take about ½ cup for a 12-inch skillet, 1/3 cup for a 10-inch one.) In Guiglia the Borlengo makers say, “Borlengo must be thin as a veil and transparent as glass.”
Cook 30 minutes over low heat, or until the Borlengo no longer looks damp and raw on the upper side. It will still be unbrowned. Turn and cook another minute or so. During the cooking, the large semi-transparent bread will crater, blister, and possibly split. It behaves in a way you have rarely seen in anything made of flour. Don’t worry. For a crisp bread that cooks a bit faster and is speckled with a little gold, use medium-low heat. Cook about 10 minutes on one side, then turn and cook another 5 minutes on the other. This Borlengo will have a brittle texture and taste “browner,” but still be very good. Once the Borlengo is done, remove it from the pan and set aside at room temperature. They should not be covered.
Serving: Rewarm the condimento. Reheat the Borlengo in the same skillets over low heat 3 minutes, turning halfway through warming. Dab with a little of the warmed condimento, sprinkle with a tablespoon or a little more of the cheese, and fold into quarters.
Suggestions Wine: In the Modena hills, fizzy local red or white wines are quaffed with Borlengo. You could also drink a simple Valpolicella or a young red Cellatica from Lombardy, or a fresh “La Monella” from Braida di Giacomo Bologna in the Asti area of Piemonte.
Menu: Borlengo is a fine Sunday-night supper. Plan on three or four per person. Follow it with either Baked Pears with Fresh Grape Syrup or cool wedges of Cinnamon and Clove Custard.
Cook’s Notes Dainty Borlengo: Borlengo can be cooked in 6-inch crêpe pans, using ¼ cup batter for each.
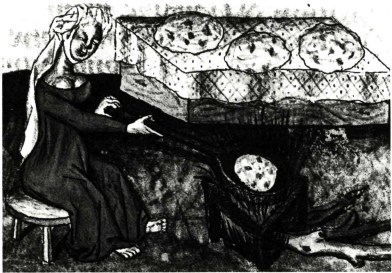
Fifteenth-century miniature of a woman making pan-cooked flatbread similar to Borlengo and Gnocco Fritto
A “Joke” of a Bread
Three hilltowns, Zocca, Vignola, and Guiglia, vie for the honor of being the true home of Borlengo. But it is perhaps Guiglia that has the strongest claim. The story of Borlengo’s beginnings goes back to a time long ago, when mountain lords clashed with great regularity. The old castle at Guiglia was ruled by Ugolino, a lord famous for his table. When his enemies laid siege, cutting off all food supplies, no one could imagine how Ugolino could continue to do battle. Fortunately the castle did have a large supply of flour. Bread and pasta doughs were continuously watered down. Finally thinned to batter, the transparent sheets were baked over fires to keep the troops fed. Borlengo, from the root burla, meaning “joke” in local dialect, was truly a joke of a bread, but the joke was on Ugolino’s attackers. Another theory claims that Borlengo was born as the food of the poor. The oldest recipes call for only flour and water, with no expensive egg. Almost everyone had a fire, water, and a little flour. When all else failed, Borlengo could feed the family. Today the bread is a favorite Sunday-night snack after a day of dining in the country. Often only men make Borlengo, perhaps because they feel linked to Ugolino’s soldiers, legendary for their courage and fortitude.
Stalking the Wild Borlengo
The bread sounded like no other that my friend Cara De Silva and I had ever heard of: a bread you can almost see through, as big as a cart wheel, dotted with cheese, garlic, and rosemary. Supposedly Borlengo was made in the hilltowns above Modena. Yet in Modena city and on the plain, few people had heard of it. Even in the hills Borlengo constantly eluded us. It was made in the winter; we were seeking it in the spring. Day after day, in town after town, we were told it was probably down the road or in the next village. The only constant was Rodiano. All agreed it was made in Rodiano. Of course, Rodiano was a mere pin speck on the map and finding it proved impossible. Every time we set out for Rodiano we lost our way on country roads no bigger than cow paths. Finally, we gave up the search and wandered the hills for pleasure. A blinding rainstorm brought us to a halt. Suddenly, the rain and mist cleared, and we were staring at a sign: “Welcome to Rodiano.” Like Brigadoon, it appeared out of the mist.
We had been told that Rodiano had two trattorie, and that the one on the left made Borlengo. Of the four buildings making up Rodiano, sure enough, there side-by-side were two trattorie. We leapt gleefully out of the car, only to discover the sign on the left-hand trattoria: “Closed for vacation.” Once again, Borlengo was not to be. We turned to the adjoining Trattoria Leonelli, crestfallen. Little did we know we were about to stumble upon yet another intriguing bread of the Modenese mountains. In the tiny back dining room, baskets holding small rounds of hot bread were served with platters of cured meats and pickled vegetables. With them came bowls of minced salt pork flavored with garlic and fresh rosemary. Our shy waitress called the breads Tigelle. We were shown how to split open the hot breads and spread them with the pork mixture, then eat the meats and vegetables as accompaniments. Instead of being heavy and overrich, the spread was sweet and clean-tasting. (Italian salt pork, lardo, is more delicately flavored than ours, and is cured to be safely eaten raw.)
Tigelle are not baked in ovens. In fact, they are not baked like any bread I know. They cook between hot terra-cotta discs or tiles. At Trattoria Leonelli the tiles, about 4 inches in diameter, are heated in a freestanding fireplace in the back garden. The hot discs are then hauled into the kitchen with its own open fire and piled on the heated hearthstone. Small rounds of risen bread dough are sandwiched between them. The bread bakes from the heat of the tiles, taking on the pattern of their sunburst embossing. It also takes its name from them: Tigelle is both the tile and the bread. When the Leonellis cater local weddings, 200 Tigelle are stacked on the hearth at a time. The bread is so old and so much a part of Modena mountain traditions that no one knows where or when it began.
The next day we had to move on to Bologna. But still resisting leaving the countryside, we decided to stop for coffee. Driving into the hilltop village of Guiglia, we almost went off the road. “Fifteenth Annual Borlengo Festival,” proclaimed the banner strung over the street. We exploded with laughter. We were among the first to arrive. Chickens were still strutting across the town square. Under a yellow tent, the local men who make Borlengo were setting up. They worked with big round pans of hammered copper over gas-fired braziers.
Guiglia’s oldest Borlengo maker demonstrated his technique. First he rubbed the hot pan with a chunk of home-cured pancetta. Then he ladled the milky batter into the pan, making a sheer film. It cooked to speckled gold on one side, then was turned and cooked on the other. More than two feet across, the Borlengo was crisp, parchmentlike. He dipped a brush into a pot of clear liquid flecked with green and white—homemade lard melted with garlic and rosemary. After dabbing the Borlengo with the brush, he showered it with a handful of Parmigiano-Reggiano cheese. We folded the Borlengo in quarters and ate it from a big napkin. We left the festival hours later—happy, full, and feeling like Stanley after he finally found Livingstone.
Burtlêina
These rounds of crisp, golden, and cratered fritters are traditionally eaten as snacks with cured meats or jam. In Piacenza’s farm country they were carried out to the farm workers as their lunch. The women stacked up three and four Burtlêina, tucked a salami and bottle of wine under their arms, and off they went. The original fritter consisted of a little flour and water fried in lard. For pure luxury, eggs were added to the batter.
Maria Bertuzzi shared this recipe and its traditions with me during a wonderful cooking lesson in the kitchen of her Ristorante Grande at Rivergaro, in the hills above Piacenza. Spiraling the Burtlêina batter into hot oil reminds me of the funnel cakes of our Pennsylvania Dutch country. While those are served with sweet syrup, Italy’s fritters are lightly salted.
Welcome family and friends in from a winter’s day outdoors with a snack of hot Burtlêina. Cut the rounds into wedges and accompany them with thin-sliced coppa, salami, or even some tart homemade jam. Offer a choice of wine or hot coffee.
[Makes 3 to 4 large fritters, serving 6 to 8]
1½ cups (6 ounces) all-purpose unbleached flour (organic stone-ground preferred)
½ cup (2 ounces) cake flour
2 eggs
2 teaspoons salt
2¼ cups water
6 cups vegetable oil for deep-frying
Method Working Ahead: Let the batter rest from 30 minutes to several hours. Once the fritters are fried, they are best eaten as soon as possible.
Making the Batter: In Piacenza, mixing by hand literally means using your hand like a big spoon to beat and stretch the batter. A large spoon or whisk also works well. Blend together the flours, eggs, salt, and water into a smooth batter, the consistency of heavy cream. Let it stand at room temperature 30 minutes or longer. If the batter thickens in standing, stir in another ¼ cup water.
Frying the Burtlêina: Preheat the oven to warm. Lay out a triple thickness of paper towels for draining the Burtlêina. Pour the oil into a 12-inch sauté pan, and heat over medium-high heat to 370°F (use a deep-frying thermometer). Using a long handled ladle, scoop up about 11/3 cups of the batter. Stand back while you spiral the batter into the hot fat, making a large disc. Fry 4 to 5 minutes, or until golden on the bottom. Then carefully turn it, bracing the Burtlêina with two long metal spatulas. Continue frying until it is golden brown on the second side, 3 to 4 minutes. Lift the Burtlêina with a slotted spoon, and drain it well on both sides atop the paper towels. Then slip it onto a baking sheet and keep it warm in the oven. Repeat until all the batter is used up.
Serving: Serve Burtlêina hot on its own or accompanied by thin-sliced coppa and pancetta. For lighter eating, serve Balsamic Vegetables. You could also offer it with a double recipe of Nonna’s Homemade Tart Jam.
Suggestions Wine: A simple red like a Bonarda from Piacenza, or a Sangiovese di Romagna or from Umbria.
Menu: For modern appetites serve Burtlêina as a snack. Or make it an antipasto, following the fritter with a light soup like Ferrara’s Soup of the Monastery or Modena’s Spiced Soup of Spinach and Cheese. Have fresh fruit for dessert.
Piadina
A bread for impatient appetites, Romagna’s hearty Piadina is semi-crisp and tender at the same time. Resembling a flour tortilla, this simple bread tastes best when eaten with its traditional toppings. Piadina is as much a part of Romagna’s soul as is her land. Poets compose odes to Piadina, historians chronicle its past, and Piadina stands are almost as common as trees in Romagna’s countryside.
Romagnoli eat Piadina with meals as well as from the snack stands throughout the region. Up until a few decades ago this ancient bread was baked on griddles of unglazed terra-cotta over hot embers in the fireplace. Today the bread is cooked on metal griddles on the stove top, but hardware stores in Romagna still stock terra-cotta ones for those who insist they impart irreplaceable flavor and crispness.
Traditional fillings are thin slices of prosciutto, salami, and sautéed spinach, chard, or wild greens. Even more satisfying is Romagna’s squaquerone cheese, tangy and spoonable. It becomes memorable when smeared on hot Piadina and topped with a few leaves of arugula. Make an informal supper of Piadina, cooking them together so everyone can enjoy their fragrance. Set out a variety of toppings, and invite diners to try different combinations. This is more than a meal—it is a piece of Romagna’s rural heritage.
[Makes 12 breads, serving 8 to 12]
4¼ cups (17 ounces) all-purpose unbleached flour (organic stone-ground preferred)
1½ teaspoons salt
½ teaspoon baking soda
6 tablespoons (3 ounces) high-quality lard, chilled
1 cup warm water
Additional lard or a little oil for the baking stone or pan
Method Working Ahead: The dough can be made early in the day; wrap and store it in the refrigerator. Piadina are best baked and eaten warm, as soon as possible. They can be wrapped in foil and kept warm in a low oven until you have finished cooking the entire recipe. If they must be made several hours before serving, keep them tightly wrapped. Shortly before serving, restore their pliability by lightly sprinkling each one with a little water, restacking, and wrapping them in foil. Then reheat in a 325°F oven about 15 minutes.
Making the Dough by Hand: Blend together all the dry ingredients in a large bowl. With your fingers, rub in the lard until the mixture resembles fine meal. Sprinkle the water over the mixture. Still using your hands, blend and knead 3 to 5 minutes, or until the dough is smooth, semi-soft, elastic, and not sticky. You can roll out the Piadina immediately, or cover the bowl with a towel and let the dough relax at room temperature about 30 minutes.
Making the Dough in a Food Processor: Combine the dry ingredients in a processor fitted with the steel blade. Run the machine about 5 seconds to thoroughly blend them. Add the lard, and process about 30 seconds to completely blend the lard with the flour. It should resemble fine meal. Sprinkle the water over the dough. Use the on/off pulse to blend in the water until the dough looks like large crumbs or clumps. Do not blend until it forms a ball. Turn the dough out on a work surface and knead three or four times to gather it into a ball. The dough will be smooth, elastic, semi-soft, and not at all sticky. Roll out the Piadina immediately, or wrap the dough in a kitchen towel and let it rest about 30 minutes at room temperature.
Shaping and Baking: Heat the oven to 200°F. Divide the dough into twelve balls. Use a rolling pin to roll each one out into a 7- to 7½-inch round. Make sure they are no bigger. If possible, cook the Piadina on a baking stone on top of the stove. If this is unavailable, it can be cooked in a heavy cast-iron skillet or griddle, or in a stainless steel—lined skillet with good, even heat distribution. I usually work with two stones or griddles to bake the breads quickly. Perfect Piadina are easily achieved by cooking them quickly without burning. They will be like a slightly stiffened flour tortilla, pliable enough to be torn or bent, but not so stiff that they are hard. Slow cooking produces a hard, crisp Piadina.
Heat the griddle or skillet over medium-high heat. If you are using a stone, heat it gradually, beginning at low and taking about 15 minutes to bring it up to medium. Usually the stone will be hotter than a metal skillet or griddle. Test the temperature by sprinkling the cooking surface with a few drops of water. They should fizzle and disappear in about 2 to 3 seconds. Rub the pan or stone with a little lard or oil. Bake the Piadina one at a time. It should take 30 to 45 seconds for the bottom to be speckled with deep golden brown. The uncooked side will look grainy and mottled. If this takes longer, raise the heat slightly. If the speckles are dark brown, the cooking surface is too hot. Lower the heat slightly. Using a metal spatula, flip the bread over and bake another 30 seconds. This second side will have fewer golden-brown speckles, and it will look slightly parched. Stack and seal the finished breads in a single layer of aluminum foil, and keep them warm in the oven.
Serving: Serve the Piadina hot, as rounds or cut in wedges, wrapped in a napkin-lined basket to keep them warm.
Suggestions Wine: Young red Sangiovese di Romagna is traditional with Piadina. Umbria’s Sangiovese is a good second choice.
Menu: Serve Piadina hot with second courses like Seafood Stew Romagna, Mardi Gras Chicken, and Lamb with Black Olives. Enjoy it as a snack, casual supper, or first course by serving it hot with Spiced Spinach with Almonds or simply sautéed spinach; prosciutto, coppa, or pancetta; or Fresh Squaquerone Cheese (below) and coarsely chopped fresh arugula. For a casual supper, offer it with all these accompaniments and any of the following that appeal.
An untraditional topping is squaquerone in combination with slices of vine-ripened tomato and chopped fresh basil, or fresh mozzarella and red onion. Piadina is also delicious with Piacenza Peppers Country Style or topped with Garlic-Sautéed Cabbage.
Cook’s Notes Stuffed Variation: Essentially stove-top calzone, these turnovers can be stuffed with any of the traditional fillings, or with about ¼ cup each tomato sauce and shredded mozzarella. Roll out a round of dough as thin as possible. Spread the filling over half of it. Fold over, and crimp the edges to seal. Bake on the griddle about 3 minutes per side over medium-low heat.
Formaggio Squaquerone
A fresh cow cheese originating in Romagna, squaquerone is tangy and creamy at the same time, a cross between yogurt and cream cheese. Sold from crocks in cheese stores throughout the area, it is spoonable and a little lumpy.
I first tasted squaquerone slathered on hot Piadina flatbread and topped with arugula leaves—a perfect combination. Later I learned that a ripe tomato and thin slices of onion add even more goodness to the blend. The more I tasted squaquerone with different foods, the more captivating it became.
In Romagna, the method for making squaquerone is almost as old as milking cows. Lactobacillus thermophilus culture is added to raw or pasteurized milk. As the milk gains acidity, it thickens. After chilling about 36 hours, the typical texture of curds suspended in cream evolves. Attempts at approximating the cheese in the United States met with frustration. No matter what kinds of culture, milk, or temperature were used, the results were disappointing. One day, in total exasperation, I blended the elements that squaquerone reminded me of: yogurt, buttermilk, sour cream, and cream cheese. The result was the closest I had come to the cheese as it is in Italy. This simple formula needs only a bowl, a spoon, and 10 minutes of effort.
[Makes 2 to 2½ cups]
6 ounces cream cheese (preferably without guar gum), chilled
¼ cup sour cream, chilled
½ cup buttermilk, chilled
¾ cup plain low-fat yogurt with live cultures (preferably made without pectin and other additives), chilled
1 tablespoon fresh lemon juice
Salt (optional)
Method Working Ahead: Let the cheese mellow in the refrigerator 24 to 36 hours before using. It will keep, covered, 5 days in the refrigerator.
Making Squaquerone: Use a fork to mash the cream cheese with the sour cream in a medium-size bowl until they are well blended. Gradually stir in the buttermilk, leaving pea-size lumps of the cream cheese mixture. Fold in (do not beat in) the yogurt and lemon juice until well blended. (If beaten in, the yogurt will liquify.) Add salt to taste if desired. Cover and refrigerate.
Using Squaquerone
Spoon it over fruits (sweetening the cheese with honey, if desired).
Spread it over sliced tomatoes.
Mix with 2 cups chopped fresh herbs (basil, marjoram, parsley, and scallions) and use bread or crackers.
Dab a few spoonfuls over the sautéed onions in Spianata stuffed with sautéed onions.
Top Piadina with a salty prosciutto and spread with squaquerone. Or merely cover the bread with the cheese and top with thinly sliced red onion.
Toss into hot pasta dressed with olive oil and garlic.
Sauté a large chopped onion in olive oil until golden. Add a handful of fresh basil and a generous amount of minced garlic. Cook a few seconds. Toss with 1 pound tagliarini, spaghetti, or linguine and ½ cup squaquerone. Season with a generous amount of black pepper.
Spoon the cheese over cucumber-onion salad.
Spoon it over a whole roasted onion.
Dab over potato salad dressed with olive oil, onion, and vinegar.
Spread squaquerone on baked potatoes.
Pane Montanaro
If I could make only one bread for the rest of my life, it would be this loaf. It is everything an old-style country bread should be; fragrant with wheat, dense with a crackled crust, and chewy with an interior that tugs at the tooth. Mixing whole-wheat and white flours, and letting the bread mellow through a long sponge and slow risings, bring out the deep, full flavor of the wheat. Crushed wheat berries mixed into the dough give the occasional crunch. The potato in the bread makes it moist. Both the potato and the small quantity of yeast keep the bread fresh a week.
[Makes 1 large loaf]
Sponge
2 tablespoons all-purpose unbleached flour (organic stone-ground preferred)
1½ teaspoons granulated yeast
¼ cup warm water (110°F)
2 cups (8 ounces) all-purpose unbleached flour (organic stone-ground preferred)
1 cup warm water (110°F)
Dough
5 to 6 ounces red-skinned potato(es)
Generous ½ cup (3 ounces) wheat berries
1 cup (4 ounces) whole-wheat flour (organic stone-ground preferred)
½ teaspoons salt
About 4½ cups (1 pound, 2 ounces) all-purpose unbleached flour (organic stone-ground preferred)
1½ cups organic stone-ground cornmeal (with baking stone)
1 tablespoon all-purpose unbleached flour (organic stone-ground preferred)
3 cups water (for steam)
Method Working Ahead: The bread takes about 1½ hours of actual effort, but it is spread over 2 days. The sponge works 12 to 18 hours. The potato and wheat berries can be cooked 1 day ahead and then refrigerated, covered. Have them at room temperature before blending them with the dough. The first rising takes 2 to 3 hours, the second 1½, and the bread bakes about 1¼ hours. It keeps, wrapped and refrigerated, 1 week and freezes well 3 months.
Making the Sponge: Start the sponge 16 to 22 hours before baking the bread. In a medium-size bowl, stir together the flour, yeast, and ¼ cup water. Let the mixture stand 5 minutes, or until the yeast is bubbly. Beat in the remaining 2 cups flour and 1 cup warm water. If you are working with an electric mixer, beat 1 minute at medium speed. By hand, beat vigorously about 3 minutes. Scrape down the sides of the bowl. Cover the bowl tightly with plastic wrap, and set aside at room temperature 12 to 18 hours.
Preparing the Potato and Wheat Berries: Boil the unpeeled potato in water to cover 30 minutes, or until very tender. Cool and peel. Save 10 tablespoons of the potato cooking water, and purée it with the potato. Cool to room temperature. Cook the wheat berries in fiercely boiling water to cover 10 minutes, or until tender. Drain and cool. Use a blender, food processor, or mortar and pestle to lightly crush the berries. Set aside at room temperature.
Making the Dough in a Heavy-Duty Mixer: In the mixer bowl, combine the sponge, potato purée, wheat berries, whole-wheat flour, salt, and half the all-purpose flour. Beat with the paddle attachment at medium speed about 2 minutes. Beat in another 1 cup flour and switch to the dough hook. Gradually add more flour until you have a sticky dough. The dough will be soft but holding its shape around the dough hook while it cleans the bottom and sides of the bowl. If it puddles at the bottom, blend in another few tablespoons of flour. It will be very elastic, soft, and a little sticky. Knead 10 minutes in the mixer.
Making the Dough by Hand: In a large bowl, beat together the sponge, whole-wheat flour, potato purée, wheat berries, salt, and half the all-purpose flour. Beat 5 minutes, and then work in enough flour to make a soft, slightly sticky dough. Turn the dough out onto a work surface and knead 10 minutes. It will be very elastic, soft, and a little sticky. If necessary, knead in another few spoonfuls of flour.
First Rising: Lightly oil a large bowl. Add the dough, and seal the bowl with plastic wrap. Set aside to rise at room temperature 2 to 3 hours, or until the dough is two-and-one-half to three times its original size. It will look blistered and soft. No harm will come to the bread if you let the dough sit as long as 8 hours.
Preparing to Bake: Although a greased baking sheet can be used, I prefer to bake the bread on a baking stone or unglazed terra-cotta tiles. If you are using tiles or a stone, set them in the oven before preheating it. You will need a flat wooden peel, cookie sheet, or piece of heavy cardboard. (Once the dough is shaped, half the cornmeal is spread on the peel, cookie sheet, or cardboard to keep the dough from sticking, and the dough is set on the cornmeal to rise. Then you slip the bread from the peel, sheet, or cardboard onto the baking surface that has been covered with the rest of the cornmeal.) If you are using a cookie sheet, lightly oil it with a little olive oil. Whichever method you use, place a shallow pan, such as a jelly roll pan, on the floor of a gas oven or on the lowest rack of an electric one. This will hold the water that steams and is vital to the crust’s dense texture.
Shaping and Second Rising: Punch down the dough, and knead it about 5 minutes. Shape the dough into a ball by stretching it down and under, tucking it under itself until you have a taut sphere. Spread half the cornmeal over the peel and set the dough on it, or set the dough on the oiled cookie sheet. Sprinkle it with the 1 tablespoon flour. Cover the dough with a kitchen towel and let it rise at room temperature 1½ hours, or until doubled in bulk. The bread is ready for baking when you poke it with a finger and it does not spring back.
Baking: Preheat the oven to 400°F. Make sure the rack is in the center of the oven. If you are using tiles or a stone, spread it with the rest of the cornmeal, and slip the bread onto it. If you are using a cookie sheet, merely slip it into the oven. Stand back as you pour the 3 cups water into the shallow pan at the bottom of the oven. Trap the burst of steam in the oven by closing the door immediately. Bake 1 hour. Then turn the bread upside down and bake another 10 to 15 minutes, or until the loaf sounds hollow when tapped. Put the loaf on a rack to cool. Although it is so tempting when it’s hot, do let the bread cool 1½ to 2 hours before cutting it. It will be at its very best then.
Suggestions Menu: Enjoy the bread on its own, or serve it with any first or second course. Modena Mountain Bread is splendid in Garlic Crostini with Pancetta, Mountain Soup with Garlic Croutons, and Fresh Garlic Soup Brisighella. Toast thin slices, rub them with garlic and olive oil, and spoon Piacenza Peppers Country Style or Garlic-Sautéed Cabbage over them. Toasted or not, the bread is excellent with Fresh Squaquerone Cheese and fresh arugula or chopped Belgian endive.
Cook’s Notes Wheat Berries: Wheat berries are found in the natural foods section of supermarkets, food co-ops, specialty food stores, and health food stores. They are sometimes labeled “Whole-Grain Wheat.”
A Memory Bread
This is a bread of memory for the women of Highwood, Illinois, who emigrated to America from the Modena mountains. They remember breads of their childhood. Maria Picchietti and Giovanna Lamberti recall that wheat was sparse in the mountains. Families grew their own and ground it into flour, often leaving specks of the whole grain. The mothers of Sue Bernardi and Anna Mardini added potatoes to moisten the loaf. Instead of leavening with yeast, they carried on a tradition as old as bread itself by saving some dough from the last loaf to begin the next. In Modena, too, my elderly friends spoke of the same breads. Each family remembered the bread with slight differences, but its essence remained the same.
Approximating a Wood-Burning Oven
For the millennia before gas and electric stoves were dreamt of, brick and stone ovens heated with wood fires were the magical places where bread was cooked. Many artisan bakers still use these ovens, knowing that they impart a special flavor and vitality to bread. The scent of burning wood subtly impregnates the loaf, and somehow the life of the fire brings more vigor to the bread. You can approximate the old ovens by using soaked wood chips and a baking stone or tiles. Soak 3 cups of applewood, oak, walnut, or maple chips in water to cover for 1 hour. (Although I have not worked with them, grape vines and other fruit woods should work well here.) Drain, saving 1½ cups of the water. Return it to the chips. Set a large shallow pan on the lowest rack of the oven. Place a second rack, holding a baking stone or tiles, in the center of the oven. Then preheat the oven to the required temperature. When the dough is ready for baking, place it on the center rack. Pull out the lower rack holding the shallow pan. Stand back as you pour the wood and its liquid down the length of the pan. Immediately close the oven door. If the wood begins to smoke while the bread is baking, pour another ½ cup water over the chips and quickly close the oven door. Ideally, there will be a fragrant wood aroma but no smoke. Once the bread has baked, let the wood pan cool completely before removing it from the oven. The chips can be reused for flavoring foods on an outdoor grill.
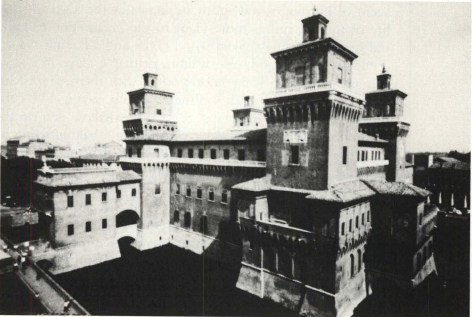
Castle of the Este dukes, Ferrara