Materials
Two 30-inch artists stretcher
strips Two 36-inch artists stretcher
strips 8/4 linen thread for warp (see
note) Swedish Berga goat hair yarn
in brown and yellow, or a
suitable substitute (see note) 4 corrugated fasteners 1 sheet of lO-square-per-
inch graph paper Transparent tape
Directions
Note To estimate the amount of materials required to make these ■mini" rugs, see the directions on page 87. As a general guide, however, plan on using about 3 cones of 8/4 linen and 12 skeins of each color yarn to make small rugs equivalent to 27x72 inches when added together. Although the loom will be warped to be 30 inches wide, the width of the rug will be only about 27 inches when finished.
To begin, build a 30x36-inch frame from the artist's stretcher strips. Stabilize the corners with corrugated fasteners. The 36-inch sides of the frame will be the top and bottom of the loom, around which the warp is wrapped. Along the top of each of these sides, tape a 1-inch-wide strip of graph paper to help mark the spacing of the warps (10 warps to the inch).
To warp the loom, tie the linen thread securely to the bottom of the loom, about 3 Inches inside the corner, warp only the center 30 inches of the frame, leaving a 3-inch margin on each side to make weaving easier. Carry the linen cord up to the top of the frame, around it. and back to the bottom again. Wrap it around the bottom, and carry it back to the top. Wrap the warp around the frame in a figure-eight pattern (When viewed from the side). Continue in this way until you've wrapped the frame 154 times, creating 308 warp threads in the 30-inch space. Pull the warp tightly as you wrap around the frame. Knot the ends of the warp string together when necessary: weft yarn will cover the knots. Knot the end of the last warp securely to the frame. Then, with your fingers, space warps along the lines of the graph paper, so there are 10 warps per inch, except on the outside edges where four warps should begrouped together on each side. Be sure to divide the warp threads evenly.
To begin the first "mini" rug. weave with the warp thread to a depth of Vi inch. On the first row. go over and under two threads at a time to establish 150 double-thread warps, except on the selvages; these should be four-thread warps. On the second row, go over the threads you went under on the first row and under those you went over. Continue until youve woven 'A inch. Then switch to yarn for the border strip.
To weave the border, use brown yarn and weave over and under three pairs of warps (6 threads) at a time to a depth of one inch. Begin and end yarn insidethe woven area rather than along the selvage. As you weave eacT\ row. beat it down f i rmly against the previous rows by pushing with your fingers, a large-tooth comb, or a dinner fork, making the weaving snug and firm.
To weave in pattern, follow the charted diagrams on pages 86 and 87, The dark areas in the diagrams represent the brown yarn; light areas are yellow. Repeat each pattern as many times as desired. The patterns in the rug shown opposite vary from 12 to 21 inches long, except for pattern number 4. which is worked only once (and can be woven at the top or bottom of an adjoining pattern). When weaving more than one pattern on the loom, separate them with an inch of brown border, following directions above.
At the top of each pattern, end the rug by working two or three rows of linen thread in plain weave over and under pairs of warp threads. Beat them down snugly against previous rows.
To remove the rug from the loom, carefully cut the warp threads from the loom and knot them tightly together as follows: Cut the
continued
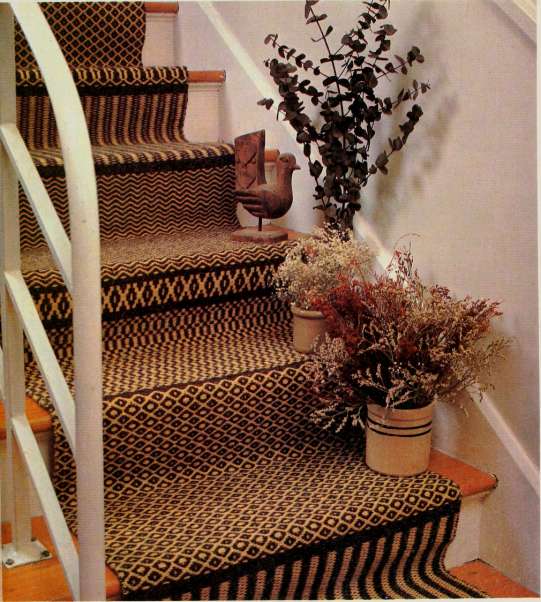
Woven Stairway Runner
(continued)
first six threads off the loom. Tie the first five together in an overhand knot Then cut the next double strands from the loom and tie together one strand from that warp with the one remaining from the previous warp. Continue cutting and tying together strands from adjoining warps until the rug is completely off the loom. Cut threads close to Knots, or leave them long for fringe if rugs are not going to be sewn together.
To make the remaining rugs, warp the loom following the directions on page 84, Instead of working Vi inch of linen warp in plain weave, however, work only three rows; then work an inch of brown border, following the directions on page 84, Work the remainder of the rug in pattern, following one of the diagrams.
To assemble the finished samples, stitch them together with strong carpet thread, following directions on page 7 for joining braided rugs. Mount on the stairway with brass rods.
1 Row of vertical squares =1 warp thread 1 Row of horizontal squares =1 weft thread
How to Estimate Quantities of Yarn for Weaving
To estimate for warp threads: First, count the number of warps (selvage threads) on the loom, or multiply the width of the weaving by the number of warps per inch. Then add to that number any extra threads for special purposes. For example, if you are double-warping the loom, then double the amount you ve figured so far. Multiply this number by the length (in inches) of the warp (from the top to the bottom of the loom). Then divide that number by 36 to convert Inches into yards. Finally, add a little extra for waste, to get an estimate of the final amount.
To estimate for weft ttireads. yarn, or fabric: Measure the width of the weaving you plan and add a bout 25 percent to determine the length of the weft (crosswise thread) you need for one row of weaving. Then estimate how many rows of weft make up one inch of weaving. (Working a small sample at this point helps.) Multiply the width estimate by the number of rows, and then multiply that total by the length (in inches) of the planned weaving. Divide this final sum by 36 for the approximate number of yards of weft yarn or fabric needed.
Family Portrait Rug
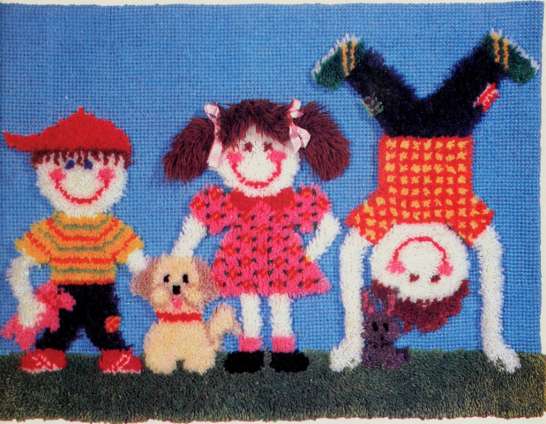
This enchanting rug features a happy comt)ination of two techniques. Here the grass, the puppy, and the chiidren are worked with a latch hook, while the lower but slightly textured background is worked in cross-stitches. By changing the color of the hair, eyes, or clothing, you can make this rug look like a portrait of your own happy family.
Materials
32x43 inches #4-count penelope rug canvas
Three 140-yard skeins (or six 70-yard skeins) Aunt Lydia's polyester rug yarn in light blue, or a suitable substitute
320-strand packages of precut latch-hook yarn in the following amounts and colors: 1 red. 1 gold, i yellow, 1 purple, l royal blue. 1 deninn blue. 1 black. 1 tan. 2 cream. 6 white. 1 medium brown. 2 pink, l light green, l rose. 1 light gray. 1 dark gray. 1 orange. 8 olive green, l kelly green, and 1 dark Drown
1 yard =/8-inch-wide pink grosgrain ribbon
Black waterproof marking pen
Light blue acrylic paint
Large paintbrush
Large tapestry needle
Latch hook
Carpet thread
Masking tape
5 yards rug binding
Brown wrapping paper
Directions
Note: The finished size of the rug is 28x39 Inches.
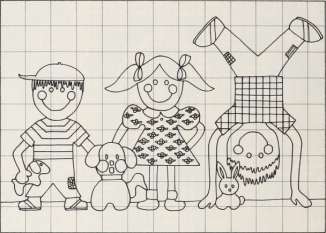
To make the rug as shown, use the pattern above. If you wish to change the design to resemble your own family, adapt the pattern by altering the design or by changing the hair color.
To make your own pattern, take a slide photograph of your family and project the I mage on a wall covered with paper cut to the same size as the finished rug. Trace the image onto paper with a pencil, then go over the lines with a black felt-tip pen so they are easy to see. Transfer the design to rug canvas, following the directions on page 53.
If you use the pattern above, enlarge it to size, following the directions on page 53. and transfer it to brown paper. Go over the design lines with a black pen.
Center the rug canvas atop the pattern and trace the design with a waterproof marking pen. Draw a border around the design, leaving a 2-inch hem margin along
1square= 3 Inches
each edge. Bind the edges of the canvas with masking tape.
Using a paintbrush and light blue acrylic paint, paint the sky so the white canvas will not show when the sky Is stitched.
To work the design, begin with the sky. Cut a 2- to 3-foot length of light blue rug yarn, thread it intoa needle, and work the sky in cross-stitches (see the diagram on page 16, if necessary). To minimize distortion of the canvas, work half cross-stitches completely across the canvas In onedirection. Then complete the stitch by working back along the row in the opposite direction. Begin and end the yarn by running it through two or three stitches along the back.
When the sky is finished, work the remainder of the design with a latch hook, referring to the photograph for colors. Begin at the bottom of the design by hooking the grass with olive green yarn, and work toward the sky. completing each row before
moving up to the next one. If necessary, see page 44 for directions for latch-hooking-
When latch-hooKing the children, use the colors of your choice for hair and eyes. Also change the patterns on the clothing, if desired. Work the children's skin in white, and the dog in cream and beige (or the colors of your own dog).
After finishing the latch hooking, add the hair ribbons to the little girl's hair. Cut the ribbon In half. Then tie each piece into a bow and run a thin piece of yarn
or string through the backs of the ribbons with a large, blunt needle. Use the needle to run the yarn through the canvas to the back. Then tie the yarn in a knot or bow on back of canvas.
Block the finished rug, following the directions on page 55. Then sew rug binding to the canvas along the worked edges. Turn the edges to the back, mi-terlng the corners. Stitch the binding to the back of the rug with carpet thread, making sure edges are secure Add metal curtain rings for hanging.
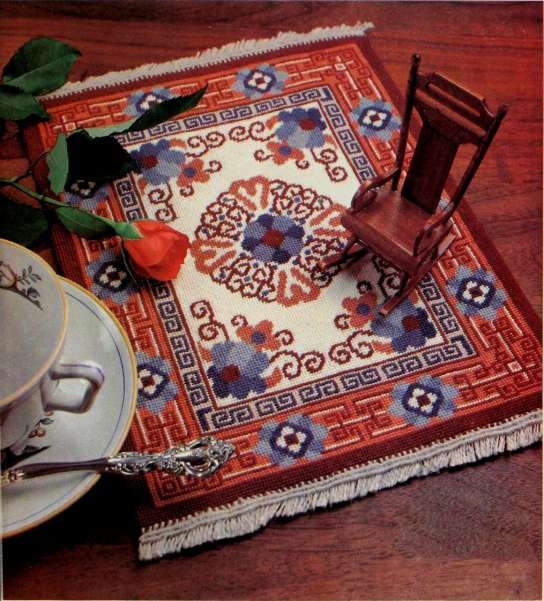
Needlepoint Doli House Kugs: Chinese Design
This stunning miniature Orientai rug design is worked on 18-mesti-per-incti-canvas to preserve ttie intricate detaiis of ttie pattern. A fringe of doubie tiaif-tiitcti knots tied in fine linen cord provides ttie finistiing toucti.
Materials
11x14 Inches #l8-countcanvas 3-ply Paternayan Persian yarn
in the following amounts and
colors (or a similar
substitute): 14 yards #266
dark rust, 22 yards #274
medium rust, 6 yards #287
light rust, 22 yards #005
white. Syards #314 dark
blue, 10 yards #380 medium
blue. 8 yards #381
medium-light blue,
and 5 yards #382
light blue 40 yards fine linen
macramecord
(fringe) Waterproof marking
pen Masking tape 11x13 inches rust
velveteen #22 tapestry needle Colored pencils
(optional) Graph paper
(optional) Needlepoint frame
(optional)
Directions
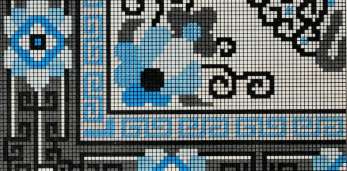
The pattern below represents one quadrant of the finished rug. You may stitch from the chart, or transfer it to graph paper with colored pencils, reversing as necessary to complete the design.
Mark the center of the canvas with a waterproof pen and bind the edges with masking tape to prevent raveling. If desired, mount the canvas in a needlepoint frame to minimize distortion.
Use one strand of yarn throughout, and begin stitching in the center of the design if you are working from the chart. Stitch small details in continental stitches and larger areas in basket-weave stitches (stitch directions are on page 50).
Block the finished rug. following the directions on page 54. Then trim the unworked canvas to within Kz inch of the needlepoint and cut backing fabric to match. With right sides facing, sew pieces together, leaving one end open. Turn, press lightly, and slip-stitch.
For the fringe, cut two 27-inch pieces of cord and approximately 155 pieces each ZVz inches long. Thread a long piece into a needle and tie it into a larks head knot in the corner mesh in the last row of needlepoint at one end of the rug. Adjust the ends of the yarn so one end is about r/2incheslong.Thelonger. outsideend will be the bearer cord for the knots that make the fringe. Tie remaining short cords into alternate spaces in the canvas along the last row of stitching, making sure ends are even. Tie all short cords into two rows of knots, as illustrated on page 92. Repeat for the other end of the rug. To finish, trim ends evenly.
lll ll ll l llllllll l ll U JLt4J444n
11 j n IP Ml llljjj j::,;.:r.:|| ijij » |:„
.: :-"-.:-"-:::::::::::l
Color Key
■ dark rust ^ med. rust D light rust D white
■ dark blue Bmed. blue Dmed.lt. blue D light blue
-•■■■•■•■■Kit i ■■
■■■ «! ■■■■■■■■■■■■■■■
1 Square = 1 Stitch
Needlepoint Doll House Rugs (continued):
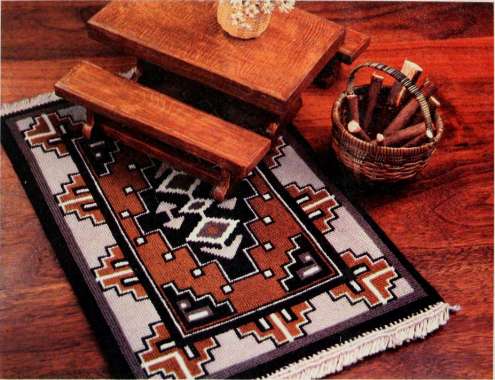
Indian Design
The handsome rug opposite is an adaptation of the Navajo "Two Gray Hilis " design. Stitched on 18-mesh-per-inch canvas, it worKs up to 7y2XlOy2 inches. To finish the rug, add a fringe worked in double half-hitch knots.
Materials
10x13 inches #l8-count canvas
#22 tapestry needle
3-ply Paternayan Persian yarn in the following a mounts and colors (or a suitable substitute): 22 yards #050 black, 22 yards #411 brown. 8 yards #005 white. 4 yards #162 dark gray, and 12 yards #166 lightgray
40 yards fine linen macrame cord
Waterproof marking pen
9x12 inches black velveteen
Masking tape
Directions
The pattern, opposite, represents one quadrant of the finished rug. You may stitch from the chart, or transfer it to graph paper with colored pencils, reversing as necessary to complete the design.
Mark the center of the canvas with a waterproof pen and bind the edges with masking tape to prevent raveling. If desired, mount the canvas in a needlepoint frame to minimize distortion.
Use one strand of yarn throughout, and begin stitching in the center of the design if you are working from the chart. If you've made a colored graph of the pattern, you may begin stitching in the upper right corner, but leave approximately 1/2 inches of un-worked canvas around the design. Stitch small details in continental stitches, and larger areas in basket-weave stitches. For an explanation and diagram of each of these stitches, see page 50.
Block the finished rug. following the directions on page 54. Then trim the unworked canvas to within 'A inch of the needlepoint and cut backing fabric to match. With right sides facing, sew the backing to the needlepoint, leaving one end open. Turn, press lightly, and slip-stitch the opening.
For the fringe, cut two 24-inch pieces of fine linen cord and approximately 130 pieces each 2/2 inches long. Thread one of the long pieces into a needle and tie it into a larks head knot in the corner mesh in the last row of needlepoint at one end of the rug. Adjust the yarn so one end is about 1^4 inches long. The longer, outside end will be the bearer cord for the knots that make the fringe. Tie short cords into alternate spaces in the canvas along the last row of stitching, making sure ends are even. Tie short cords into two rows of double half-hitch knots, following the directions below.

Horizontal double half-hitch knot
Making a Fringe with Double Half-Hitch Knots
To make this decorative fringe, first tie on the cords for the knots, as indicated in the directions above and on page 90. The outside cord, number 1 in the diagram at left, should be the longer of the two cords tied in the first knot. It is the bearer cord, around which all of the double half-hitch knots are tied.
Stabilize the rug and bearer cord by thumbtacking them to a cork or macrame board. Tack the bearer cord on the left to hold it in place. Then carry it across the rug and tack it off to the side so it is straightand tautatall times.
For each knot, wrap the end of a short cord around the bearer cord twice, as shown in the diagram (see cord 2). Push loops close together. Then wrap the next knot (with cord 3). using your fingers to snug it close to the previous one. The bearer cord should be completely hidden by the knots that are made over it.
At the end of the first row of knots, unpin the bearer cord, bend it back along the first row of knots, and re-tack it in position for the second row of knots. When all knots are tied, trim fringe to 'A inch so ends are even.
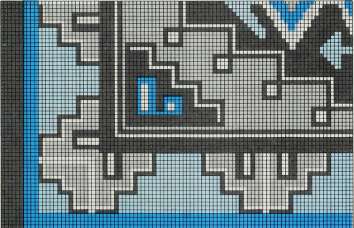
Color Key ■ black D brown D white @dark grey nlight grey
iE!S£SiliiSiSSS£Si£
1 Square = 1 Stitch
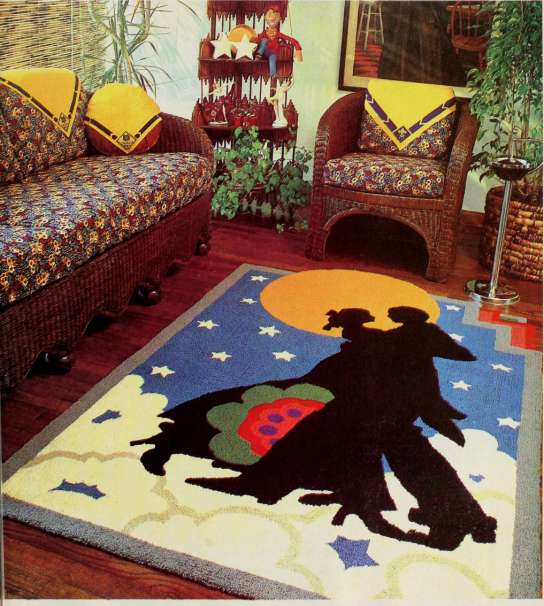
Speed-Hooked Rug: Deco Doncers
Our romantic "Dancers" design, opposite, is a puncti-needie rug worked witti a speed-hooking tool. Witt! this nifty device, you can hook up to a square foot of backing fabric in just an hour or two, making it a reai boon to rug crafters with busy schedules.
Materials
Norden Crafts' Eggbeater" speed-hooking rug needle, or a suitable substitute
72x84 inches heavy-duty burlap
Norden Crafts 3-ply wool rug yarn (or a comparable substitute equal in weight to 4-ply knitting yarn) in the following amounts and colors: iSounces white. 4 ounces beige. 14 ounces blue. 12 ounces gray. 22 ounces black. 4 ounces green. 4 ounces red, 2 ounces pink, l ounce purple, and 12 ounces yellow
Rug frame
Liquid latex rug backing
Waterproof marking pen
Color Key
1 White
2 Beige
3 Light blue
4 Gray
5 Black
6 Green
7 Red
8 Rose
9 Purple 10 Yellow
Directions
Note: The finished size of the rug is approximately 50x75 inches.
Enlarge the pattern below, following the directions on page 53. Note that the design has already been reversed, so it can be transferred directly to the rug backing. Transfer it. centered, to the fabric and go over design lines with a waterproof pen so they are easy to see. Mount the fabric, or a portion of it. in the rug frame with the design facing up. The fabric must be taut.
Roll yarn into balls, if necessary, so it will flow freely into the needle as you work. Set the needlefor a medium-height loop and thread yarn into It. following manufacturers directions.
To hook the design, first outline the shapes in the pattern with one or two rows of loops. Then fill shapes with rows of loops hooked back and forth across each area. Work one section of color at a time, following the color key at left.
To work the needle, grasp the handle In your left hand (if you are right-handed) and push the needle Into the fabric until the base rests firmly on the burlap. Working with the needle perpendicular to the fabric, turn the handle clockwise, guiding it so it "walks" along the burlap, automatically making loops. When you finish a row. move the needle to the next row. crank the handle counterclockwise, and work back alongsldethe previous row. With practice, you'll be able to work about a square foot an hour.
Check the front of the rug periodically to make sure that the loops cover the backing completely and that the height is consistent. If you've missed a spot, fill it in when working the next row.
After hooking the rug. remove it from the frame. To finish it. nail or staple it facedown on a board or floor, making sure corners are square and fabric is taut Apply liquid latex rug backing to the hooked area. When latex is dry. trim excess fabric to within 3 Inches of the hooked area. Finish the margin of the rug (making a finished edge), following the directions on page 54,
1 Square = 3 Inches
We would like to express our appreciation and sincere thanks to all of the people who contributed designs to this book.
Our ttianks also go to these people whose creative talents and technical skills were a valuable help to us in producing this book.
Designers
AliciQ Anderson 42-40, 64-65
John Doker 94-95
Gory Doling 22-25. 26, 50-52, 56-58, 69, 78-80
Joan Cravens 16-17, 74
Derry Crisr 00
Robert Dirrmer 69
Done Ehlinger 46-47
Verno Hoir 70-71, 72-70
Christine Koczmorczyk 28-29
Lourie Kosl^ 62-60, 84-87
Donno Leoch 44-45
Ann Levine 14, 68
Connie Lidsrer 00-01
Nancy Lindenneyer 18-20
Ellen Morello 12-10
Morjorie Nichols 40-41
MoryWolker Phillips 27
Morgie Poffenborger 88-89
Gay Ann Rogers 90-91, 92-90
Minni Shimmin 06-07, 09, 48-49, 60-61
Suzy Taylor 66-67, 76-77
Naomi Thompson 18-20
Cibo Voughan 8-11
Linda Wilson 15
Acknowledgments
Peter Amfr, Photographer 95
Mike Dieter, Photographer Cover, 4-5, 14,
15, 19, 22-20, 26-27, 41, 49, 51, 56-57, 61, 60, 68, 69, 71, 70, 77, 78-79, 85, 89, 91, 90
Thomas E. Hooper, Photographer 40, 65
Williom Hopkins, Photographer 10, 17, 21,
29,01,02,00,0(^07,45,67,74
Frank L. Miller, Photographer 47
Dick Swift, Photogropher 8-9, 10-11
DIoser/Court Art Studio Jill Mead
Linda Emmerson Jessie Walker