CHAPTER 3
Setting Up a Service
This chapter will explain how the Linux Package system works, how to install a package, install a service, configure it, and run your first application in your first LAMP (Linux Apache MySQL PHP) server.
Structure
In this chapter, we will discuss the following topics:
- Learning how to install a package
- APT
- Installing the Apache
- Configuring your service
- Creating a VHost
- Installing MySQL
- Configuring the service
- Creating a database and tables
- Deploying your application
- Installing PHP
- Deploying WordPress
Objectives
After studying this unit, you should be able to:
- Understand the Linux package system
- Install packages using APT
- Setup a web server
- Setup a database server
- Deploy an application
Learning how to install a package
Most of the Linux distributions have a package manager by default. It can be YUM, APT, Zypper, pacman, slackapt, etc. Each one has its own particularities, but all were made for the same purpose, to install the packages that are basically the Linux programs, via centralized repositories which are distributed all over the world.
In the first chapter, I gave a brief explanation about the Linux distributions and some differences. Some of them are in the package management systems. Now, I am going to give 2 examples of the most famous package managers.
Debian based distributions, like Ubuntu, have the APT (Advanced Package Tool). It connects to a central repository like this: http://de.archive.ubuntu.com/ubuntu. It is just an Apache web server, and in it, are stored several packages which we can choose and install.
RedHat based distributions, like CentOS, have YUM (Yellow Dog Update Manager), which will soon be replaced by the DNF (Dandified Yum), the new substitute of YUM. It also uses a central repository like https://dl.fedoraproject.org/pub/epel/7/x86_64/, and also stores several packages.
Now, let's focus on Debian which is our goal here, once we are using Ubuntu.
APT
If you run just the command apt without any parameter, you will see the following output:
alisson@devops:~$ apt
apt 1.6.11 (amd64)
Usage: apt [options] command
apt is a commandline package manager and provides commands for
searching and managing as well as querying information about packages.
It provides the same functionality as the specialized APT tools,
like apt-get and apt-cache, but enables options more suitable for
interactive use by default.
Most used commands:
list - list packages based on package names
search - search in package descriptions
show - show package details
install - install packages
remove - remove packages
autoremove - Remove automatically all unused packages
update - update list of available packages
upgrade - upgrade the system by installing/upgrading packages
full-upgrade - upgrade the system by removing/installing/upgrading packages
edit-sources - edit the source information file
See apt(8) for more information about the available commands.
Configuration options and syntax is detailed in apt.conf(5).
Information about how to configure sources can be found in sources.list(5).
Package and version choices can be expressed via apt_preferences(5).
Security details are available in apt-secure(8).
This APT has Super Cow Powers.
Therefore, the options are self-explained. Let's use them in practice. One interesting thing is the command top:
top - 18:19:11 up 2 days, 2:34, 1 user, load average: 0.04, 0.03, 0.00
Tasks: 92 total, 1 running, 50 sleeping, 0 stopped, 0 zombie
%Cpu(s): 0.0 us, 0.0 sy, 0.0 ni,100.0 id, 0.0 wa, 0.0 hi, 0.0 si, 0.0 st
KiB Mem : 1008816 total, 133020 free, 126512 used, 749284 buff/cache
KiB Swap: 2017276 total, 2016752 free, 524 used. 716548 avail Mem
PID USER PR NI VIRT RES SHR S %CPU %MEM TIME+ COMMAND
28427 alisson 20 0 107988 3460 2448 S 0.3 0.3 0:00.14 sshd
28462 alisson 20 0 42788 3940 3344 R 0.3 0.4 0:00.25 top
1 root 20 0 77992 9104 6680 S 0.0 0.9 0:02.58 systemd
2 root 20 0 0 0 0 S 0.0 0.0 0:00.00 kthreadd
4 root 0 -20 0 0 0 I 0.0 0.0 0:00.00 kworker/0:0H
6 root 0 -20 0 0 0 I 0.0 0.0 0:00.00 mm_percpu_wq
7 root 20 0 0 0 0 S 0.0 0.0 0:00.55 ksoftirqd/0
8 root 20 0 0 0 0 I 0.0 0.0 0:19.94 rcu_sched
To exit from the top, press q. This command basically shows the current state of your machine, the state of memory, CPU, processes running, etc. There is another version of top which is called htop. It does exactly the same thing. However, it has a better interface, and therefore, before we install that version, run the following command:
alisson@devops:~$ sudo su -
[sudo] password for alisson:
root@devops:~#
The previous command changes your current user to the user root. Until now, we were running the command sudo before every command which needs more permission. Now, we need not type sudo before the command every time because we are already the administrator of this server. Or, you can say that we are the root user.
Sometimes, when we create a server based on an image. The local cache of APT is completely outdated. So, we need to clean it and update using the following commands:
root@devops:~# apt clean
root@devops:~# apt update
Hit:1 http://de.archive.ubuntu.com/ubuntu bionic InRelease
Hit:2 http://de.archive.ubuntu.com/ubuntu bionic-updates InRelease
Hit:3 http://de.archive.ubuntu.com/ubuntu bionic-backports InRelease
Hit:4 http://de.archive.ubuntu.com/ubuntu bionic-security InRelease
Reading package lists… Done
Building dependency tree
Reading state information… Done
65 packages can be upgraded. Run 'apt list --upgradable' to see them.
root@devops:~#
Now, you have the local cache updated. We can try to find the htop and see if it is available to install:
root@devops:~# apt search htop
Sorting… Done
Full Text Search… Done
aha/bionic 0.4.10.6-4 amd64
ANSI color to HTML converter
htop/bionic,now 2.1.0-3 amd64 [installed,automatic]
interactive processes viewer
libauthen-oath-perl/bionic 2.0.1-1 all
Perl module for OATH One Time Passwords
pftools/bionic 3+dfsg-2build1 amd64
build and search protein and DNA generalized profiles
Analyzing the previous output, we can say that htop is available. So, to install the package, we use the following command:
root@devops:~# apt install htop -y
Reading package lists… Done
Building dependency tree
Reading state information… Done
htop is already the newest version (2.1.0-3).
htop set to manually installed.
0 upgraded, 0 newly installed, 0 to remove and 65 not upgraded.
root@devops:~#
The package is installed now. So, run the following command:
CPU[
0.0%] Tasks: 29, 28 thr; 1 running
Mem[||||||||||||||||||||||||||||||||||||||||||||||||||||||||||||||||||128M/985M] Load average: 0.07 0.02 0.00
Swp[| 524K/1.92G] Uptime: 2 days, 02:45:09
PID USER PRI NI VIRT RES SHR S CPU% MEM% TIME+ Command 28771 root 20 0 32468 4868 3764 R 0.0 0.5 0:00.02 htop 1 root 20 0 77992 9104 6680 S 0.0 0.9 0:02.58 /sbin/init maybe-ubiquity
394 root 19 -1 100M 17652 16796 S 0.0 1.7 0:00.36 /lib/systemd/systemd-journald
420 root 20 0 103M 1852 1664 S 0.0 0.2 0:00.00 /sbin/lvmetad -f
421 root 20 0 45836 4476 2888 S 0.0 0.4 0:00.87 /lib/systemd/systemd-udevd
496 systemd-t 20 0 138M 3256 2744 S 0.0 0.3 0:00.00 /lib/systemd/systemd-timesyncd
491 systemd-t 20 0 138M 3256 2744 S 0.0 0.3 0:00.20 /lib/systemd/systemd-timesyncd
672 systemd-n 20 0 80048 5076 4484 S 0.0 0.5 0:00.19 /lib/systemd/systemd-networkd
696 systemd-r 20 0 70636 4916 4356 S 0.0 0.5 0:00.19 /lib/systemd/systemd-resolved
In this simple output, we are able to see some improvements. For example, we now have a bar to indicate the amount of memory used in the server. It is a good tool to analyze the current state of your server, but, it is not used much in the production system because it consumes more memory than the traditional top. So, let’s remove this package using the following command:
root@devops:~# apt remove htop
Reading package lists… Done
Building dependency tree
Reading state information… Done
The following packages will be REMOVED:
htop ubuntu-server
0 upgraded, 0 newly installed, 2 to remove and 64 not upgraded.
After this operation, 269 kB disk space will be freed.
Do you want to continue? [Y/n] y
(Reading database … 102467 files and directories currently installed.)
Removing ubuntu-server (1.417.3) …
Removing htop (2.1.0-3) …
Processing triggers for mime-support (3.60ubuntu1) …
Processing triggers for man-db (2.8.3-2ubuntu0.1) …
These are all the commands you will probably use in your daily work while installing the packages on Linux. Beside the commands, we also have some important files which are required to install some packages that may not be available in the official repositories.
The first important file is /etc/apt/sources.list:
root@devops:~# cat /etc/apt/sources.list
# See http://help.ubuntu.com/community/UpgradeNotes for how to upgrade to
# newer versions of the distribution.
deb http://de.archive.ubuntu.com/ubuntu bionic main restricted
deb http://de.archive.ubuntu.com/ubuntu bionic-updates main restricted
Above-mentioned is an example of the first few entries from the sources.list. These are the lines representing the remote repositories where the packages are found. If you want to add a new repository, you can just find the respective line and add at the end of this file, for example:
deb http://ppa.launchpad.net/canonical-kernel-team/unstable/ubuntu bionic main
In the beginning of the URL, you can see that it starts with PPA (Personal Packages Archines). These are the useful repositories that are not included in the distribution by default, but you may find some packages which you want to use.
Another important directory is: /var/cache/apt/. In the beginning, I explained that the APT stores the cache inside the Linux, and if it is too old, we need to clean and update it. This folder also downloads the packages installed in our system, for example:
root@devops:~# apt install htop --download-only
Reading package lists… Done
Building dependency tree
Reading state information… Done
The following NEW packages will be installed:
htop
0 upgraded, 1 newly installed, 0 to remove and 64 not upgraded.
Need to get 80.0 kB of archives.
After this operation, 221 kB of additional disk space will be used.
Get:1 http://de.archive.ubuntu.com/ubuntu bionic/main amd64 htop amd64 2.1.0-3 [80.0 kB]
Fetched 80.0 kB in 0s (451 kB/s)
Download complete and in download only mode
I ran the APT installation just to download the package using the option –download-only, and if we check the directory:
root@devops:~# ls /var/cache/apt/archives/
htop_2.1.0-3_amd64.deb lock partial
You can see the package there. Now, if you run the following clean command:
root@devops:~# apt clean
root@devops:~# ls /var/cache/apt/archives/
lock partial
The package is not there anymore.
Installing Apache
We installed one basic package to learn how APT works. Now, let's install a real one. The Apache web server is currently the most used web servers in the world. You can deploy any application using it as a Load Balancer, cache for static files, proxy for another web server, and many other options that depend on your usage. To install Apache, use the following command:
root@devops:~# apt install apache2 -y
Reading package lists… Done
Building dependency tree
Reading state information… Done
The following additional packages will be installed:
apache2-bin apache2-data apache2-utils libapr1 libaprutil1 libaprutil1-dbd-sqlite3 libaprutil1-ldap liblua5.2-0 ssl-cert
If the installation ran well for you, it is possible to validate if Apache is installed and running using the following command:
root@devops:~# service apache2 status
apache2.service - The Apache HTTP Server
Loaded: loaded (/lib/systemd/system/apache2.service; disabled; vendor preset: enabled)
Drop-In: /lib/systemd/system/apache2.service.d
└─apache2-systemd.conf
Active: active (running) since Mon 2020-07-06 12:56:38 UTC; 11s ago
Process: 22810 ExecStart=/usr/sbin/apachectl start (code=exited, status=0/SUCCESS)
Pay attention to the part where says it Active (running), or, you can also use the command ss -ntpl:
root@devops:~# ss -ntpl
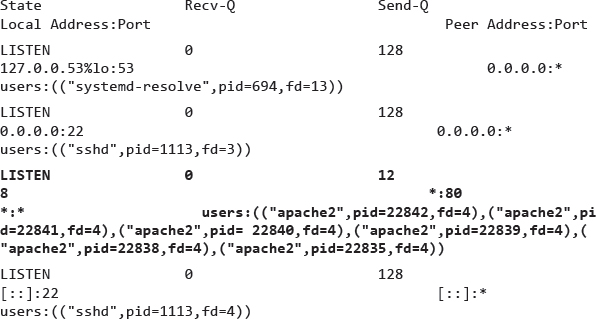
We can see Apache running on port 80, with the PID 22848. PID means process identification. Now, the server is up and running. Let's check the access via browser:
http://192.168.178.62/
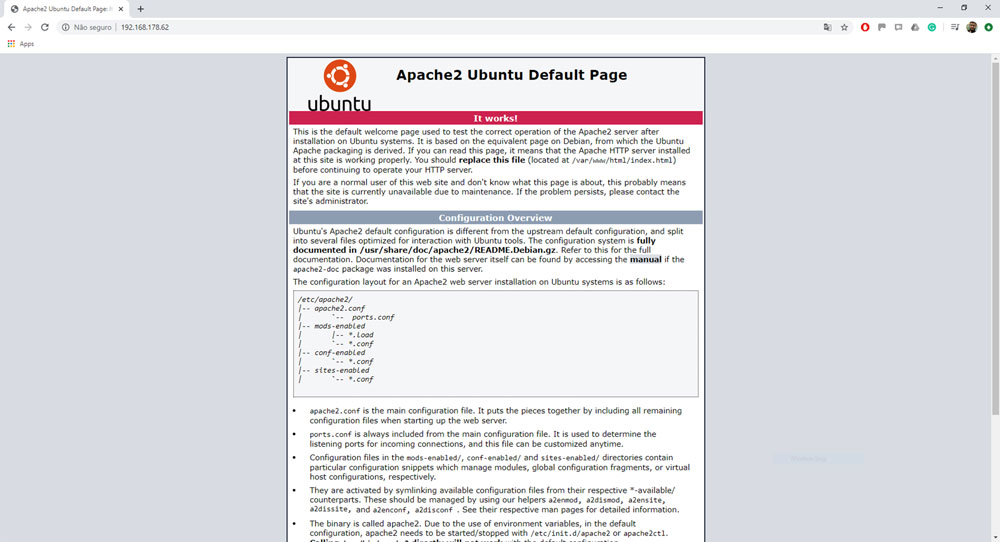
Figure 3.1
This is the Apache default page when the server is running on Ubuntu. Usually, this page is different depending on your OS.
Now, you can say that you have setup a web server. However, we know that the websites are not just made using HTML. There is a lot of back-end processing. Usually, it is PHP. Of course, you can develop your website using any of the dozens of programming languages that are available. But, I am still pretty sure that PHP is the most common used for most of the websites.
Installing PHP
In this part, let's install PHP and create a simple page to check if it is installed, and what are the modules available to use with it:
root@devops:~# apt install php -y
The installation is simple using APT. When we install PHP and Apache, there are many Apache modules that are installed together. You can run the following command to check them:
root@devops:~# a2enmod
Your choices are: access_compat actions alias allowmethods asis auth_basic auth_digest auth_form authn_anon authn_core authn_dbd authn_dbm authn_file authn_socache authnz_fcgi authnz_ldap authz_core authz_dbd authz_dbm authz_groupfile authz_host authz_owner authz_user autoindex buffer cache cache_disk cache_socache cern_meta cgi cgid charset_lite data dav dav_fs dav_lock dbd deflate dialup dir dump_io echo env expires ext_filter file_cache filter headers heartbeat heartmonitor http2 ident imagemap include info lbmethod_bybusyness lbmethod_byrequests lbmethod_bytraffic lbmethod_heartbeat ldap log_debug log_forensic lua macro mime mime_magic mpm_event mpm_preforkmpm_worker negotiation php7.2 proxy proxy_ajp proxy_balancer proxy_connectproxy_express proxy_fcgi proxy_fdpass proxy_ftp proxy_hcheck proxy_html proxy_http proxy_http2 proxy_scgi proxy_wstunnel ratelimit reflector remoteip reqtimeout request rewrite sed session session_cookie session_crypto session_dbd setenvif slotmem_plain slotmem_shm socache_dbm socache_memcache socache_shmcb speling ssl status substitute suexec unique_id userdir usertrack vhost_alias xml2enc
Which module(s) do you want to enable (wildcards ok)?
There are many options, but the one we are looking for is php7.2:
root@devops:~# a2enmod php7.2
Considering dependency mpm_prefork for php7.2:
Considering conflict mpm_event for mpm_prefork:
Considering conflict mpm_worker for mpm_prefork:
Module mpm_prefork already enabled
Considering conflict php5 for php7.2:
Module php7.2 already enabled
The command a2enmod, enables the php7.2 module, which is responsible to integrate Apache and PHP. When we access a PHP page via a browser, Apache will call that module which will call the PHP interpreter and run the code. Let's create a simple page as an example:
root@devops:~# vim /var/www/html/info.php
<?php
phpinfo();
?>
This code is the simplest code that you can run on PHP to check if everything is running. When you call that page via a browser, you will see the following:

Figure 3.2
Now, you can see via browser, everything which is installed with your PHP installation, and make sure that PHP is running. When we are running a complete application within a web server, PHP and Apache are enough to publish the information and make it available for access everywhere.
However, full systems store and manage data, and in order to do it, we need a Database Management System, which can be many. We have as much database systems as we have programming languages, and in different categories, SQL, NoSQL, Key Values, etc.
The most popular DBMS running on web servers is MySQL/MariaDB. So, let's install it and test.
Installing MariaDB
The most popular DBMS running on web servers is the MySQL, then let's install it and make a test:
root@devops:~# apt install mariadb-server mariadb-client -y
After the installation completes, run the following command:
root@devops:~# mysql
Welcome to the MariaDB monitor. Commands end with ; or \g.
Your MariaDB connection id is 30
Server version: 10.1.44-MariaDB-0ubuntu0.18.04.1 Ubuntu 18.04
Copyright (c) 2000, 2018, Oracle, MariaDB Corporation Ab and others.
Type 'help;' or '\h' for help. Type '\c' to clear the current input statement.
MariaDB [(none)]>
Now we are inside the MariaDB console.
In the past, we usually used MySQL. But, after Oracle bought it, a fork called MariaDB was created and it became more and more popular. Its API is completely compatible with MySQL. We will run some commands here and you can use exactly the same in an original MySQL server.
To create a database, you need to run the following command:
MariaDB [(none)]> create database chapter03;
Query OK, 1 row affected (0.00 sec)
MariaDB [(none)]> use chapter03;
Database changed
MariaDB [chapter03]>
You can see that we created a database, called chapter03, with no tables:
MariaDB [chapter03]> show tables;
Empty set (0.00 sec)
We can create one by running the following command:
MariaDB [chapter03]> create table users(id integer primary key auto_increment, name varchar(50));
Query OK, 0 rows affected (1.77 sec)
We just created a table with 2 columns, one called ID, which will store numbers, and the other called name, which will receive strings. To check the table structure, use the following command:
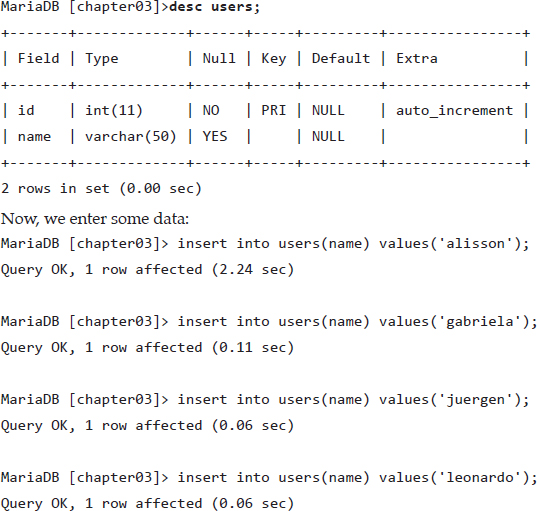
I just entered 4 different users, alisson, gabriela, juergen, and leonardo to demonstrate how we can see the data stored in a table:
MariaDB [chapter03]>select * from users;
+----+----------+
| id | name |
+----+----------+
| 1 | alisson |
| 3 | juergen |
| 4 | leonardo |
+----+----------+
4 rows in set (0.00 sec)
Notice that I just entered the names and the numbers were automatically increased by the database. This is normal when we have an auto-increment column. We did that just to make sure the database server is running. Now, we have a full setup which we call LAMP (Linux Apache MariaDB PHP) and we are ready to deploy a real application.
For that, we will use WordPress and see how it works. Leave the MariaDB console by pressing Ctrl + D.
Installing WordPress
The first task is to download WordPress from the official website:
root@devops:~# wget https://wordpress.org/latest.tar.gz
--2020-07-06 13:51:03-- https://wordpress.org/latest.tar.gz
Resolving wordpress.org (wordpress.org)… 198.143.164.252
Connecting to wordpress.org (wordpress.org)|198.143.164.252|:443… connected.
HTTP request sent, awaiting response… 200 OK
Length: 12238031 (12M) [application/octet-stream]
Saving to: 'latest.tar.gz'
latest.tar.gz 100%[========================================
================================================>] 11.67M 359KB/s in 31s
2020-07-06 13:51:35 (380 KB/s) - 'latest.tar.gz' saved [12238031/12238031]
Now, you need to decompress the file inside the Apache folder:
root@devops:~# tar -xf latest.tar.gz -C /var/www/html/
root@devops:~# ls /var/www/html/
index.html index.nginx-debian.html info.php wordpress
See that now we have a WordPress folder within /var/www/html with the following files:
root@devops:~# cd /var/www/html/wordpress/
root@devops:/var/www/html/wordpress# ls
index.php readme.html wp-admin wp-comments-post.php wp-content wp-includes wp-load.php wp-mail.php wp-signup.php xmlrpc.php
license.txt wp-activate.php wp-blog-header.php wp-config-sample.php wp-cron.php wp-links-opml.php wp-login.php wp-settings.php wp-trackback.php
The important file is the wp-config-sample.php. We will rename it to wp-config.php and edit setting the database information for our website. Now, let's do it:
root@devops:/var/www/html/wordpress# mv wp-config-sample.php wp-config.php
root@devops:/var/www/html/wordpress# vim wp-config.php
/** The name of the database for WordPress */
define('DB_NAME', 'database_name_here');
/** MySQL database username */
define('DB_USER', 'username_here');
/** MySQL database password */
define('DB_PASSWORD', 'password_here');
/** MySQL hostname */
define('DB_HOST', 'localhost');
/** Database Charset to use in creating database tables. */
define('DB_CHARSET', 'utf8');
/** The Database Collate type. Don't change this if in doubt. */
define('DB_COLLATE', '');
Previously, you can see that WordPress is already telling you where you have to replace the values, and then you can edit the file to the following:
/** The name of the database for WordPress */
define('DB_NAME', 'chapter03');
/** MySQL database username */
define('DB_USER', 'devops');
/** MySQL database password */
define('DB_PASSWORD', 'devops');
/** MySQL hostname */
define('DB_HOST', 'localhost');
With all the credentials and configuration set, we have to create the same on MariaDB:
root@devops:/var/www/html/wordpress# mariadb
Welcome to the MariaDB monitor. Commands end with ; or \g.
Your MariaDB connection id is 31
Server version: 10.1.44-MariaDB-0ubuntu0.18.04.1 Ubuntu 18.04
Copyright (c) 2000, 2018, Oracle, MariaDB Corporation Ab and others.
Type 'help;' or '\h' for help. Type '\c' to clear the current input statement.
MariaDB [(none)]> use chapter03
Reading table information for completion of table and column names
You can turn off this feature to get a quicker startup with -A
Database changed
MariaDB [chapter03]> grant all privileges on chapter03.* to devops@'%' identified by 'devops';
Query OK, 0 rows affected (0.00 sec)
We just created a user, called devops and granted all the privileges to all the tables in the chapter03 database. Now, you can access it via browser:
http://192.168.178.62/wordpress
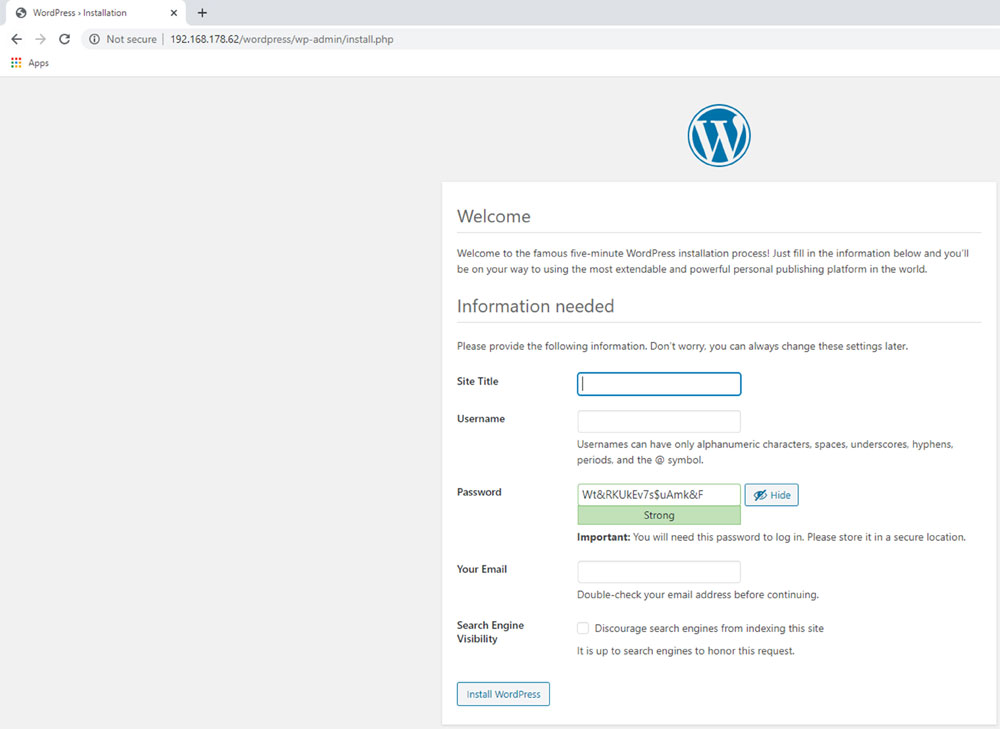
Figure 3.3
You can fill the fields with the following parameters:
Site Title: Chapter03
Username: devops
Password: devops
Click on Install and finish, and after that, you need to click on Login:
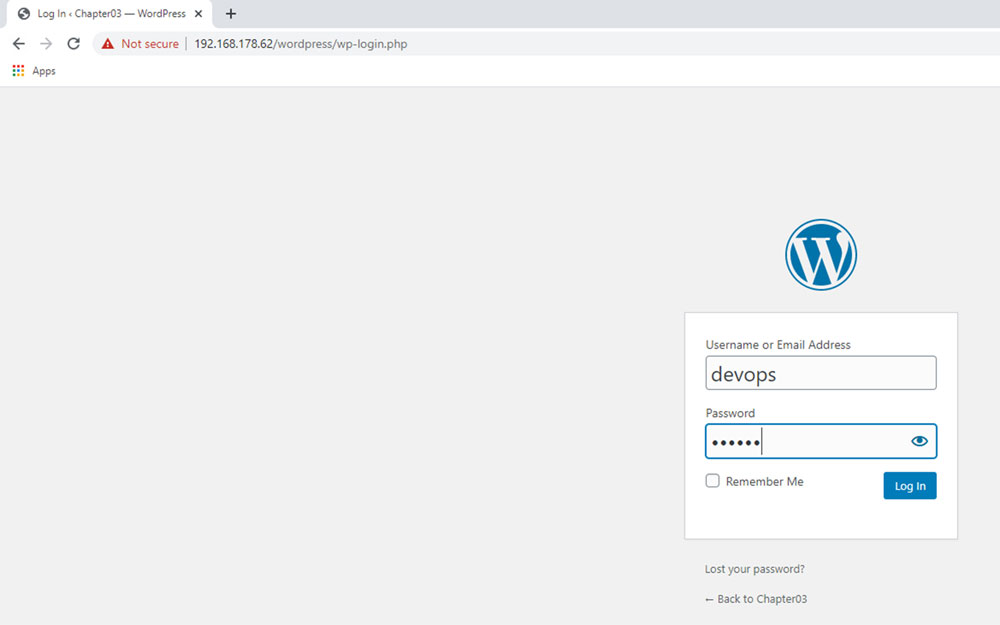
Figure 3.4
Use the same credentials you set earlier, and you will see the WordPress administration:
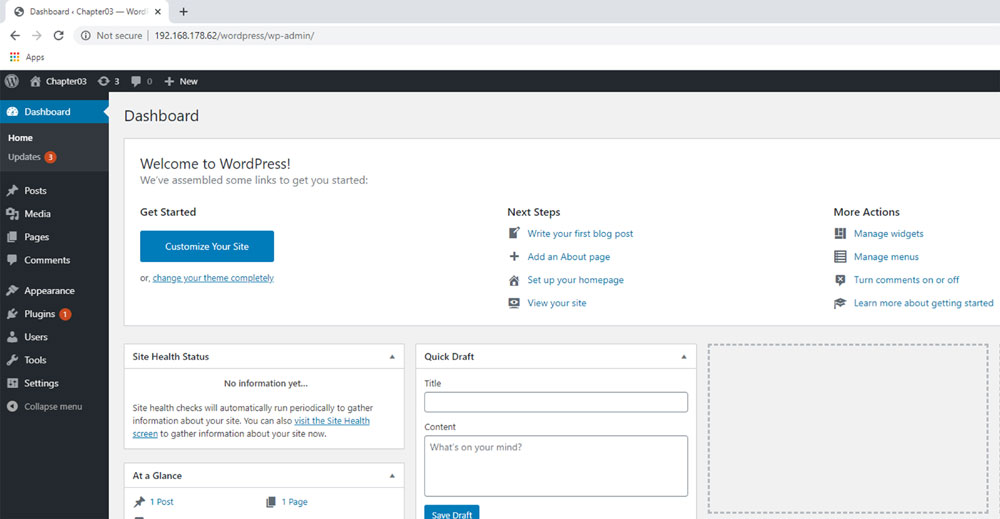
Figure 3.5
Conclusion
We just set up the most popular stack on Linux using PHP, Apache, and MariaDB. If you are working with webhosting or as a freelance web developer, it can be very useful for you, because you can create the websites using WordPress and now you know how to set up and manage your server. It was just a prerequisite for the next chapters where we will automate everything.