CHAPTER 7
Creating Your Infrastructure Using Cloud Services
This chapter aims to introduce you to the biggest Cloud players and how we can use it to speed up the provisioning, scalability, and reliability of our Infrastructure.
Structure
In this chapter, we will discuss the following topics:
- Cloud and Main Players
- Provisioning using AWS
- Provisioning using GCP
- Provisioning using Azure
Objectives
After studying this unit, you should be able to:
- Define Cloud and how to use it
- Set up the environment on each player
- Create a simple infrastructure using the command line
- Check the infrastructure created in the Cloud console
Cloud and Main Players
Until this moment, we have been using our own computer to create everything. However, running the applications in production requires a lot of stuff, such as, high availability, backup, monitoring, redundancy, etc. In the past, many companies had their own data centers or local servers which were turned on 24*7. Hence, it takes a lot of effort to manage everything, because it is not just taking care of the virtual machines or the software; it is necessary to manage the network, storage, energy, no breaks, internet connection, and many other things that are involved in IT. Also, a team with different skills to manage everything is required to have the redundancy of people as well, because, if some employee in the company gets sick, you must have another available, in case something stops working.
When I began working in the IT industry, some of the companies that I worked for were using a service called Colocation, in which you can basically rent a Rack inside a data center, and you can install your servers. Therefore, you just need to manage your servers. The networking, energy and internet part were delegated to the company which was offering the service. After sometime, we began to use the services from a company called SoftLayer. They had their own data center and we could pay and use a physical server for some time when we were renting the server.
After this period, we started working with the AWS, which is a Cloud company. There, we could rent the virtual machines, exactly like the VMs that we have been created in the earlier chapters. There are a lot of benefits of using this service, such as high availability. So, if some physical server fails in their data center, you can just shut down the VM and start the VM in another server, or even pay them to do the backup for you. Thus, only one person can manage an entire infrastructure with hundreds of servers.
AWS
Amazon Web Services is currently the main Cloud player at the moment. They have dozens of services which you can use to deploy your applications, monitor, backup, create VMs, databases, queues, etc. It also allows you to create everything in an automated way using a command line, which is called AWSCLI. But, of course, it is not that easy to use all their services. That is why, they have created many courses and certifications, so that the people can get qualified and take the best of what their services can offer.
GCP
Google Cloud Platform is the newest one. They are offering many services like AWS, but, they still do not have all the services as theirs. Nevertheless, they have some unique services, like Big Query, which is one of the most used to query large datasets and store the data on the Cloud. Furthermore, if you are working with machine learning, they have clusters available to take the maximum performance with TensorFlow Projects. GCP is often cheaper than its other big competitors. I am using it for my personal projects.
Azure
This is the Microsoft Cloud platform. So, if you are planning to export your active directory to the Cloud, this is the one. They have unique services, like SQL server, Azure Active Directory, or even the Azure DevOps which have become very famous. Some of the big companies that I worked for in the past used Azure as their main platform, because Microsoft is a reliable company. But, they are the most expensive as well. So, if money is not your problem, and you are using Microsoft products in your applications, this is the right option.
Provisioning using AWS
AWS has its own courses to explain how to use all the services. Then, my goal here is to show you how we can provide the same infrastructure like we did using the VirtualBox and Vagrant. So, I will focus on VMs and how we can install things on it.
Therefore, your first task is to create your own AWS Account. You can visit the following link to do so:
http://console.aws.amazon.com/
After you have created your account and logged in into the console, you will see a page shown in the following figure:

Figure 7.1
This console allows you to create any service that you want. Now, click on Services| EC2| Running Instances. You will see the following page:
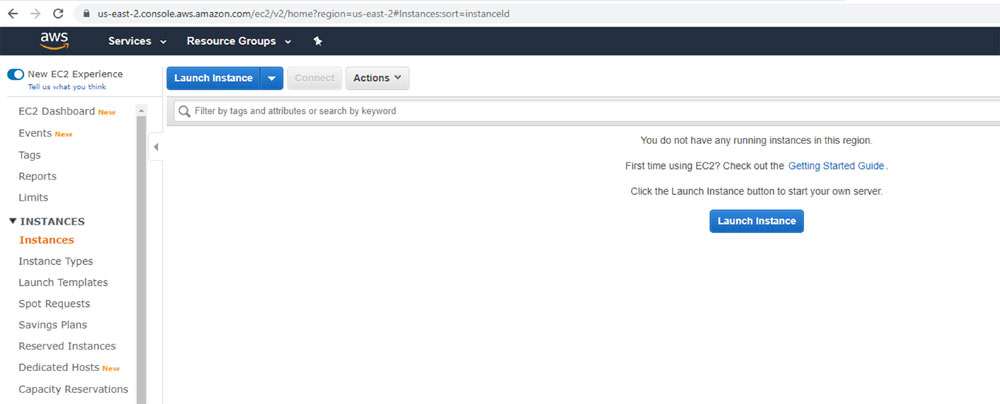
Figure 7.2
My account is empty. I have used more AWS in the past, and currently, I am using Azure in my current job, and am using GCP for personal projects. However, this is the console for you to manage your VMs. It is important for you to know where you can see your virtual machines in the console, because it is easier to see the watch you have. But starting from now, we will create everything using the command line. So, now, install Python and then write the following AWS command line:
https://www.python.org/downloads/
After Python is installed, install the AWS CLI running the following command line:
PS C:\Users\1511 MXTI> python -m pip install awscli --user
Collecting awscli
To check if the AWS CLI was installed successfully, run the following command:
PS C:\Users\1511 MXTI> aws --version
aws-cli/1.18.42 Python/3.8.2 Windows/10 botocore/1.15.42
Everything is working. Now, to configure the access, you need to create an IAM account with the programmatic access. The easiest way is by clicking on Services and typing IAM, like the following screenshot:

Figure 7.3
IAM means Identity Access Management. This service is responsible to create and manage users and groups. In the dashboard, click on Users| Add User:
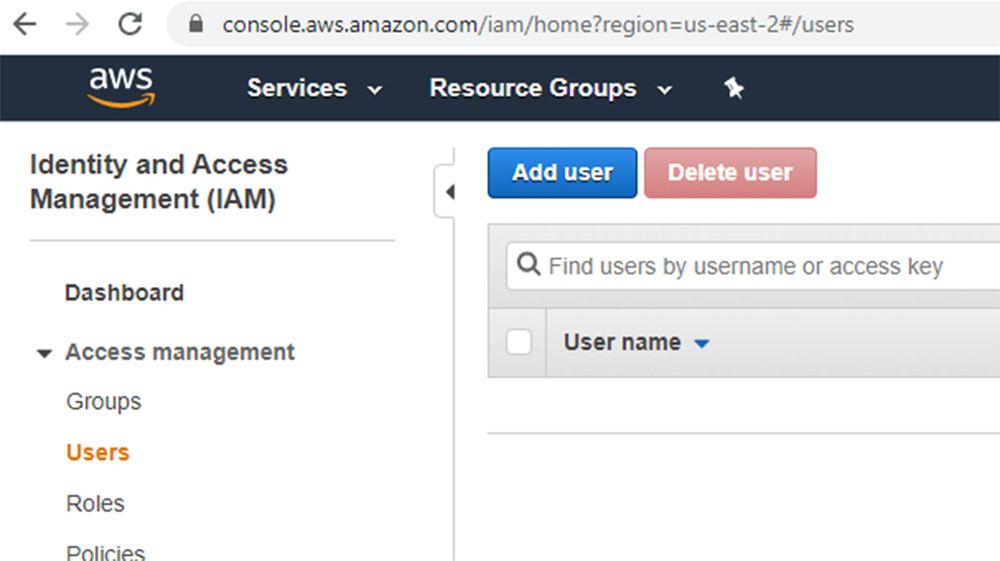
Figure 7.4
I am creating a new user, called DevOps, with the programmatic access:
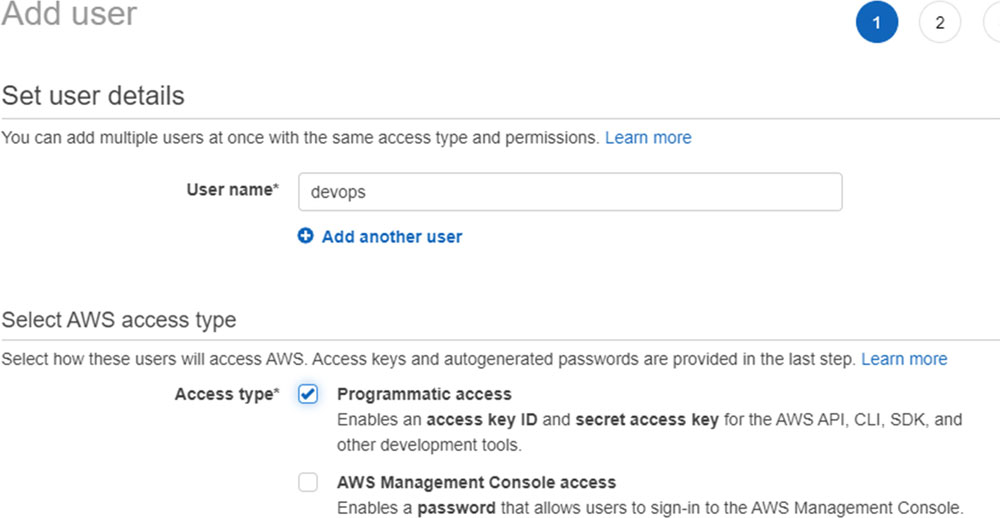
Figure 7.5
Select the option Attachexisting policies directly and the policy AdministratorAccess will appear. This policy will enable our user to do everything in our AWS account. This permission is not recommended for production environments. The user must have only the permission required for a specific purpose.

Figure 7.6
After saving your user, you will be redirected to the page with the Access Key and the Secret Key. Save these values because you will never be able to get the Secret Key again. The only way is creating a new user.
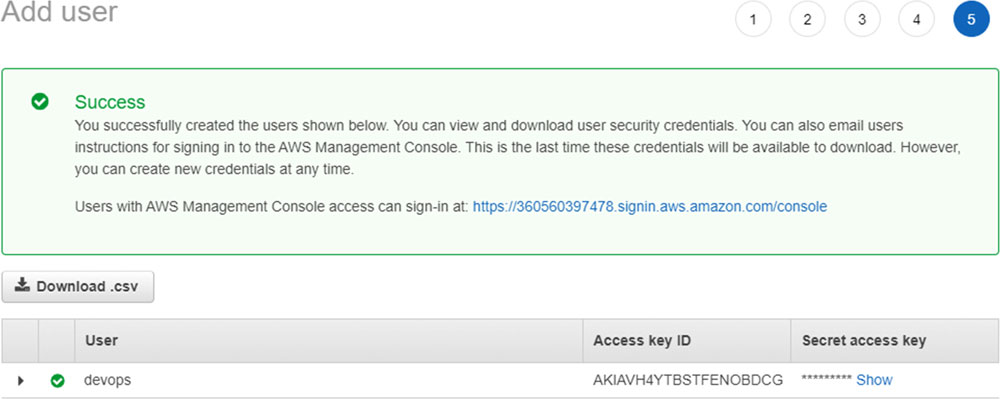
Figure 7.7
After following these steps, we can configure the command line and test if we are able to connect to the console. The first task is to add our keys in the local environment:
PS C:\Users\1511 MXTI> aws configure
AWS Access Key ID [None]: YOU_ACCESS_KEY
AWS Secret Access Key [None]: YOUR_SECRET_KEY
Default region name [None]: eu-central-1
Default output format [None]:
In the region name, I have set eu-central-1, which is respective to Frankfurt, because I am living in Germany. Often, people set this option as us-east-1, which is respective to Virginia in the USA. So, it is up to you.
Now, you can check if you have any example, created using the following command:
PS C:\Users\1511 MXTI> aws ec2 describe-instances
{
"Reservations": []
}
I do not have any example, but to create one when you're using the console is an easy task. With just few clicks, you can create one. However, you cannot automate. To automate, you need to use the command line and for that, you should know every single object necessary for your VM.
The first one is creating an SSH Key. It is required to access the VM after creating it.
PS C:\Users\1511 MXTI> aws ec2 create-key-pair --key-name DevopsBook --query'KeyMaterial' --output text YOUR_PRIVATE_KEY
The parameter,--query was used to get only the private key in the format of a plain text. Otherwise, you can have only one string, which creates problems with the file format when you use it.
Copy the private key and save it into a file. In my case, I saved it as devopbook.pem, which is the standard used by AWS.
Every instance needs an IP address. Otherwise, you will not be able to access it remotely. But, to have an IP address, a subnet is required and in a sequence. Now, let's create a network using the following command:
PS C:\Users\1511 MXTI> aws ec2 create-vpc --cidr-block "192.168.0.0/24"
{
"Vpc": {
"CidrBlock": "192.168.0.0/24",
"DhcpOptionsId": "dopt-891c21e2",
"State": "pending",
"VpcId": "vpc-0825b5c6f6a2a2429",
"OwnerId": "360560397478",
"InstanceTenancy": "default",
"Ipv6CidrBlockAssociationSet": [],
"CidrBlockAssociationSet": [
{
"AssociationId": "vpc-cidr-assoc-07b70a566b3a97801",
"CidrBlock": "192.168.0.0/24",
"CidrBlockState": {
"State": "associated"
}
}
],
"IsDefault": false,
"Tags": []
}
}
Virtual Networks on AWS are called VPC (Virtual Private Cloud). I had to specify the CIDR block, which represents the network size, which allows us to have 254 available addresses. Save the VpcId. We will need it later on.
The next step is creating a subnet. Use the following command:
PS C:\Users\1511 MXTI> aws ec2 create-subnet --cidr-block "192.168.0.0/24" --vpc-id vpc-0825b5c6f6a2a2429
{
"Subnet": {
"AvailabilityZone": "eu-central-1a",
"AvailabilityZoneId": "euc1-az2",
"AvailableIpAddressCount": 251,
"CidrBlock": "192.168.0.0/24",
"DefaultForAz": false,
"MapPublicIpOnLaunch": false,
"State": "pending",
"SubnetId": "subnet-0c7889e706674e64f",
"VpcId": "vpc-0825b5c6f6a2a2429",
"OwnerId": "360560397478",
"AssignIpv6AddressOnCreation": false,
"Ipv6CidrBlockAssociationSet": [],
"SubnetArn": "arn:aws:ec2:eu-central-1:360560397478:subnet/subnet-0c7889e706674e64f"
}
}
In the subnet too, I used the same CIDR Block. I want to have only one subnet in my VPC. But, you can create, for example, a VPC with a bigger block like /16 or /8 and split it into many subnets, as many as you want.
For security reasons, we are obligated to create security groups. It is like firewall rules, which will allow the traffic to determine the IP address, networks, and block, or allow ports depending on the protocols. Therefore, let's create it because it is a requirement, for instance:
PS C:\Users\1511 MXTI> aws ec2 create-security-group --group-name devops-book --description "Example used in the book" --vpc-id vpc-0825b5c6f6a2a2429
{
"GroupId": "sg-0da7b308d99365dc3"
}
Save the GroupId. Now, we need to allow all the TCP connections in this group:
PS C:\Users\1511 MXTI> aws ec2 authorize-security-group-ingress --group-id sg-0da7b308d99365dc3 --protocol tcp --port 22 --cidr 0.0.0.0/0
For the port 22, the access can be given from any source and we can assign this SecurityGroup to any instance that we have. And finally, we can create an instance:
PS C:\Users\1511 MXTI> aws ec2 run-instances --count 1 --instance-type t3.micro --key-name DevopsBook --security-group-ids sg-0da7b308d99365dc3 --subnet-id subnet-0c7889e706674e64f --image-id ami-0b418580298265d5c
{
"Groups": [],
"Instances": [
The new parameter here is the Image ID. This represents an ID of an Amazon Machine Image, which is the ISO that we used in the first chapter or the Box we used in the Vagrant chapter. To see the image options, you can give a look in the Amazon Marketplace https://aws.amazon.com/marketplace. I am an Ubuntu fan, so, this Image ID represents an Ubuntu version 18.04.
Check if your instance is running with the following command:
PS C:\Users\1511 MXTI> aws ec2 describe-instances --query "Reservations[*].Instances[*].{Instance:InstanceId,State:State}"
[
[
{
"Instance": "i-0d26f9c327b92b630",
"State": {
"Code": 16,
"Name": "running"
}
}
]
]
If we have an instance and it is running, we are able to connect. Usually, when we create an instance using the console, a public DNS is assigned to it. Check if you have one with the following command:
PS C:\Users\1511 MXTI> aws ec2 describe-instances --query "Reservations[*].Instances[*].{Instance:InstanceId,State:State,DNS:PublicDnsName}"
[
[
{
"Instance": "i-0d26f9c327b92b630",
"State": {
"Code": 16,
"Name": "running"
},
"DNS": ""
}
]
]
The instance does not have access to the internet. So, we need to create an Internet Gateway for that using the following command:
PS C:\Users\1511 MXTI>aws ec2 create-internet-gateway
{
"InternetGateway": {
"Attachments": [],
"InternetGatewayId": "igw-05d94c382dd27185b",
"Tags": []
}
}
Now, we need to associate the Internet Gateway with the VPC, and all the instances inside the same VPC will have access to the internet.
PS C:\Users\1511 MXTI>aws ec2 attach-internet-gateway --internet-gateway-id igw-05d94c382dd27185b --vpc-id vpc-0825b5c6f6a2a2429
Even creating the Internet Gateway and the VPC, it is required to create a default route. Then, all the connections, by default, will try to go through the internet first. You can check the route tables using the following command:
PS C:\Users\1511 MXTI>aws ec2 describe-route-tables
{
{
"Associations": [
{
"Main": true,
"RouteTableAssociationId": "rtbassoc-0388bce2f3bf06f9b",
"RouteTableId": "rtb-0ba4bf0ea11f024ee",
"AssociationState": {
"State": "associated"
}
}
],
"PropagatingVgws": [],
"RouteTableId": "rtb-0ba4bf0ea11f024ee",
"Routes": [
{
"DestinationCidrBlock": "192.168.0.0/24",
"GatewayId": "local",
"Origin": "CreateRouteTable",
"State": "active"
}
],
"Tags": [],
"VpcId": "vpc-0825b5c6f6a2a2429",
"OwnerId": "360560397478"
},
},
The route with the ID rtb-0ba4bf0ea11f024ee is associated with the VPC vpc-0825b5c6f6a2a2429, which is the vpc that we created. Therefore, we need to assign a new route so that every connection with the destination to 0.0.0.0/0 will pass through our Internet Gateway, represented by the ID igw-05d94c382dd27185b.
PS C:\Users\1511 MXTI> aws ec2 create-route --route-table-id rtb-0ba4bf0ea11f024ee --destination-cidr-block 0.0.0.0/0 --gateway-id igw-05d94c382dd27185b
{
}
Now, you can create a public IP address, and see if we can connect using the following command:
PS C:\Users\1511 MXTI> aws ec2 allocate-address
{
"PublicIp": "18.156.153.94",
"AllocationId": "eipalloc-04066542351eff3a4",
"PublicIpv4Pool": "amazon",
"NetworkBorderGroup": "eu-central-1",
"Domain": "vpc"
}
Now, we have the public IP and we need to assign it with the instance:
PS C:\Users\1511 MXTI>aws ec2 associate-address --allocation-id eipalloc-04066542351eff3a4 --instance-id i-0d26f9c327b92b630
{
"AssociationId": "eipassoc-07026da6c9093c86a"
}
Let us check the instance one more time:
PS C:\Users\1511 MXTI> aws ec2 describe-instances --query "Reservations[*].Instances[*].{Instance:InstanceId,State:State,DNS:PublicDnsName, IP:PublicIpAddress}"
[
[
{
"Instance": "i-0d26f9c327b92b630",
"State": {
"Code": 16,
"Name": "running"
},
"DNS": "",
"IP": "18.156.153.94"
}
]
Now, we have the IP address: 18.156.153.93assigned with the instance. We still do not have the Public DNS, but, we can try to connect using the IP. Remember the Private Key that you saved when we created the SSH? You will need it now:
PS C:\Users\1511 MXTI> ssh -i devopskey.pem ubuntu@18.156.153.94
The authenticity of host '18.156.153.94 (18.156.153.94)' can't be established.
ECDSA key fingerprint is SHA256:N5kMSWQKVwBLycjjUpzJ/AsRnRbBvDVqagBJunxCXyA.
Are you sure you want to continue connecting (yes/no)? yes
Warning: Permanently added '18.156.153.94' (ECDSA) to the list of known hosts.
Welcome to Ubuntu 18.04.3 LTS (GNU/Linux 4.15.0-1057-aws x86_64)
* Documentation: https://help.ubuntu.com
* Management: https://landscape.canonical.com
* Support: https://ubuntu.com/advantage
Welcome to Ubuntu 18.04.3 LTS (GNU/Linux 4.15.0-1057-aws x86_64)
* Documentation: https://help.ubuntu.com
* Management: https://landscape.canonical.com
* Support: https://ubuntu.com/advantage
System information as of Tue Apr 21 19:07:47 UTC 2020
System load: 0.24 Processes: 104
Usage of /: 13.6% of 7.69GB Users logged in: 0
Memory usage: 16% IP address for ens5: 192.168.0.44
Swap usage: 0%
ubuntu@ip-192-168-0-44:~$
Everything is working successfully. A lot of effort is put to create something which we could do in some simple clicks using the dashboard. But, that is the life of a DevOps guy. We need to automate many using the command line, like the REST APIs, sometimes SOAP Interfaces. It does not matter what you have to automate, just do it.
If you want to delete everything, you can access the web interface directly and delete the VM. All the resources will be deleted as well.
Provisioning using GCP
Now is the time to create the same infrastructure using the Google Cloud Platform. The elements are the same in all the platforms. We will need networks, subnets, SSH keys, public IP address, etc. However, the commands and the way we are going to implement it, changes by the platform. Therefore, let's install the Google Cloud Shell and start a walkthrough of it:
https://dl.google.com/dl/cloudsdk/channels/rapid/GoogleCloudSDKInstaller.exe
To install it, double click, then click on Next, Next, and Finish. After the installation finishes, you need to create your configuration by running the following command:
PS C:\Users\1511 MXTI> gcloud config configurations create book
Created [book].
Activated [book].
Now, you must configure your Google account to access the platform.
PS C:\Users\1511 MXTI> gcloud init
Welcome! This command will take you through the configuration of gcloud.
Settings from your current configuration [book] are:
core:
disable_usage_reporting: 'True'
Pick configuration to use:
[1] Re-initialize this configuration [book] with new settings
[2] Create a new configuration
[3] Switch to and re-initialize existing configuration: [default]
Please enter your numeric choice: 1
Your current configuration has been set to: [book]
You can skip diagnostics next time by using the following flag:
gcloud init --skip-diagnostics
Network diagnostic detects and fixes local network connection issues.
Checking network connection…done.
Network diagnostic passed (1/1 checks passed).
Choose the account you would like to use to perform operations for
this configuration:
[1] alisson.machado@stone.com.br
[2] Log in with a new account
Please enter your numeric choice: 2
Your browser has been opened to visit:
I already have one existing configuration. So, I choose the re-initialize the option, and then, I add a new account, because the first email displayed is not my current Google account. This process will open a browser for you and you just need to login to your account. If everything went well with you, the terminal will show you the following message:
You are logged in as: [alisson.copyleft@gmail.com].
Pick cloud project to use:
[1] alisson-187813
[2] saas-205517
[3] Create a new project
Please enter numeric choice or text value (must exactly match list item):
In my case, I will create a new project, called chapter7-20200423:
Please enter numeric choice or text value (must exactly match list item): 3
Enter a Project ID. Note that a Project ID CANNOT be changed later.
Project IDs must be 6-30 characters (lowercase ASCII, digits, or
hyphens) in length and start with a lowercase letter. chapter7-20200423
Waiting for [operations/cp.8418911479956985045] to finish…done.
Your current project has been set to: [chapter7-20200423].
Now, my project is ready to use. To access it, go to https://console.cloud.google.com, click on Projects| All and you will see your projects there:
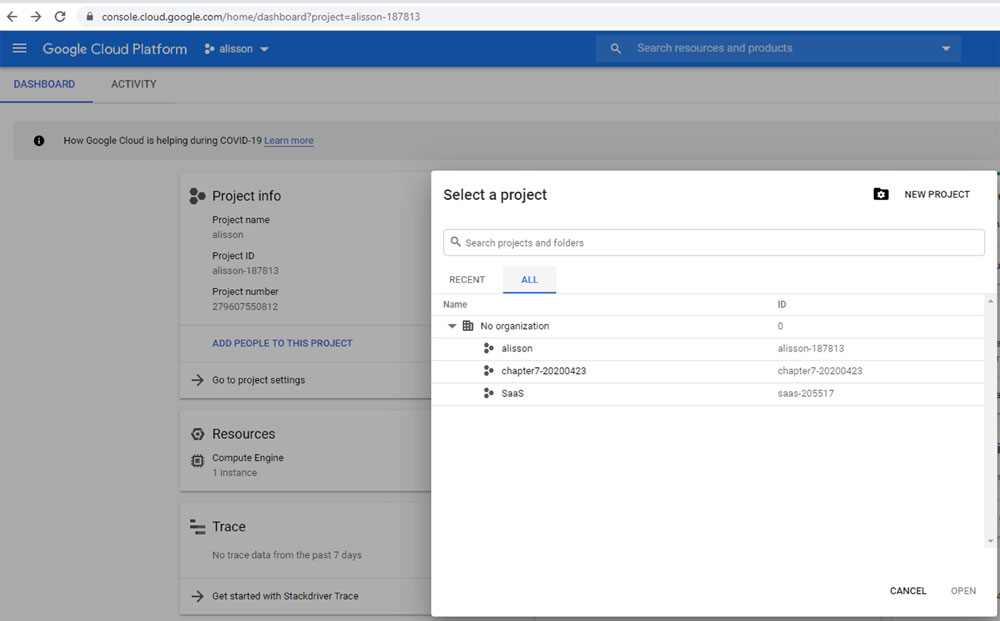
Figure 7.8
On Google, the service name to create the VMs is Google Compute Engine. Using this service, we will be able to create exactly as we did on Amazon.
Firstly, you need to activate the billing in your account. In your Dashboard within the project, click on Go to Compute Engine, and there, you have a button, called Enable billing, as shown in the following figure:

Figure 7.9
Click it and wait for a few minutes for the configuration to complete. Once the configuration is done, you can find the image with which you want to create your instance using the following command:

You will find many options. In my case, I will use ubuntu-1804-xenial-20200407.You also need to choose the zone where you want to create your VM:

This time, I will create my VM on the US using the zone us-east1-b. In the AWS part, we created an instance with the t3.micro size. On Google, we have a respective, but with a different name:

There are many machine family types which you can use. The difference between families is the purpose for what you want to use your VM. The E2 family was made for the general purpose VMs. So, I will use that only and the smallest size is micro, which corresponds to 2 CPUs and 1 GB of memory.
Sometimes, just setting the image name when you are creating your VM can raise an error. To avoid that, you can put the image link directly, as follows:
PS C:\Users\1511 MXTI> gcloud compute images list –uri
https://www.googleapis.com/compute/v1/projects/centos-cloud/global/images/centos-6-v20200402
https://www.googleapis.com/compute/v1/projects/centos-cloud/global/images/centos-7-v20200420
https://www.googleapis.com/compute/v1/projects/ubuntu-os-cloud/global/images/ubuntu-1804-bionic-v20200414 https://www.googleapis.com/compute/v1/projects/coreos-cloud/global/images/coreos-alpha-2430-0-0-v20200229
Therefore, the image link is as follows:
https://www.googleapis.com/compute/v1/projects/ubuntu-os-cloud/global/images/ubuntu-1804-bionic-v20200414
To create your VM, run the following command:
PS C:\Users\1511 MXTI> gcloud compute instances create vm1 --zone=us-east1-b --machine-type=e2-micro --image=https://www.googleapis.com/compute/v1/projects/ubuntu-os-cloud/global/images/ubuntu-1804-bionic-v20200414
Created [https://www.googleapis.com/compute/v1/projects/chapter7-20200423/zones/us-east1-b/instances/vm1].

The VM is now running with the external IP 25.229.97.23. You can use it to connect to your machine. However, the Google Cloud Shell has a specific command to create the SSH key for you and automatically login into the instance:
PS C:\Users\1511 MXTI> gcloud compute ssh vm1
WARNING: The PuTTY PPK SSH key file for gcloud does not exist.
WARNING: The public SSH key file for gcloud does not exist.
WARNING: The private SSH key file for gcloud does not exist.
WARNING: You do not have an SSH key for gcloud.
WARNING: SSH keygen will be executed to generate a key.
WARNING: Invalid characters in local username [1511 MXTI]. Using username corresponding to active account: [alisson_copyleft]
No zone specified. Using zone [us-east1-b] for instance: [vm1].
Updating project ssh metadata…\Updated [https://www.googleapis.com/compute/v1/projects/chapter7-20200423].
Updating project ssh metadata…done.
Waiting for SSH key to propagate.
The server's host key is not cached in the registry. You
have no guarantee that the server is the computer you
think it is.
The server's ssh-ed25519 key fingerprint is:
ssh-ed25519 255 9c:f6:6d:58:38:8e:d7:c4:df:63:28:8b:b4:c8:53:24
If you trust this host, enter "y" to add the key to
PuTTY's cache and carry on connecting.
If you want to carry on connecting just once, without
adding the key to the cache, enter "n".
If you do not trust this host, press Return to abandon the
connection.
Store key in cache? (y/n)
Previously, you have all the output. Just to show you how it works, once the command finishes, a terminal will open for you where you have already logged in within the VM:

Figure 7.10
And if you want to delete your instance after learning all these steps, you need to run the following command:
PS C:\Users\1511 MXTI> gcloud compute instances delete vm1
No zone specified. Using zone [us-east1-b] for instance: [vm1].
The following instances will be deleted. Any attached disks configured
to be auto-deleted will be deleted unless they are attached to any
other instances or the '--keep-disks' flag is given and specifies them
for keeping. Deleting a disk is irreversible and any data on the disk
will be lost.
- [vm1] in [us-east1-b]
Do you want to continue (Y/n)?
For now, this is enough for you to start with your Infrastructure on GCP.
Provisioning using Azure
As we did with the other Cloud players, we are going to do the same on Azure. The goal of providing the same Infrastructure, in the same way, is to show you the process and make you feel comfortable in choosing the one you prefer.
The first step is installing the Azure command-line by the following link:
https://docs.microsoft.com/en-us/cli/azure/install-azure-cli-windows?view=azure-cli-latest
The installation process is exactly the same as all the MSI packages. Double click, click Next, Next, and Finish. After the installation finishes, you can run the following command to check if it is working:
PS C:\Users\1511 MXTI> az --version

Python location 'C:\Program Files (x86)\Microsoft SDKs\Azure\CLI2\python.exe'
Extensions directory 'C:\Users\1511 MXTI\.azure\cliextensions'
Python (Windows) 3.6.6 (v3.6.6:4cf1f54eb7, Jun 27 2018, 02:47:15) [MSC v.1900 32 bit (Intel)]
Now, the Azure CLI is installed successfully. To begin with, run the following command:
PS C:\Users\1511 MXTI> az login
You have logged in. Now let us find all the subscriptions to which you have access…
[
{
"cloudName": "AzureCloud",
"isDefault": true,
"managedByTenants": [],
"name": "Pay-As-You-Go",
"state": "Enabled",
"user": {
"name": "alisson.copyleft@gmail.com",
"type": "user"
}
}
]
The command, az login authenticates your command line with your Azure account.
Similar to Google, where we created one project to separate all the provisioned services by context, we will do the same on Azure, but instead of creating the projects, we will create ResourceGroups.
But, before creating the ResourceGroup, we need to know which location we will use. To see the locations available, run the following command:
PS C:\Users\1511 MXTI>az account list-locations
[
{
"displayName": "Central US",
"id": "/subscriptions/55465d5a-355d-43d1-85ce-9e518c812c0c/locations/centralus",
"latitude": "41.5908",
"longitude": "-93.6208",
"subscriptionId": null
},
{
"displayName": "East US",
"id": "/subscriptions/55465d5a-355d-43d1-85ce-9e518c812c0c/locations/eastus",
"latitude": "37.3719",
"longitude": "-79.8164",
"name": "eastus",
"subscriptionId": null
},
]
The command will show all the locations available. In my case, I will use the East US. Now, we can create ResourceGroup with the following command:
PS C:\Users\1511 MXTI>az group create --location eastus --name book
{
"id": "/subscriptions/55465d5a-355d-43d1-85ce-9e518c812c0c/resourceGroups/book",
"location": "eastus",
"managedBy": null,
"name": "book",
"properties": {
"provisioningState": "Succeeded"
},
"tags": null,
"type": "Microsoft.Resources/resourceGroups"
}
Now, we have created one and called the book, and within it, we will create all the resources required for our instance. One interesting point is, when you delete your resource group, everything underlying it will be deleted as well:
PS C:\Users\1511 MXTI> az vm image list
You are viewing an offline list of images, use --all to retrieve an up-to-date list
[
"offer": "openSUSE-Leap",
"publisher": "SUSE",
"sku": "42.3",
"urn": "SUSE:openSUSE-Leap:42.3:latest",
"urnAlias": "openSUSE-Leap",
"version": "latest"
},
{
"offer": "UbuntuServer",
"publisher": "Canonical",
"sku": "18.04-LTS",
"urn": "Canonical:UbuntuServer:18.04-LTS:latest",
"urnAlias": "UbuntuLTS",
"version": "latest"
},
]
The preceding command will show you the images available to create your VM. As always, we will choose the UbuntuServer. Therefore, you can create the VM by running the following command:
PS C:\Users\1511 MXTI>az vm create -n vm1 -g book --image Canonical:UbuntuServer:18.04-LTS:latest --admin-username ubuntu
{
"fqdns": "",
"id": "/subscriptions/55465d5a-355d-43d1-85ce-9e518c812c0c/resourceGroups/book/providers/Microsoft.Compute/virtualMachines/vm1",
"location": "eastus",
"macAddress": "00-0D-3A-9A-DF-E9",
"powerState": "VM running",
"privateIpAddress": "10.0.0.4",
"publicIpAddress": "52.224.120.36",
"resourceGroup": "book",
"zones": ""
}
For the image name, we usually refer to the URN (Uniform Resource Name), which is the identification for the image. The parameter, --admin-username is the user who will have the access to run sudo and do the administrative tasks.
The Azure command line is smart enough to get your default SSH-key and add it into the VM. Therefore, to connect, you can just run an SSH command as default and login:
PS C:\Users\1511 MXTI>ssh ubuntu@52.224.120.36
The authenticity of host '52.224.120.36 (52.224.120.36)' can't be established.
ECDSA key fingerprint is SHA256:F/Tb2nXVw4B3aertXLsde0wUTzNkBzu+aOwFHEFpl/A.
Are you sure you want to continue connecting (yes/no)? yes
Warning: Permanently added '52.224.120.36' (ECDSA) to the list of known hosts.
Welcome to Ubuntu 18.04.4 LTS (GNU/Linux 5.0.0-1036-azure x86_64)Welcome to Ubuntu 18.04.4 LTS (GNU/Linux 5.0.0-1036-azure x86_64)
ubuntu@vm1:~$
Now that you have everything up and running, we can delete everything to avoid some unexpected costs, except the ones we are studying:
PS C:\Users\1511 MXTI>az group delete --name book
Are you sure you want to perform this operation? (y/n): y
PS C:\Users\1511 MXTI>
You can be relieved now and be sure that everything we created before will cost.
Conclusion
I showed you how to create a VM in three of the main Cloud players. On Amazon, I showed with so much more details than the other competitors. But I do not mean that it is harder than the other. It was just my explanation. Currently, I am working with Azure. But in the past, I have worked with Amazon and Google as well. Therefore, in my view, a good DevOps engineer should be able to work with all the platforms. The concepts are same and you can deliver the same essential infrastructure. There is another concept which is called Multicloud, which aims to use all the Clouds together and you can retrieve the best from each one, like authenticating your users and services using Azure Active Directory, creating the VMs using Amazon EC2, and query your data using the Big Query on Google.