CHAPTER 10
Continuous Integration and Continuous Delivery Using Jenkins
This chapter aims to introduce you to the concept of Pipelines, CI (Continuous Integration), and CD (Continuous Delivery). It also gives an introduction to Jenkins, the most famous CI/CD platform and open-source.
Structure
In this chapter, we will discuss the following topics:
- Pipelines
- Continuous Integration
- Continuous Delivery
- Pipeline as Code and Jenkins
Objectives
After studying this unit, you should be able to:
- Know about DevOps pipelines
- Differentiate and how to implement CI/CD
- Create your pipelines as code using Groovy and Jenkins
- Deploy an application using Vagrant, Docker, and Jenkins
Pipelines
We can define a pipeline as a sequence of steps, which will take one thing from a starting point to an ending point, following a predefined path. In our case, when the code enters the pipeline, we have to check many things, like the code quality, best practices, running tests, generating a ZIP file, and it can be increased as much as you want. At the end of your pipeline, you will have your code with quality, following the best practices and ready to deploy everything in an automated way. It helps you improve the quality of your product or infrastructure, and speed up the process, as no one has to test each part of the pipeline. For some pipelines, the DevOps practices defined specific names, like Continuous Integration and Continuous Delivery.
Continuous Integration
Usually, when we are developing a software, we have many stages where our application goes through before reaching the end customer. Currently, we have these most common stages:
- Development: Where the developers can test the applications, fix bugs, and validate new feature requests. In this environment, we can break everything because it will not affect our end customers.
- Staging: A copy of the production environment, but just for the business team to validate the business rules if they follow the requirements defined by the clients. In this environment, we can have failures and new improvement requests. Following this is the last stage before it goes to the end customer.
- Production: This environment is where the application is in production, with everything validated, tested, and ready for our end customer. Of course, bugs can be found here, but the goal is to deliver the applications as much tested as we can to avoid problems.
The Continuous Integration pipeline is created to connect all the environment. For example, in the development stage, we have to follow some of the following tests:
- Unit tests: This test aims to validate the business rules for each part of our code, like classes, methods, functions, or whatsoever. But, these are the simplest tests that you can do in your application. For example, you can receive the task of creating a function where you need to sum 2 numbers. Your test will pass the numbers to that function and check if you are returning the expected result.
- Integration tests: Here, you will have to test a business case. For example, you created an API. Your end customer will make a request sending 2 parameters and he is expecting a JSON response with a product data. In this case, we do not need to check what is happening in the source code of your API, we just need to make sure that when we receive those 2 parameters, we will return the JSON with the product data.
- End-to-end: This is the hardest test that you have in your application. It will test your entire system, each functionality in detail impersonating a real customer. It takes a lot of time to be developed, so, most of the companies stop at the integration tests.
- Quality test: This test is used more to check the quality of your code. If you are following the best practices, if you are creating reusable codes, and not just copying and pasting code everywhere in your code, which will make the maintenance harder.
Of course, those tests that I explained are just common tests that you will find in most of the companies that you will work. However, there are more ways of testing applications. It can vary from project to project and company to company.
Once we pass in all these tests, we have to make our application go to other teams who will also test the application, many times in a manual way, to make sure that the developer understood what the requirements are and how we need to code our product. This is where we have the Continuous Delivery.
Continuous Delivery
In this stage, the developer did all work they were delegated to do. But, of course, we can have many communication problems between the client request and the software delivery.
Therefore, once all the tests were made by the developers, we can assume that we have a new version of our application, which can be called version 0.1. Assuming that it is working, we will create a package of that application and deploy it in the staging environment. In this environment, someone from the business part of the company will validate again if the feature requests are working properly as they requested. This stage is also used for the UX team to validate if your interface is understandable and easy to use. If this version of the application does not fulfill all the requirements, or the developers did not understand how the new feature should work, this version can be discarded and they will work in a new version called, 0.2. For example, and it will pass through all the environments again until it fulfills all the requirements specified by the end customer.
At the end of the day, Continuous Delivery is being able to deploy a version of your application every time a new feature is released. Not accumulating these features will be harder to test, since many are not uncommon for business areas validating the application manually.
Pipeline as Code and Jenkins
We have many tools which can help us with the pipelines and integration between the environment, and indeed Jenkins is the most famous, because of its flexibility that allows us to install many plugins to easily integrate with the Cloud providers and also being open source. Thus, we do not need to pay for a license.
The focus of this book is not especially software development, but Infrastructure as Code. So, all the examples that I will use will be regarding Infrastructure and how we can test and deploy it.
Firstly, we need to setup our Jenkins server. I will setup it using Vagrant. To create a VM with Ubuntu, install Docker, and then, Jenkins will run on top of the Docker:
# -*- mode: ruby -*-
# vi: set ft=ruby :
Vagrant.configure("2") do |config|
config.vm.box = "ubuntu/bionic64"
config.vm.box_check_update = false
config.vm.provider "virtualbox" do |vb|
vb.memory = "1024"
end
config.vm.define "docker" do |docker|
docker.vm.box = "ubuntu/bionic64"
docker.vm.network "private_network", ip: "192.168.33.11"
docker.vm.hostname = "docker"
docker.vm.provision "shell", inline: <<-SHELL
apt clean
apt-get update
apt-get remove docker docker-engine docker.io containerd runc -y
apt-get install apt-transport-https ca-certificates curl gnupg-agent software-properties-common -y
curl -fsSL https://download.docker.com/linux/ubuntu/gpg | apt-key add -
add-apt-repository "deb [arch=amd64] https://download.docker.com/linux/ubuntu $(lsb_release -cs) stable"
apt-get update -y
apt-get install docker.io -y
SHELL
end
end
The preceding code is just edited a little bit from chapter06. Then, we already know how to install and run a VM on Vagrant. Now, I have a Docker environment running and to run the Jenkins in a container is very simple. Just run the following command:
root@docker:~# docker run -tdi --restart=always --name jenkins -p 8080:8080 -p 50000:50000 jenkins/jenkins:lts
After the containers start, you can access the Jenkins by the following address:
http://192.168.33.11:8080/login?from=%2F
It will show you the following screen asking for the initial password:
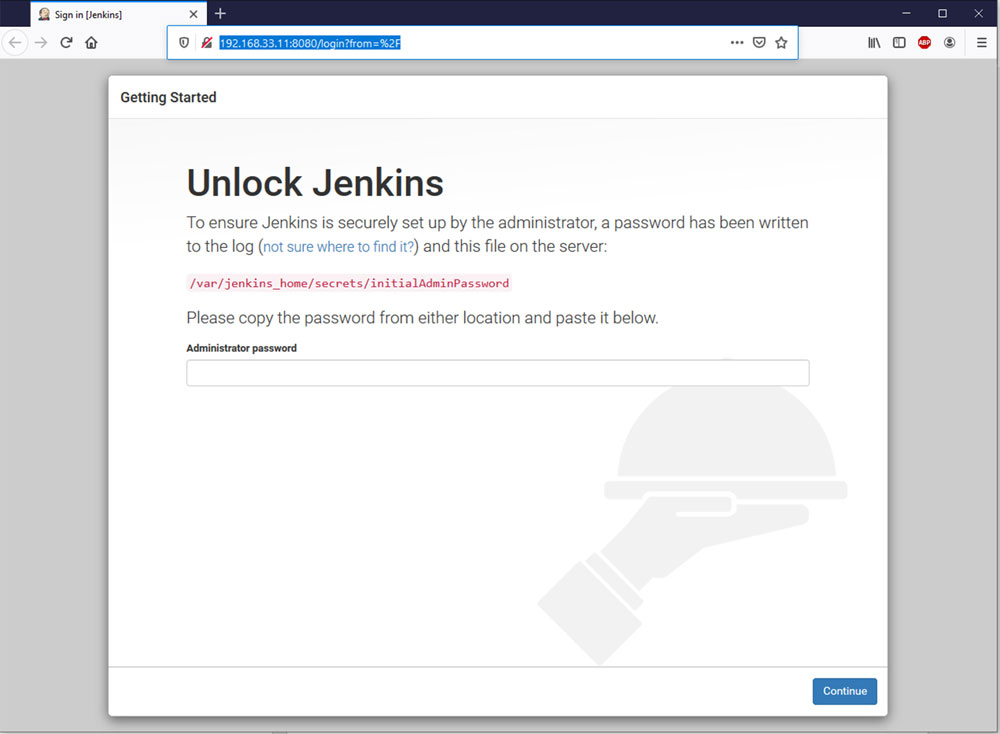
Figure 10.1
You can get the password by running the following command:
docker exec -ti jenkins cat /var/jenkins_home/secrets/initialAdminPassword
a7a1b2c796404bceab99b014f3220a9a
You can just copy the password:
a7a1b2c796404bceab99b014f3220a9a
Paste in the screen and proceed with the installation.

Figure 10.2
It is highly recommended to install the suggested plugins because it will install one of the most important, which is the git plugin. Now, you just need to follow the sequence, Next, Next, and Finish, to finalize your installation.

Figure 10.3
The last part of the installation is setting your admin credentials. I have set admin/admin for user and password. Finally, welcome to Jenkins:

Figure 10.4
Everyone who has worked with Jenkins knows that the UX is not one of Jenkins’ strengths. To work around this problem, there is a very famous plugin, called the Blue Ocean to improve our interface and usability.
Go to Manage Jenkins | Manage Plugins | Available and Search for the Blue Ocean:

Figure 10.5
Install the plugin and restart Jenkins. After everything, you will see a new button, Open Blue Ocean is available:
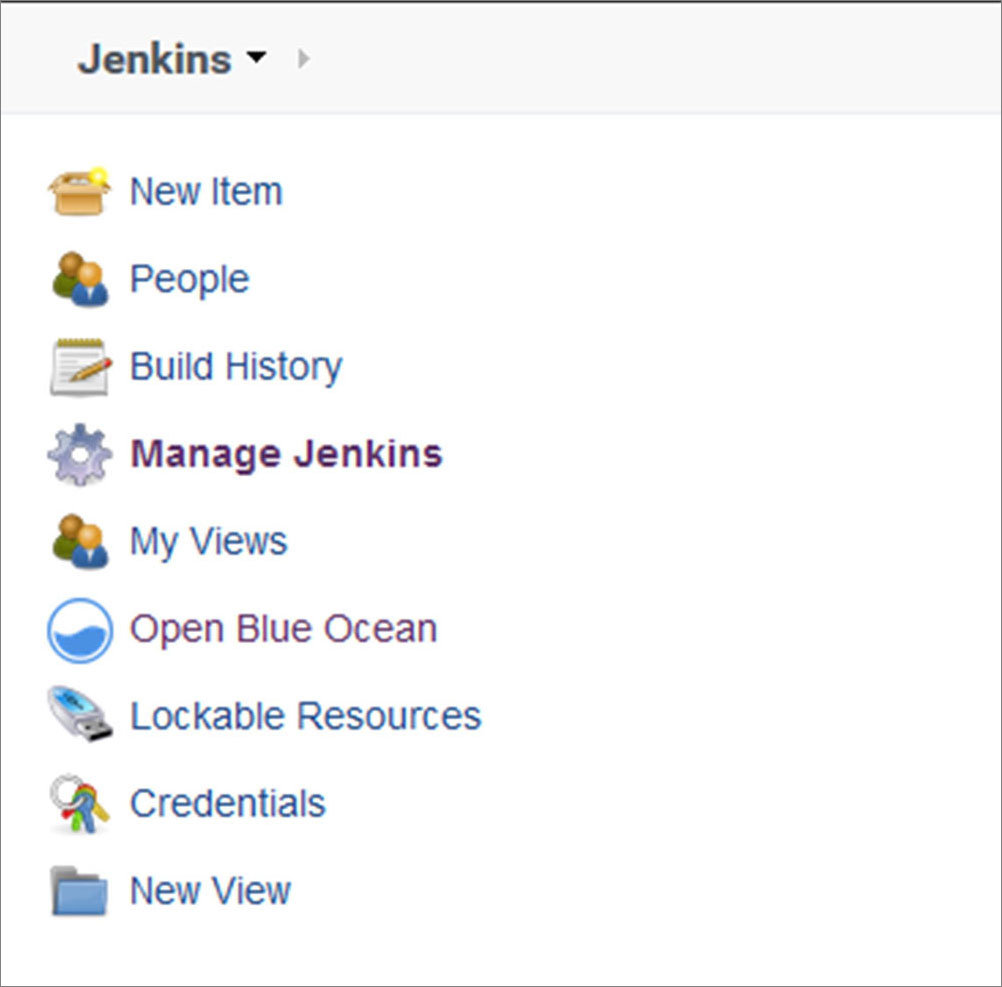
Figure 10.6
Click on the button and check the new interface:
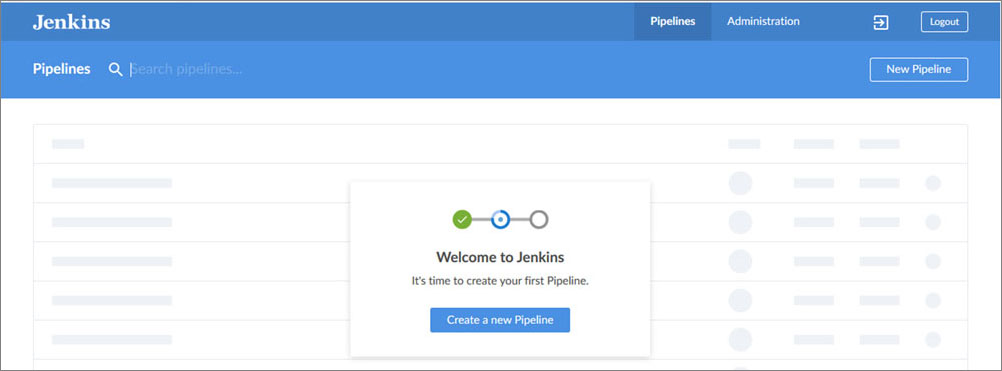
Figure 10.7
From the initial screen, we can see that it is so much better. Of course, it is not mandatory to use this interface. It is just some sort of fancy feature, but I liked it. Not just for the interface, but it also makes mandatory the usage of a repository to versioning your pipelines. You can click on Create a new Pipeline and check it:

Figure 10.8
In my case, I will select GitHub, because I have already created a repository for this chapter. Creating the pipeline is pretty simple. You can just follow the steps showed in the screen followed, create an access token on GitHub, and bind it to your installation, like the preceding screenshot:
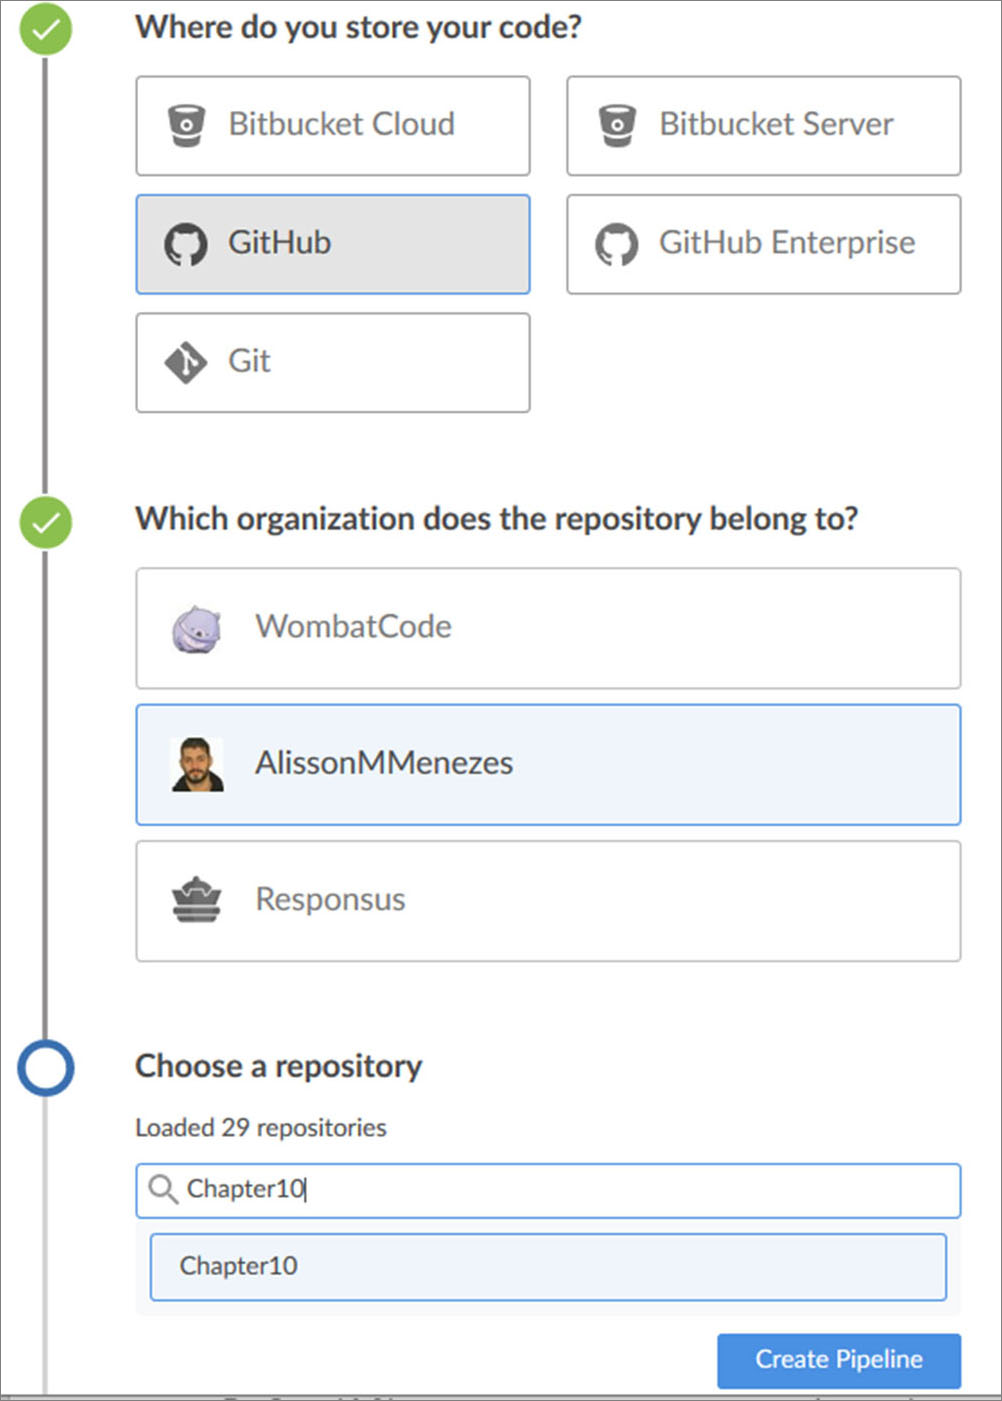
Figure 10.9
In the bound repository, you must have a file, called Jenkinsfile, in the root. The Jenkins will scan the files looking for that specific one, read the code, and run the pipeline. I already created one with the following code:
pipeline {
agent any;
stages {
stage('Code Quality') {
steps {
sh 'echo checking code quality'
}
}
stage('Unit Tests') {
steps {
sh 'echo Testing the Applications'
}
}
stage('Build') {
steps {
sh 'echo Creating application Package'
}
}
stage('Delivery') {
steps {
sh 'echo Uploading the artifact to a repository'
}
}
stage('Deploy') {
steps {
sh 'echo Deploying the Application'
}
}
}
}
Jenkins uses the Groovy language to write the pipelines. It was a basic scaffold of what are the basics we need to have in our pipeline. Saving everything and checking the interface, you will see that the pipeline ran automatically and successfully:

Figure 10.10
In the code, we just have some echo statements which are representing the real codes. Now, we need to replace them with a real application and real commands to check the application, test the application, and deploy it after all. However, of course, it will not be a complex application. Nevertheless, we will have everything, and here is what the application will do.
Create an API which will receive credit card transactions and to validate the transactions follow these criteria:
- Validate if the credit card is active.
- Validate if the transaction amount is above the credit card limit.
- Validate if the transaction was approved.
The API must receive a JSON request in the following format:
{
"status": true,
"number":123456,
"limit":1000,
"transaction":{
"amount":500
}
Now, I developed everything using Flask, because is fast and easy. The API code is as follows:
#!/usr/bin/python3
from flask import Flask, request, jsonify
from functools import wraps
app = Flask(__name__)
def check_card(f):
wraps(f)
def validation(*args, **kwargs):
data = request.get_json()
if not data.get("status"):
response = {"approved":False,
"newLimit":data.get("limit"),
"reason":"Blocked Card"}
return jsonify(response)
if data.get("limit") < data.get("transaction").get("amount"):
response = {"approved":False,
"newLimit":data.get("limit"),
"reason":"Transaction above the limit"}
return jsonify(response)
return f(*args, **kwargs)
return(validation)
@app.route("/api/transaction",methods=["POST"])
@check_card
def transaction():
card = request.get_json()
new_limit = card.get("limit") - card.get("transaction").get("amount")
response = {"approved":True,"newLimit":new_limit}
return jsonify(response)
if __name__ == '__main__':
The application is receiving the transactions and the validating via Python decorators. If tested manually, it works. But, it is very exhaustive to test everything every time. That is why, we create automated tests. In this case, I have 3 business rules that were already mentioned and here follows the code for those tests:
#!/usr/bin/python3
import os
import tempfile
import pytest
from app import app
@pytest.fixture
def client():
app.config['TESTING'] = True
client = app.test_client()
yield client
def test_valid_transaction(client):
card = {
"status": True,
"number":123456,
"limit":1000,
"transaction":{
"amount":500
}
}
rv = client.post("/api/transaction",json=card)
assert True == rv.get_json().get("approved")
assert 500 == rv.get_json().get("newLimit")
def test_above_limit(client):
card = {
"status": True,
"number":123456,
"limit":1000,
"amount":1500
}
}
rv = client.post("/api/transaction",json=card)
assert False == rv.get_json().get("approved")
assert "Transaction above the limit" in rv.get_json().get("reason")
def test_blocked_card(client):
card = {
"status": False,
"number":123456,
"limit":1000,
"transaction":{
"amount":500
}
}
rv = client.post("/api/transaction",json=card)
assert False == rv.get_json().get("approved")
assert "Blocked Card" in rv.get_json().get("reason")
Of course, I also need to install some external module which must be in the requirements.txt file:
pytest
flask
pylint
Now, you have the following three files:
app.py
test_app.py
requirements.txt
This belongs to the application and we have the Jekinsfile, which is not a part of the application, but it is important for the process, in general. The next step is to prepare the Jenkins environment to test the application. Of course, we do not need much, just the Python and the PIP to install the new modules. Then, you can run the following command within the container:
root@docker:~# docker exec -ti -u 0 jenkins apt clean
root@docker:~# docker exec -ti -u 0 jenkins apt update
root@docker:~# docker exec -ti -u 0 jenkins apt install python python-pip -y
The parameter -u is new for us. It says to the Docker for which user we need to run the commands. In our case, the user represented by the UID 0, is the user root, the Jenkins default image. Therefore, the default user is the user Jenkins. We can validate it using the following commands:
root@docker:~# docker exec-ti jenkins whoami
jenkins
root@docker:~# docker exec-ti jenkins id
uid=1000(jenkins) gid=1000(jenkins) groups=1000(jenkins)
Going back to the pipeline topic, now, we need to replace the echo statements in the stages for the real commands which will be used. Then, the pipeline should be as follows:
pipeline {
agent any;
stages {
stage('Preparing the environment') {
steps {
sh 'python -m pip install -r requirements.txt'
}
}
stage('Code Quality') {
steps {
sh 'python -m pylint app.py'
}
}
stage('Tests') {
steps {
sh 'python -m pytest'
}
}
stage('Build') {
steps {
}
}
stage('Delivery') {
steps {
sh 'exit 1'
}
}
stage('Deploy') {
steps {
sh 'exit 1'
}
}
}
}
Make sure that everything is within your repository, like mine. You can check using the following link:
https://github.com/AlissonMMenezes/Chapter10
Run your pipeline manually. For now, we cannot trigger it automatically, because the Jenkins installation is local, and the GitHub is in the Cloud. However, we will see that in the next chapters.
In order to run the pipeline manually, you can open a new tab: http://192.168.33.11:8080/:

Figure 10.11
Click on the Run button, by side of the star. In your first attempt, it will raise the following error:

Figure 10.12
This error means the code is not following the code quality standards defined by the pylint. So, we need to fix it in order to go to the next stage of the pipeline. Fixing it is simple. There is a module, called autopep8, which can fix the code automatically for you. To install it, use the following command:
python -m pip install autopep8
PEP8 is a set of best practices for your Python code. You can check more details about it in by clicking on this link: https://www.python.org/dev/peps/pep-0008/
Fixing the code:
python -m autopep8 --in-place --aggressive --aggressive .\app.py
Most of the code was fixed, although, autopep8 module fixes most of the indentation issues. If you run the pylint again, we can see that not everything was fixed. Therefore, the module cannot refactor your code. This is a developer's duty, but, we will do that here:
PS C:\Users\1511 MXTI\Pictures\Book\DevOps With Linux\Chapter10\VMs> python -m pylint .\app.py
************* Module app
app.py:27:0: C0325: Unnecessary parens after 'return' keyword (superfluous-parens)
app.py:1:0: C0114: Missing module docstring (missing-module-docstring)
app.py:9:0: C0103: Argument name "f" doesn't conform to snake_case naming style (invalid-name)
app.py:9:0: C0116: Missing function or method docstring (missing-function-docstring)
app.py:32:0: C0116: Missing function or method docstring (missing-function-docstring)
app.py:4:0: C0411: standard import "from functools import wraps" should be placed before "from flask import Flask, request, jsonify" (wrong-import-order)
------------------------------------------------------------------
Your code has been rated at 7.27/10 (previous run: 7.73/10, -0.45)
After fixing everything required by the pylint module, the code now is as follows:
#!/usr/bin/python3
"""
This code is used as an example for the Chapter10 of the book DevOps With Linux
"""
from functools import wraps
from flask import Flask, request, jsonify
APP = Flask(__name__)
def check_card(func):
"""
This function validates the credit card transactions
"""
wraps(func)
def validation(*args, **kwargs):
"""
This function is a decorator,
which will return the function corresponding to the respective action
"""
data = request.get_json()
if not data.get("status"):
response = {"approved": False,
"newLimit": data.get("limit"),
"reason": "Blocked Card"}
return jsonify(response)
if data.get("limit") < data.get("transaction").get("amount"):
response = {"approved": False,
"newLimit": data.get("limit"),
"reason": "Transaction above the limit"}
return jsonify(response)
return func(*args, **kwargs)
return validation
@APP.route("/api/transaction", methods=["POST"])
@check_card
def transaction():
"""
This function is resposible to expose the endpoint for receiving the incoming transactions
"""
card = request.get_json()
new_limit = card.get("limit") - card.get("transaction").get("amount")
response = {"approved": True, "newLimit": new_limit}
return jsonify(response)
if __name__ == '__main__':
APP.run(debug=True)
It is looking quite better, is it not? Remember that we refactored the code, and then, we need to change our tests as well. In the test source code, we just need to change the following part:
@pytest.fixture
def client():
APP.config['TESTING'] = True
client = APP.test_client()
yield client
We are ready to run the pipeline again. Let's see how is the new behavior:
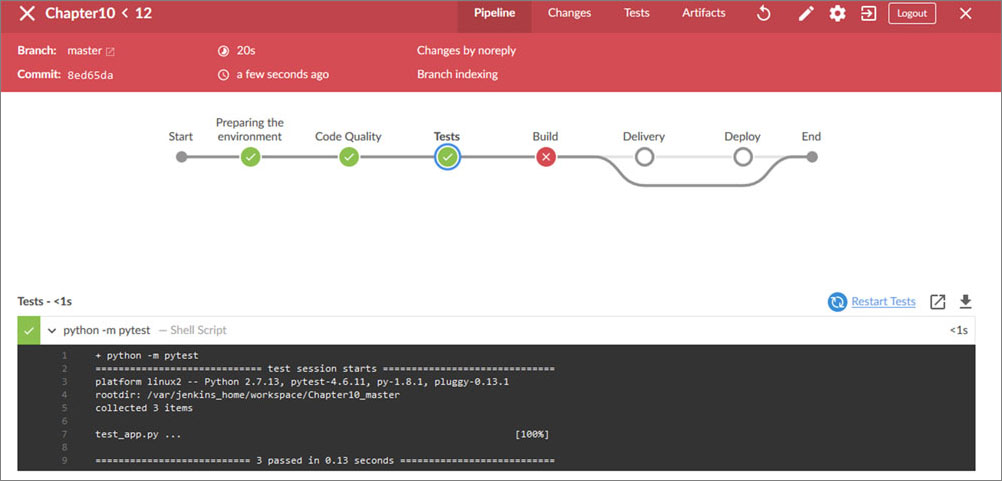
Figure 10.13
Now it is perfect! We passed the code quality check, the functional tests, and we are blocked at the build step. It makes sense, because I coded it to run an exit 1. For that step, we need to generate a new Docker image. With our application inside, deploy it in the same server that we are running our Jenkins container.
In order to do it, we can set up the VM as a Jenkins node. The address you must access to add a new node is as follows:
http://192.168.33.11:8080/computer/new
I will call that node as Docker server. The remote root directory must be /tmp, and the Labels Docker server as well. The Launch method must by the agent, connect to the master. Then, we will install the agent within the VM and it will be responsible to run the next steps of the pipeline:
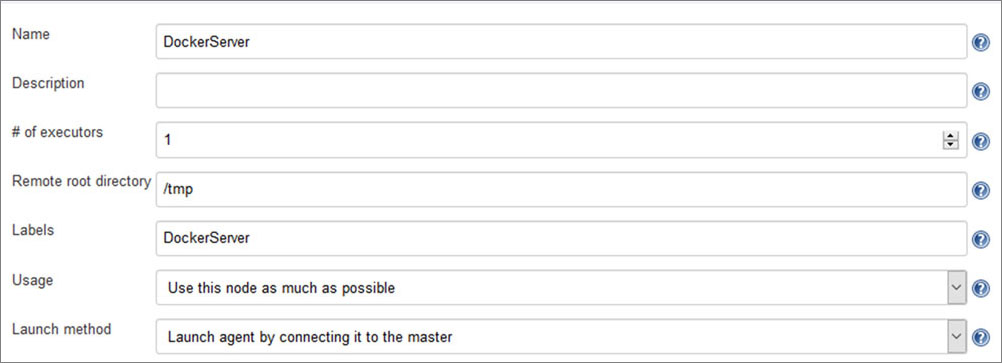
Figure 10.14
After configuring and saving the configuration, the Jenkins will make the agent available for you:
http://192.168.33.11:8080/computer/DockerServer/

Figure 10.15
We can just copy and paste the line in the VM:
root@docker:~# apt install openjdk-8-jre-headless -y
root@docker:~# wget http://192.168.33.11:8080/jnlpJars/agent.jar
root@docker:~# java -jar agent.jar -jnlpUrl http://192.168.33.11:8080/computer/DockerServer/slave-agent.jnlp -secret 1309b876151399817cab2ef0da0ea34716ecbc01a44b38a95c93fdd748d72629 -workDir "/tmp"
INFO: Agent discovery successful
Agent address: 192.168.33.11
Agent port: 50000
Identity: 52:84:5b:cb:ed:f7:98:4c:da:b2:64:66:48:de:cf:be
Jun 10, 2020 12:46:41 PM hudson.remoting.jnlp.Main$CuiListener status
INFO: Handshaking
Jun 10, 2020 12:46:41 PM hudson.remoting.jnlp.Main$CuiListener status
INFO: Connecting to 192.168.33.11:50000
Jun 10, 2020 12:46:41 PM hudson.remoting.jnlp.Main$CuiListener status
INFO: Trying protocol: JNLP4-connect
Jun 10, 2020 12:46:42 PM hudson.remoting.jnlp.Main$CuiListener status
INFO: Remote identity confirmed: 52:84:5b:cb:ed:f7:98:4c:da:b2:64:66:48:de:cf:be
Jun 10, 2020 12:46:43 PM hudson.remoting.jnlp.Main$CuiListener status
INFO: Connected
The agent is successfully connected. Now, we can continue to code the pipeline and finish the application deployment:
pipeline {
agent any;
stages {
stage('Preparing the environment') {
steps {
sh 'python -m pip install -r requirements.txt'
}
}
stage('Code Quality') {
steps {
sh 'python -m pylint app.py'
}
}
stage('Tests') {
steps {
sh 'python -m pytest'
}
}
stage('Build') {
agent {
node{
label "DockerServer";
}
}
steps {
sh 'docker build https://github.com/AlissonMMenezes/Chapter10.git -t chapter10:latest'
}
}
agent {
node{
label "DockerServer";
}
}
steps {
sh 'docker run -tdi -p 5000:5000 chapter10:latest'
}
}
}
}
This is the latest version of the pipeline. Let's run it and see if it will work:
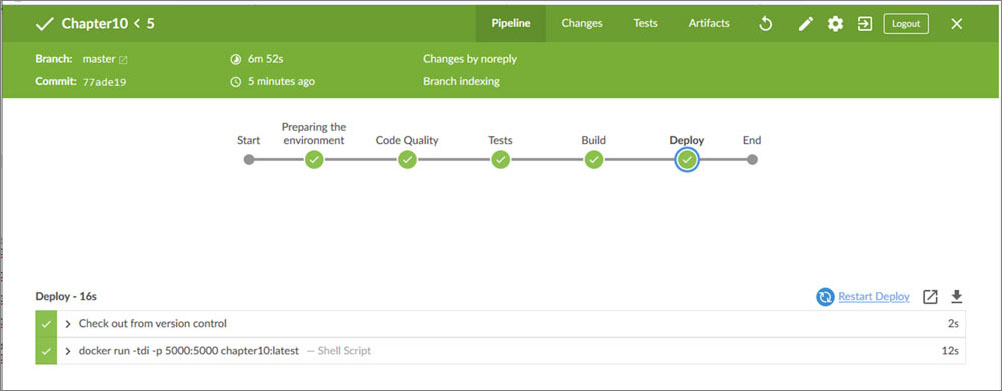
Figure 10.16
Great! Now we have a fully functional pipeline, versioned with an application, running tests, code quality, and also Dockerized.
Conclusion
We just learned how to create a pipeline as code using Jenkins, run code quality checks, functional tests, create an image based on a functional application, and deploy it on the top of a Docker server.
We could see that it is not an extremely hard task. Of course, as complex as is your project, more complex will be your pipeline. For example, in the initial steps, we were able to run everything on Jenkins by itself. By the final steps, we had to add a node and run on top of it. We also learned new information about Docker, for example, some parameters to start the container every time that the server has started. It is also possible to build an image using a Dockerfile hosted directly in a remote repository.
I am pretty sure this introduction will give you the start for creating your pipelines which will fit perfectly with your projects.
Questions
- What are the benefits of using pipelines?
- What are CI and CD?
- Why is it a good practice to use the pipeline as a code?
- What benefits can we have from the BlueOcean plugin?
- When are the Jenkins nodes needed?