All About Kitchen Equipment
The majority of our cookware is intended for use on top of the stove. For the recipes in this book, you’ll need three items for stovetop cooking. The first is a Dutch oven. My preference is for a cast iron Dutch oven because I love the way cast iron browns foods as well as how it distributes heat evenly for long slow braises. If you don’t have a cast iron Dutch oven, however, a large stainless steel or aluminum stockpot will work for you as well. Just make sure that the pot is oven-safe (ideally broiler-safe). A 6-quart Dutch oven will work for all these recipes, but in many cases you will be able to get away with a smaller 4-quart size.
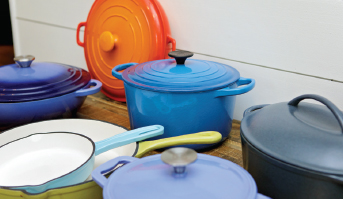
The other two items needed for the stovetop recipes are a large 12-inch skillet and a large sauté pan. These two items are often confused by people and for good reason. In the cookware industry, a “skillet” refers to a pan with sloped sides whereas a “sauté pan” has straight sides and usually comes with a lid. It’s a little counterintuitive because when you sauté something, you toss it around and that is much easier to do in a skillet rather than a sauté pan. Makes no sense, but there you have it!
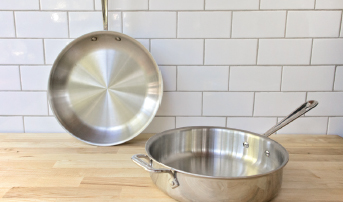
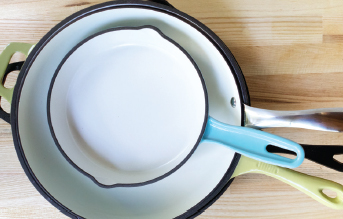
I do love a good cast iron skillet for the same reasons that I like a cast iron Dutch oven, but there are times when you’ll want an aluminum or stainless steel skillet as well, which is easier to control on high heat. Whether or not you use cookware with a non-stick surface is entirely up to you. Obviously, a non-stick surface is easier to clean, but many people prefer a plain stainless steel interior.

The oven equipment that you will need for this book is also very straightforward. You will need a baking sheet. My favorite size of baking sheet is called a half sheet pan. It measures roughly 18-inches by 13-inches. A full sheet pan is twice the size and used only in professional kitchens. I don’t specify “half sheet pan” in my recipes because I know that there are so many different sized baking sheets in home kitchens, but understand that for some of the quantities of food in the recipes, a large 18-inch by 13-inch pan is ideal and the most versatile.
You should also have the most common size of baking dish – a 9-inch by 13-inch baker. This could be a ceramic baker or a metal baking pan. The decision between the two really comes down to whether you intend to serve the food right out of the baking dish. Ceramic bakers are obviously more attractive at the table than a metal baking pan.
Finally, for some of the larger roasts, a roasting pan is very convenient, although in truth you could use one of the two vessels above as a substitute in a pinch.
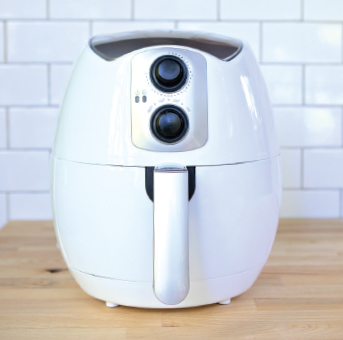
In the simplest of terms, an air-fryer is a compact cylindrical countertop convection oven. It’s a kitchen appliance that uses superheated air that is blown around by a fan to cook foods, giving results very similar to deep-frying or high-temperature roasting. Air fryers use the same technology as convection ovens, but instead of blowing the air around a large rectangular box, it is blown around in a compact cylinder and the food sits in a perforated basket. This is much more efficient and creates an intense environment of heat from which the food cannot escape. The result is food with a crispy brown exterior and moist tender interior – results similar to deep-frying, but without all the oil and fat needed to deep-fry. In fact, when you air-fry, you usually use no more than one tablespoon of oil!
Better still, an air fryer doesn’t just cook foods that you would usually deep-fry. It can cook any foods that you would normally roast, bake, grill, sauté or even microwave. It is a great tool for re-heating foods without making them rubbery, and is a perfect and quick way to prepare ingredients as well as make meals. It has become a valued helper in my kitchen.
You can get different sizes of air fryers these days. They range from two to six quarts in capacity. The most common size is a 3-quart, but if you do a lot of air-frying, the larger version is a wise investment. You’ll do fewer batches of food and get dinner on the table faster.
Air fryers do come in different configurations. The recipes in this book were written for air fryers that have a pull out drawer and perforated basket, rather than the air fryer ovens that are either domed or have racks inside.
General Tips for Air-Frying
• Don’t overcrowd the basket. I can’t stress this enough. It’s tempting to try to cook more at one time, but over-crowding the basket will prevent foods from crisping and browning evenly and take more time over all.
• Flip foods over halfway through the cooking time. Just as you would if you were cooking on a grill or in a skillet, you need to turn foods over so that they brown evenly.
• Open the air fryer as often as you like to check for doneness. This is one of the best parts of air fryers – you can open that drawer as often as you like (within reason) to check to see how the cooking process is coming along.
• Shake the basket. Shaking the basket a couple of times during the cooking process will re-distribute the ingredients and help them to brown and crisp more evenly.
• Spray with oil part way through. If you are trying to get the food to brown and crisp more, try spritzing it with oil part way through the cooking process. This will also help the food to brown more evenly.
• Re-heating foods in the air fryer. There’s no hard and fast rule for time and temperature when re-heating leftovers because leftovers vary so significantly. I suggest re-heating in the air fryer at 350°F and doing so for as long as it takes for the food to be re-heated to a food safety temperature of 165°F. This is especially important for any potentially hazardous foods like chicken, pork and beef.
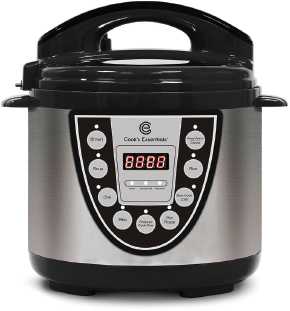
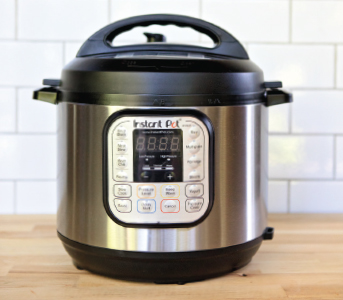
A pressure cooker is a cooking vessel with a lid that locks on and prevents steam from escaping. As a result, the steam builds up pressure in the pressure cooker – about 12 to 15 pounds per square inch of pressure (psi) – and the temperature inside the cooker increases. At sea level, water boils at 212°F before it is converted into steam and it cannot get any hotter than that, regardless of the heat source below it. In a pressure cooker, with 15 psi of pressure added, water boils at 250°F before being converted into steam. That means that we are able to cook foods inside a pressure cooker at higher temperatures and they are therefore finished sooner – in about one third of the time it would take to cook on a regular stovetop. The time saved by using a pressure cooker is obviously a huge benefit, but that is secondary to how your foods taste out of the pressure cooker.
In a pressure cooker, the lid is sealed onto the pot letting nothing escape, and the flavors of the foods have nowhere to go but to mingle with each other. With flavor infused throughout, soups, stews, chilies, everything is intensely flavorful. Cuts of meat that usually need a long cooking time in order to become tender are transformed into spoon-tender, succulent meals. Because the lid prevents steam from escaping, foods remain moist too. The results of pressure-cooking are juicy, tender, moist and flavorful meals. All of that in one-third of the time it would normally take. You can’t beat that!
Pressure cookers also come in different sizes, ranging from small 2-quart pressure cookers all the way up to 10-quart cookers and larger pressure canners. The recipes in this book were all tested in a 6-quart electric pressure cooker, but many can be made in a smaller model or a stovetop cooker. Just remember not to exceed the “max fill” line on the pressure cooker insert while ensuring that you still have 1 cup of liquid in the pot.
Converting from Electric Pressure Cookers to Stovetop Pressure Cookers
Stovetop pressure cookers get to pressure a little faster than electric pressure cookers and also drop their pressure a little faster than electric pressure cookers. Because of this, the actual cooking time of foods in a stovetop pressure cooker is shorter than when using an electric pressure cooker. However, stovetop pressure cookers often reach a higher pressure than electric pressure cookers, so it almost evens out. You won’t find much difference in the timing for many recipes, but if you are cooking big pieces of meat, beans or grains, reduce the cooking time by a couple of minutes for stovetop cookers.
Converting to Smaller Pressure Cookers
Converting recipes for different sizes of pressure cookers can be tricky, but it doesn’t need to be. The rule of thumb about pressure cookers is that you need to have at least one to one and a half cups of liquid in the recipe. (Check your pressure cooker manual for the minimum liquid requirement.) That liquid is needed to create the steam that will then create the pressure in the cooker. So, if you are decreasing the recipe, divide all the ingredients equally and then take a look at what you’re left with. If there is less than one cup of liquid, increase just the liquid to the minimum amount required and leave the other quantities alone. Understand that you will probably have more sauce with your finished dish, or the final result of your cooking will be wetter than intended, but you can simply either reduce the liquid by simmering the sauce after the cooking time, or just use less of the sauce on the plate.
Converting for Pressure-Cooking at High Altitudes
Anyone cooking at a high altitude knows that water boils at a lower temperature because of the decreased atmospheric pressure. This affects the pressure inside a pressure cooker as well. So, when using a pressure cooker at higher altitudes, increase the cooking time by 5% for every 1000 feet over 2000 feet above sea level.
General Tips for Pressure-Cooking
• Brown foods first. For visual appeal as well as for flavor, it’s important to brown your foods either before pressure-cooking, or after the food has been cooked. Many electric pressure cookers now have BROWN settings, which will allow you to sear foods before you add the liquid required for cooking. If your electric pressure cooker does not have a BROWN setting, simply brown the foods on the stovetop in a skillet first, add the liquid to the skillet to deglaze the pan, scrape up any brown bits that have formed on the bottom of the pan and pour everything into the pressure cooker along with the remaining ingredients. It’s a small step that does take a little time, but it is important to the final result.
• Natural-Release Method. This method of releasing the pressure in the cooker involves simply turning your electric pressure cooker off. The temperature will slowly decrease in the cooker and the pressure will come back to normal. Understand that a natural pressure release can take as long as fifteen minutes, so account for that time in your meal planning. Use the natural-release method for meats in order to obtain tender results, for beans whose skins tend to burst otherwise, and for dishes with a lot of liquid where the liquid might spit out of the pressure release valve.
• Quick-Release Method. Electric pressure cookers have a release valve that you can turn to release the pressure manually. Steam will escape out of the valve until the pressure has returned to normal. Use the quick-release method for foods that are easily over-cooked, like grains, seafood or vegetables.
Multi cookers, as the name implies, have multiple functions. They almost always have pressure cooker as well as slow cooker functions, and often many other settings as well. The most popular multi cooker on the market these days is the Instant Pot®. It’s become so popular, in fact, that it’s almost become synonymous with multi cooker and people wonder about the difference between the Instant Pot® and a pressure cooker. All Instant Pot® multi cookers have multiple settings like browning, steaming, rice cooking and slow cooking but they are most often used as a pressure cooker. One quick word about the Instant Pot® slow cooker function: unlike most slow cookers, which have two temperature settings, the Instant Pot® has three settings – LOW, NORMAL and MORE. The MORE setting is equivalent to HIGH and the NORMAL setting is the same as LOW on other brands. Instant Pot®’s LOW setting is like a keep warm function.
Because browning foods before pressure- or slow-cooking is so important, having a multi cooker makes cooking much more convenient with fewer dishes to wash. If you don’t have a multi cooker or a BROWN setting on your pressure or slow cooker, you can still make the recipes in this book by browning on the stovetop first, but it will mean you’ll have to use another pan.
Slow cookers have been around so long that I probably don’t even need to explain what they are, but I will anyway. A slow cooker is a round or oval electric pot, usually with a stoneware insert, that cooks foods at a very low temperature over a long period of time. Some have heating elements at the bottom of the unit only, while others have a base element as well as elements around the sides to heat more evenly and quickly. Slow cookers are always covered with a lid, which not only traps the heat and steam, but allows moisture to condense and fall back into your food. Some slow cookers have lids that clamp down on the pot, which are helpful for travel and to prevent any heat loss as the food cooks. Most slow cookers come with two cooking levels – LOW and HIGH – that keep foods around 190°F to 200°F or 250°F to 300°F, depending on the brand. You can usually set the cooker using LOW or HIGH based on how much time you have before you wish to eat. In general, LOW cooking times are about twice as long as HIGH cooking times. I have tried to give both options in the recipes that follow, but my recommended setting always comes first.
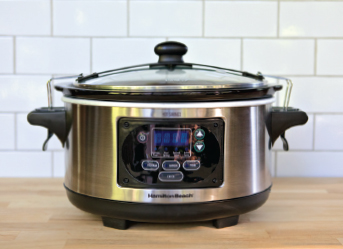
In my opinion, some starchy foods do not turn out very well in a slow cooker. Rice and pasta, in particular, do not have good results when slow-cooked. That’s not to say that you can’t make these foods in the slow cooker (many people do), but because I don’t find the results as successful as in other cooking methods, I’ve chosen not to recommend them for the slow cooker.
General Tips for Slow-Cooking
• Don’t lift the lid. This is by far the most important thing to remember when slow-cooking. When you lift the lid, you will lose a relatively enormous amount of heat from the pot. Lifting the lid out of curiosity will increase your cooking time. If you do need to open the slow cooker to check the food, do so as quickly as possible. Otherwise, resist the temptation.
• Brown foods first. Just as with pressure cookers, browning the foods first will enhance the appearance and the flavor of the final dish. If your slow cooker doesn’t have a browning feature, do this on the stovetop and add the food to the cooker already browned.
• No frozen foods. Frozen foods bring the temperature of all your ingredients down and they don’t heat fast enough in the slow cooker to avoid prolonged periods of time in the temperature danger zone. Make sure all your ingredients are thawed before adding to the cooker.