UNDERSTANDING LAYERS
What are layers, and what do they do?
Layers are like sheets that can be stacked on top of another. They are essential features of Photoshop. Layers are where you can manage images; you can place one on top of another, add color, blend them, merge them, take some away from each other, and do many more things. How these layers are stacked will play a significant role in how your work will look. You can alter the Opacity of a layer to make other layers more visible.
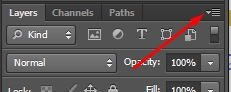
The Layers panel is situated on the right side of the window. You just have to click "Layers" to access it. Suppose, for any reason; you were unable to find the Layers panel when you open PhotoShop. In that case, you can get access to it by clicking the Window menu and then selecting Layers. Once it is clicked, the panel will be displayed on the screen.
ADDING A NEW LAYER
Adding a new layer can be done differently, but the more comfortable and most commonly used method is by pressing Ctrl + Shift + N for Windows or Command + Shift + N for macOS. You will see a pop-up with different options for the new layer you are creating. The options can be changed anytime. But if you are okay with it, give the layer a name, and click OK. This will automatically create a layer on top of the existing layer in your Photoshop.
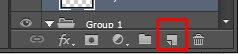
Creating a new layer can also be done by simply clicking "Create a new layer" on the Layers panel.
Once the layer has been completed, you can now add objects to it without making any changes to the background.
TYPES OF LAYERS AND HOW TO ADD THEM
The more you utilize layers, the more you might want to look into Photoshop's different layers. In this section, we will be analyzing some critical types of layers and how to create them.
-
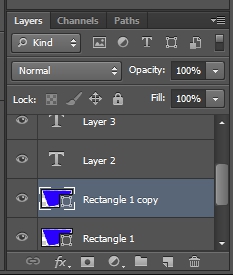
The Text layers:
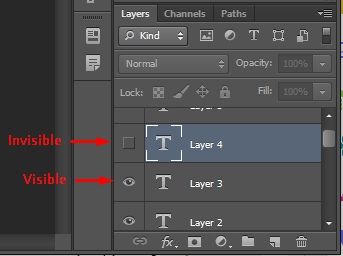
This type of layer is created when you make use of the Text tool. It is denoted with a big T symbol in the Layers panel. You can rename it by double-clicking on the layer in the Layers panel.
-
The Shape layers:
This type of layer is created when you make use of the Shape tool. It is denoted by the shape you draw in the Layers panel. You can rename it by double-clicking on the layer in the Layers panel.
-
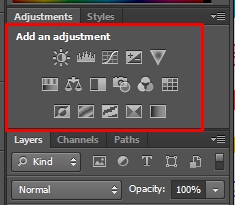
The Adjustment layers:
These layers let you make image adjustments like Saturation, exploration, or hue. They can be useful when you are about to create some color effects. To create a new Adjustment layer, go to the Adjustments panel located around the Layers panel's top. If you cannot find the Adjustment panel, simply go to Window
> Adjustment. Now, click any of the functions and apply accordingly to get the effect you would like to use.
-
The Fill layers:
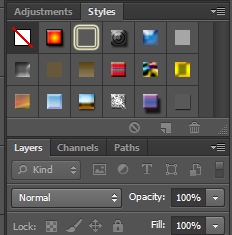
These layers create a solid gradient color or a pattern for your work. Like adjustment layers, these layers cannot permanently alter what exists in the other layers. It is even possible to adjust them after creating them by merely double-clicking the icon that is in the Layers panel. To create a new Fill layer, go to the Styles panel located around the Layers panel's top. If you cannot find the Styles panel, simply go to Window > Styles. Now, click any of the patterns and apply them accordingly to get the effect you would like to use.
-
The Image layers:
The Image layers can also be created by inserting images into Photoshop either by dragging or importing from folders.
-
The Smart Object layers:
The Smart Object layers are created when objects, images, or texts are converted into smart objects.
DUPLICATING A LAYER
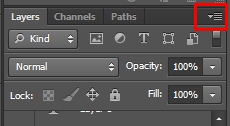
Sometimes, you might need to duplicate a layer to create some form of effect. To do this, simply choose the layer, click the Layers panel menu > Duplicate Layer.
There will be a pop up to ask for a name for the new layer. By default, Photoshop can give the new layer the original layer's name, followed
by "copy."
It is also possible to duplicate the layer into any other open document or even into a new Photoshop document by selecting from the Documents box.
SHOWING OR HIDING A LAYER
It is possible to toggle between the layers' visibilities by merely clicking the eye icon next to the layer in the Layers panel. The visible eye means the layer is visible. Once you click on the eye and it disappears, the layer automatically becomes invisible.
ARRANGING LAYERS
Layers can be placed just the way you want them. This means you can shift how the layers have been ordered by simply clicking on the layer you want to move and dragging it to the new destination. You will see a fade-like effect which indicates where the layer will now be located. Once the mouse is released, the rearrangement of the layer is complete.
LOCKING OR UNLOCKING A LAYER
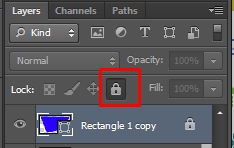
By default, every new layer is unlocked when created, and only the background is locked. If you wish to lock a layer in the Layers panel, select the layer and click on the lock icon visible above the Layers list in the Layers panel. You can also click on the same padlock icon to unlock the layer.
It is okay to lock a layer, especially when you want to avoid moving an object from such layer by mistake when you are on a project. However, the background layer is always locked by default. And can be opened by double-clicking the layer in the Layers panel. You then get a pop-up, and the layer name will be set to "Layer 0." Click OK, and the background layer will automatically appear unlocked with the new name as "Layer 0."
DELETING A LAYER
To remove a layer in Photoshop is relatively easy. Just click the layer, hold and drag it to the trash icon located in the panel's lower right corner.
It is also possible to delete the layer by selecting it in the Layers panel and clicking "Delete Layer" from the menu. You will get a pop-up to confirm if you want to delete the layer. Once you click Ok, the layer will be deleted.
ALIGNING LAYERS
This feature enables users to take many images and combine them into one perfect image by aligning them and masking out the parts you do not want. To align your layers, do the following:
-
Create a document with the dimensions of the source
images.
-
Open all the original images and use the Move tool to drag each image and drop it into the document you created. The images should have separate layers. You can choose one layer as your reference and lock it. If not, PhotoShop selects a reference layer by analyzing the different layers.
-
Go to Layers panel, choose the layers you want to align, and select Edit > Auto-Align Layers. Choose one method from the following:
-
Auto: This allows Photoshop to analyze the layers and decide the method to use on its own. It usually uses a Perspective or Cylindrical layout depending on the composite.
-
Perspective: This gives you a consistent composition where you can designate one layer as the reference image, and the others are transformed to fit in.
-
Cylindrical: This option is best for creating wide panoramas because it places the reference layer in the middle while the other layers are placed on a cylinder to reduce distortion.
-
Spherical: This will align your image with an extensive view both vertically and horizontally.
-
Collage: This combines layers and perfect overlapping areas while still maintaining the shape of the objects.
-
Reposition: This will not transform any of your layer but bring the layers together and correct overlapping areas.
You can check for any lens problems that need to be corrected and click OK. Photoshop aligns the layers, and you are done.
CHANGING THE OPACITY AND FILL
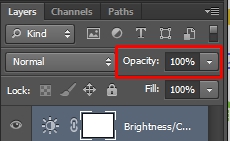
Simply you can say that Opacity is the level of transparency of a layer. Sometimes, you might need to suppress the background layer and focus more on the image subject. All you have to do is select the layer you want to adjust and click the drop-down arrow or input in a
value. The lower the opacity, the more transparent it becomes.
You can also change the opacity of an entire group of layers by merely selecting the group and altering its opacity value.
We also have the Fill directly below the Opacity. Fill is slightly similar to Opacity, but it directly affects the layer content without affecting the layer style opacity. However, changing the layer's fill will be the same as adjusting its Opacity as long as you have not applied Layer styles.
Opacity of the text layer at 100%
Opacity of the text layer at 50%
LAYER MASKS
A layer mask will allow you to alter some parts of the layer's visibility without permanently deleting other parts of the same layer. To add a mask that shows or hide the whole layer, do the following:
-
First, you need to be sure there is no selected part of the image. If there is, click Select > Deselect to deselect.
-
Go to Layers panel and select the layer or group of layers. Then, do one of these:
-
Create a mask that hides the whole layer, Alt + Click for Windows or Option + Click for macOS the button for "Add Layer Mask" or select Layer > Layer Mask > Hide All.
-
Create a mask that shows the whole layer by clicking the "Add Layer Mask" button or choosing Layer > Layer Mask > Reveal All.
If you wish to add a layer mask that will hide parts of the layer, do these:
You can edit the layer transparency by creating a mask through these steps:
To enable or disable a layer mask, do one of these:
You can also apply or delete a mask by doing the following:
BLENDING MODES
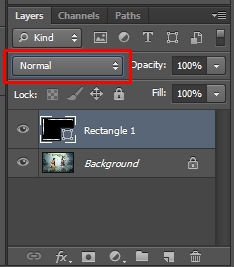
This is also one of the ways you can manipulate the color pattern on
your image. This feature is located in the Layers panel, and it controls how pixels in images are affected by editing and painting tools. They affect how one layer reacts with another, and you can get more beautiful pictures applying one of the blending modes.
Normal is the default blending mode. Now, the real color of your image is the image itself. You can add a blended color by introducing another color by an editing or painting tool, and the result color is the final result of the blend. Note that you can scroll over many options in the Blend Mode menu to see how they fit the images because Photoshop gives a live preview on the canvas. There are about twenty-six different color blending modes, and examples are Dissolve, Normal, Multiply, Darken, Lighten, Difference, Linear Dodge (Add), Saturation, Hue, Luminosity, Color, Darker color, Lighter color, and amongst other blending modes. To use blending mode, do these:
-
Create a new layer, and make sure you are on the new layer by selecting the layer.
-
Grab the Brush tool, choose a color from the color picker, and adjust your brush's size at the options bar.
-
Paint the area you would like to see the effect.
-
Click the drop-down arrow of the Blending modes just by Opacity's left.
-
Then, choose your desired mode. Try different modes to get the one that fits well for what you want.
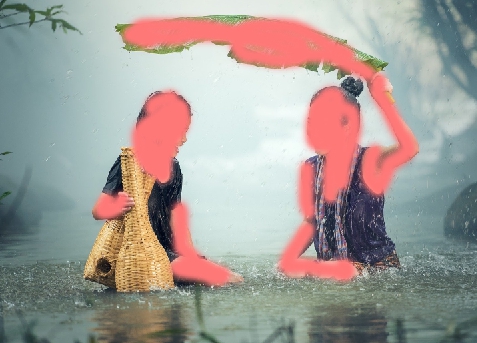
Before
After painting
After applying Color burn blending mode
Now, practice with some images of yours applying different blending modes.