THE BEAUTY RETOUCHING
Beauty Retouching is another excellent part of PhotoShop that you must learn, especially if you plan to become a Photographer. This part will show you how to edit and tweak your photos in a fantastic way for the final presentation. However, for perfection, as a beginner, you must practice these things with different pictures. We will be discussing the steps to adjusting skin color, removing blemishes, resizing body parts, blurring unwanted details in your photos, and more…
REMOVING WRINKLES AND BLEMISHES
To get a perfect picture, you need to remove wrinkles, spots, or blemishes on the face. Zoom in the face area and make necessary adjustments before proceeding to other enhancing processes. Achieving this is simple; follow the steps below for spot removal:
-
Zoom in the face area using the Zoom tool, or just press Z on your keyboard.
-
Now, grab the Spot healing brush tool, and then apply as discussed earlier. You can adjust your brush tool size with [ or ].
-
For tricky areas, switch to the Healing Brush tool, press Alt or Option, and click on the exact spot you wish to copy some pixels. Then, use those pixels to remove the wrinkles and blemishes.
-
You can zoom out when you are done by grabbing the Zoom tool and pressing Alt or Option on your keyboard.
-
Save your picture. Export it to the JPG format, and then share (this will be discussed shortly).
Keep practicing this simple process until you before perfect. Have fun.
ADJUSTING THE SKIN COLOR
The process of adjusting skin color is easy and effective. In the end, you have an enhanced bright skin color in your photo. However, for you to improve the skin color in your pictures using PhotoShop, you have to follow these simple steps carefully:
-
Get your picture ready i.e., open the photo you would like to enhance.
-
If needed, remove wrinkles and blemishes as just discussed.
-
Now, click Image > Auto Tone. This will automatically tone your photo. But you can still go ahead and tone manually to get the exact picture you want.
-
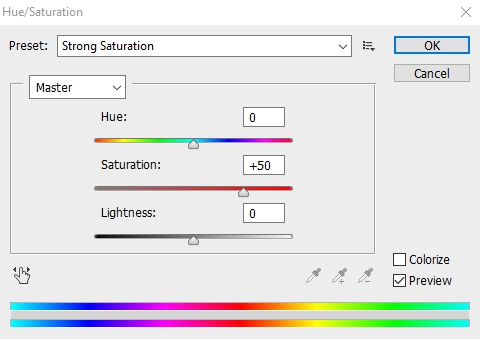
Now, click the Image menu again, and navigate to Adjustments > Hue/Saturation.
-
Click Preset and choose from the options. These are predefined toning. If you want a manual toning, play with the Hue, Saturation, and Lightning slider till you get the kind of skin tone you desire.
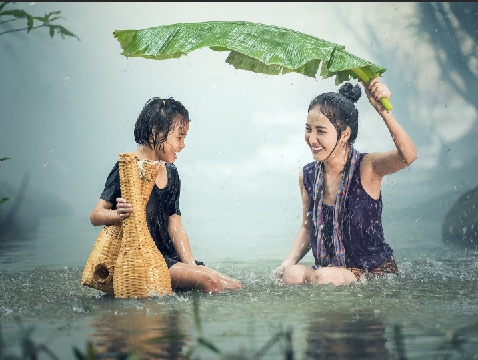
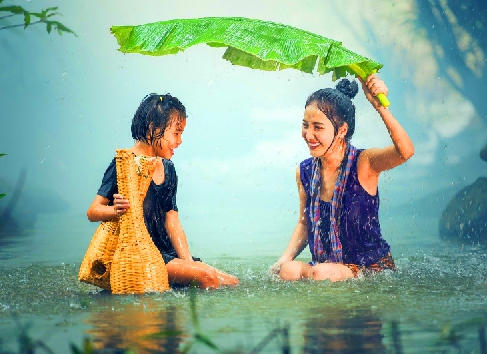
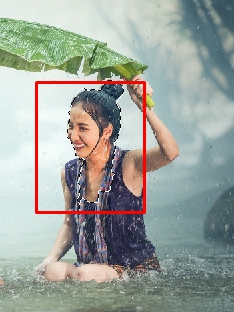
As you see in the above picture, the entire picture is toned. However, you need to know you can select a part of the skin and retouch it individually. To do this:
-
Then, go to Image > Adjustment > Hue/Saturation, and apply the necessary changes as discussed earlier.
-
When you have your desired result, go to Select > Deselect or use Ctrl + D to deselect the selection you made.
-
Save your picture. Export it to the JPG format, and then share (this will be discussed shortly).
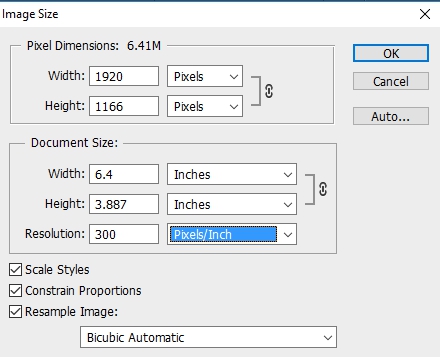
RESIZING IMAGES
You might want to resize your image due to a unique reason best known to you. Some resize images to reduce the size. A photo of 10 MB, for instance, can be reduced to 1 MB or even below. And some want to crop out a part of their image for use.
To reduce the size of your image:
-
Now, input the width and height for your image in the Pixel Dimensions to reduce the image size in megabytes.
-
Input the width and height for your image in the Document Size to reduce the size as required. Then, click OK.
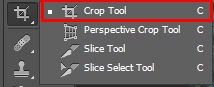
To crop your image:
-
Open your image.
-
Grab the Crop tool.
-
Adjust the area of the object or image you wish to retain with your mouse. Once the mouse button is released, the selected size is highlighted.
-
Click Enter to crop, and then save your work.
THE DODGE AND BURN TOOLS
Whenever you need a little touch here and there, you can always make use of the Dodge and Burn tools. The Dodge tool will help you darken a chosen area of your image, while on the other hand, the Burn tool will increase the brightness. You can utilize these tools to withholding light to lighten some areas or allow more exposure to darken some areas. To use these tools:
-
Get your picture ready, i.e., open the picture you would like to enhance.
-
Choose the Dodge tool (to increase brightness) or the Burn tool (to darken).
-
At the Options bar, choose your brush size, hardness, and mouth. Click the Range icon and select one of these:
-
Shadows to change darker areas.
-
Midtones to change the areas of gray.
-
Highlights to change lighter areas.
-
Now, move the brush over those parts of the image you would like to brighten or darken, respectively.
-
Once you have your desired result, save it.
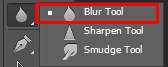
THE BLUR TOOL
Ever wish to make your viewer focus on a particular part of your photo? Using the Blur tool is the answer. Although most cameras can
give you a wide aperture, sometimes you might have taken beautiful pictures forgetting to use a wide aperture, or the aperture is not wide enough; you can use the Blur tool here. This tool will help you form soft blur areas in your images, create a romantic tone, clear out a particular background or unwanted objects. To use the Blur tool:
-
Get your picture ready.
-
Grab the Blur tool.
-
At the Options bar, set the Blur tool size, hardness, and brush mouth. Choose a mode; the default mode is Normal. Also, set the strength size.
-
Select the image layer you want to alter from provided your project has different images.
-
Now, click and drag over any area you would love to blur. If the strength is not enough, increase it at the Options bar.
-
You could undo anything, as discussed in the first section, if you had made some mistake.
-
Save your work.
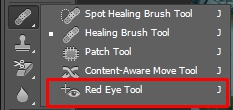
REMOVING RED EYES
Have you ever taken a picture and you get a vampire kind of eyes instead of the normal eyes you are looking at? Sometimes, when a photo is taken in an environment with much light, light reflection can cause red eyes. Be rest assured, it is straightforward to fix. All you have to do is:
EXERCISE
Pick from your photos and make them look beautiful than ever before. Save and save as JPEG.